Interact Social Security Administration SystemInteract SSAS is an integrated portal designed to cater to all the needs of international social security administrations. It consists of 16 modules which cover all business needs in a social security environment. These modules include:
Both Interact SSAS and Interact HRMS are built on the same common platform and share the same logic, look & feel and underlying technology which delivers the functionality through a user-friendly and highly flexible configurable portal application. Functional OverviewSystem ManagerThe System Manager is the highest level within the Interact SSAS application and it is where the entire setup is done for the various modules of Interact SSAS. It consists of many different functions but at its most basic level it supports the General Setup of the application, the definition of all master tables which will be used in the various modules and basic configuration around financial rules, GL, currencies, interfaces, workflow, alerts and more. General Setup 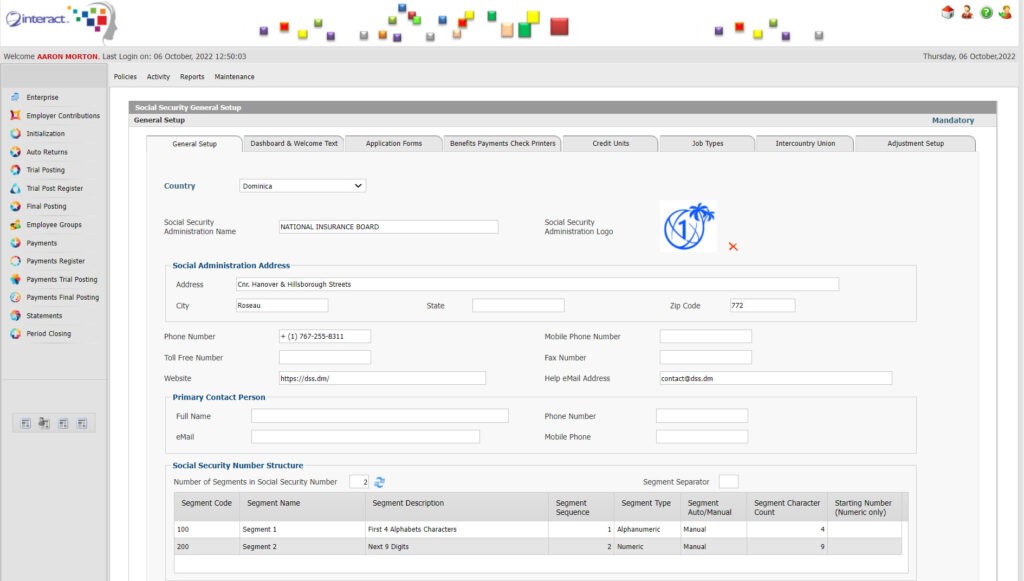 Figure 1: Part 1 of General Setup Form In the above Part 1 of the General Setup Form, you can see basic demographic information that is captured on the Social Security Administration as well as the setup for the Social Security Number Structure. Since each country will have its own Social Security Number Structure or Format, it is important that this is fully configurable. In Interact SSAS you can choose to have any number of segments, and for each segment you can choose the number of characters, whether they should be alphanumeric or numeric only, what will be the segment separator, whether the segments should be auto-generated or manually entered and for numeric segments what will be the starting number. 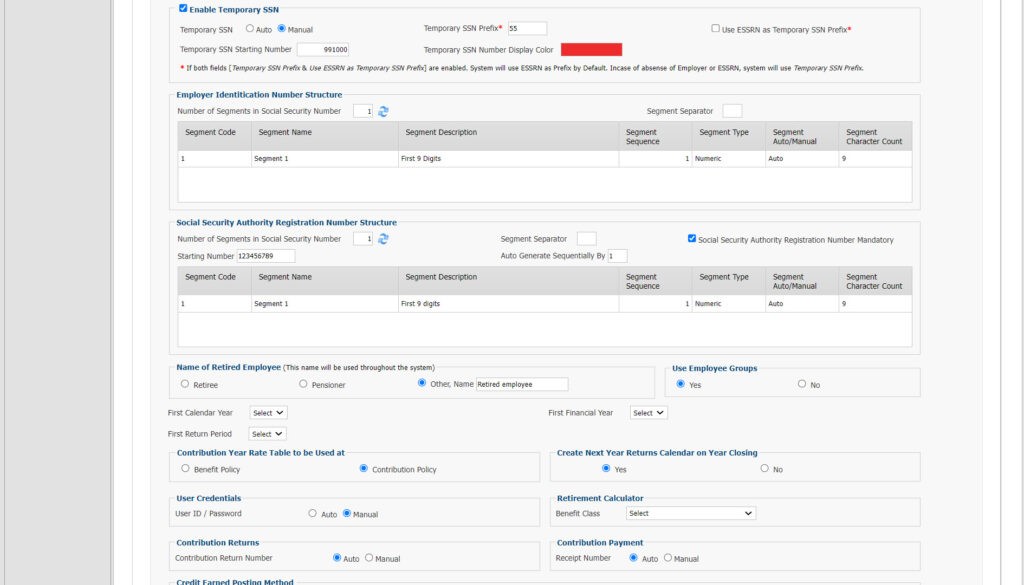 Figure 2: Part 2 of General Setup The same General Setup screen contains many other settings, such as:
This allows the user to define if and how Temporary (or Suspense) Social Security Numbers can be used in the general operations of the Social Security Administration. Such numbers are usually used in case Employers and others provide documentation that is incomplete or erroneous and the Administration needs to record the information regardless and investigate further to be able to identify the correct permanent Social Security Number to be used.
Similar to the Social Security Number Structure, you can also define the structure to be used for any Employer Identification Numbers (E.I.N.) for which you can use unlimited segment codes & segment names, choose the segment sequences, the segment character count and choose whether they should be generated automatically or manually.
Similar to the Social Security Number Structure, you can also define the structure to be used for any Employer Identification Numbers (E.I.N.) for which you can use unlimited segment codes & segment names, choose the segment sequences, the segment character count and choose whether they should be generated automatically or manually.
If there is a separate number for employers for social security related transactions only and different from the EIN number, then the structure of this number is also fully configurable and can be setup in these setup screens.
Since Interact SSAS is used around the world, the exact terminology to be used for various key elements in social security matters is also configurable since the same terminology, even in the English language, does not apply everywhere. Therefore, you can choose which term to use in all reports and all forms for a “Retired Employee”.
Employee Groups are used to allow the Administration to treat different types of Employees in a different manner from a social security policy point of view. This may be used to apply different contribution rates, filing frequency, benefit eligibility, benefit entitlement calculation rules, or any other matter. If such distinction is to be made then this can be done by choosing “Yes” for the “Use Employee Groups” option. In such case, the user can create as many Employee Groups as required and setup different policies to be linked with each Employee Group. It also affects data access which may be restricted for certain Social Security Administration users who may only be authorized to handle applications and claims for specific Employee Groups. Finally, such distinction will also allow the user to separate Employee Groups in reports and get the correct statistical reports from this.
The system allows the user to choose whether Rate Tables should be used for Contribution Policies or for Benefit Policies as in some countries the contributions rates may be defined at the benefit level and individuals pay different contributions for different benefits for which the contribution rates may change over time and differ between Employer and Employee. In such cases the Contribution Rate Tables by Year can be used at the Benefit Policy level. Otherwise, a standard Contribution Rate Table can be used for a generic Rate Table which applies to one main Social Security Contribution regardless of the Benefits for which an individual may be entitled.
A Retirement Calculator will allow a user to calculate the applicable Retirement which they will be entitled to at a given point and the specific Retirement Benefit Definition to be used for this Retirement Calculator can be selected in the Setup.
User Credentials can be generated automatically by the system based on an algorithm, or can be manually entered by the user who approves a user’s access.
The numbering of all incoming Contribution Returns and Payments is usually done automatically by the system, but in Interact SSAS you do have the choice to configure the system so that either one of those numbers can be assigned manually. 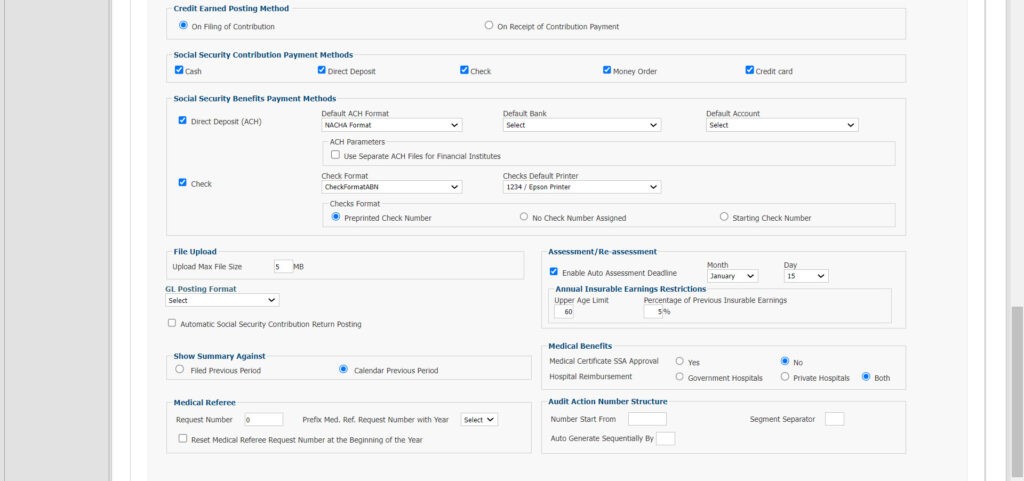 Figure 3: Part 3 General Setup
Credits earned in a social security context are usually earned as a result of earnings (and resulting contributions made). These Credits which accumulate over time will allow an individual to qualify for specific Benefits based on the actual Credits. The calculation of how Credits are earned is fully configurable and in this particular setup screen the user can choose whether Credits are Earned (and therefore posted to the individual’s account) based at the time of Filing of Contributions information (indicating that the individual has worked, earned money and is therefore liable to pay contributions), or at the time of Receipt of the Contribution Payment. While in most cases this difference will be irrelevant when Contributions are paid on time, if there is a general challenge in the country of having Contributions paid significantly later than their filing and often in arrears, then the distinction of when exactly the Credits are to be posted can be important especially for determining eligibility for Short Term Benefits.
Interact SSAS supports multiple methods of payment including Cash, Direct Deposit, Check, Money Order or Credit Card and the user can choose all or exclude some of them so that only the allowed options are shown when accepting payment in the system.
The method to be used for Direct Deposit (ACH or other international formats) or Checks, including Check Format and Default Check Printer are all configurable.
For Voluntary Contributors and or Self-Employed, the process usually includes some form of self-reporting of income, based on which the appropriate Social Security Contribution is calculated. The system allows the user to set a specific deadline for the annual reporting of this income so that an individuals Contributions can be recalculated and adjusted if necessary in case of a change in income or a change in applicable contribution rates. It also allows to set an Upper Age Limit or a Limit on the Increase vs. Prior Year Insurable Earnings (to avoid individuals reporting artificially low earnings initially to minimize contributions and subsequently submit dramatically higher earnings closer to retirement age).
In order for any financial transactions such as incoming payments for contributions or outgoing payments for benefit claims to be recorded accurately, they must also be reflected in the General Ledger of the Social Security Administration. In order for the GL Journal Entries to be generated correctly and then posted to an external General Ledger application, the Posting Format of the GL must be selected so that this can be posted automatically. Interact SSAS supports most commercial GL formats out-of-the-box and can support any bespoke or custom-made GL format also as required.
When looking at variances for summaries compared to a previous period, the user has a choice to configure the system to always calculate the variance against the most recent filing or to always compare against the previous calendar period regardless of the most recent filing. If the latter is chosen, then if there was no previous period filing, the system will show a 100% variance.
For Medical Benefits, a separate approval may be required by the Social Security Administration for the Medical Certificate that makes a beneficiary eligible for a Medical Benefit. If the Medical Certificate is to be approved first, then this can be configured as such in the system General Setup.
For important Medical Benefits, especially the longer-term ones, it will be important for the Social Security Administration to be able to refer the matter to an independent “Medical Referee” before approving a particular claim based on a medical diagnosis. The manner in which the matter is to be referred and how it is to be tracked and how the case should be numbered, is fully configurable.
If as the result of an Audit that has been conducted there is a need to undertake an Audit Action, then the case numbers for this can be auto-generated, and like all significant numbers in Interact SSAS, it is possible to define the structure and starting numbers as well as the segment separator and other elements. Dashboard and Welcome Message 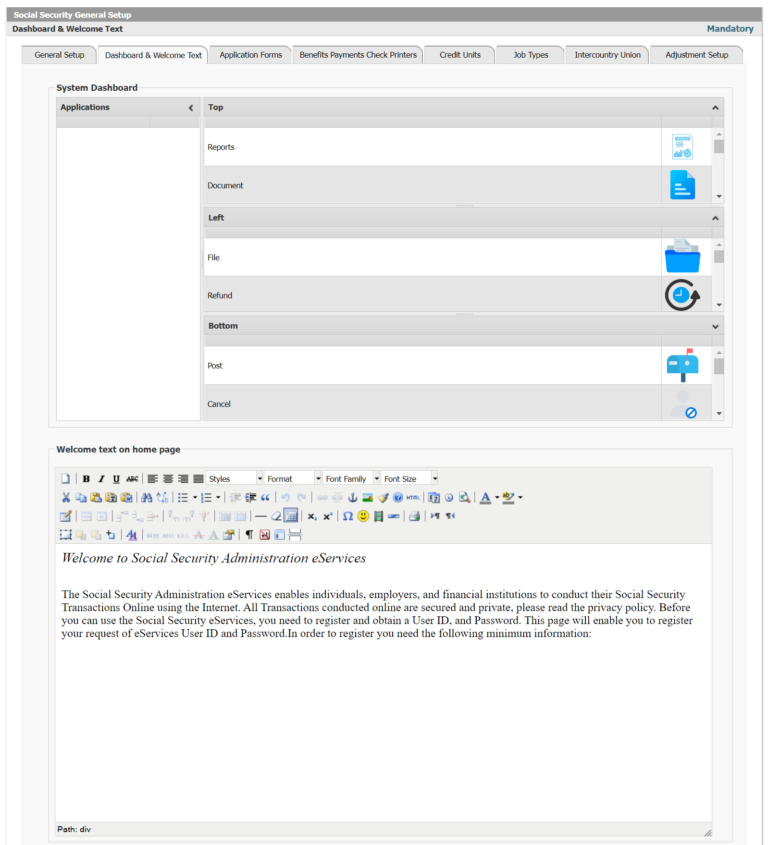 Figure 4: Dashboard and Welcome Text 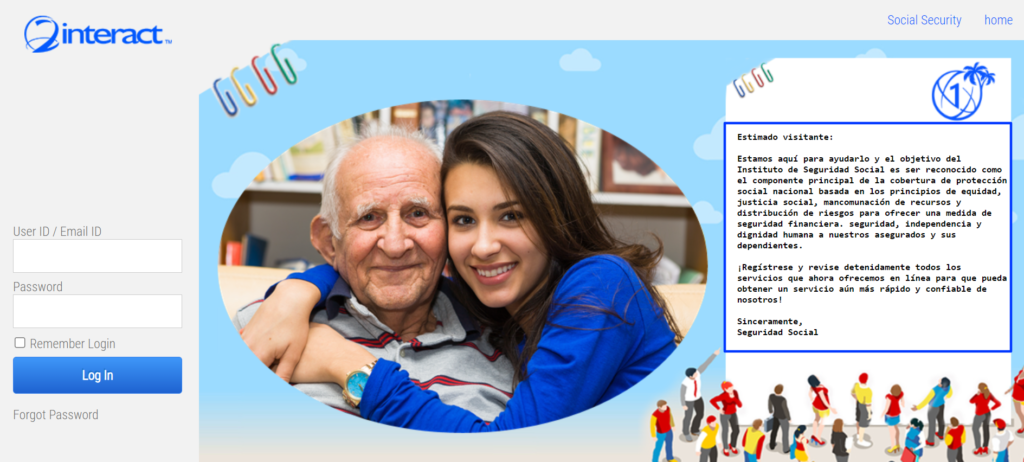 Figure 5: Welcome Screen Application Forms In Figure 4 you can see that for each form the user can define:
Since these can be completely new forms, even the most basic elements are configurable.
Forms can be completed by an Employer, a Financial Institution, a Volunteer Contributor, an Employee, a Self-Employed Individual, a Pensioner, any other Person or a Survivor. If a user identifies in the setup who should complete a specific form, the form will be set to only appear for the specific profile user who has been linked with this type of Form.
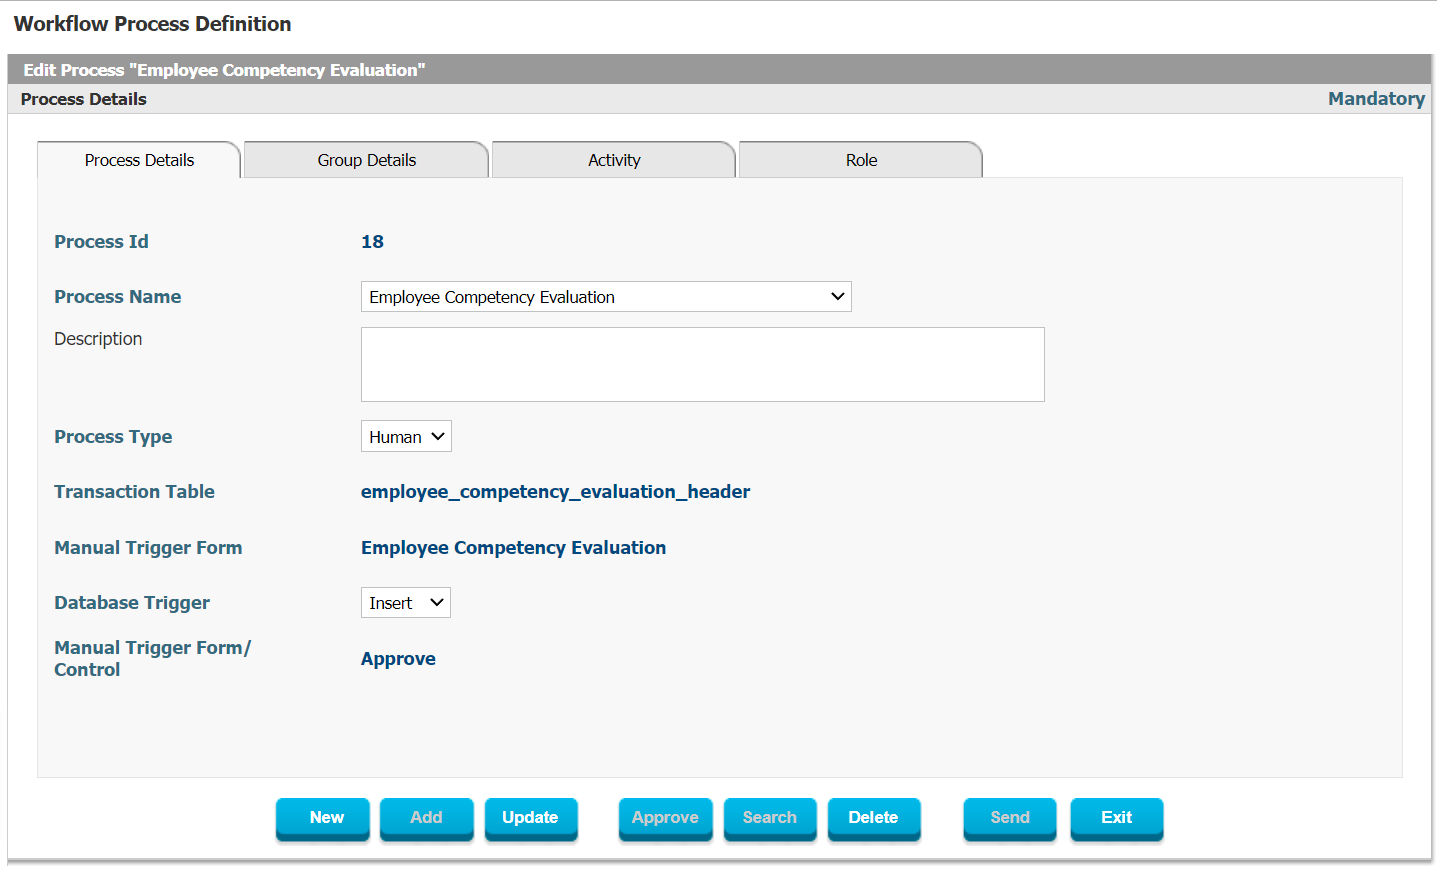
One of the key tools in Interact SSAS to streamline processes and speed up transaction processing is through the use of flexible and user-friendly Workflow. It is key therefore that for any form, regardless of whether it is a Registration Form, an Application Form, a Request Form, a Claim Form or any other type of form, the Workflow is fully configurable. Configurable Workflow in Interact SSAS means that you can add any number of Workflow Steps, with each its own Approval Sequence, Maximum Review and Approval Time, and specific Role, Workflow Actor and Workflow Actor Name.
Another key goal of Social Security Administrations who implement Interact SSAS, is to reduce the paperwork they are currently processing and eliminate or drastically reduce the use of hardcopies and physical papers. This can be done to a large extent through all the electronic forms, but another critical feature is that the user needs to be able to attach any mandatory documents to any particular process. Processes are always initiated through Forms, hence the need for Attachments to be included with Forms. The flexible manner in which the system allows for configuring which attachments can be included with any particular Form is very user-friendly. Specifically, for any attachment related to a particular Form, the user can set which Type of Attachment should be included, choose a default Document ID/Name and Description, whether or not the Attachment should be Mandatory or Optional, how long the Attachment will be considered valid before expiry and it allows for tracking of who signed the attachment also. 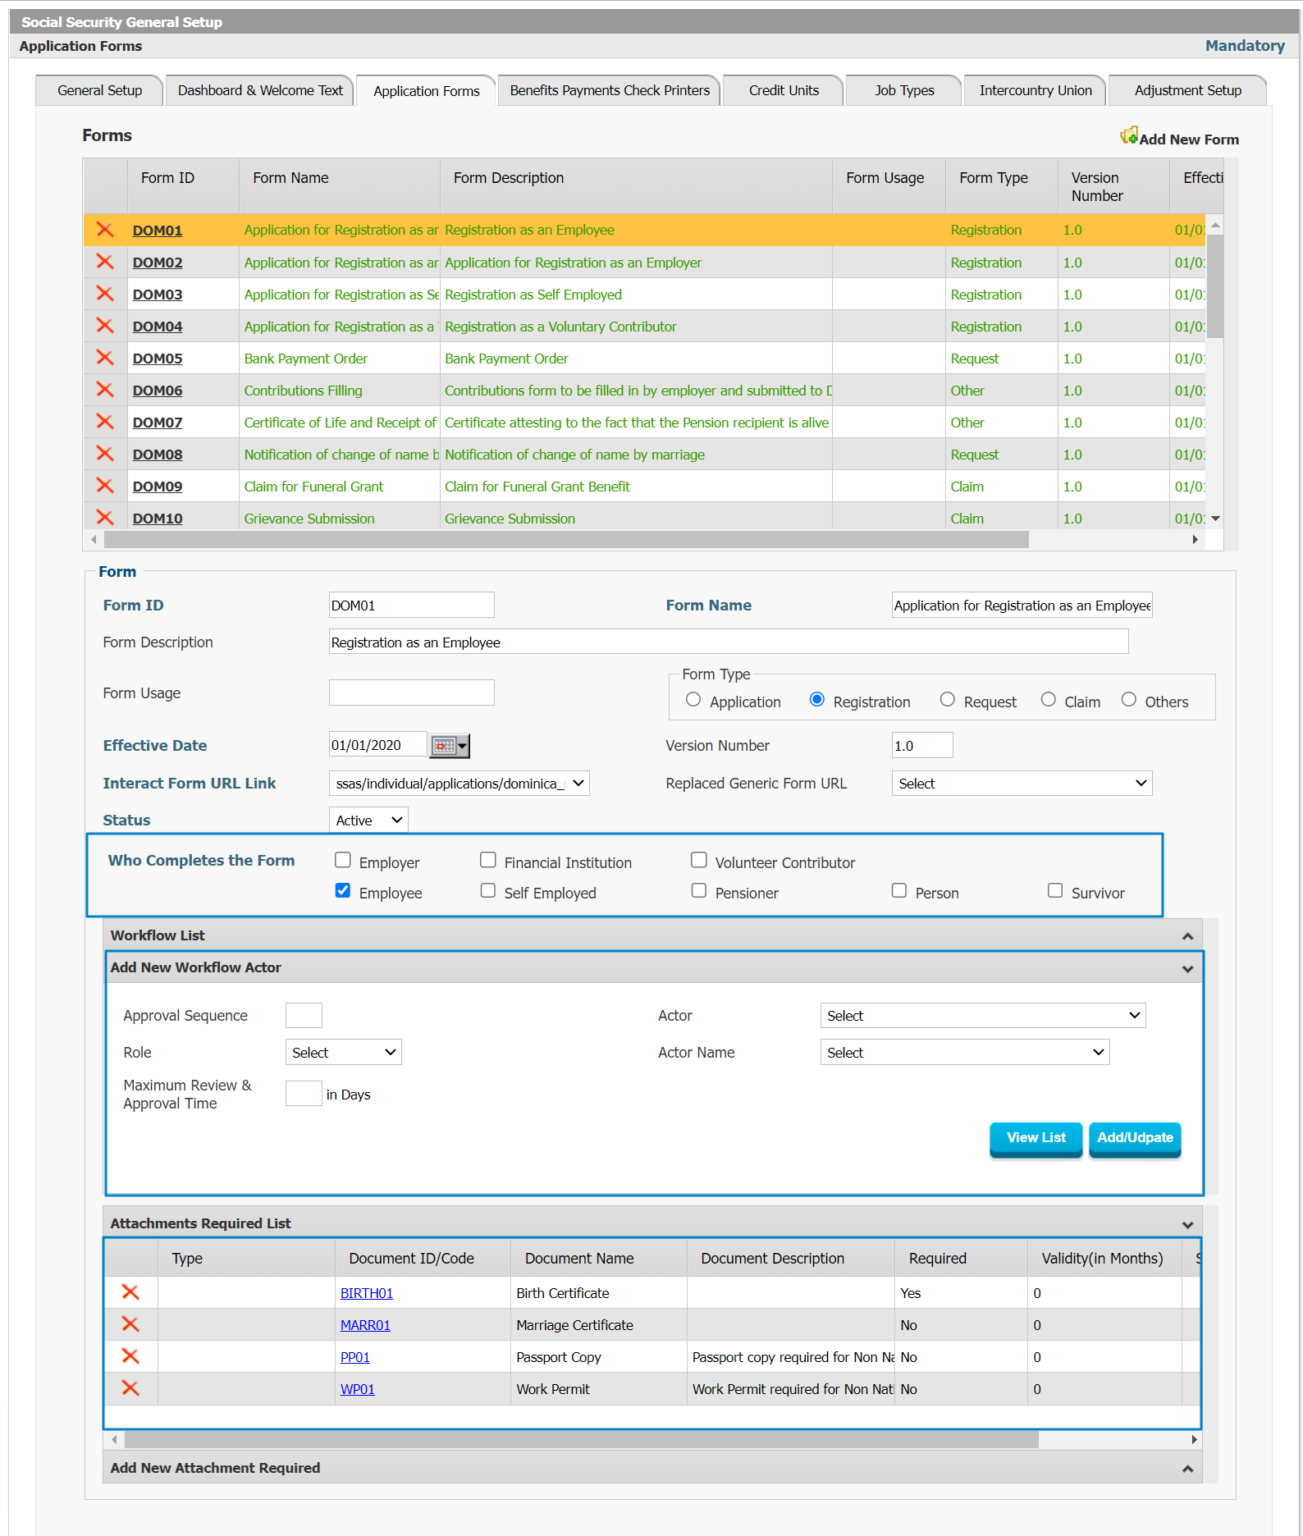 Figure 6: Application Form Setup Benefits Payments Check Printers The Printer Status can be set so that Print Jobs are only sent to the right Active Printers.  Figure 7: Benefit Payments Printer Setup 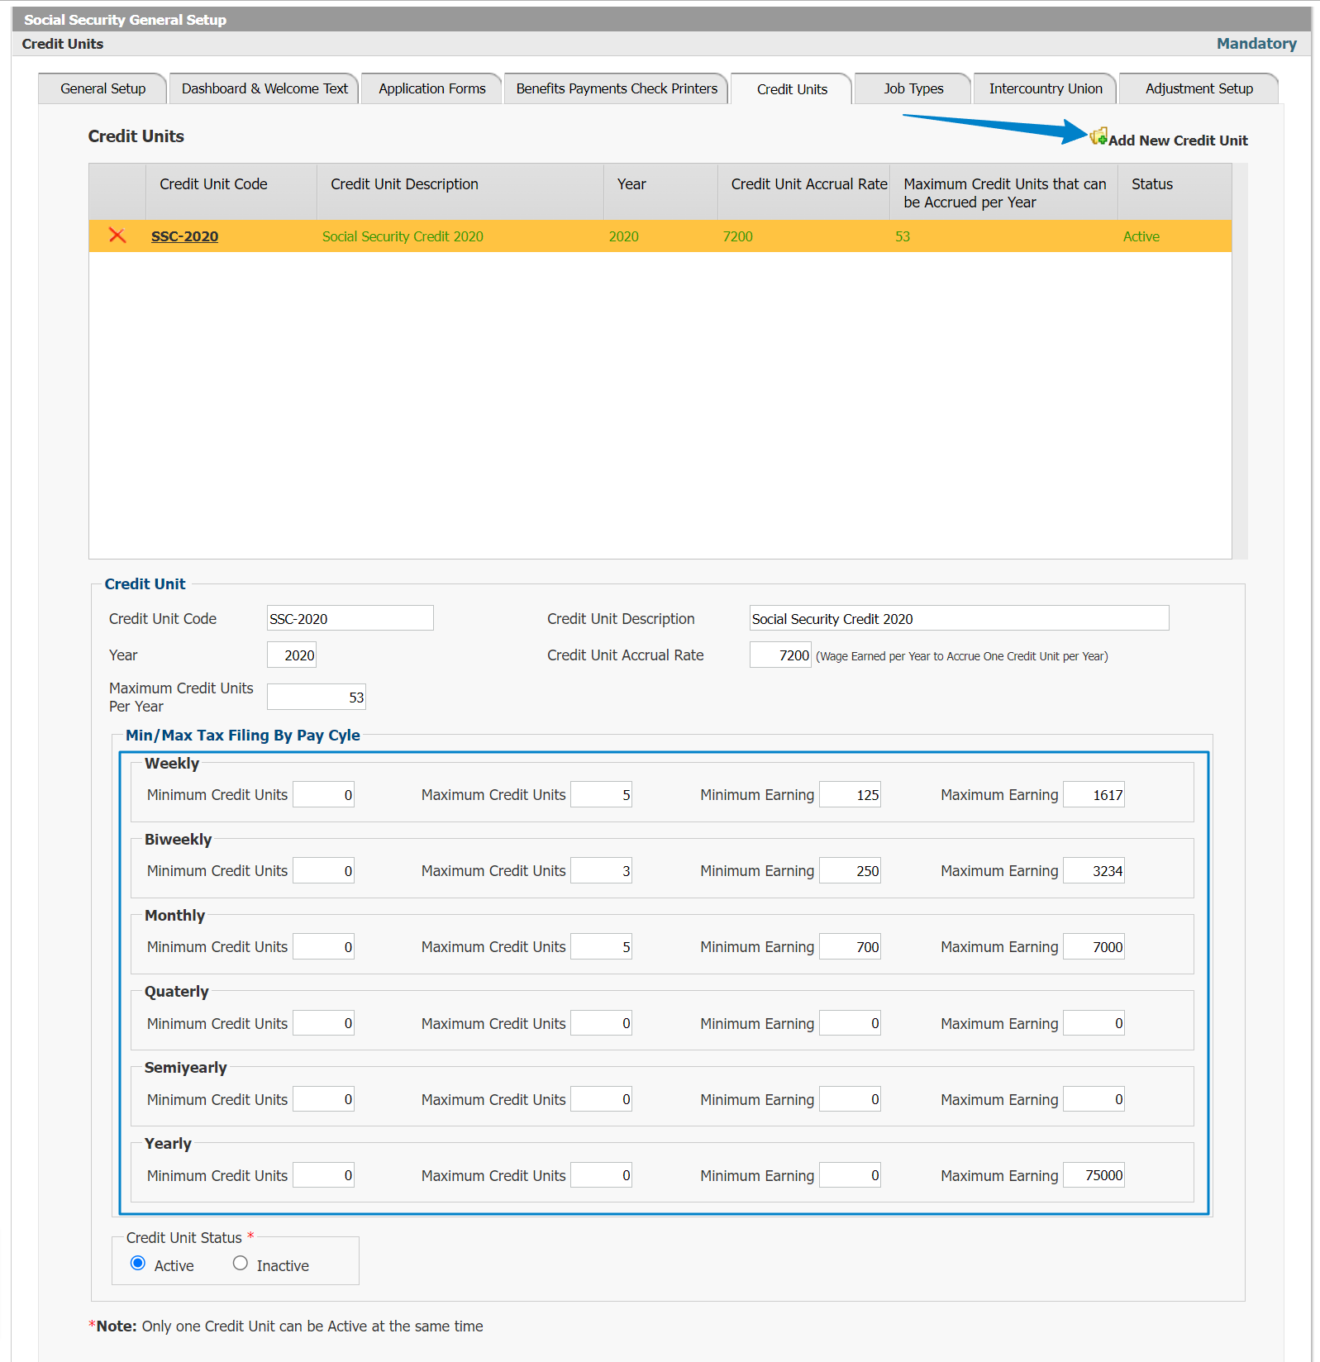 Figure 8: Credit Units Setup Credit Units 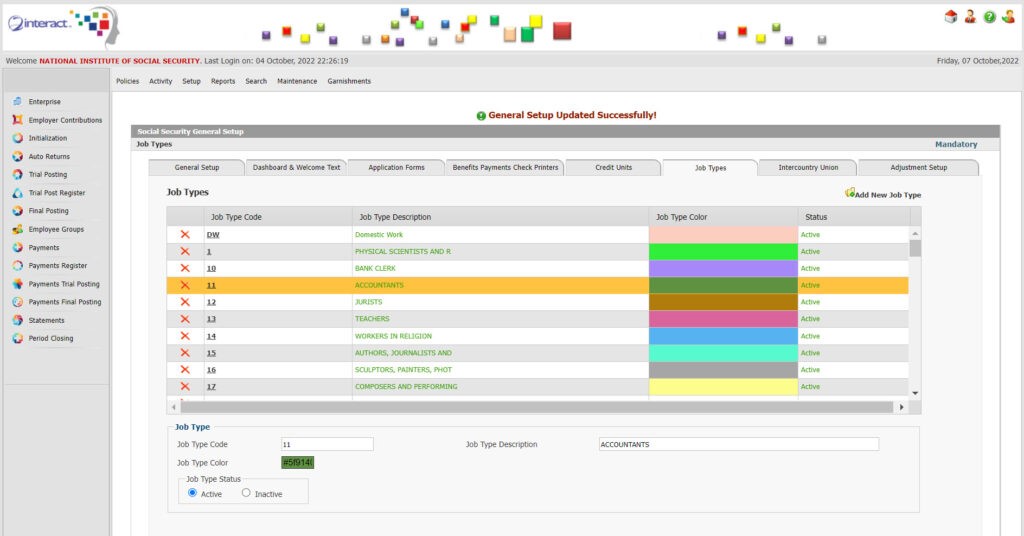 Figure 9: Job Type Setup Job Types Setup 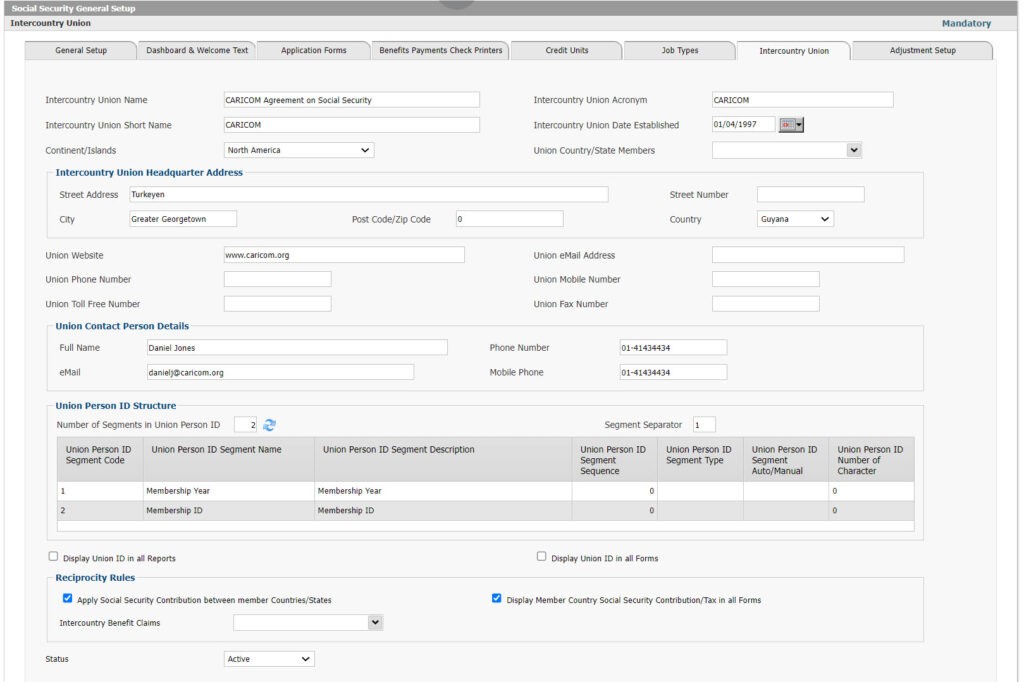 Figure 10: Intercountry Union Intercountry Unions Setup The Intercountry Union Setup is designed to allow the user to first of all define all the usual demographic and general data about the Intercountry Union based on which Reciprocity Rules are meant to be implemented. In addition to the country-specific social security ID, the system allows the user to define a structure and format of a common structure of a Union Person ID which allows a person to be identified with a single ID across all countries which fall under the Social Security Intercountry Union. In this setup you can also identify which countries are included in the Social Security Intercountry Union so that the data for any employees working in any of those countries can be tied with unique Intercountry Union Person IDs to allow for data-exchange in line with the current data privacy laws. Based on the settings, the user can choose to apply Social Security Reciprocity Rules (between countries) for Social Security Contributions between Member Countries and to Display Member Country Social Security Contributions in all Forms. In addition to this, the user can select which specific Benefit Claims should be subject to Intercountry Reciprocity Rules and which ones are not. 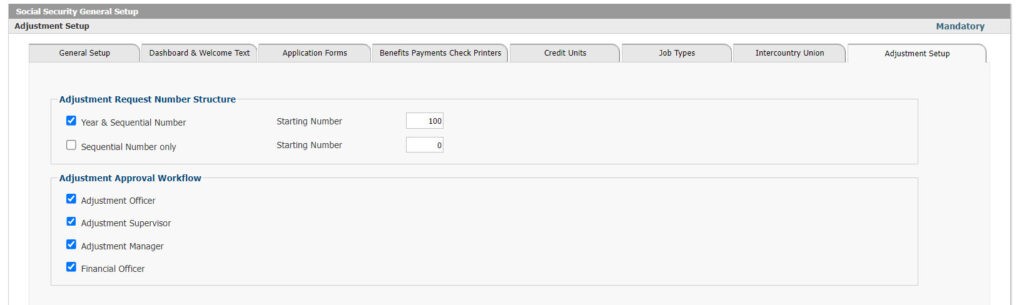 Figure 11: Adjustment Setup Adjustment Setup The initial setup related to Adjustments in the General Setup allows the user to first of all define the Adjustment Request Number Structure and in addition to this the user can define the exact Approval Workflow that should govern the Approval of any Adjustment Requests. This easy and flexible Workflow Definition allows for an Adjustment Officer, an Adjustment Supervisor, an Adjustment Manager or a Financial Officer to be involved in the Workflow process. Definitions or Master Tables
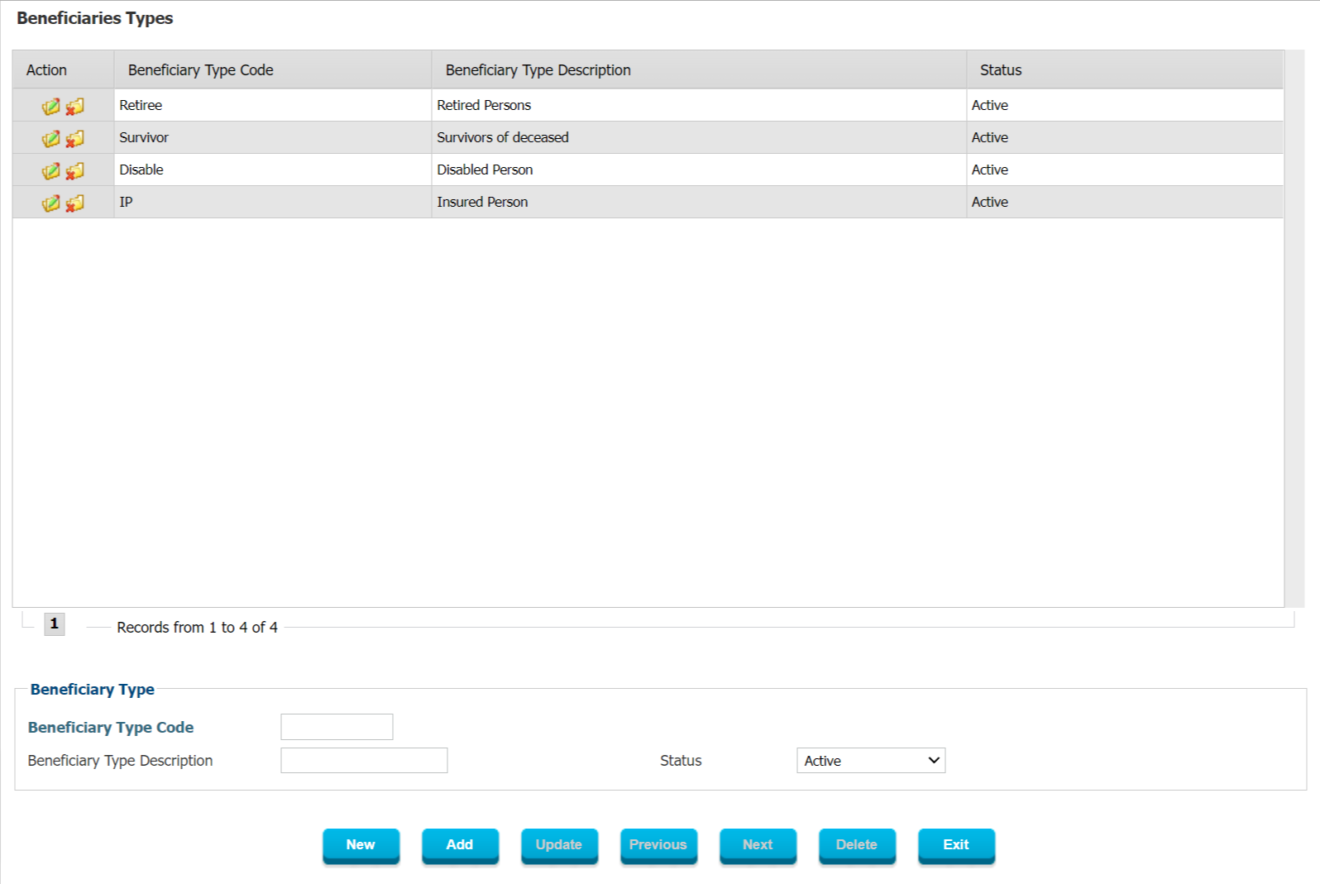 Figure 12: Beneficiary Types Beneficiary Types can be used to allow for separate policies for different types of Beneficiaries and to manage the Payment Runs which can be divided into separate runs for each Beneficiary Type. On top of this, all reports will allow you to filter by Beneficiary Type when relevant so that the data can be analyzed better. There is no limit to the number and type of Beneficiary Types you can define in the system. Each will come with a Code and Description.
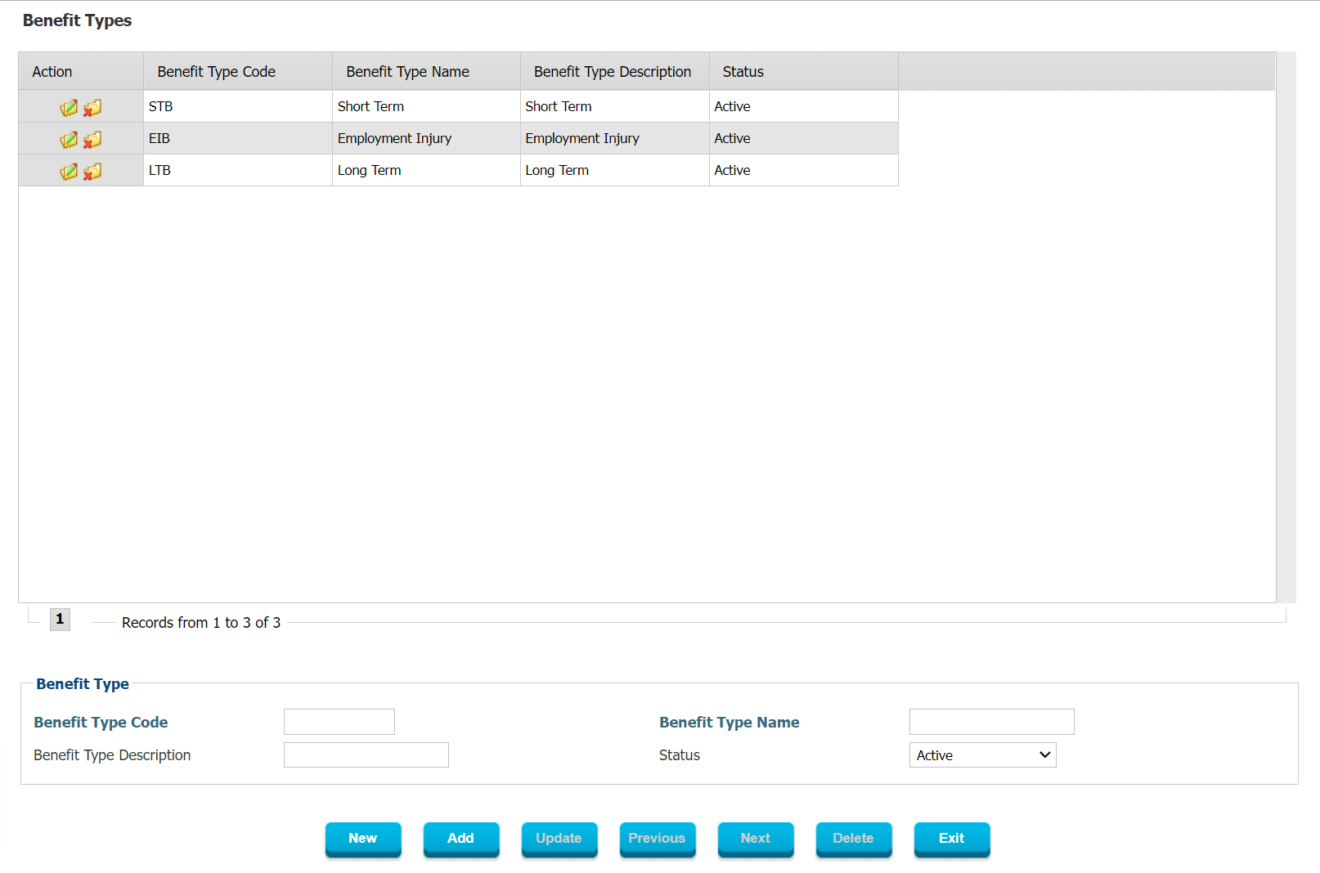 Figure 13: Benefit Types Apart from the different types of Beneficiaries, you can also define any number of Benefit Types. Again, this type of grouping and classification is used to enable the user to configure the system with different policies and rules which apply to different types of Benefits in this case. It also will allow reports to be run separately for specific types of Benefits and enable the user to run reports for a combined number of Benefits which all fall under the same Benefit Type.
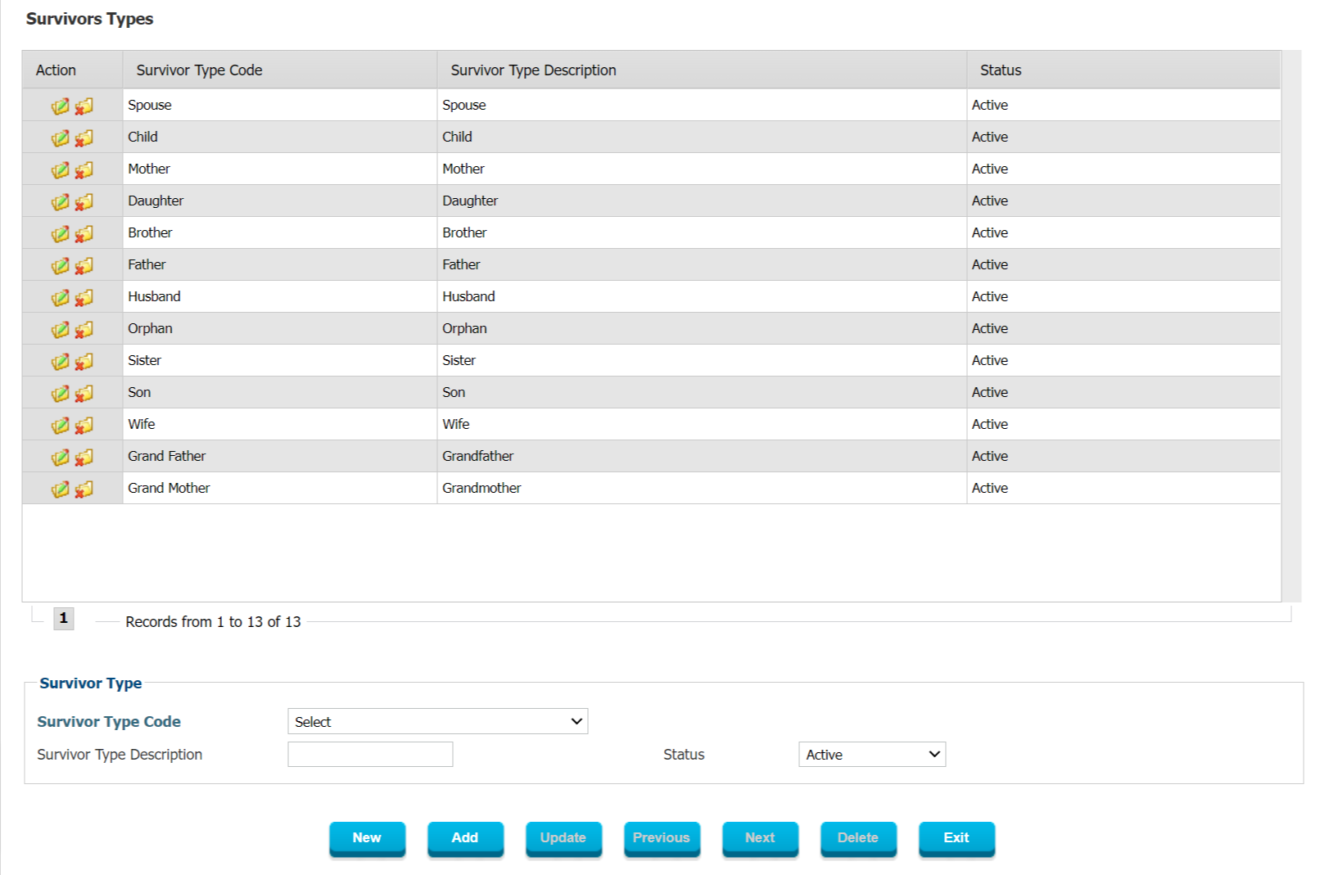 Figure 14: Survivor Types Definition Interact SSAS supports Survivor Pensions and in order to do so it manages the different types of Survivors, their relationship to the Deceased and their own Demographics and Dependents. In order to do so, it allows for the user to first of all to define the different Types of Survivors which are relevant in the country under the country’s Social Security Laws. Since none of this is uniform across the world, the system is flexible enough to have these types of elements defined in the setup.
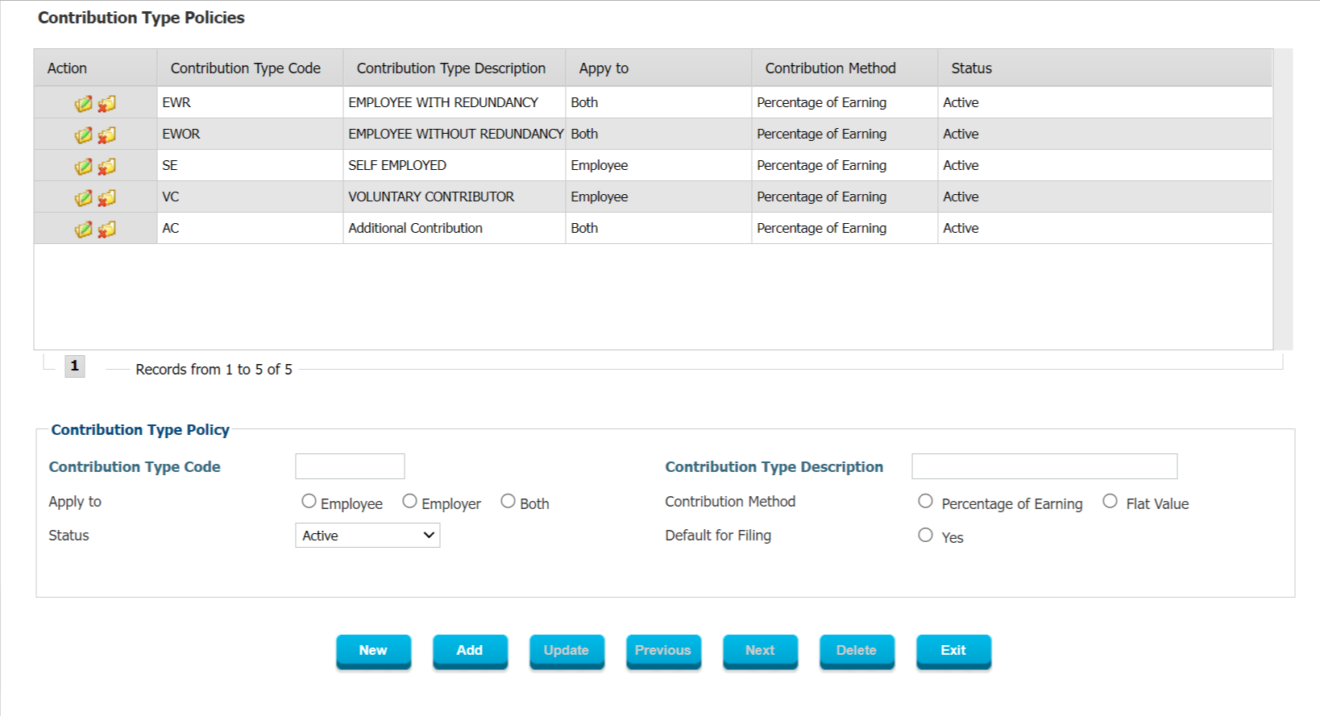 Figure 15: Contribution Types In Interact SSAS there are always multiple ways to support a certain outcome, but depending on the exact requirement and scenario, one method can be far more efficient and effective than another. The use of Contribution Type Policies is meant to allow for the easy definition of unique Contribution Rates based on the Contribution Type. The above example shows different Contribution Types for Employees who are entitled to a Redundancy Benefit and those who are not, as well as for Self-Employed and Voluntary Contributors. By defining specific Contribution Type Policies here, it’s easy to setup a rate table afterwards for Contributions whereby the user will be able to specific a unique Contribution Rate for each Contribution Type Policy
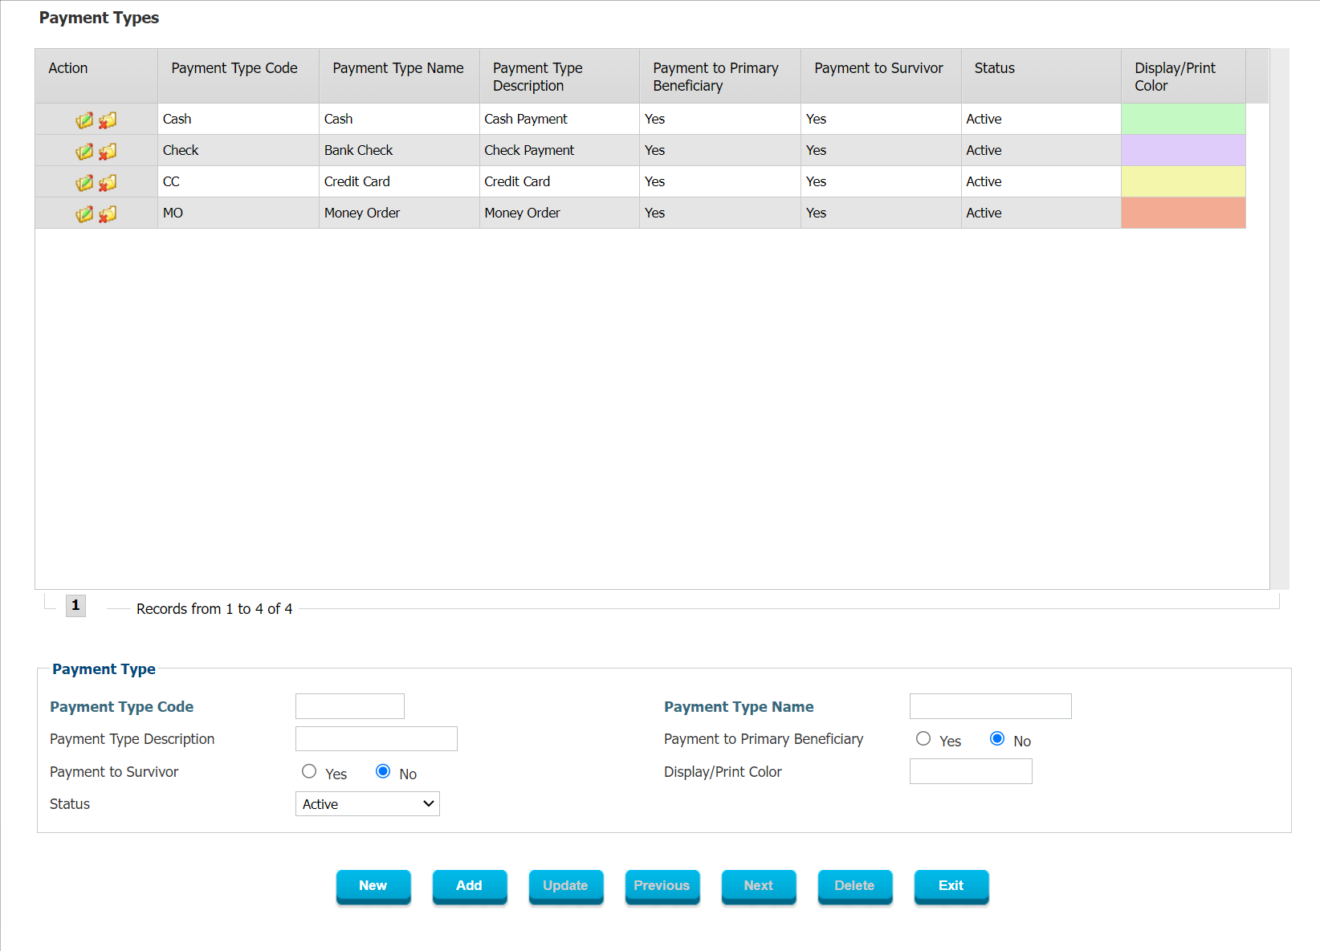 Figure 16: Payment Types As indicated previously, Interact SSAS supports various Payment Methods, including Cash, Check, Electronic Payment, Cash Card, etc.. These settings in the System Manager allow the user to define similar elements but also link additional logic to it such as whether this Payment Method can be used to pay a Survivor or to pay a Primary Beneficiary. By setting up the Payment Type Methods correctly from the start, you ensure that the system will automatically apply the correct Payment Method based on a given scenario.
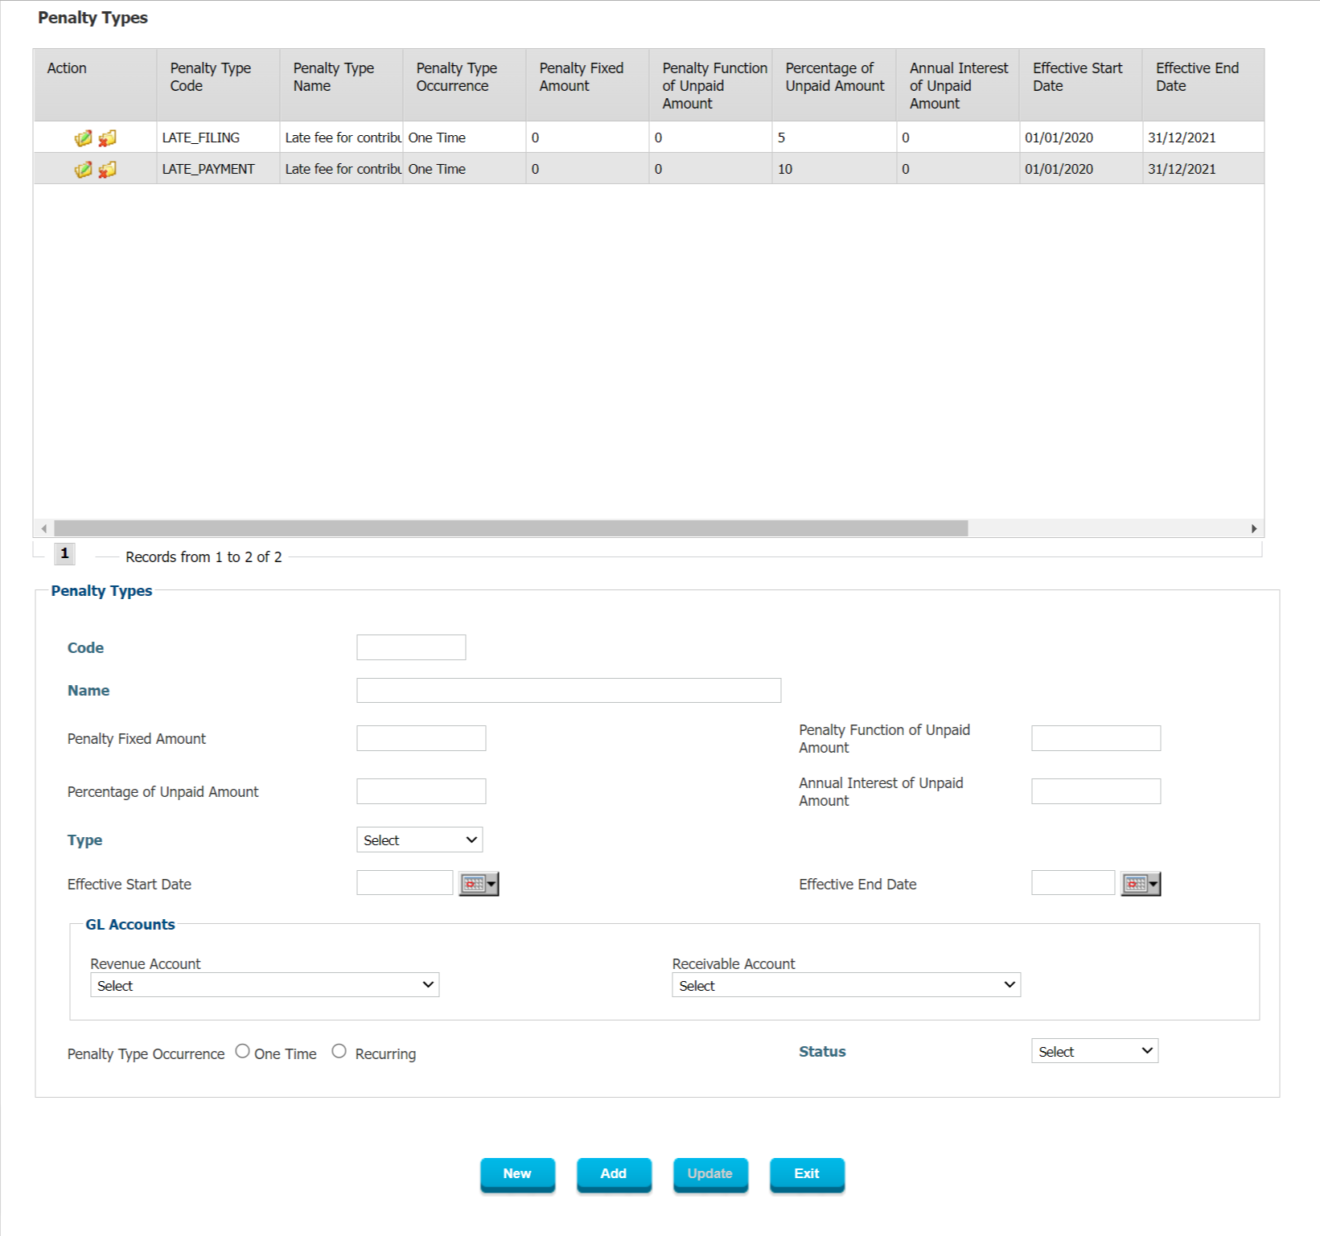 Figure 17: Penalty Types Depending on the Compliance Regulations and Laws in effect, there may be various Penalties which apply for those Employers (or Employees) who are not in Compliance with Social Security Laws in a country. The most basic types of Penalties are those which apply for Late Filing or Late Payment of Contributions. Because these types of rules always differ in each country, the system allows the user to define their own Penalty Types, and define the Code & Description for it, as well as whether or not the Penalty will be a fixed amount or a calculated percentage based on an original amount due or an unpaid balance. In the same setup, the system will allow the user to define GL Revenue Accounts and Receivable Accounts where the Penalties are to be booked. Penalty Types can also be set to be One Time only or Recurring.
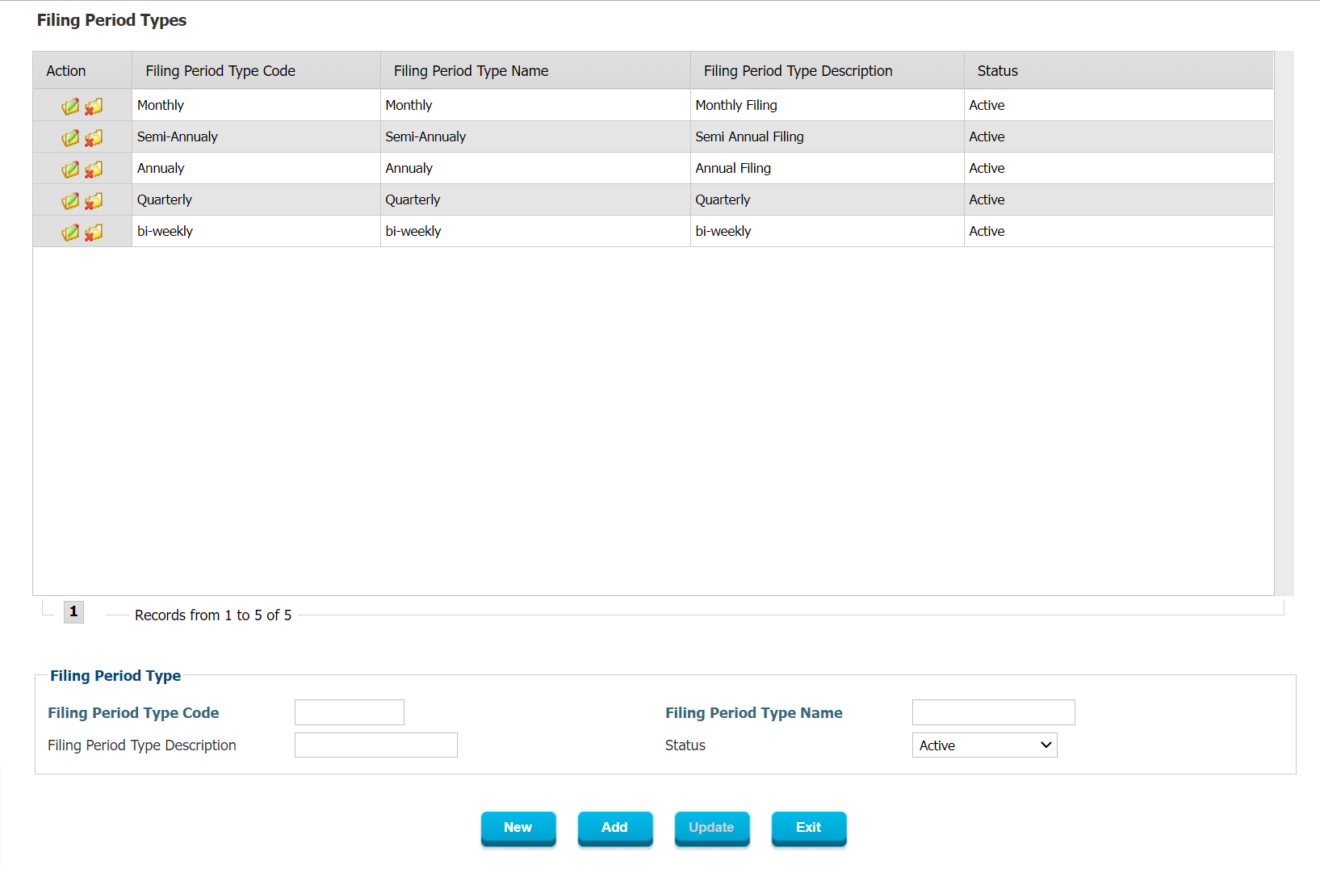 Figure 18: Filing Period Type Interact SSAS supports many different types of Filing Periods for the periodic filing of salary and contribution data which is done by Employers, Self-Employed and Voluntary Contributors. Since every country is different, the System Manager allows the user to define the Filing Periods which should apply in this particular country’s context.
Used for Different Sickness Description that a Practitioner may Diagnose the Patient with 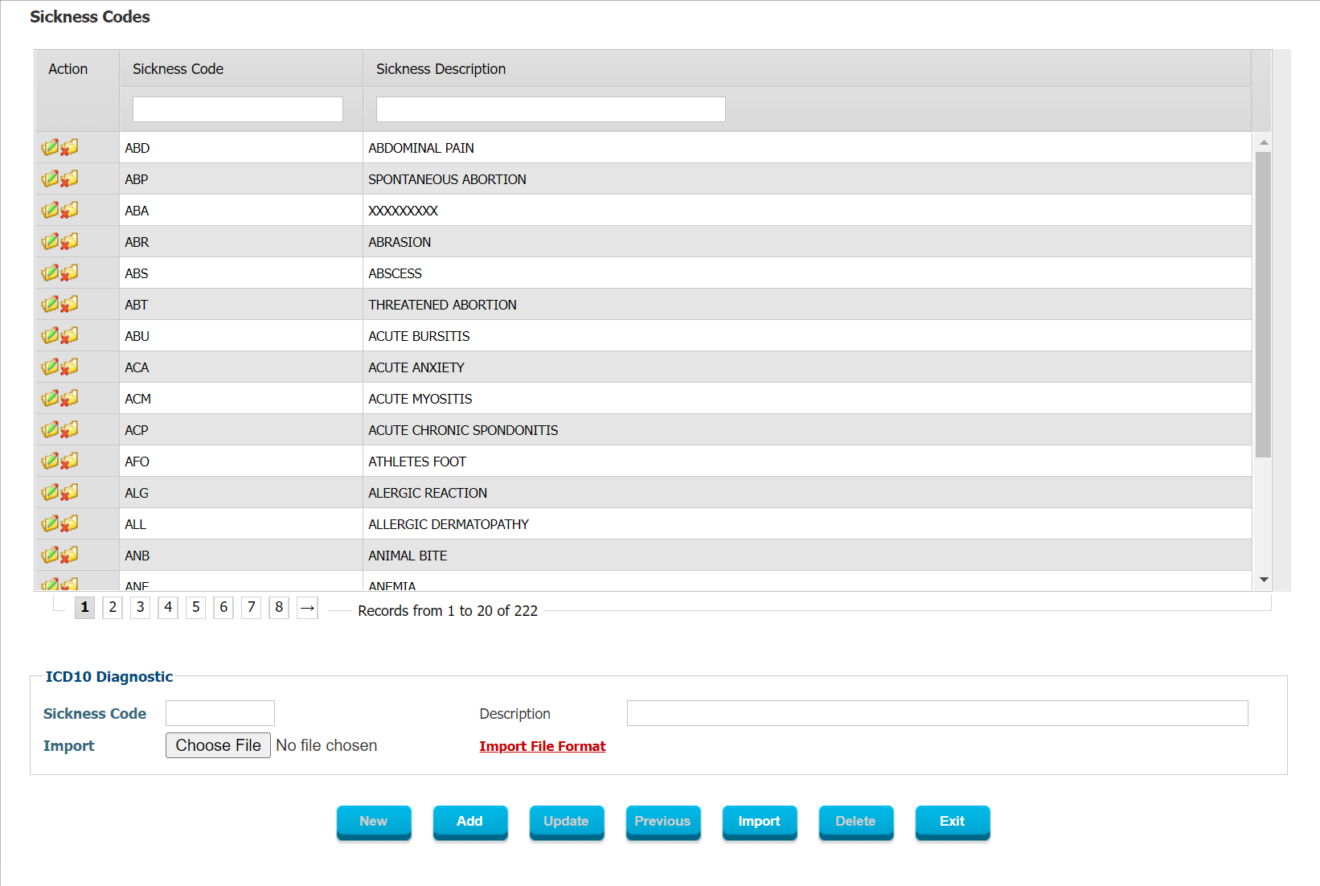 Figure 19: Sickness Codes Sickness Codes or Diagnostic Codes can be used to streamline all medical reporting from the Medical Providers to the Social Security Administration and can also inform the Social Security Administration’s own creation of policies to address particular situations which are observed based on careful analysis of the data. While there are International Diagnostic Codes which can be used, the user is free to set any reporting standard they want and create their own codes which are more applicable for the local conditions.
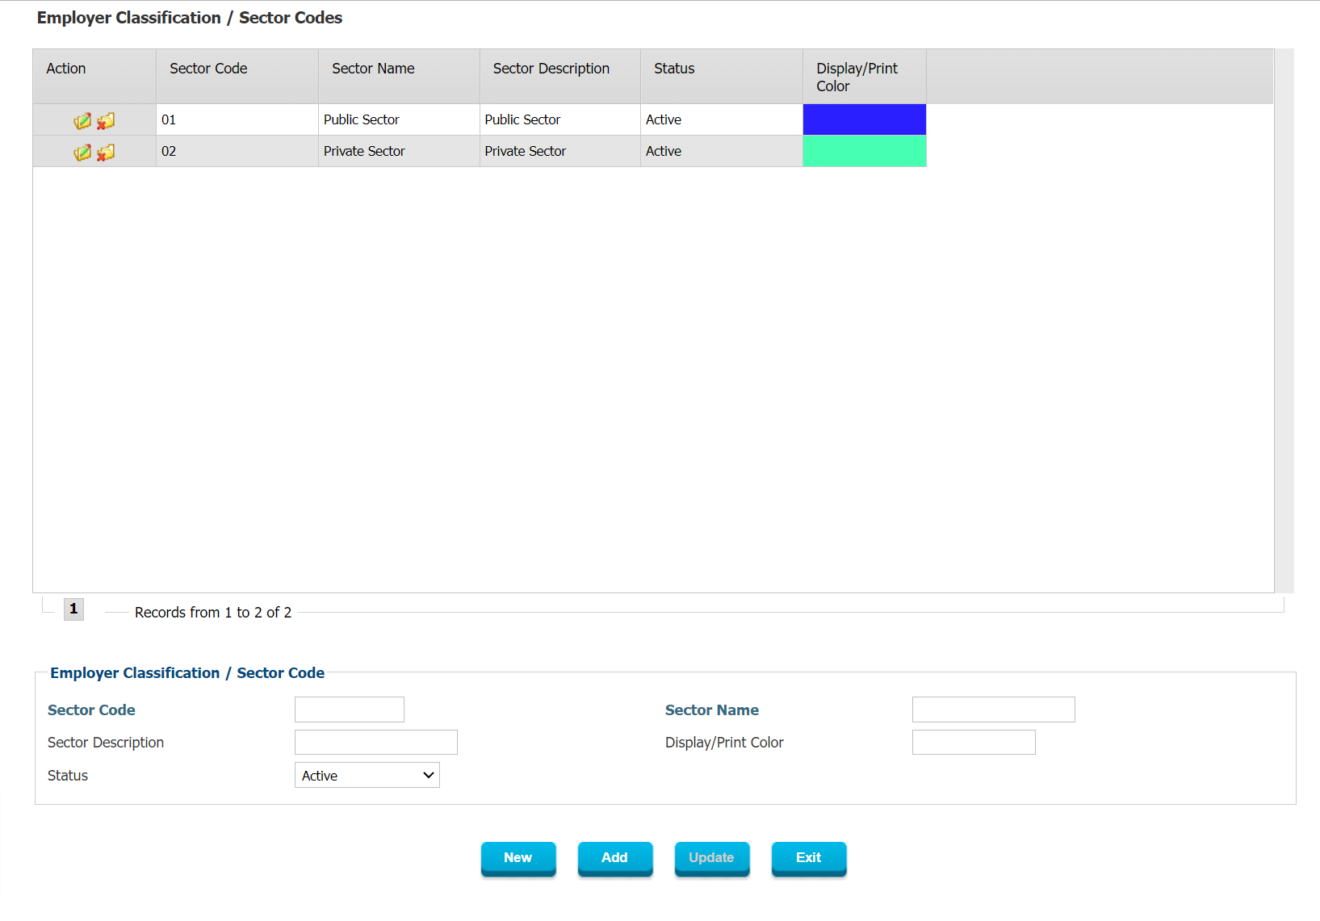 Figure 20: Employer Classification / Sector Codes Because often in the context of Social Security Laws there are distinctions made among different sectors of the economy, it is important to be able to classify Employers based on a Classification which is meaningful in this context. Therefore, the Employer Classification or Sector Codes are fully user defined and can be set up as required. Employer Classifications can be as simple as Domestic vs. International, or Public vs. Private Sector, but they can also be based on Economic Activity such as Banking & Finance, Tourism, Retail, Food & Beverage, Agriculture. In times of economic distress, governments may want to offer specific relief or launch initiatives targeting a particular sector in the economy and this classification will first of all ensure that the Social Security Administration can provide all relevant data needed for decision making and can subsequently execute any targeted policies easily without having to go through major changes in their system. REASONS
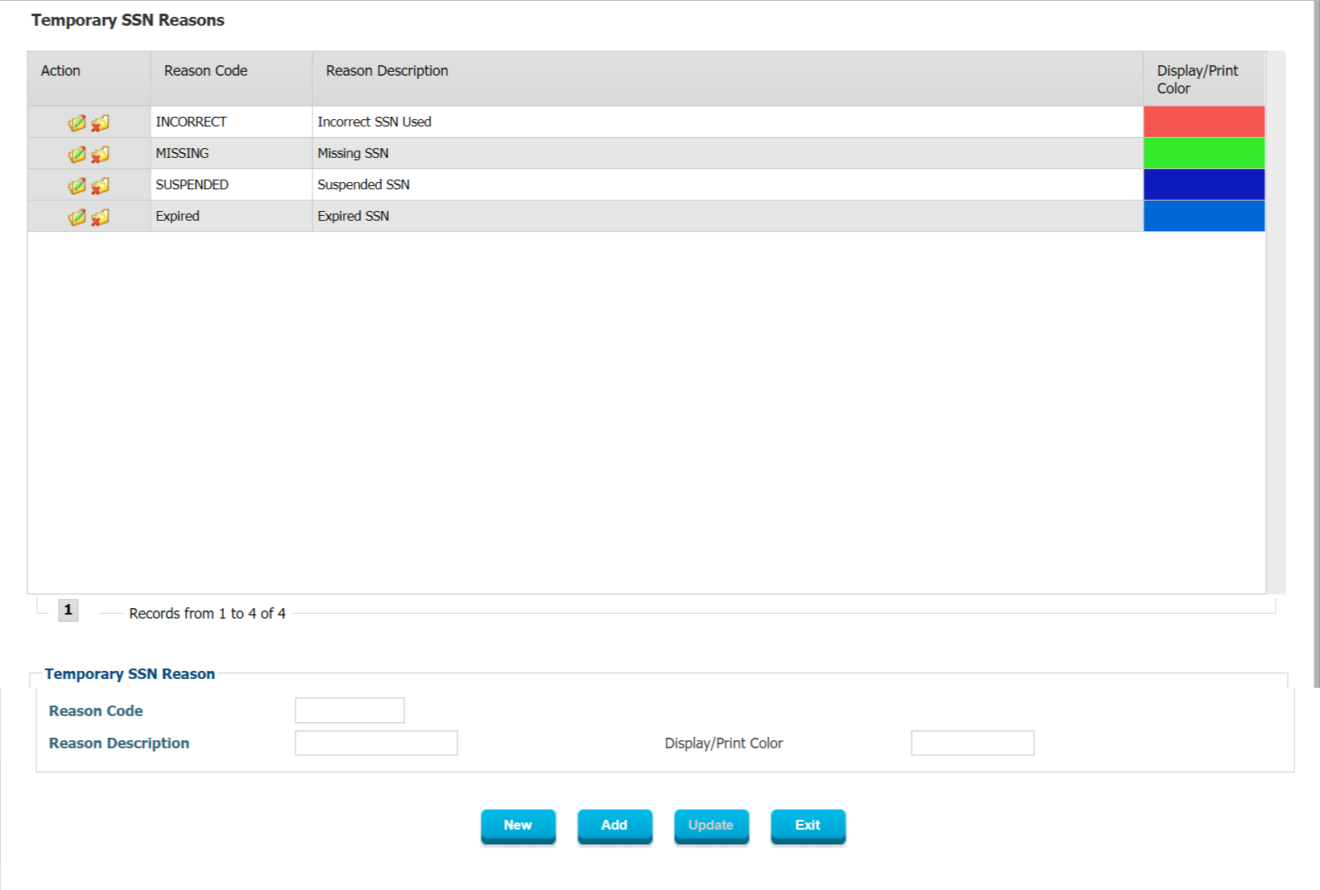 Figure 21: Temporary SSN Reasons The purpose of using Temporary Social Security Numbers can vary between different Social Security Authorities and therefore the Reasons are user-defined with a Code, Description and Color.
 Figure 22: Contribution Payment Rejection Reasons There may be specific reasons for which Contribution Payments sometimes are rejected, but since these payments are important financial transactions the user can setup specific Rejection Reasons which are the only ones that can be chosen by the person rejecting a contribution payment. This will also allow the Social Security Administration to more easily report on and investigate the causes of rejections and take action to mitigate these circumstances.
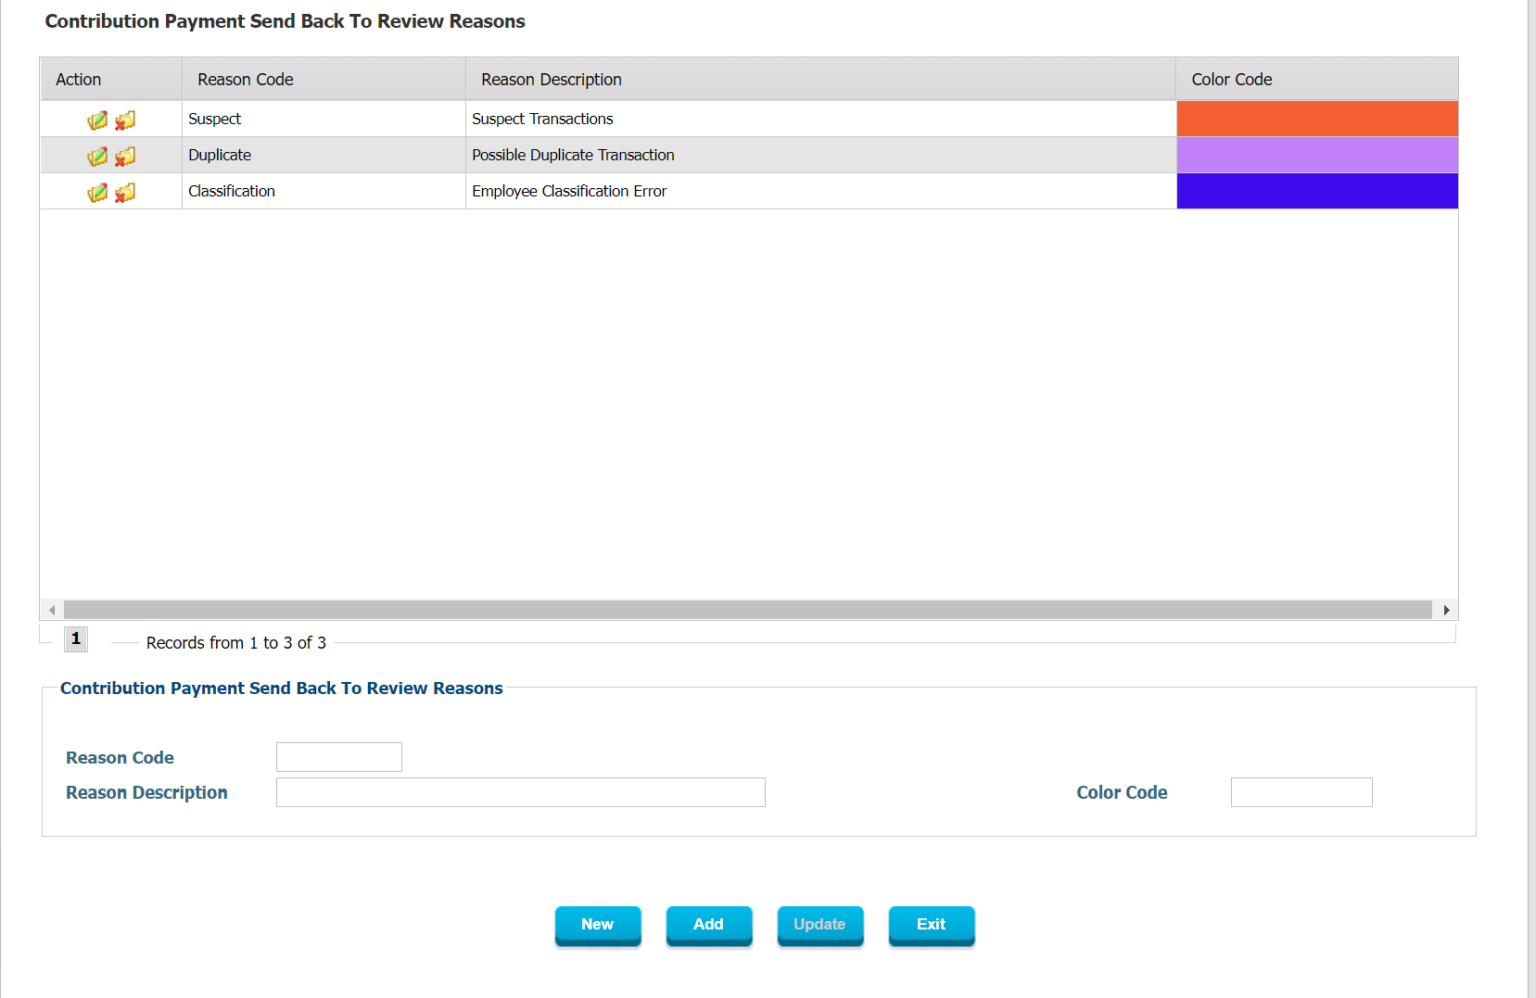 Figure 23: Contribution Payment Send Back to Review Reasons Similar to tracking Contribution Payment Rejection Reasons, it is important to track “Contribution Payment Send Back to Review Reasons” so that the Social Security Administration can also investigate the frequency of certain reasons occurring and take appropriate action.
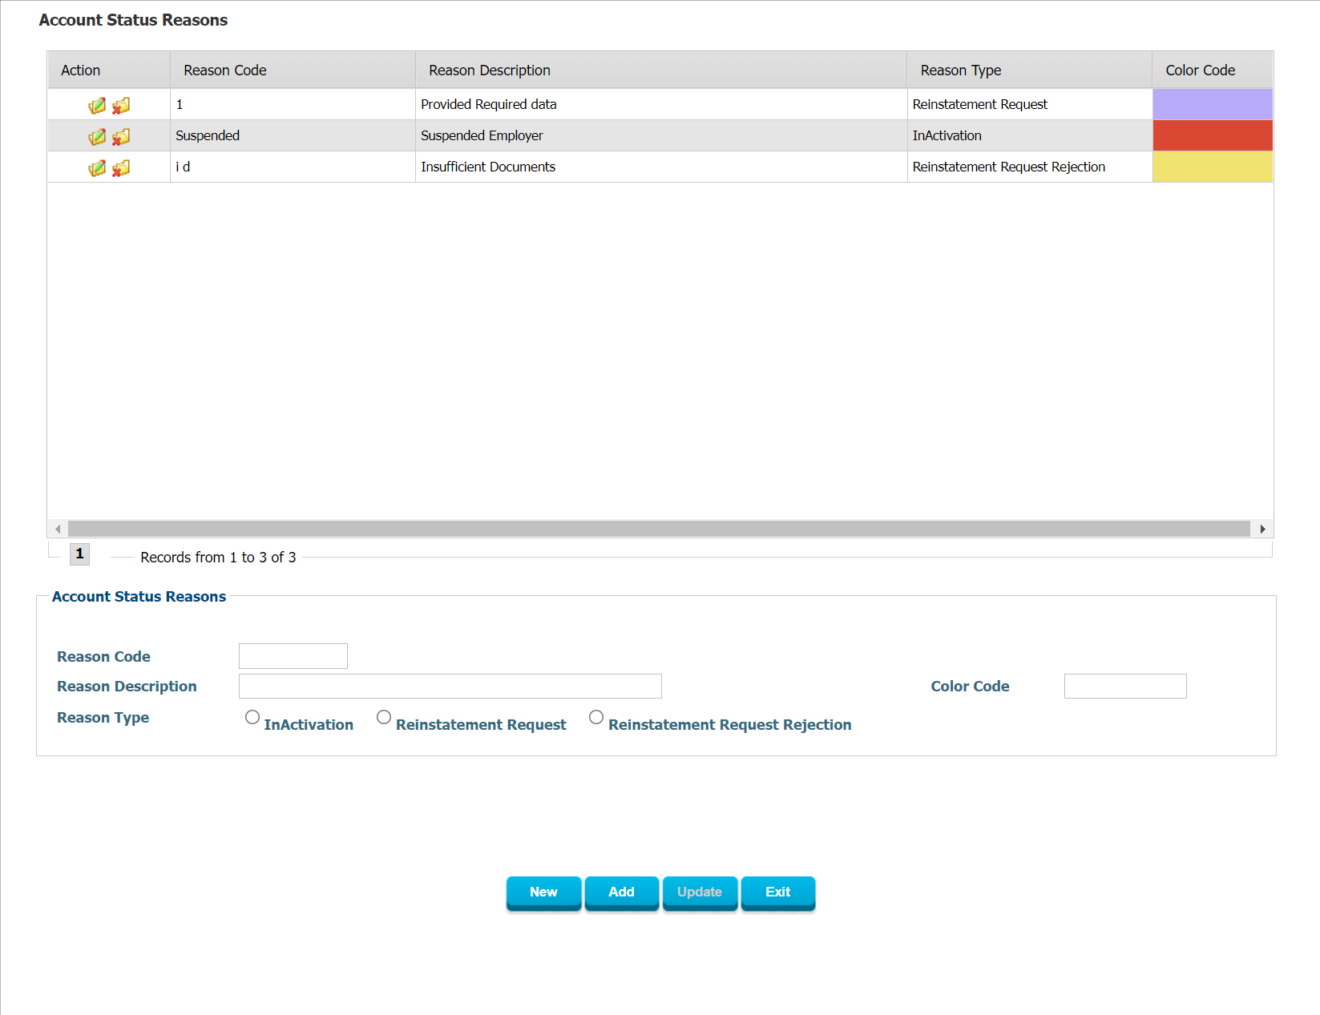 Figure 24: Account Status Reasons Sometimes the account of an employer is Suspended, or made Dormant or Inactive. This can occur for a variety of reasons but it is important that whoever changes this status of an employer clearly indicates the reason for the status change. This allows the administration to investigate and address the reasons more proactively and look for ways to spot or pre-empt such account changes in the future to reduce administrative work and to improve operations. The Account Status Reasons are fully flexible and user-defined as they must reflect the local conditions in which the Social Security Administration is operating.
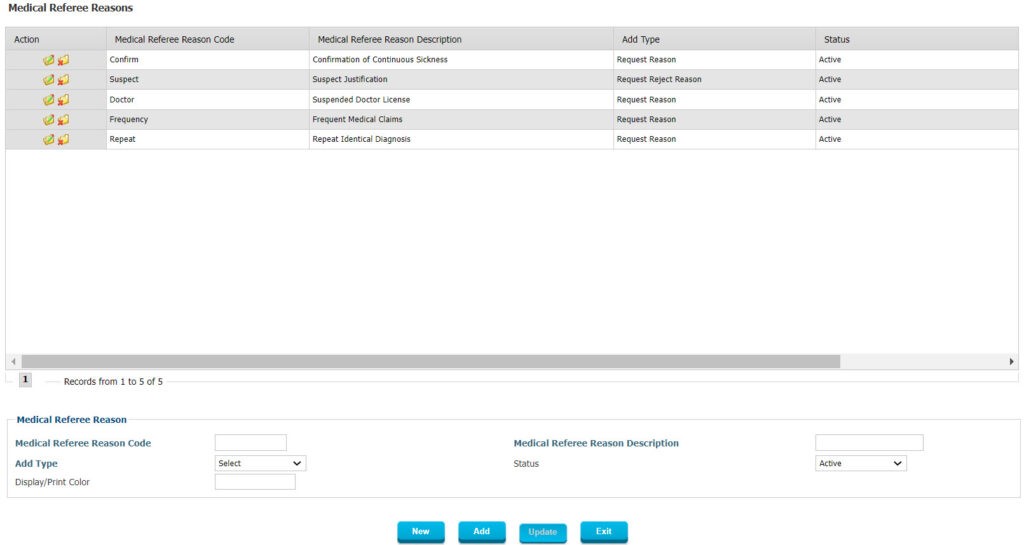 Figure 25: Medical Referee Reasons The reasons for referring a case to a Medical Referee are user defined and can be configured as per the requirements of the Social Security Administration and its practices in this regard. Registration ManagementThere are different types of Registration in Interact SSAS to support the different concepts which apply in this context.
Below we will first cover those Registrations which lead first of all to access to the Social Security Administrations web-portal, i.e. the e-Services Access Requests afterwards we’ll look at the additional Registrations which take place when the individuals and organizations are already registered in the system. In order for anyone to access the Social Security Administration’s portal, they will first need to be registered in the system and have user credentials. To register, they can go to the main portal page and select the type of access they are requesting and then complete the corresponding form, attach any mandatory documents and submit their registration. The different types of access or user profiles in Interact SSAS are mainly:
Each one of the above will have their own required data to be provided in order for the applicant to be registered and given access to the Social Security Portal. The Registration Forms are user-defined and typically customized for the particular local context in which they are used. The data collected in these Registration forms will automatically be reflected in the system in the Individual or Employer’s Profile and throughout the various modules of Interact SSAS wherever necessary. One of the key principles of Interact SSAS is that no data ever needs to be entered more than once, so all data collected at this early stage will be available in the system anytime and anywhere. Once the Registrations or e-Services Access Request Forms are received, the appropriate user in the Social Security Administration will be able to process the Access Request Form and issue User Credentials so each Individual or Employer will be able to access their own e-Services Portal. The Workflow and Documents required for each form are defined in the General Setup under the Application Form tab.
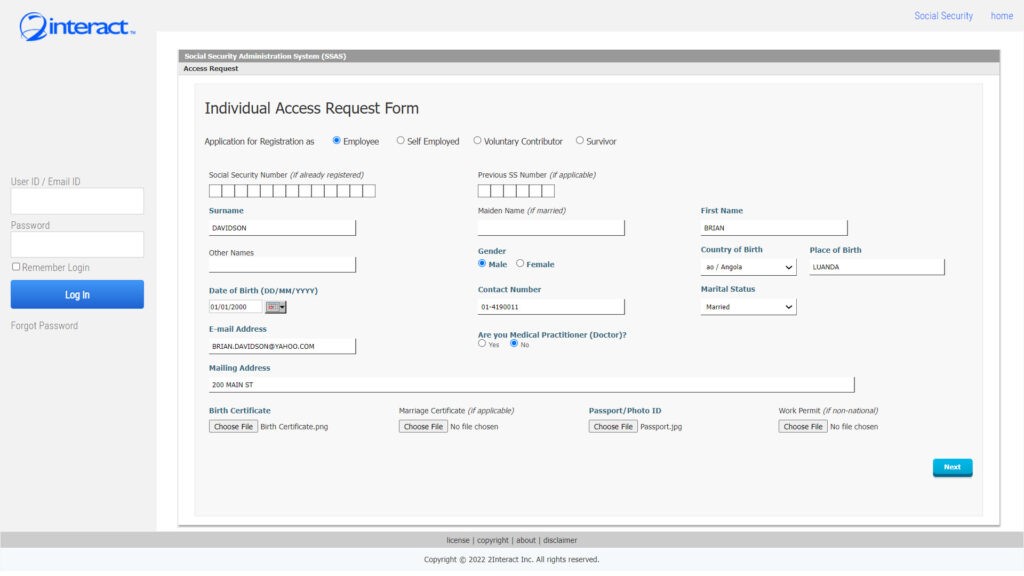 Figure 26: Individual Access Request Form The above form is as it appears to an end-user individual who wants to request access as a regular employee. Basic demographic data is collected and a few mandatory supporting documents are to be attached by the user. Note that the form can have underlying logic such as making a marriage certificate mandatory in case the registrant indicates their civil status as married or making a maiden name mandatory in case a female registrant indicates being married. 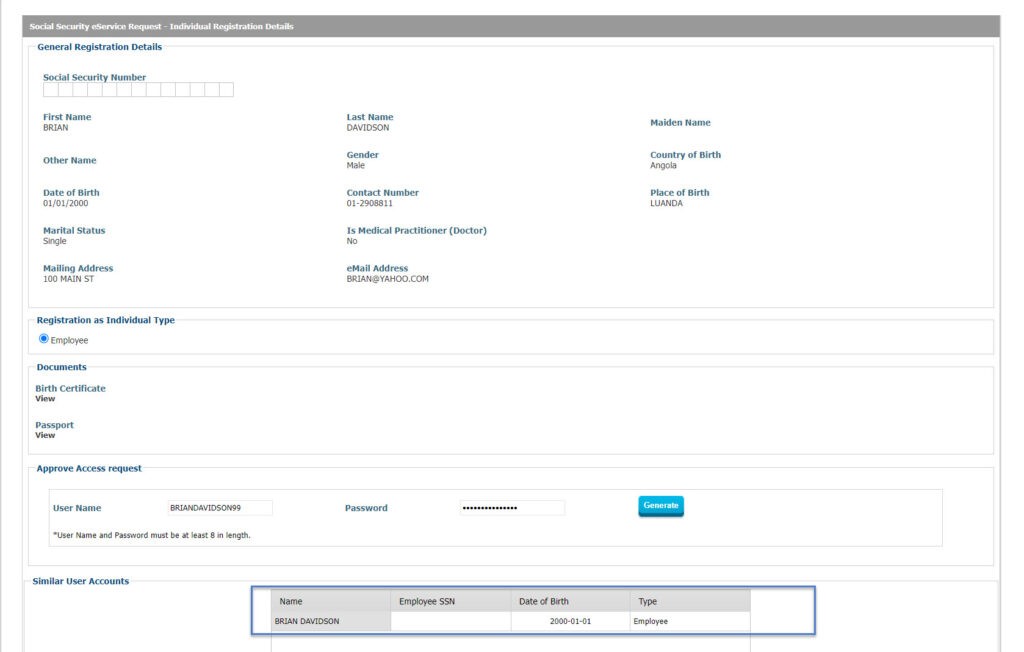 Figure 27: Employee e-Services Access Request Form Approval The above screen shows a user from the Social Security Administration reviewing and approving an e-Services Access Request Form/Registration and issuing user credentials. Note the box which lists Similar User Accounts and indicates that another Individual with the same name and birth-date is already registered. This gives the user the opportunity to investigate further first before approving the registration or to proceed in case it has been determined that it is a pure coincidence. All data submitted by the registrant can be reviewed by the Social Security Administration user and any documents that were attached can be reviewed in detail.
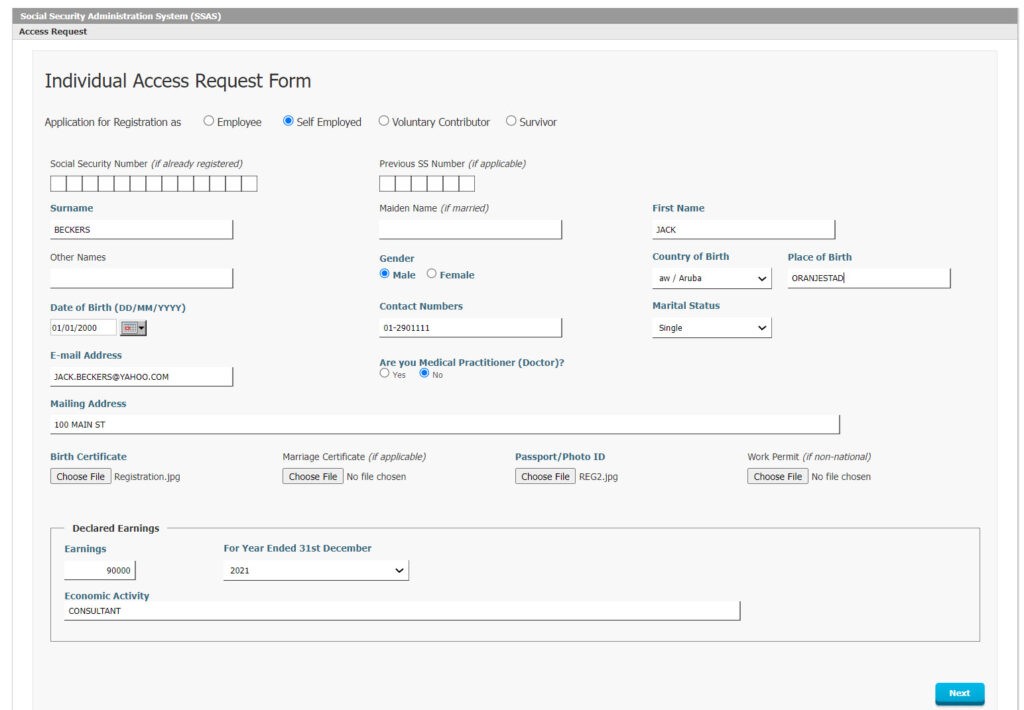 Figure 28: Individual Access Request Form for Self-Employed The Self-Employed will be able to fill a similar form as that one for regular Employees with the main difference being that Self-Employed individuals typically need to report their Declared Earnings for one of the most recent previous Fiscal Years as this information is used to determine their future contributions. 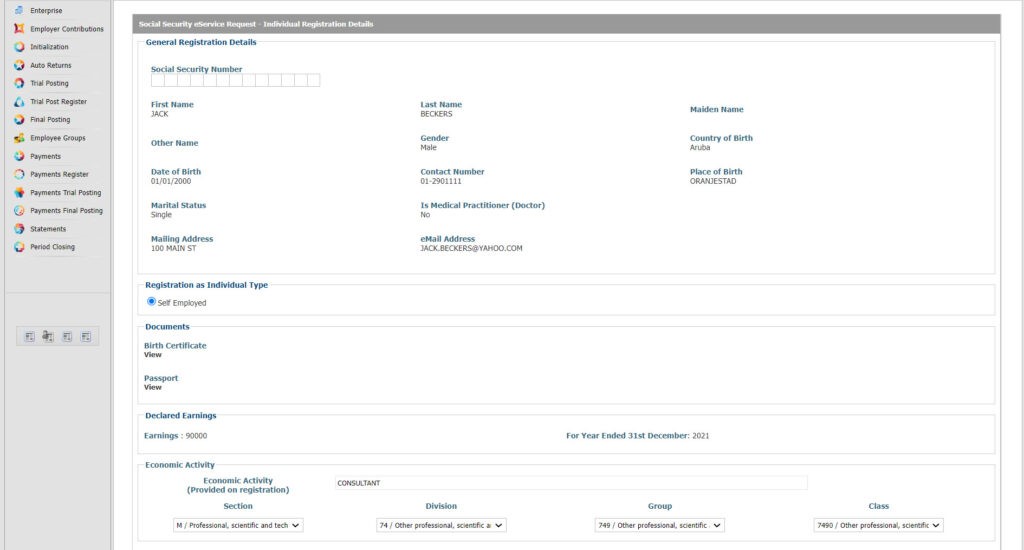 Figure 29: Self Employed e-Services Access Request Processing Form Once the Access Request Registration form has been received online by the correct user in the Social Security Administration, then it can be processed quickly. In the case of a Self-Employed individual, the economic activity which was provided by the individual during registration can be further classified based on International Standard Industry Codes so that the administration can produce better reports and analyze its data more effectively.
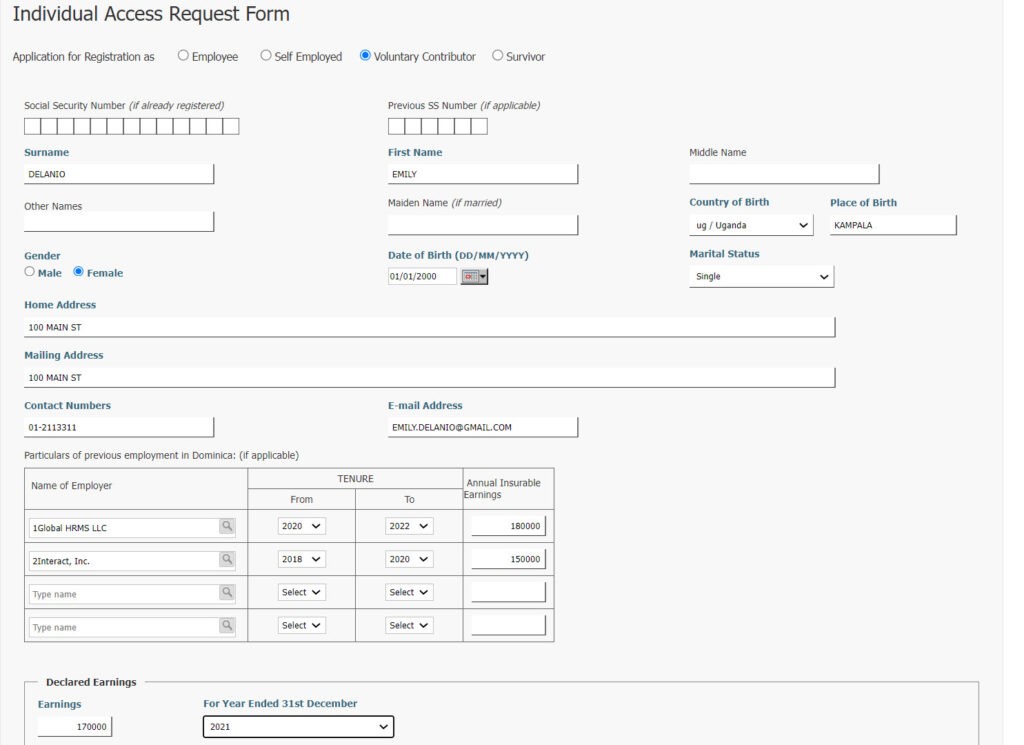 Figure 30: Voluntary Contributor e-Services Access Request Form Voluntary Contributor Registration Forms differ mostly from regular Employee Registration forms in that they capture past Employer data and earnings information and also capture the Declared Earnings for the most recent fiscal year for this Contributor. This information will then be used to determine the appropriate contribution the Voluntary Contributor will need to make from that moment onwards.
 Figure 31: Survivor e-Services Request Form Approval Survivors, who don’t have a Social Security Number yet, can initiate the process to obtain their Survivor Benefits by registering on the portal and requesting e-Services Access. In order to do so, they will have to not only provide their own demographics but also information on the deceased person as shown above.
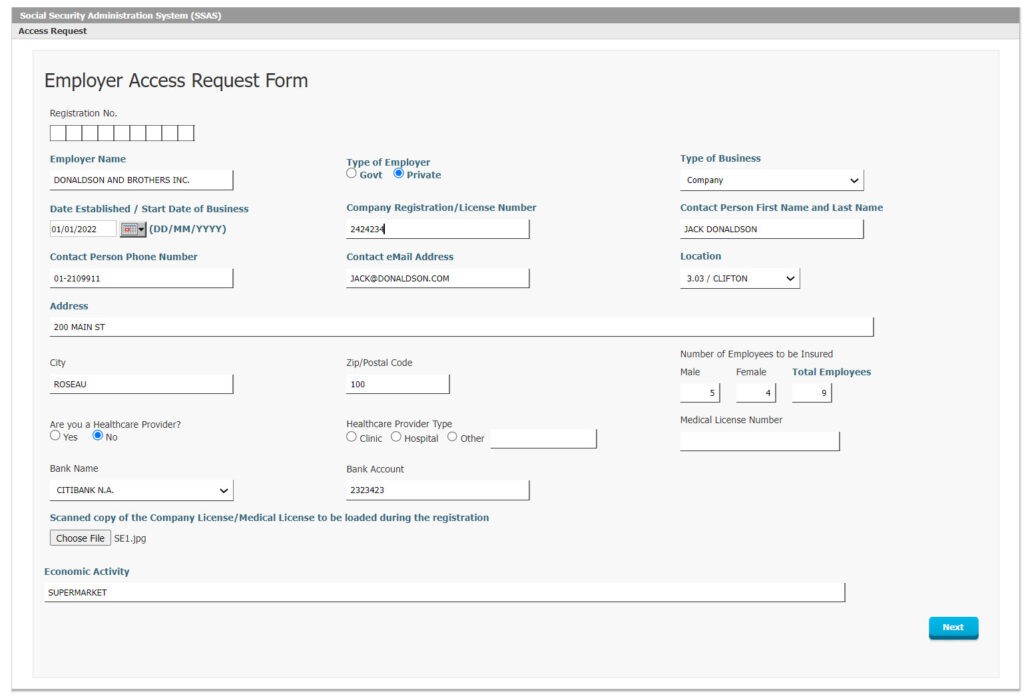 Figure 32: Employer e-Services Access Request Form Employers can register for the first time online by providing basic demographic details, as well as banking information, an employee count, business license details and a description of their economic activity. These documents will be reviewed afterwards by the Social Security Administration prior to approving the request and then issuing user credentials. 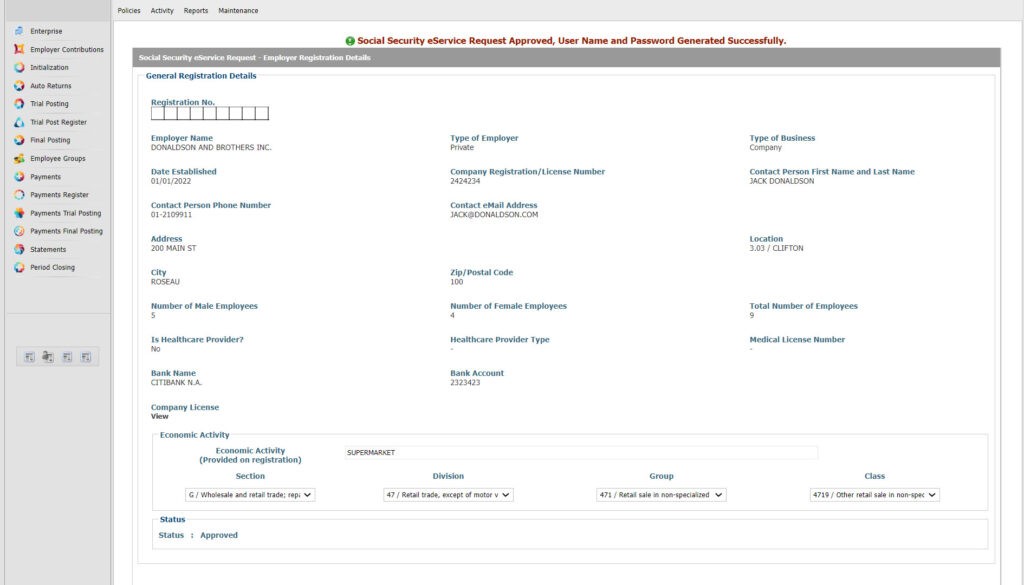 Figure 33: Employer e-Services Access Request Approval Form When the user in the Social Security Administration reviews and processes the e-Services Access Request Form from the employer, they will be able to verify the documents which were included in the application and specify the exact economic activity by using the multi-level International Standard Industry Codes so that future reporting can be analyzed by Economic Activity using the ISIC Section, Division, Group and Class.
 Figure 34: Financial Institution e-Services Access Request Form Because Financial Institutions play a unique role in the context of social security, they have a separate access and profile in the Interact SSAS system. While on the one hand they are Employers just like all other Employers, they also hold accounts for individuals, employers and possibly even for the Social Security Administration. As a Financial Institution they are therefore able to receive payment files from the Social Security Administration which will allow them to process the Benefit Claims Payments which are meant for the wider population. For this reason, their Role in the system is unique and as a result their Registration is also separate from the rest.
It is important for many reasons that the Social Security Administration has the correct information as to which Employees are employed by which Employer. This information can be gathered in various ways: either by the Employee reporting it or by the Employer reporting it. If an Employee wants to report a new engagement or job with a new Employer, they can do so by filling in an “Application for Registration as Employee”. This Application will then be routed first to the Employer for confirmation, using the Employer’s e-Services, to confirm that the individual is truly a new Employee and to verify the Employee’s job title, start date, starting pay and pay frequency. The Employer can quickly verify and confirm the information and then proceed by “Posting” the Application to the Social Security Administration, without having to do any data-entry themselves. If this is the first time an Individual reports being employed, and if the country’s social security laws dictate that Social Security Numbers are only issued upon initial employment, then this Application for Registration as Employee will ultimately be converted by the system into a Social Security Number Application also. Once this is processed, the system will automatically link the Employee with this Employer and from now on all records will show the Employee-Employer relationship and the Employee’s Employment History will also be updated. 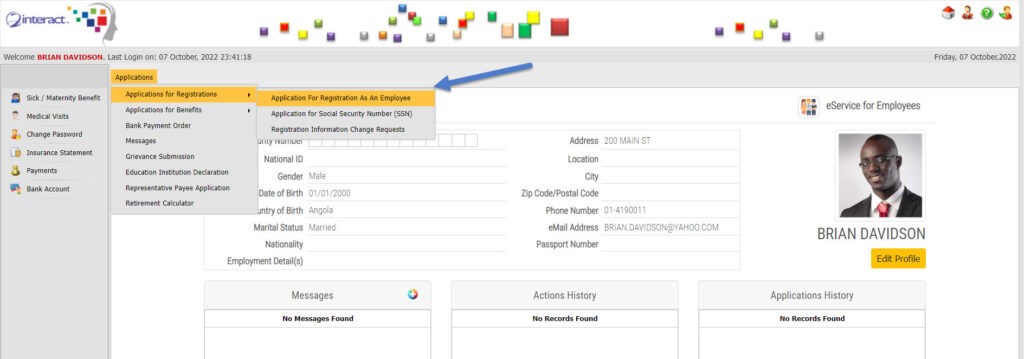 Figure 35: Employee’s e-Services Portal View In the above e-Services Portal View you can see how an Individual can access a menu to Register as an Employee with a particular Employer. Once the Employee clicks on the menu, they will be taken to the following screen to be filled in. 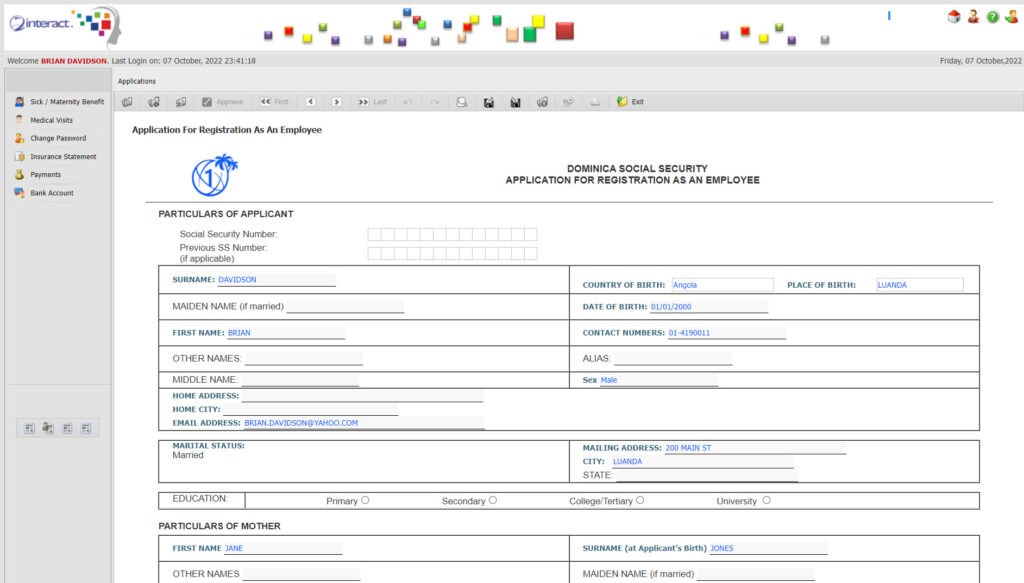 Figure 36: Registration as Employee with Employer The individual can fill in the above form online, and submit it. They only need to provide the information that is mandatory, which is highlighted in bold and blue. 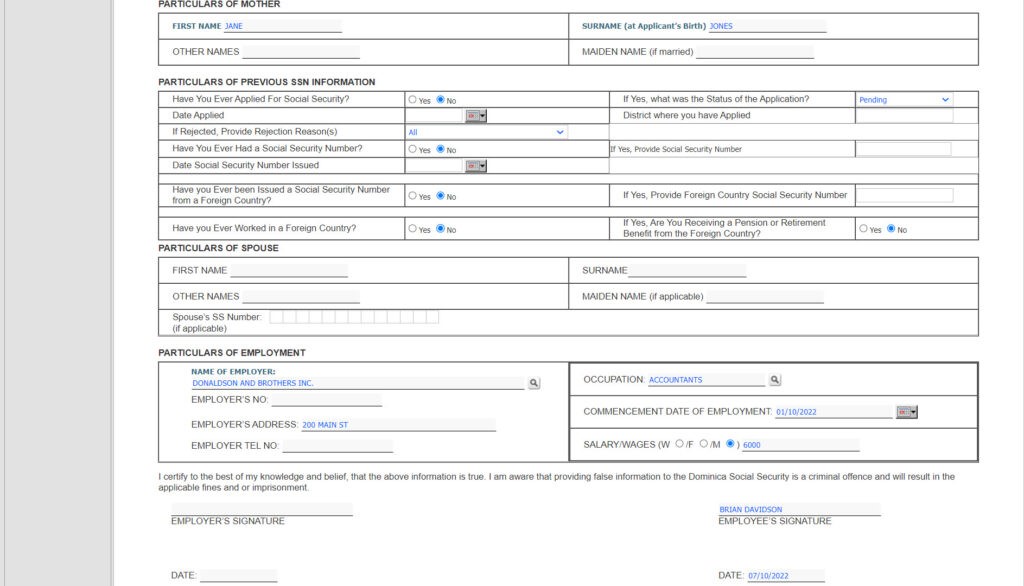 Figure 37: [Continued] Registration as Employee with Employer Social Security Number Management and TrackingOne very important responsibility of Social Security Administrations is to issue Social Security Numbers and IDs, track them and manage them to make sure they are used for the right purpose and any abuse of the Social Security Number is quickly tracked and addressed. The Social Security ID Management consists of several aspects:
SSA Supports Social Security Number Issuance which is produced for Employees, Voluntary Contributors and Self-Employed Persons. It can be generated automatically by the system upon approval of a Person Registration or can be Requested Separately by the User, this depends on the Configuration of the Setup and based on each Client’s Requirement. The formatting and configuration of these numbers is fully flexible and done in the setup of Interact SSAS, below are a few examples of this to see how the format and structure of Social Security Numbers, Temporary Social Security Numbers, Employer Social Security Registration Numbers and Employer Identification Numbers are defined: 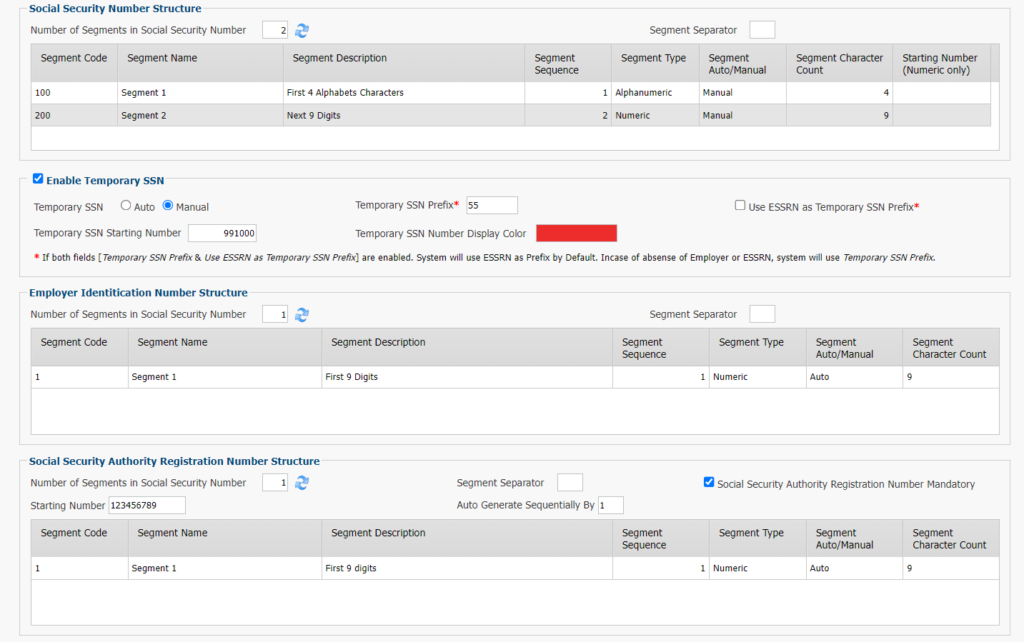 Figure 38: General Setup – Number Structures Below you can also see how Intercountry Union Person IDs are configured in case the country is subject to Intercountry Union Reciprocity rules.  Figure 39: General Setup – Intercountry Union Person ID Structure Setup SSN Number Requests are created in two ways: either they are initiated by a Social Security Administration user, or they are the result of an Employee who registers for Employment the first time (in countries where SSN’s are only assigned upon first employment and not prior to that). The most basic way for a Social Security Number Request to be issued therefore is based on an Employee who registers with an Employer for the first time, using the Employee Registration with Employer form as shown below: 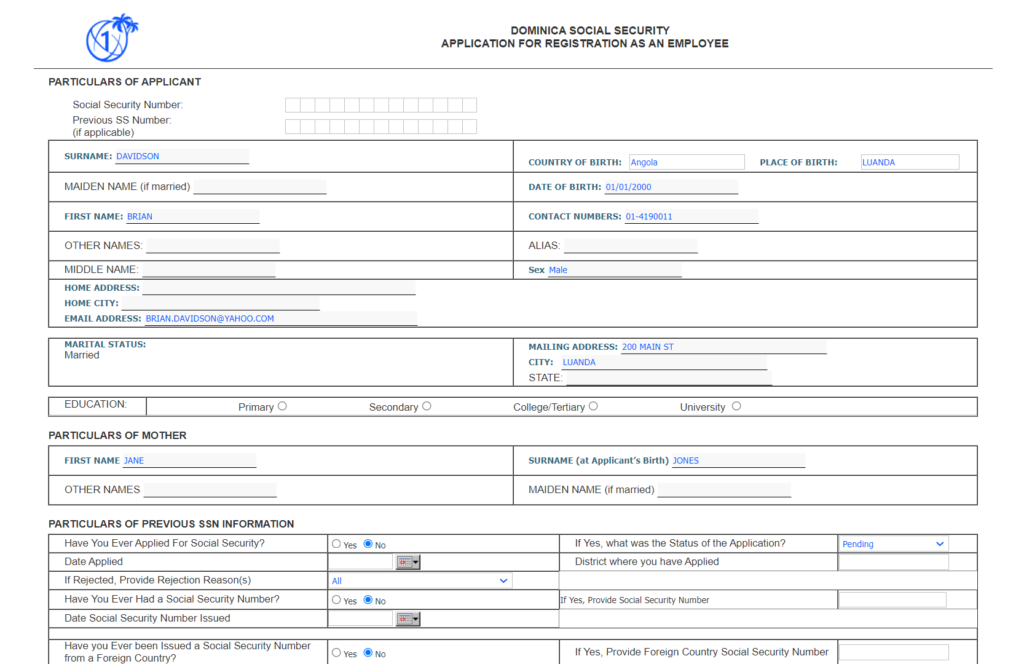 Figure 40: Registration as Employee with Employer The above form is used for individuals to register themselves with an Employer so that the Social Security Administration is informed of their connection with this Employer. 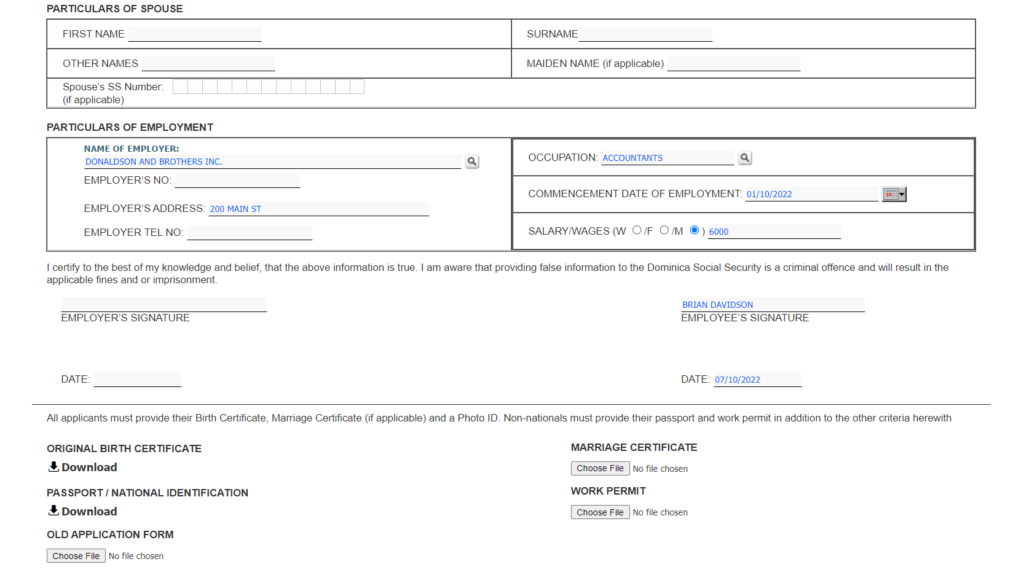 Figure 41: [Continued] Employee Registration with Employer 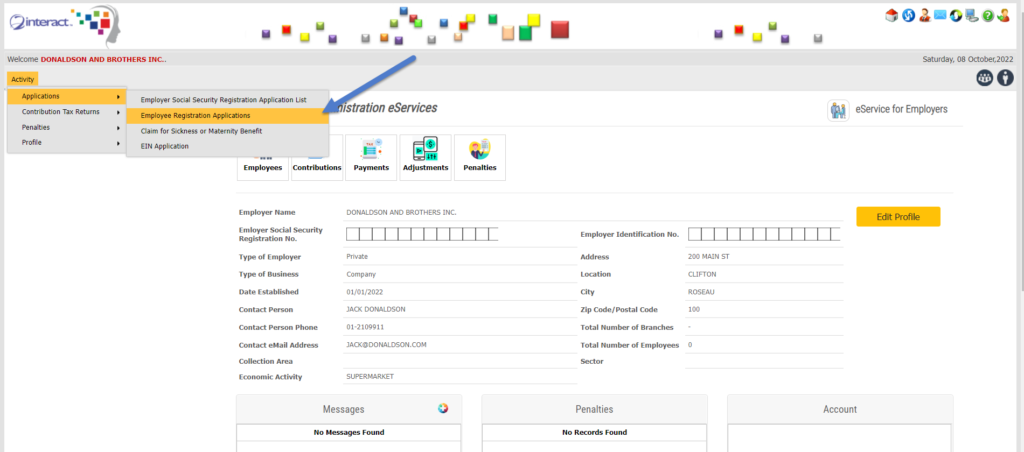 Figure 42: Employer e-Services Portal After the Employer has reviewed and approved the Application for Registration as an Employee it is sent (posted) to the Social Security Administration for processing. If the Employee registering with the Employer does not yet have a Social Security Number, the Application for Registration as an Employee will be converted into a Social Security Number Application by the system and appear on the dashboard for the Social Security Administration user to process. 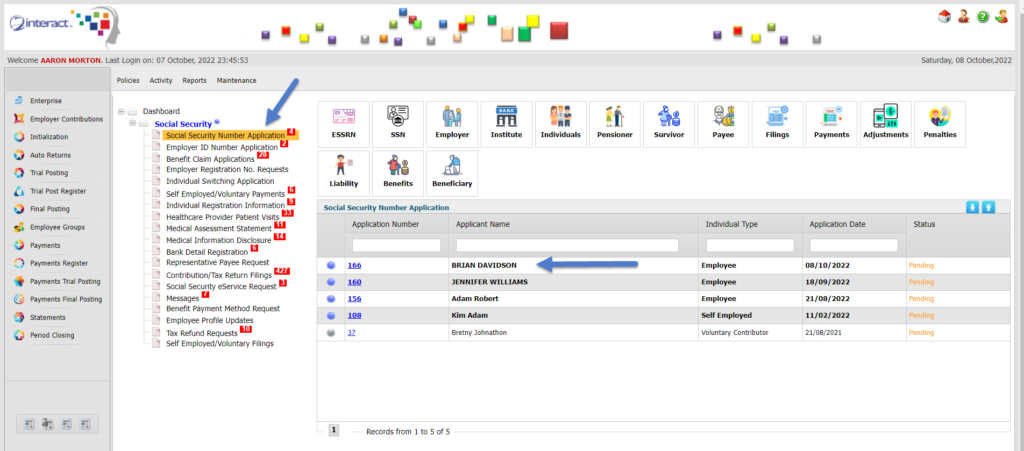 Figure 43: Social Security Administration User 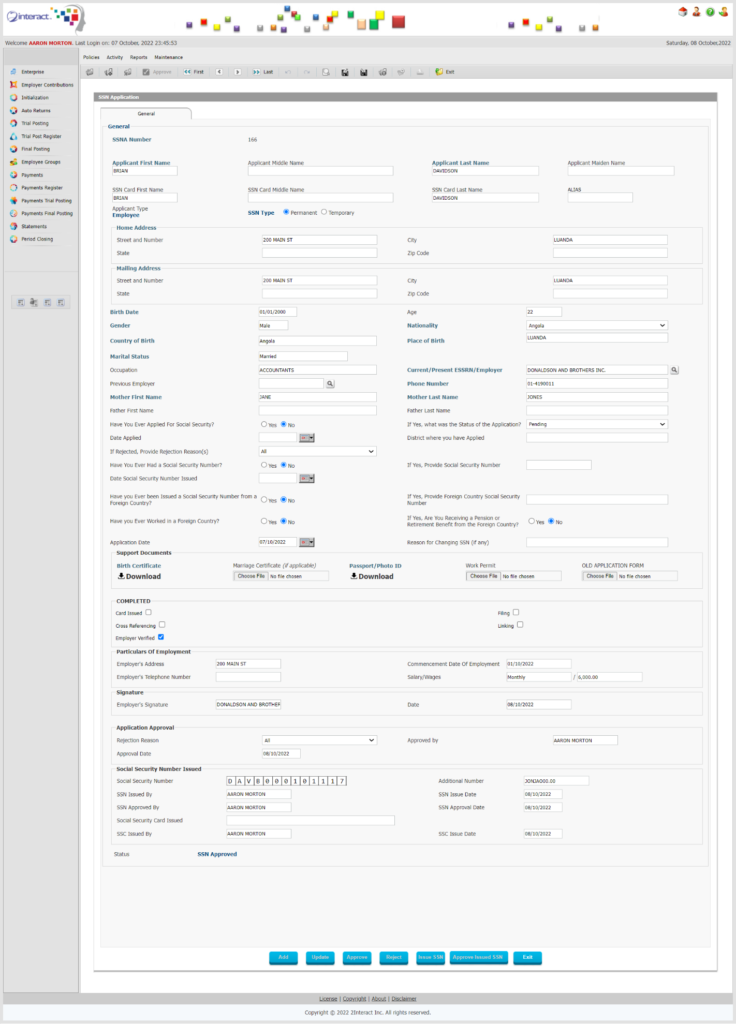 Figure 44: Social Security Number Application (converted from Employee Registration) After processing, the individual will be assigned a Social Security Number which will be used for all transactions related to Social Security for this individual.  Figure 45: Employee Electronic Record with Social Security Number For cases where the individual needs to be assigned a Temporary Social Security Number in order to safeguard data integrity and ensure that no records are mixed up with the wrong person, Interact SSAS supports assigning a Temporary Social Security Number and later converting this Temporary SSN to a Permanent SSN. 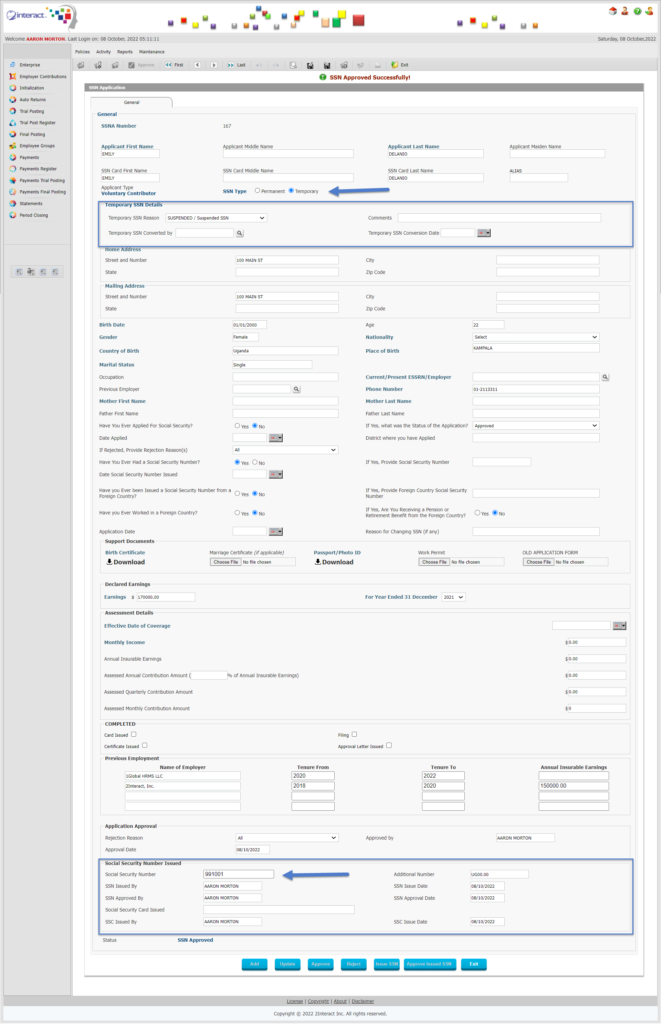 Figure 46: Voluntary Contributor Social Security Number Application The above Figure 9 shows an example of a Social Security Number Application being processed whereby the Social Security Administration user processing the application is assigning a Temporary Social Security Number as the existing SSN is Suspended for this Voluntary Contributor. Note the unique format and structure of the Temporary Social Security Number, to ensure it is easily recognized and can be taken into account by administrators when processing transactions. 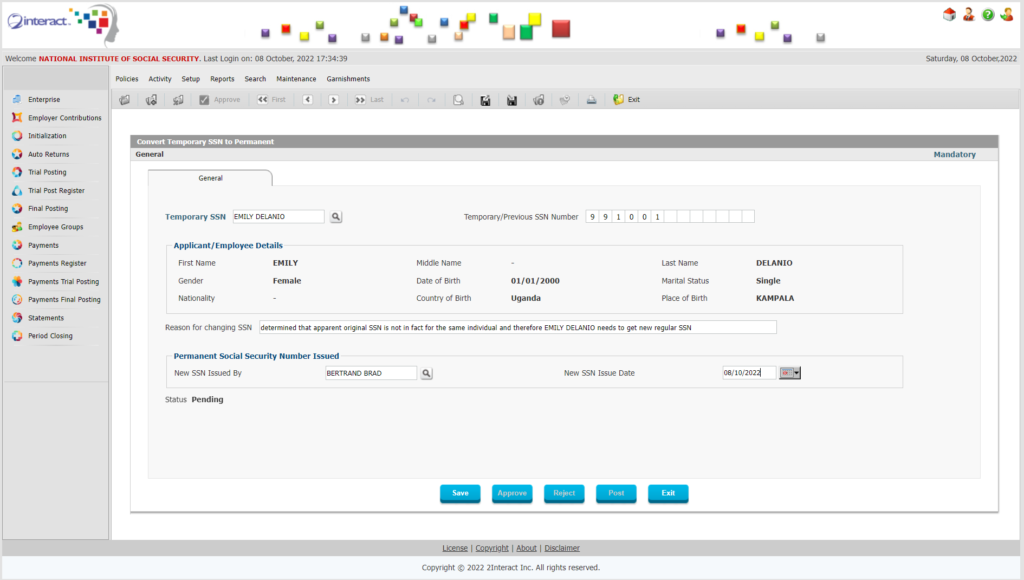 Figure 47: Converting Temporary Social Security Number to Permanent After the request to Convert a Temporary Social Security Number to Permanent has been approved, the authorized user in the Social Security Administration will be able to issue the new Social Security Number for the Voluntary Contributor as shown below. 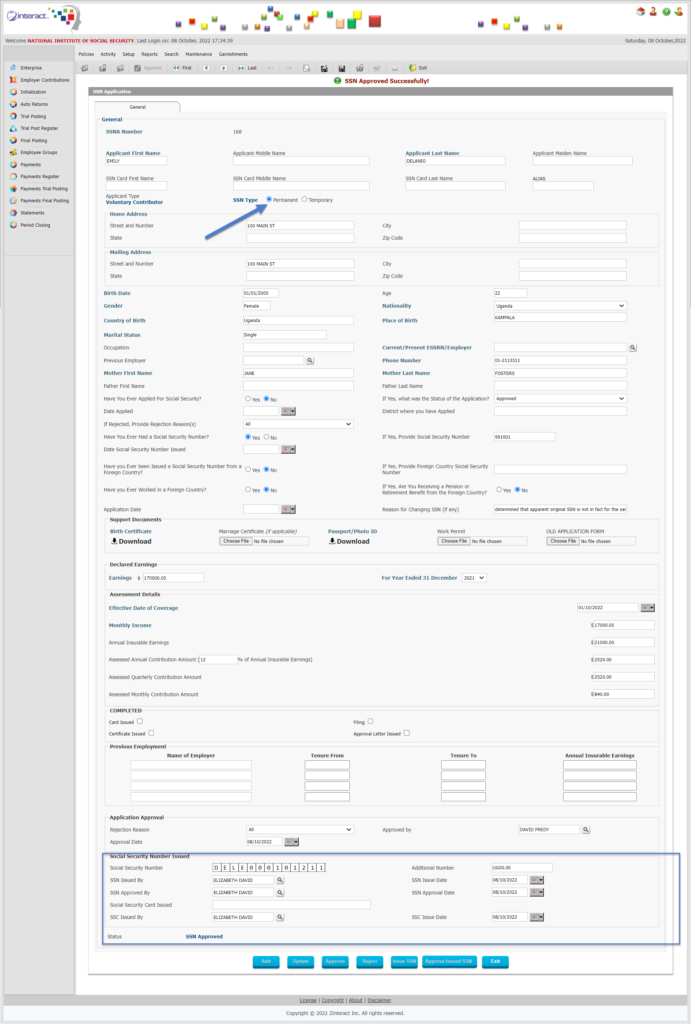 Figure 48: Social Security Number Application Processing Similar processes exist for Employers who are issued Employer Social Security Registration Numbers and Employer Identification Numbers. Contribution Filing & Payments ManagementContribution Filing and Payments Management provides a comprehensive set of functions for Employers to file their Salary & Contribution Information based on the governing social security laws in the country and to subsequently pay the Contributions as required. In addition, the module provides all the required features for a Social Security Administration to receive all Salary & Contribution Information online from all employers in the country and to verify and process these Contribution Returns. Once the Returns are processed, the system provides the tools for the Social Security Administration to receive and process all payments against the outstanding Contribution amounts for each Employer and Employee. The application supports Contributions Filing and Payment for regular Employers but also for the Self-Employed and for Voluntary Contributors. Key Features include:
Overview The entire Contribution Filing and Payment process starts with the Filing of Contribution and Ends with the Payment of Contributions. The process is seamlessly integrated with Employee and Employer Profiles, Employee Group Setup, Contribution Calendar and Social Security Contribution / Tax Policies. Based on the System Setup the Contribution Filing and its related Penalties whether for late Contribution filling or late Contribution Payment are calculated. The Setup defines when Contributions are to be Filed, how they are to be calculated and when and how any applicable Penalties will be applied. Trial Processing and Trial Posting before Final Posting provide functionality to allow the user to spot any anomalies and take corrective action before they affect the final totals. SSAS Provides Printing Submitted Social Security Contributions in Trial and Final Posting using Excel, Word and PDF.
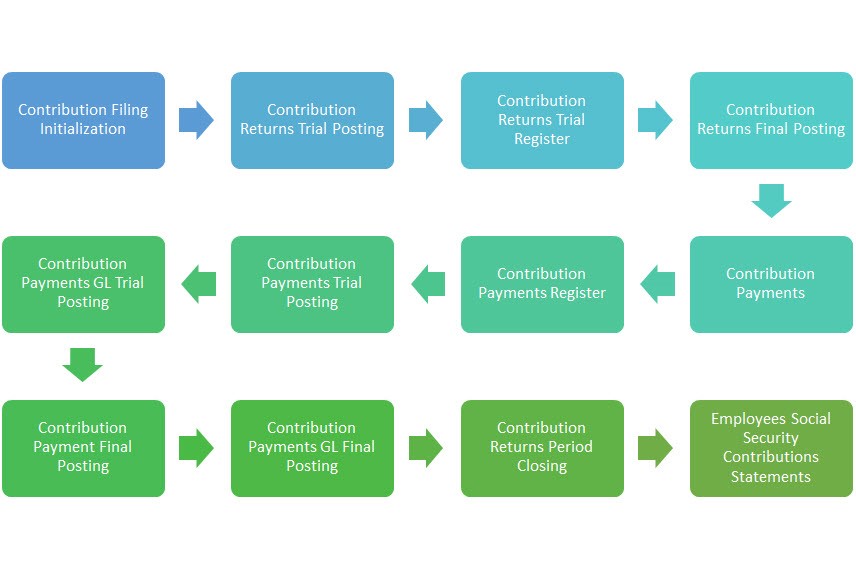 Figure 49: Contribution Filing and Payment Workflow Below is an example of the different steps in the process of Contribution Filing and Payment.
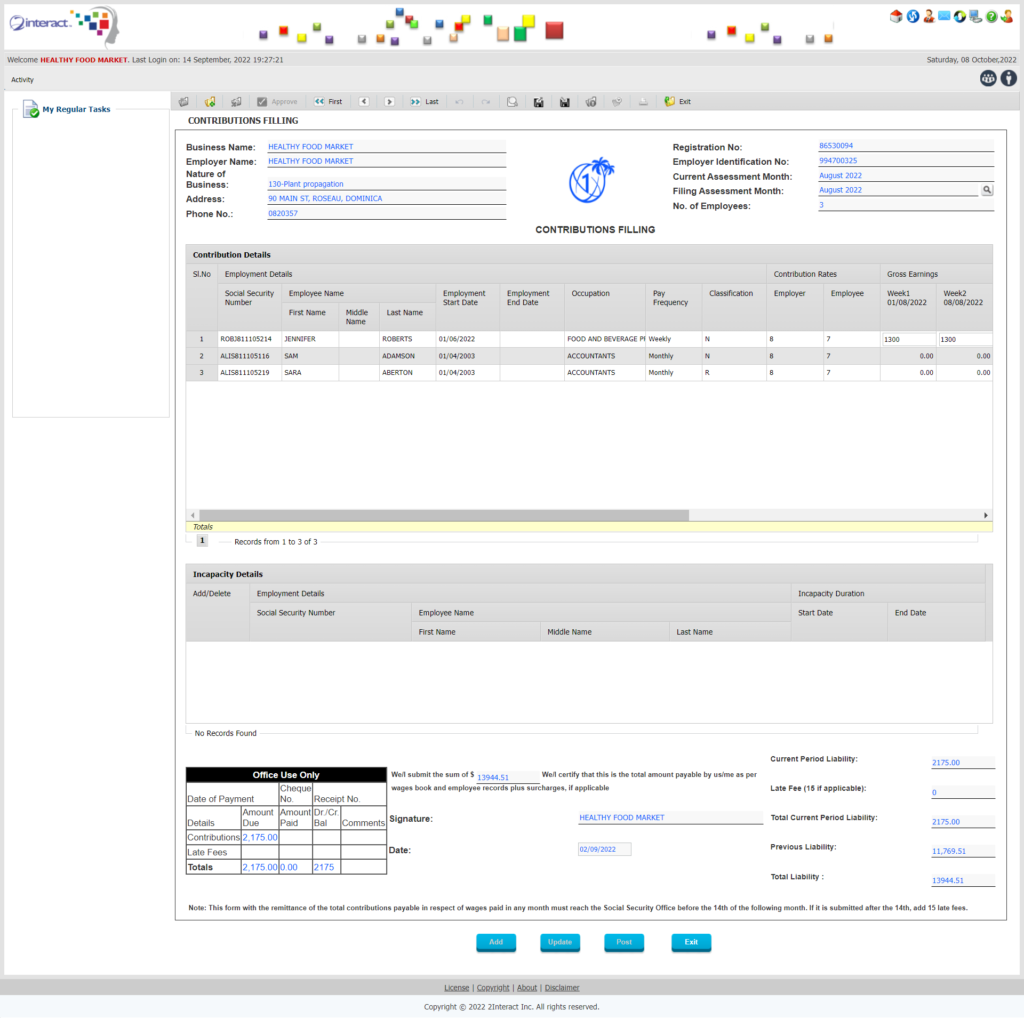 Figure 50: Contribution Filing Form in Employer e-Services The above form is mostly auto-completed by the system and the Employer only needs to submit it as all the data is filled based on existing information in the system. Typically, one of the only exceptions to consider is that of Employees who have been on Sick Leave during the reporting period where the Employer has paid the Employee during Sick Leave. In such cases the amount paid by the Employer may affect the amount that an Employee can claim in terms of Sickness Benefits from the Social Security Administration. If that is the case, then the information included in this reporting period by the Employer will automatically be taken into account by the system for calculation the appropriate Sickness Benefit.
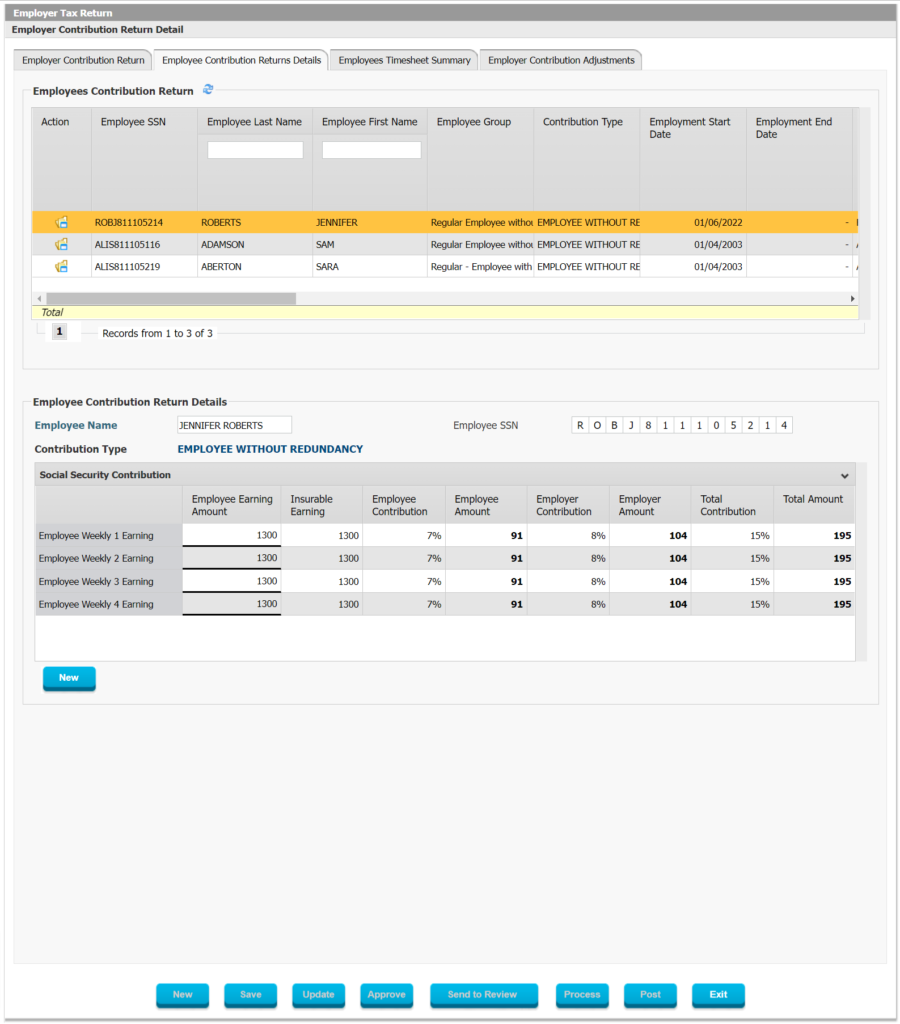 Figure 51: Detail Screen for Employer Contribution Filing Review The authorized user in the Social Security Administration will be able to review the Contribution Filings from the Employer and verify the details by Employee if necessary. The user can check variance against prior periods and send the Contribution Filing back for further Review or Edit it in case of an obvious mistake. 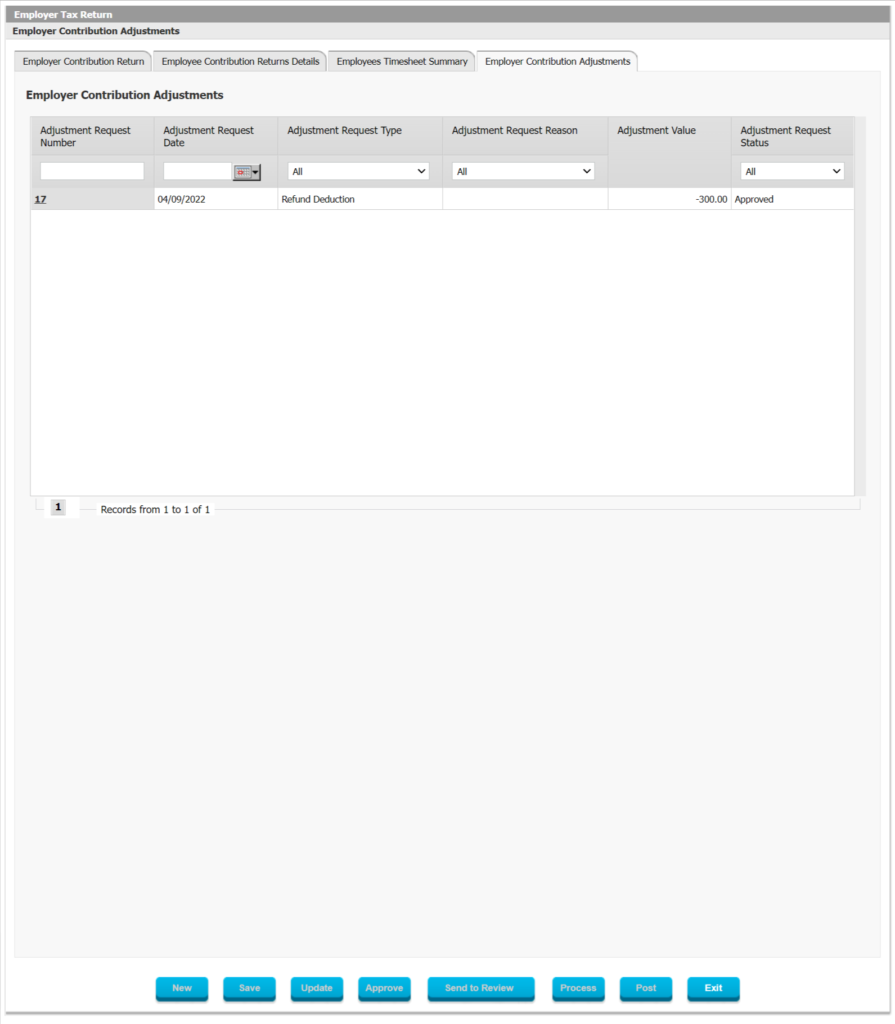 Figure 52: Adjustments Screen in Review of Employer Contribution Filing Interact SSAS ensures data integrity through its modules and complies with international accounting standards, therefore any corrections to be made after final processing of financial transactions or closing of a period must be done through a careful Adjustment process. Any such adjustments will show in the Contribution Filing for the next period so that the Adjustment can automatically reduce or increase the total amount due for that period. In the above screen you can see a Contribution Refund that was approved which will reduce the total due.
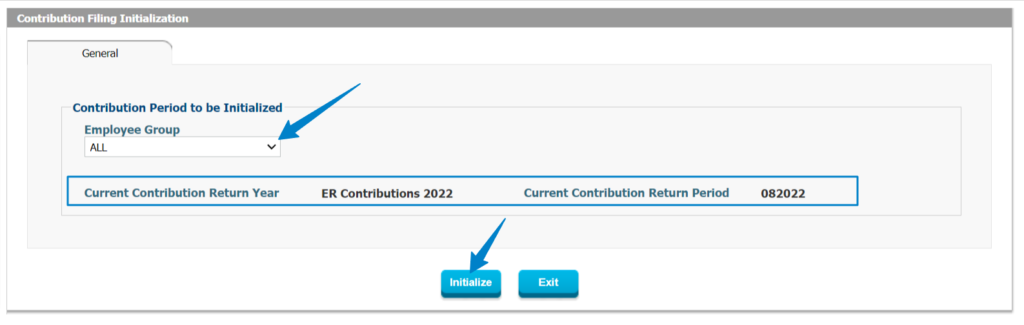 Figure 53: Initialization of Contribution Filings Screen Because Interact SSAS supports filing of Contributions in the past, the present and the future, the application will Initialize all Contributions Filings applicable in a specific period so they can be picked up and processed while others which have already been processed will be kept aside.
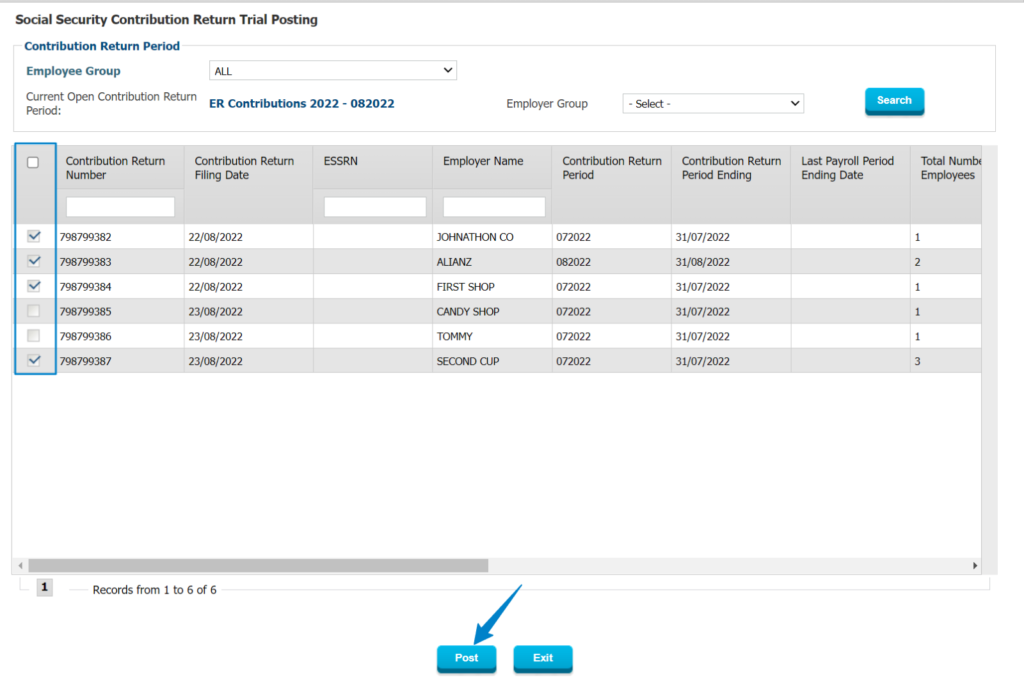 Figure 54: Social Security Contribution Filing Trial Posting Posting of Social Security Contributions Filing will calculate the exact Contributions that will be due and make them ready for payment. Once Final Posting has been completed, these calculations can no longer be modified. Therefore, the application provides a very powerful tool to run Trial Posting and show the exact outcome of the calculations. This provides the options for Social Security Administration users to investigate anything that appears out of the ordinary, take action to correct any identified mistakes due to incorrect underlying data and then re-run the Trial Posting as many times as necessary until all calculations are 100% accurate. 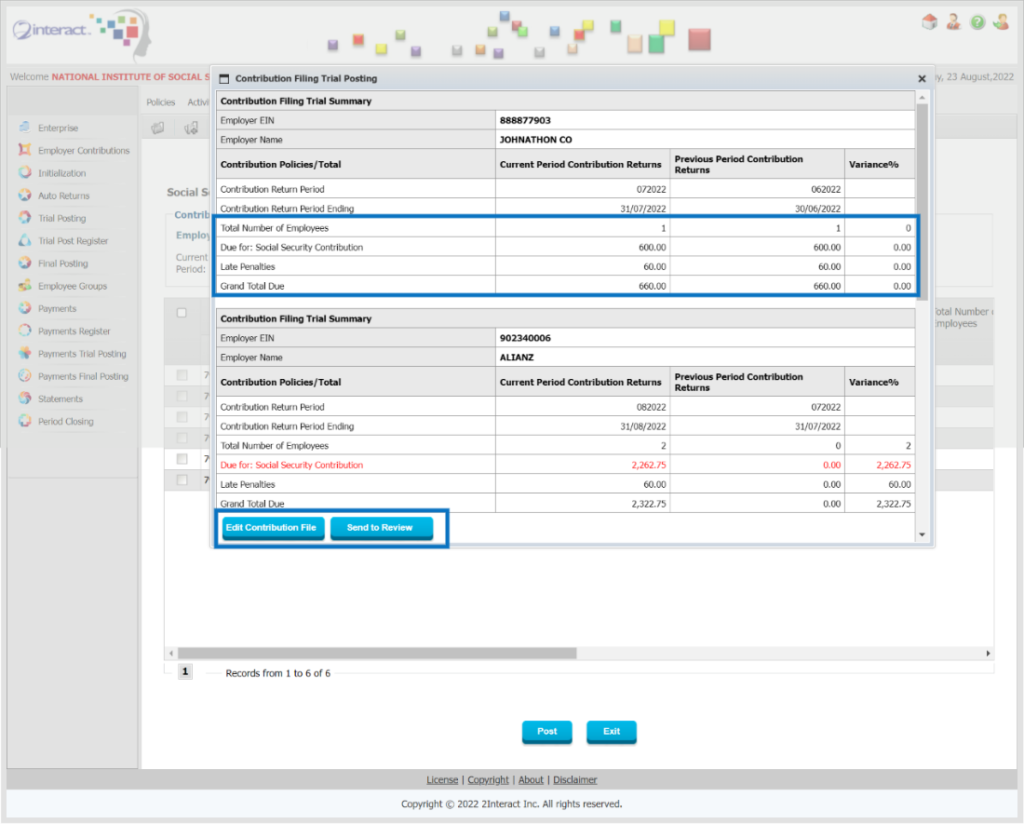 Figure 55: Social Security Contribution Filing Trial Processing In the above form you can see the detail report provided after Trial Processing of several Contribution Filings submitted during a specific period. This summary report provides details on the total number of employees, the amount due, late penalties and grand total. The system provides a clear comparison with the previous period (either Calendar Period or Filing Period, depending on the setup) to easily spot anomalies.
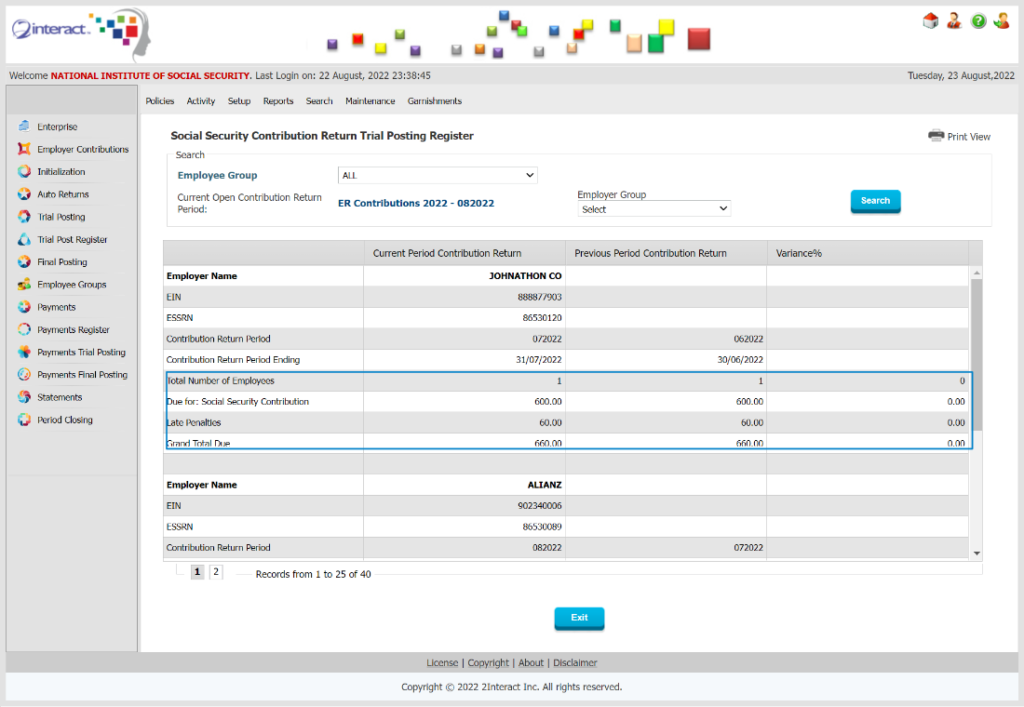 Figure 56: Trial Processing Register A more detailed Contribution Filing Trial Processing Register is available in this step to ensure that all authorized users have the ability to review and confirm the numbers calculated in the Trial Process before the user proceeds to the Final Posting Process.
 Figure 57: Social Security Contribution Return Final Posting As explained in the previous step, the Posting step is meant to calculate the exact Contributions which will need to be paid, taking into account Adjustments and any corrections which may have been made in the prior Trial Process. At each stage, the user can always select which transactions to include in the process and leave others for another user to process or to process separately afterwards.
Payments for Contributions may be submitted by Employers directly online through a bank transfer or credit card, or they can be processed by the Social Security Administration when the Employer sends in or brings in a check. Below is an example of the Contribution Payment being entered by a user from the Social Security Administration. 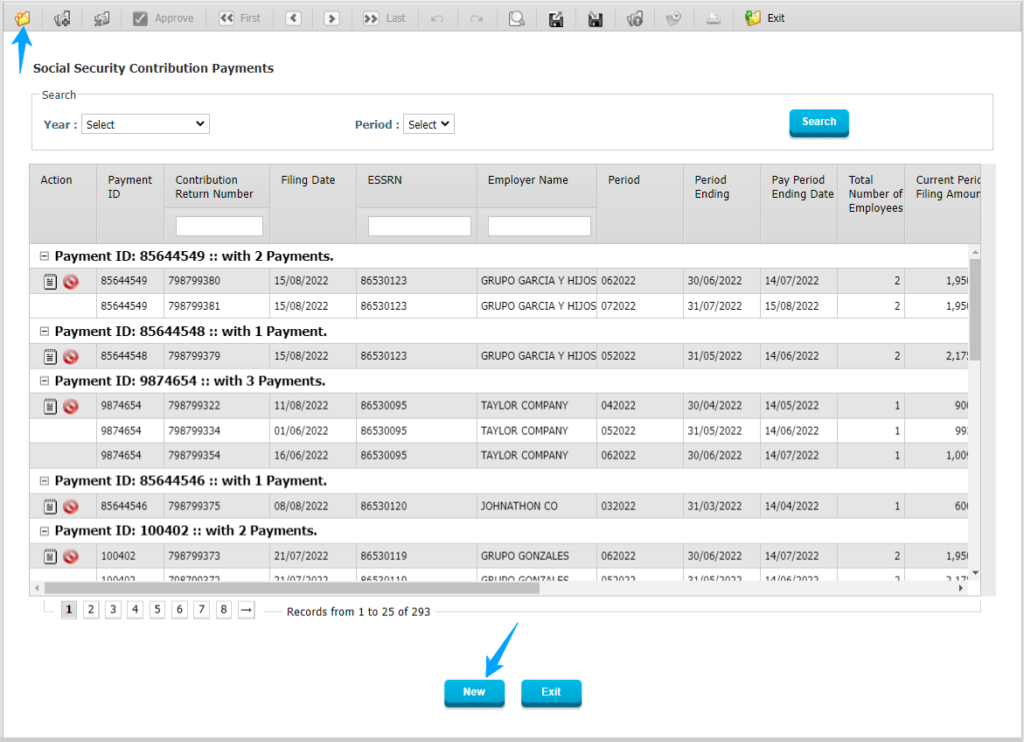 Figure 58: List of Existing Payments in the System with Button to Enter New Payment The user just needs to go to the list of Contribution Payments and select New to start the entry of a new Payment. 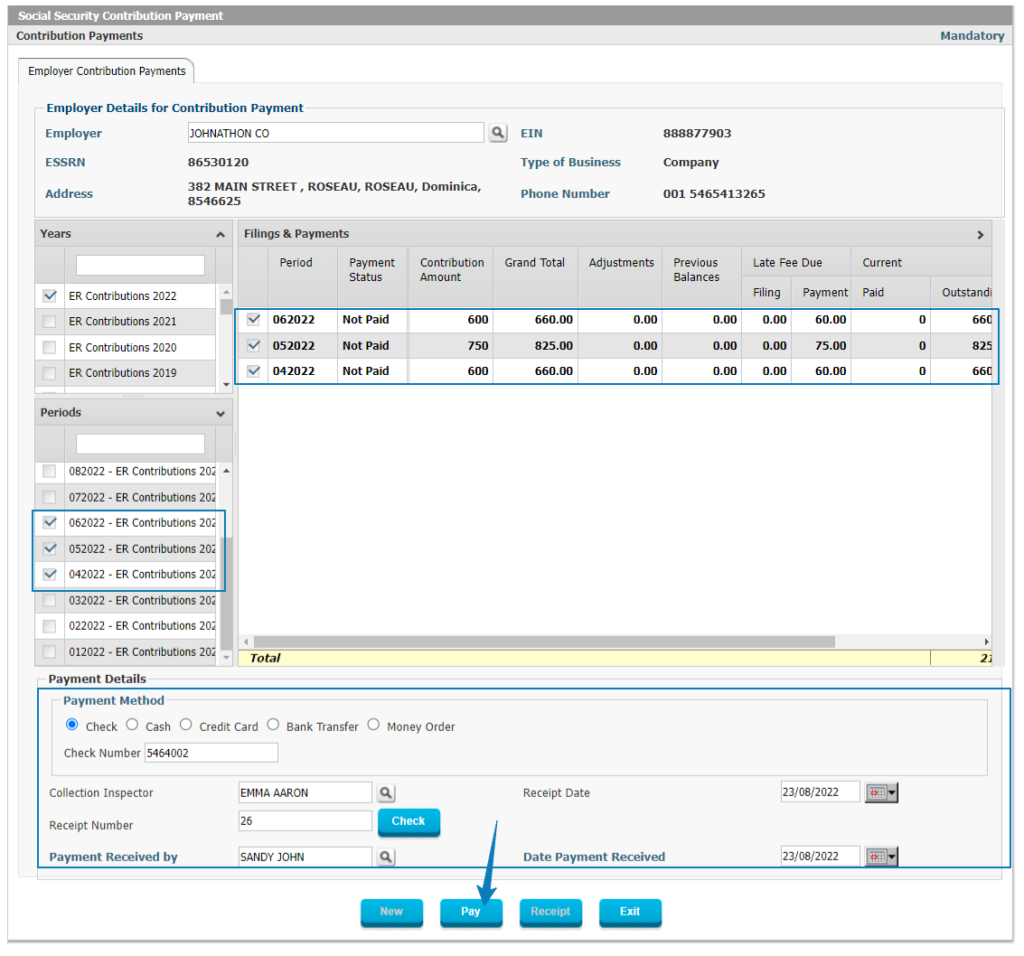 Figure 59: Payment Entry Screen In the above screen you can see the user entering payments for 3 separate periods. You will note that the system automatically pulls up all the relevant details for a specific Employer including all open/unpaid amounts for current or prior period Contribution Filings. The process to enter new payments is very simple and user friendly, by the user merely selecting the unpaid invoices, the system will automatically list them in the payment window and add up the totals. If the employer is paying the exact amount outstanding, the system already populates the field for the user, otherwise the user can enter the exact amount being paid and the system will display the difference for any unpaid balance. The Payment Details will include information on who accepted the payment, what the payment method was and in case of check it captures the check number. The date of receipt is important as it may affect potential penalty calculations.
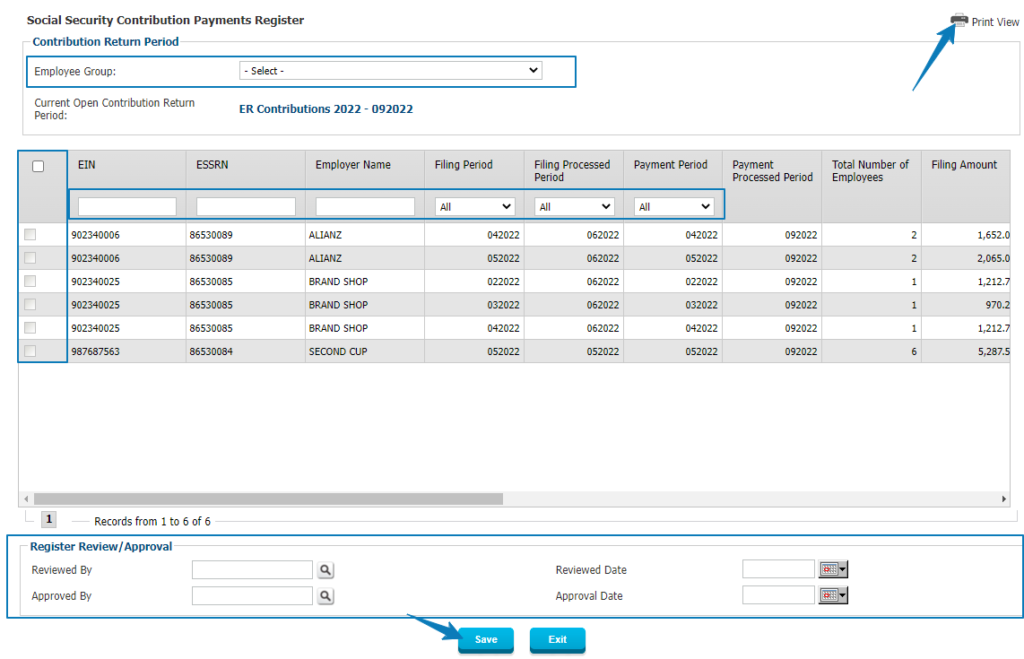 Figure 60: Social Security Payment Register Review and Approval Since any payments received must be carefully reviewed before being applied to the correct Employer and Employee (or Voluntary Contributor and Self-Employed) accounts, it is important to have the Payment Register reviewed carefully by different users. Therefore, the user can filter the Payment Register and select those transactions which require further analysis, and can export the Register to PDF, Excel, Word and other formats for any analysis. Once Reviewed by an authorized user, and so confirmed in the system, the same Payment Register will need to be Approved by another user to make sure multiple people have verified and confirmed the accuracy.  Figure 61: Export Screen for Payment Register
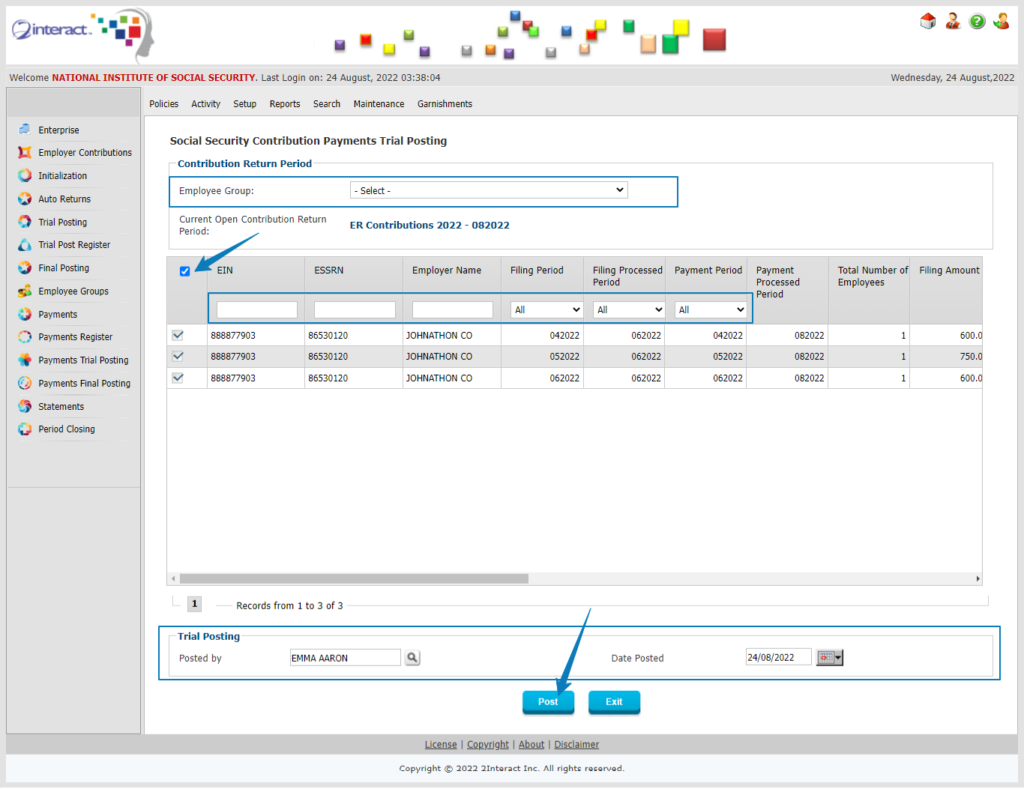 Figure 62: Social Security Contribution Payments Trial Posting Form During Trial Posting of the Social Security Contribution Payments, the system will prepare to post the Payments to the various accounts for Employers and Employees. It will show the exact payments and how they will be applied to the various outstanding Contributions due from each Employer. This Trial Process again gives the opportunity for authorized users to carefully review and verify the numbers before proceeding to the Final Posting step.
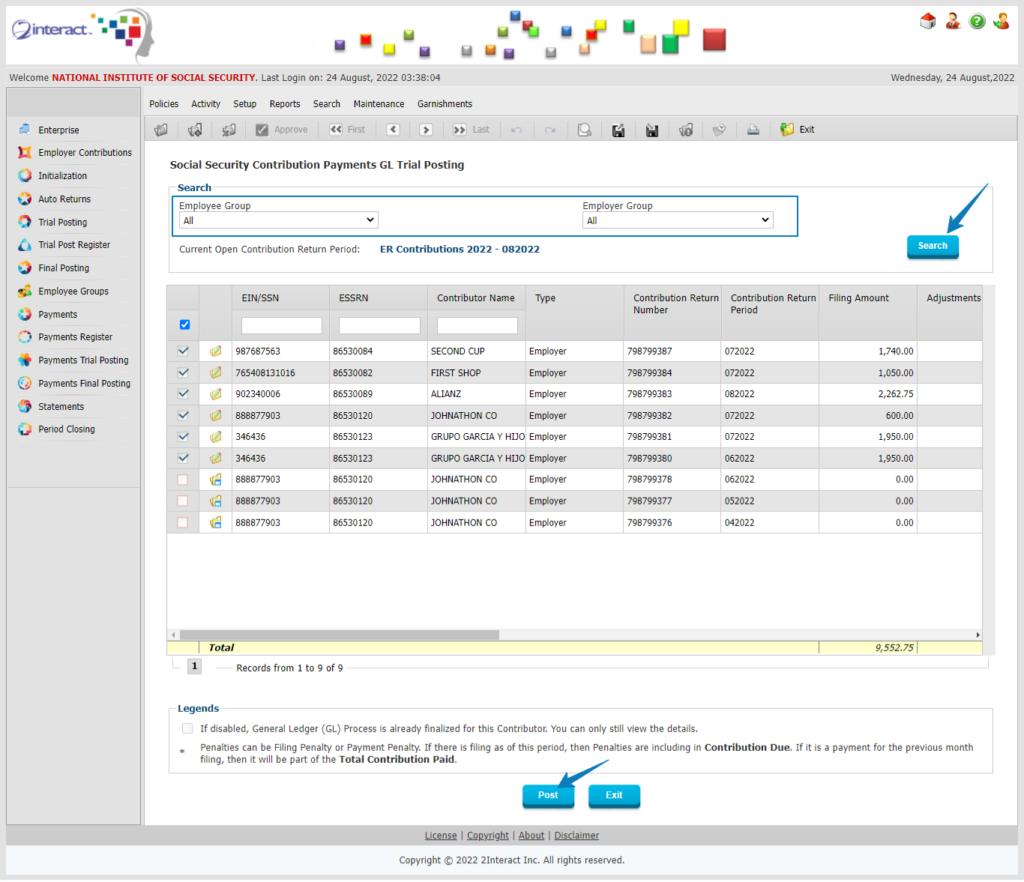 Figure 63: Social Security Contributions Payments GL Trial Posting 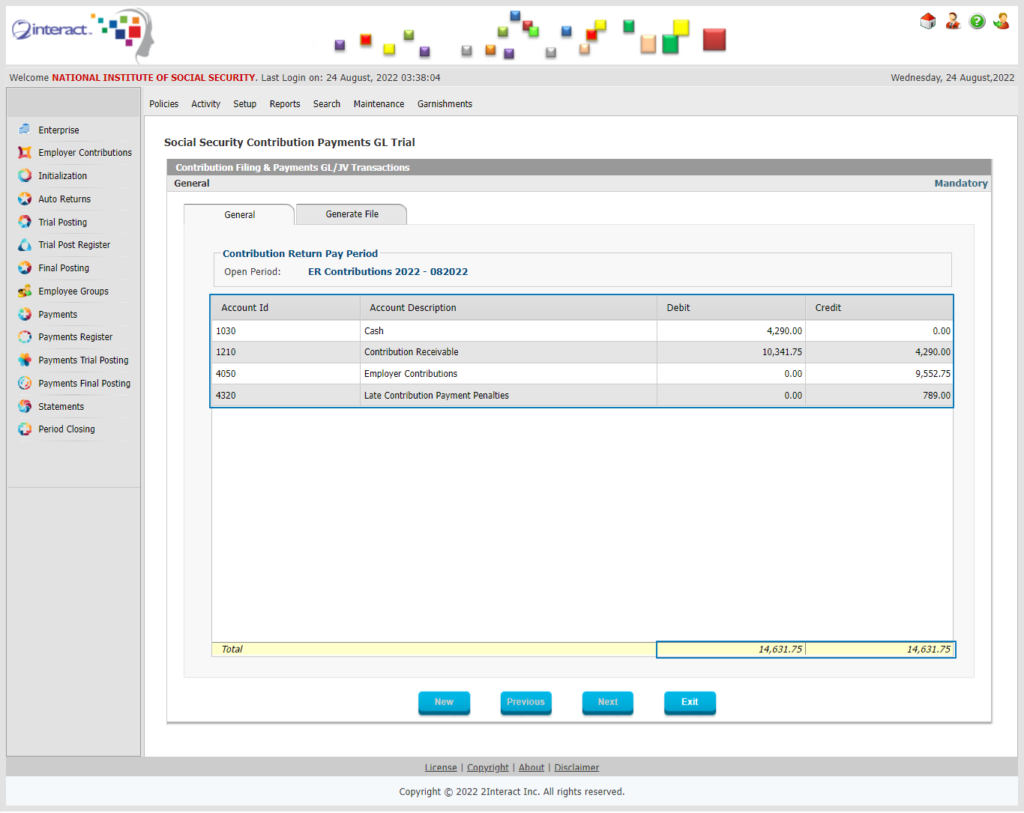 Figure 64: GL Trial Transactions All financial transactions need to ultimately be reflected in the General Ledger of the Social Security Administration. In order to ensure that these Journal Entries are 100% correct, the user can first run the GL Trial Process in order to verify the exact GL Accounts, Debit/Credit status and the amounts to be used which will be posted to the GL afterwards. As with all Trial Processes, the purpose is to ensure that various users can check the data while it is still relatively easy to adjust and make corrections instead of having any mistakes included in final processes which require more cumbersome adjustment processes to be done. There is no limit to the number of times that a user can run a Trial Process. Any mistakes in the GL Journal Entries will be due to the underlying data being incorrect, either through an incorrect original setup or linking of GL accounts with the appropriate or incorrect data entry. Both can be edited still to ensure that the final Journal Entries will be accurate. This process is run before the Contribution Payment Final Posting process has been run because issues uncovered in reviewing the GL Journal Entries may require changes which can only be done prior to Final Posting of Payments.
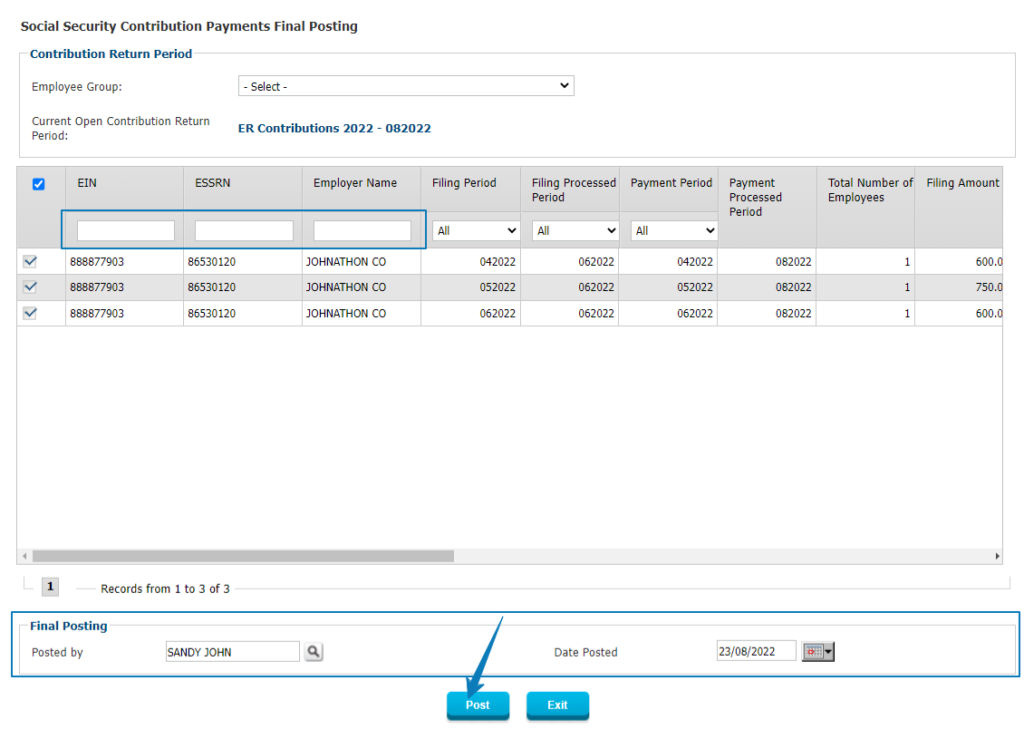 Figure 65: Social Security Payment Final Posting If the Trial Posting of Contribution Payments has been completed successfully with no issues uncovered and if the Trial GL Processing was also run successfully, then the payment data is ready for Contribution Payments Final Posting.
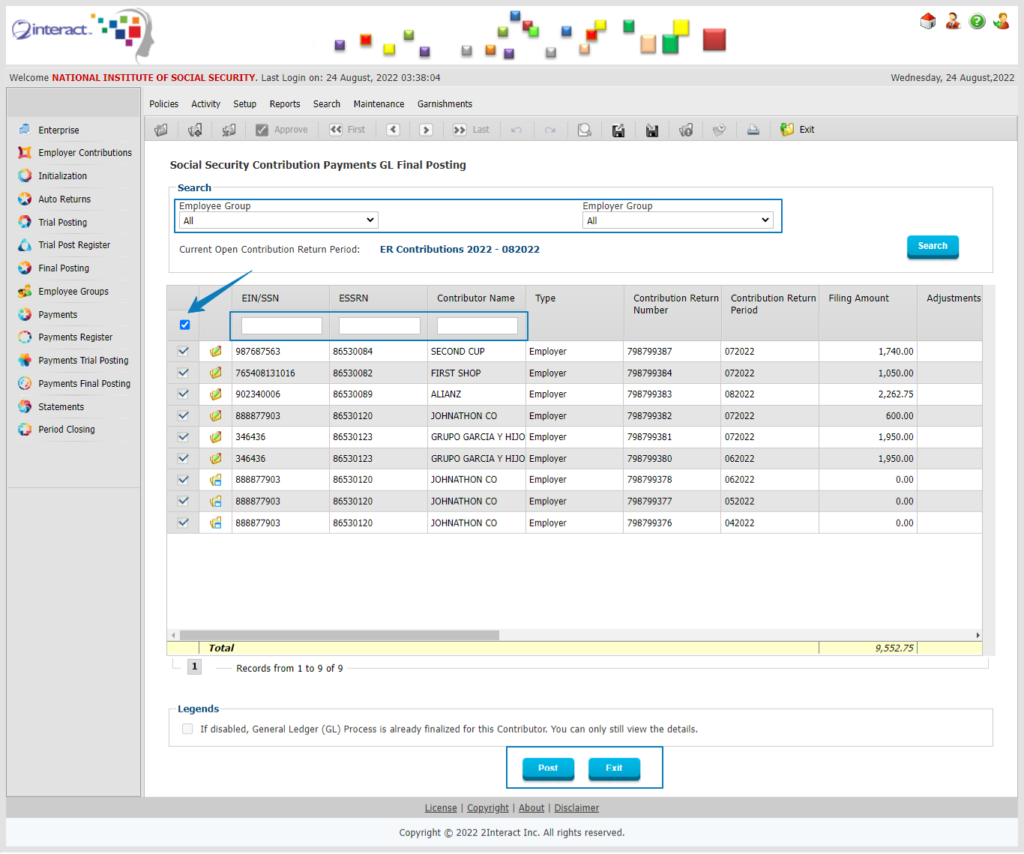 Figure 66: Social Security Contribution Payment GL Final Posting Screen Since the Social Security Contribution Payments have been processed through Final Posting in the previous step, the user can now also proceed with Final Posting of the GL Entries for Social Security Contribution Payments. The system will provide all the data for review and in a file format that can be imported directly in any commercial GL, based on the settings configured in the Setup under the System Manager. 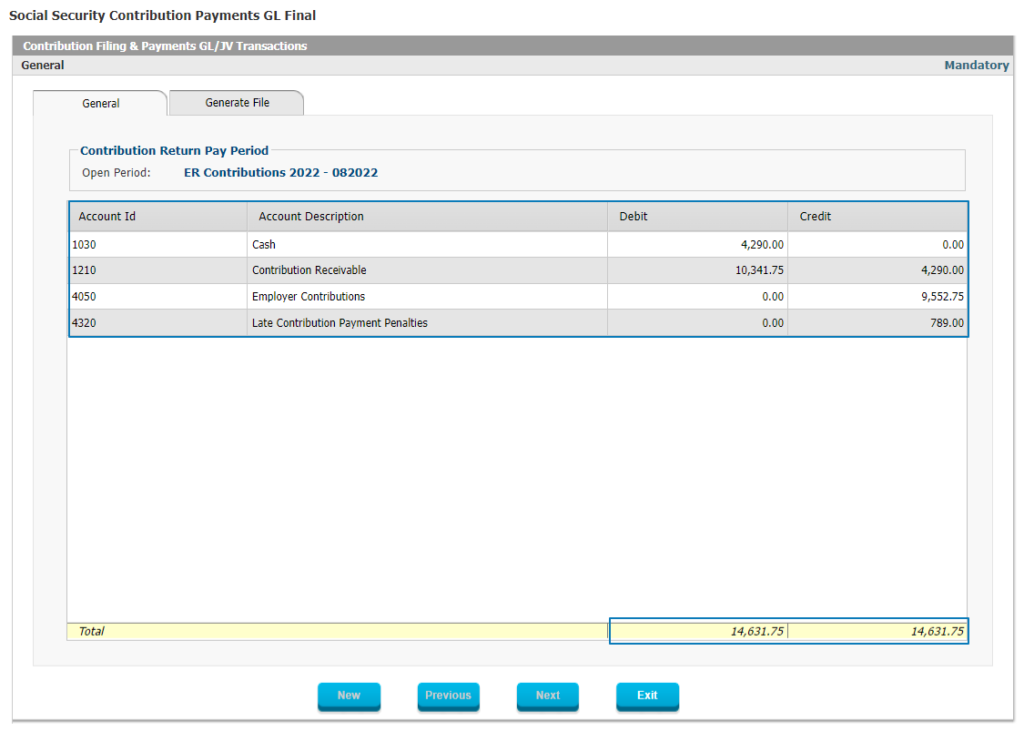 Figure 67: GL Transactions The Journal Entries will be shown for the period and the user can verify the totals and proceed to generating the file that goes to the external General Ledger.
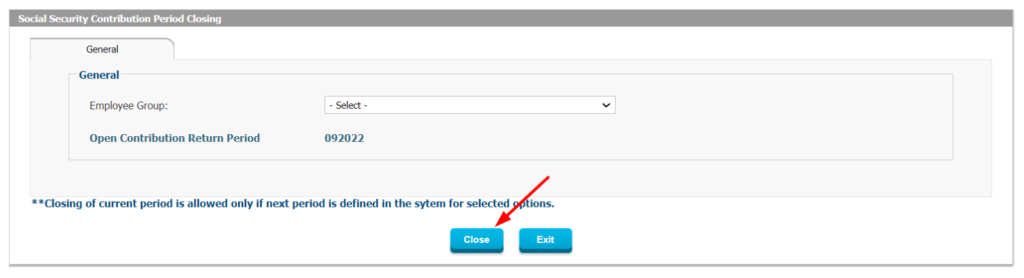 Figure 68: Social Security Contribution Period Closing Once Filing of Contributions and Payment of All Contributions has been completed, the user can close the Period.
The system will inform the user if there are unfinished transactions still in the period so the user can choose how to proceed by either going back and finishing the transactions or having the system move them to the next open period. The system will also calculate the Credit Units as per the rules defined in the General Setup regarding Credit Units earning and assign them to the right individuals. 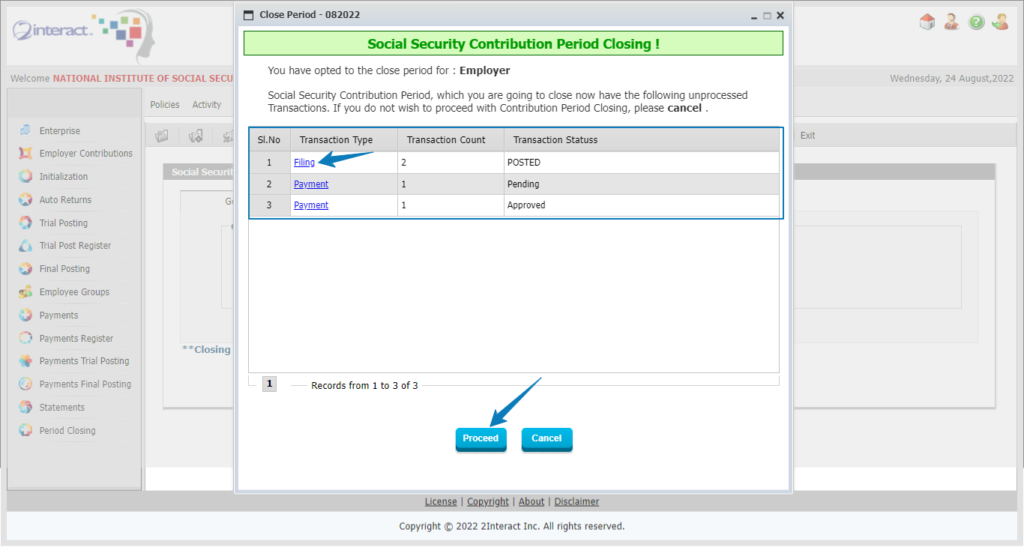 Figure 69: Contribution Period Closing
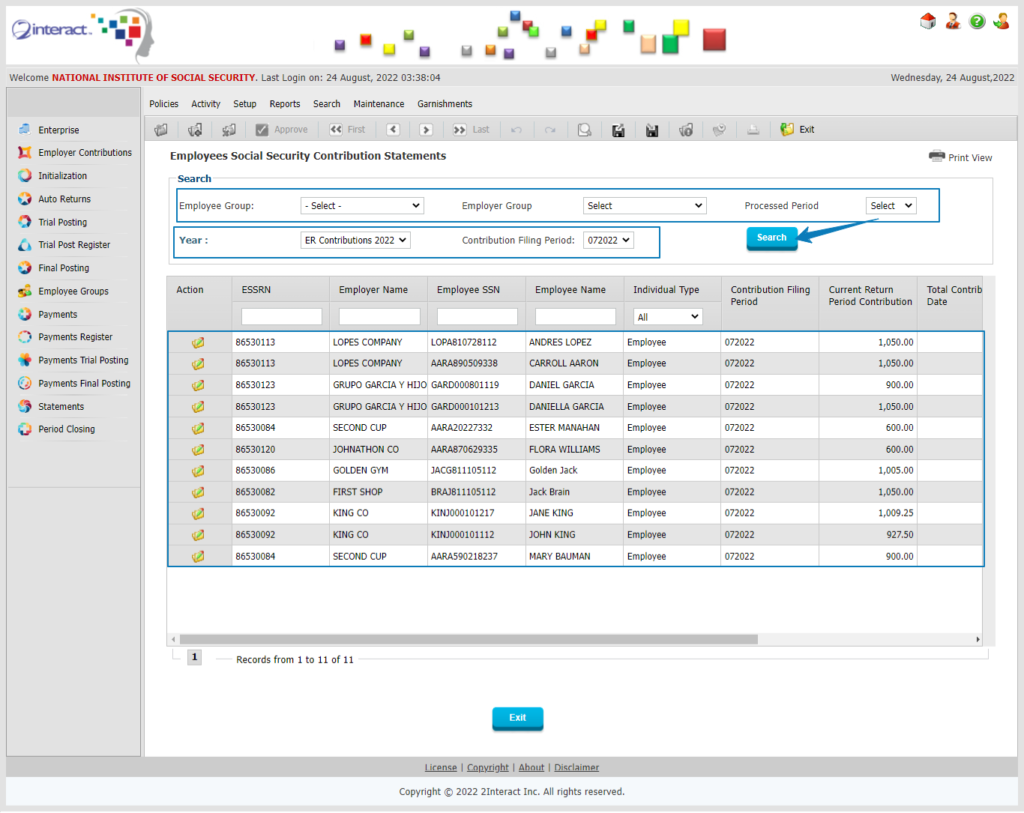 Figure 70: Social Security Employee Contributions Statement After Closing of the Period, the Employees’ Social Security Contributions will be showing in their Statements and their Credit Units will have been calculated and posted to their account. These will Credit Units and the associated Contributions and Insurable Earnings information will be used from then on in any determination of eligibility and calculation of benefit entitlement for the individuals. All relevant information will be seamlessly accessible by the various modules of Interact SSAS without there being any need for separate data entry by any user. Benefit Claims & Payments ManagementBenefit Claim Applications and Payment Management handles the entire cycle from the original Benefit Claim through its review and approval until its Payment. This comprehensive module is highly configurable as there is no limit to the number of benefits which can be defined and the rules for eligibility and entitlement calculation are fully configurable and highly flexible. There is no limit on the number of Benefit Classes which can be defined, and for each Benefit Class there is no limit of Benefit Types which can be grouped under a given Benefit Class. The elements used to determine benefit eligibility and to calculate the benefit entitlement are defined in Benefit Class. Based on the included elements, the user can configure the Benefit Type with the exact benefit eligibility rules and benefit entitlement calculation by configuring the parameters. The elements used to determine benefit eligibility and to calculate the benefit entitlement are defined in Benefit Class. Based on the included elements, the user can configure the Benefit Type with the exact benefit eligibility rules and benefit entitlement calculation by configuring the parameters. In the Benefit Claim Application Form, the user can define which specific fields are to be included in the application form and even choose the label for each field. The user can also set the documents that should be included with the Claim and the Workflow to be used for reviewing and approving the Benefit Claim. For Benefit Claims which require a Medical Certificate which can be entirely preceded through the system as even medical Practitioners will have access to a certain form which is used to approve the Benefit Classes which required Medical Practitioners approval. Lastly, the system also provides a medical referee feature which allows the Social Security Officer to request another Opinion for a specific case in order to pay a Benefit Claim. The user can select a specific Medical Practitioner to be a referee. Steps in the Benefit Claims and Payments Management Process are the following: Step 1: Doctor Certificate 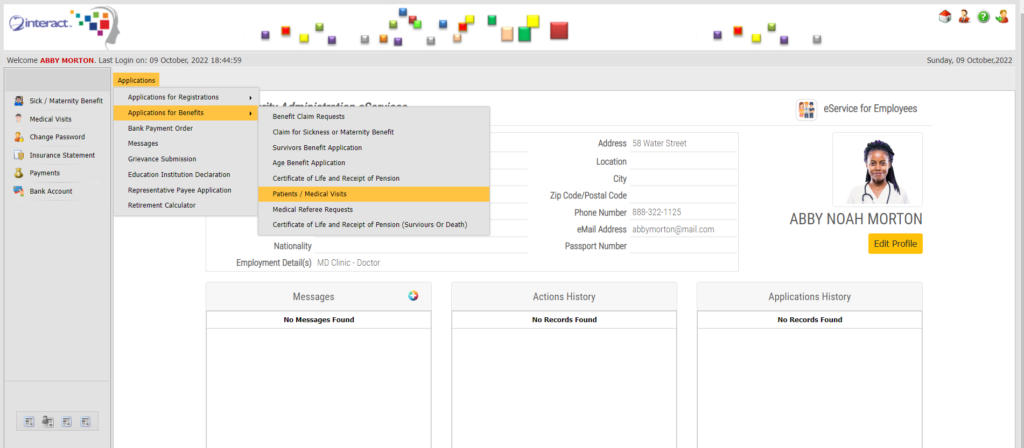 Figure 71: Medical Doctor e-Services Home Screen Before an individual can claim any type of Medical Benefit, they will need to first have an (approved) Medical Certificate in the system which needs to be submitted together with the Medical Benefit Claim. In order to have this in the system, the individual will need to visit with a medical doctor who can enter the Patient Visit directly into the system so that the information will be validated immediately and is ready for submission with the Medical Claim. In the above screenshot you can see the Medical Doctor’s home screen where they will access the Patient/Medical Visit menu to be able to fill in the appropriate Medical Certificate. 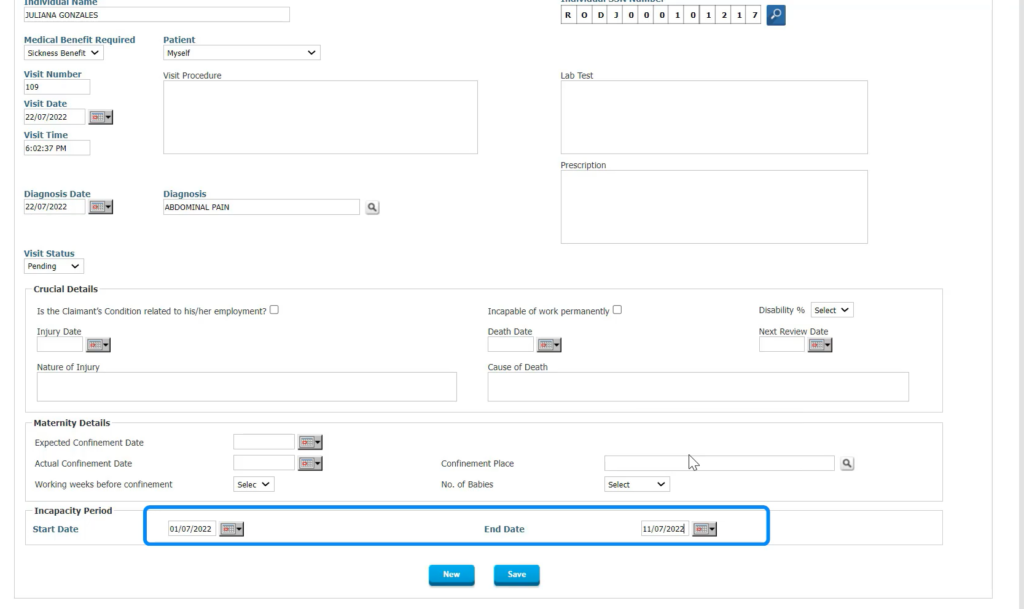 Figure 72: Medical / Healthcare Provider Certificate In Figure 72 you can see the Medical Certificate as completed by the doctor, indicating the diagnosis, the visit details and the recommended Medical Benefit as well as the Start and End Date of the Incapacity Period as per the doctor’s finding. Step 2: Sickness Benefit Claim Submission by Claimant 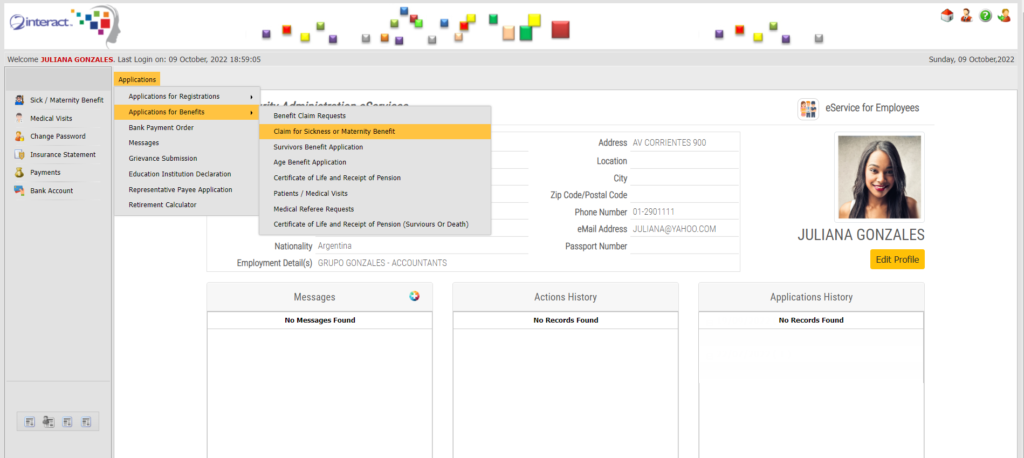 Figure 73: Employee e-Services Home Screen In the above Figure 73, you can see the Employee (Claimant) access their e-Services in order to submit the Medical Claim. They will simply select the “Claim for Sickness or Maternity Benefit” in order to access the form. The form itself is a user-defined form, specifically designed for capturing relevant data for Medical Benefits. It is automatically populated by the system to reflect all the known information regarding the benefit claim, using the Medical Certificate previously entered by the medical doctor and including all other known information about the Claimant. 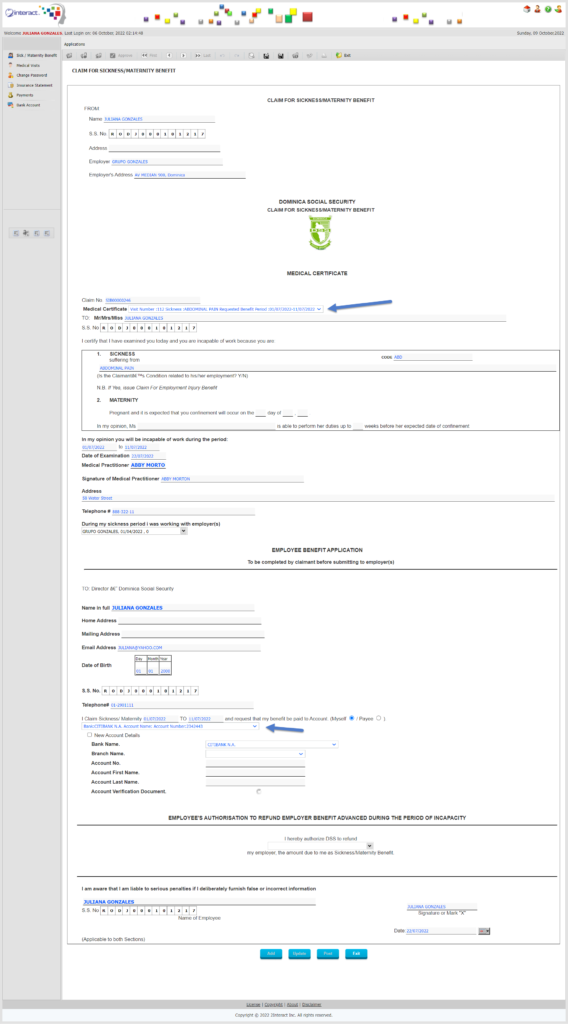 Figure 74: Claim for Sickness or Maternity Benefit The above figure shows a form as seen by the Claimant in her e-Services, where once she has selected the relevant Medical Certificate that applies for her claim, the system populates most of the data automatically. The Claimant just has to review and submit the Claim for further processing. Note the selection of the Medical Certificate as well as the choice of Bank Account to be used for Payment of the Benefit Claim afterwards. Step 3: Sickness Benefit Claim Review and Approval by Employer  Figure 75: Employer e-Services Access Form Any Sickness Claim which involves employment will need confirmation or review by the Employer. This is done through the Workflow whereby the Claim is automatically routed to the Employer’s e-Services and they can access all information regarding Sickness Benefit Claims with one mouse click.  Figure 76: Sickness Benefit Claim in Employer e-Services In the context of this particular claim and the Social Security Laws in place, the Employer needs to confirm when the Employee was last at work prior to the start of the claimed period of sickness (Incapacity Period). In addition, the Employer needs to confirm whether and how much was paid to the Claimant for the Period of Incapacity (Sick Pay), as any amount in excess of 40% in this particular setup will mean that the Social Security’s own benefit payment will be reduced by the excess amount. Therefore, the Employer will need to confirm what and how much was paid, whether overpaid amounts will be claimed back from the Social Security Administration. It should be clear that unique conditions like the ones described above are country-specific and the support for these rules in the setup of Interact SSAS underlines the flexibility and power of the system. Step 4: Sickness Benefit Claim Review and Approval by Social Security Administration User  Figure 77: Social Security Administration User Dashboard Once the Employer has approved the Sickness Claim of their Employee and confirmed the Work Date and other conditions related to the Claim, then it will be Posted by the Employer to the Social Security Administration with a simple click. The user in the Social Security Administration will find the correct claim instantly on the dashboard and can review and approve it.  Figure 78: Benefit Claim Review & Approval The Social Security Administration can now review and approve the Benefit Claim, starting by reviewing all the data submitted, checking the Medical Certificate and verifying all the underlying information. There is no need for any data-entry since all mandatory data is already there as it was reviewed and submitted by the Claimant and their Employer. 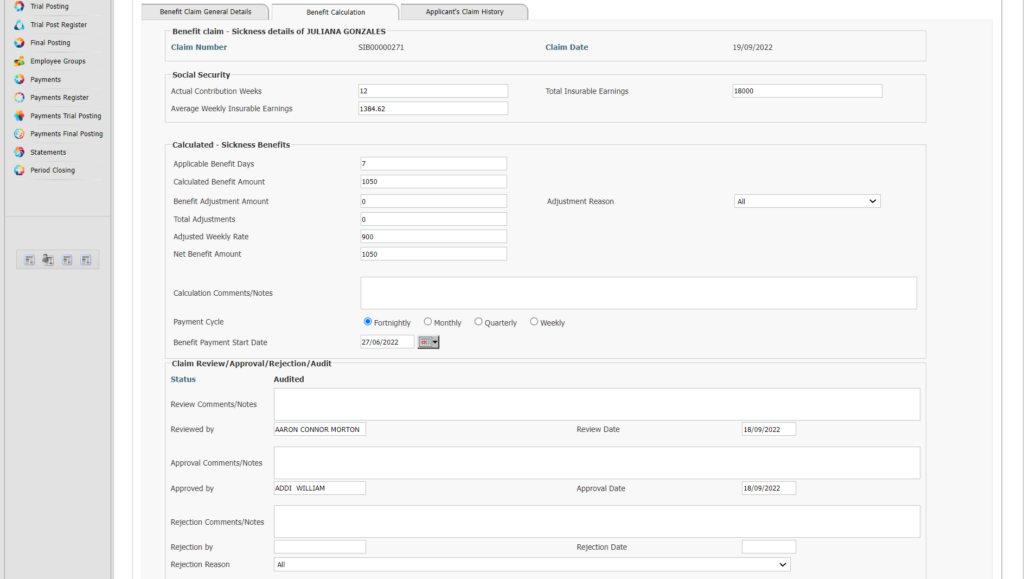 Figure 79: Benefit Claim Calculation In order to be able to proceed to payment of the Benefit Claims, the Claim itself needs to be approved for payment and for this the Benefit Calculation first needs to be Reviewed, Approved and possibly also Audited. The Benefit Claim Calculation shown in Figure 8 above shows a detailed calculation which allows a user to review all the elements taken into account to determine the exact outcome of the calculation. If everything checks out and the auditor has also given their ok, then the Benefit Claim can be included in the next applicable Payment Run. Step 5: Social Security Benefit Payments Initialization 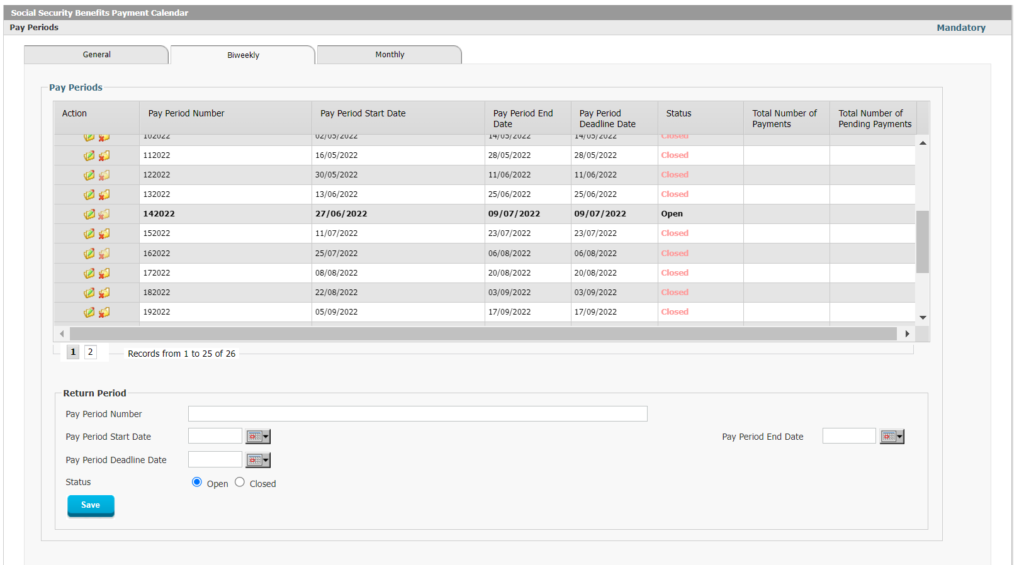 Figure 80: Social Security Benefits Payment Calendar In the above figure you can see the Payments Calendar which is completely configurable and you’ll notice that one particular Period can only be Open at the same time for each Pay Cycle. This way the system will know which approved Benefit Claim Payments to include in any particular Payment Run. Interact SSAS supports multiple Pay Cycles, including Weekly, Fortnightly, Monthly, Quarterly and Annual Payments. The Payment Calendar for this is completely configurable as shown above. The dates for each payment in the calendar are fully configurable. Different benefits can then be associated with different Pay Cycles so that the system can automatically include a specific approved Benefit Claim Payment in the correct Pay Cycle. 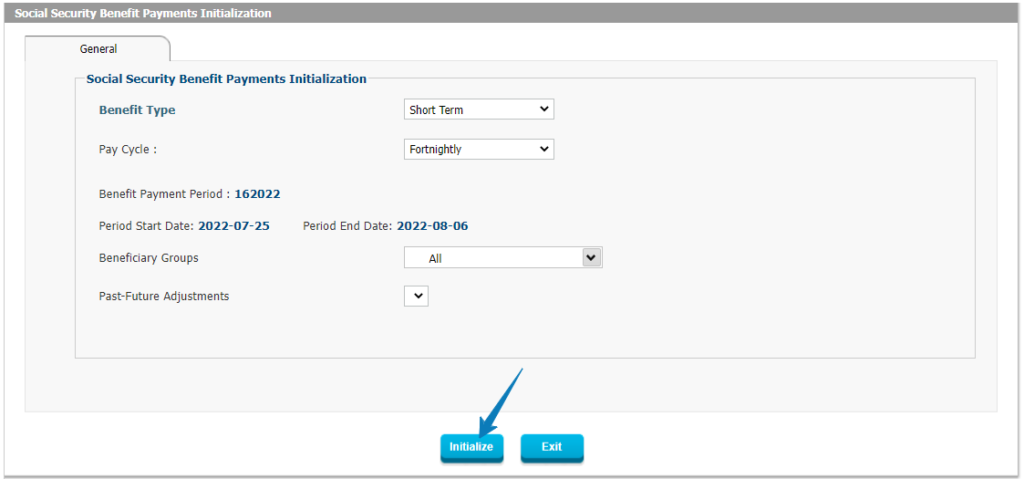 Figure 81: Social Security Benefit Payments Initialization The first step in the Payment Process is to run the Payment Initialization to basically make them active and ready for payment and inclusion in the current Pay Cycle. Since Interact SSAS supports the entry and approval of claims from the past, present and future, and there may be multiple Payment Periods (with different Pay Cycles each) open at any given time, it’s critical to separate the transactions so only the relevant Claims are included in a particular Payment Run. If there are Past or Future Adjustments which will affect current Benefit Payments these will also be picked up and listed at this time for inclusion so they can either increase or reduce the amount to be paid to a Beneficiary. Step 6: Social Security Benefit Payments Trial Processing 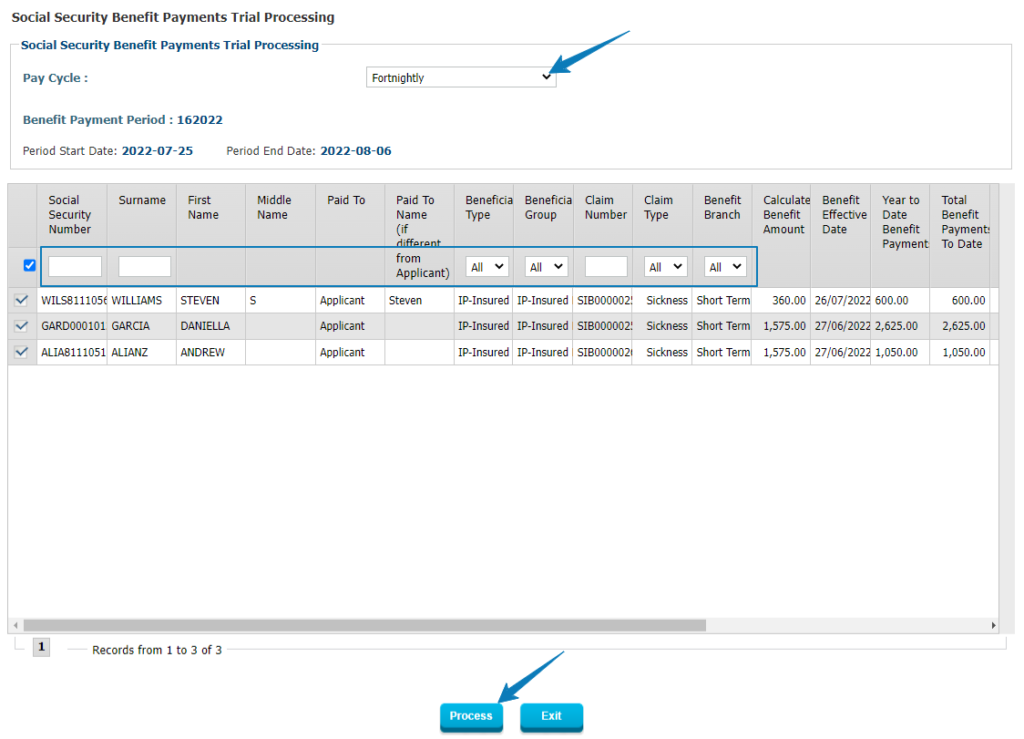 Figure 82: Social Security Benefit Payment Trial Processing The Benefit Payment Trial Process will give the user the actual Benefit Payments which are to be included in the Pay Run and provide all details for each Beneficiary Type, Beneficiary Group and Claim Type so that the right people can verify and make sure that the right Benefit Claims with the right amounts are included in this particular Pay Cycle. At this point in the process, the user will be able to choose whether to Approve or Suspend certain Benefit Claims from this particular Payment Run. The result of the Trial Process will be a Trial Register to facilitate the Review and Approval of the results prior to Final Processing. Step 7: Social Security Benefit Payments Trial Check Register 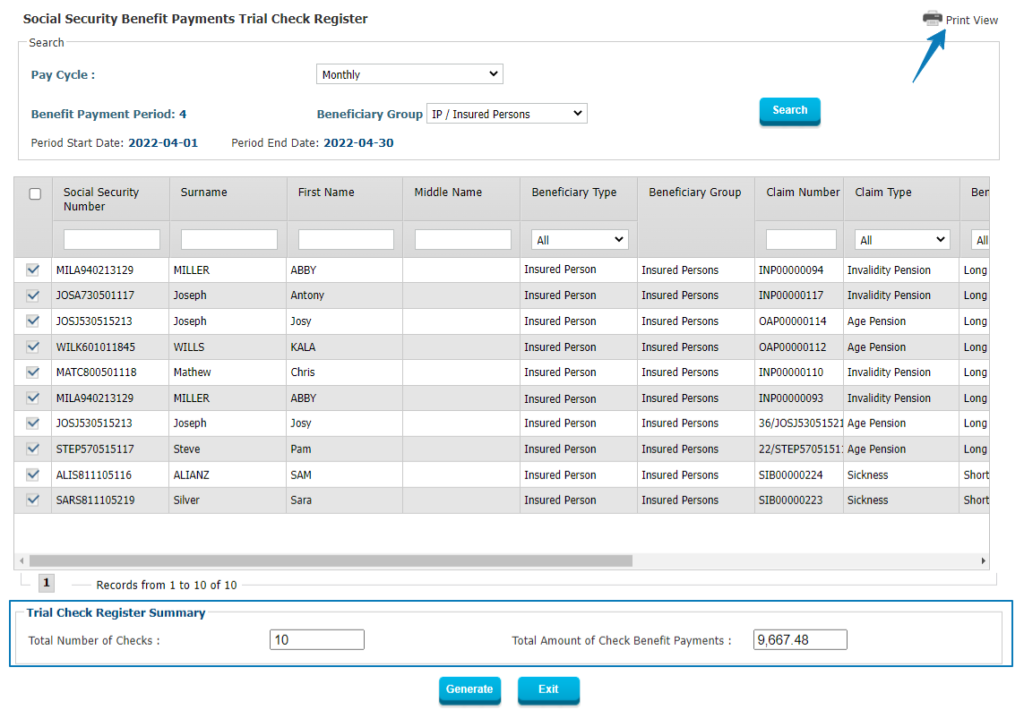 Figure 83: Social Security Benefit Payments Trial Check Register For those Beneficiaries who are to be paid by Check, the next step to follow will be to produce a Trial Check Register which offers the opportunity to verify that the right Beneficiaries are paid by Check (vs Direct Deposit or Cash) and that the amounts included are correct. Step 8: Social Security Benefit Payments Trial ACH  Figure 84: Social Security Benefit Payments Trial ACH For those Beneficiaries who will be paid directly in their bank account, Interact SSAS will produce an electronic file in the exact format required by the various banks used by the Social Security Administration so this file can be uploaded or sent to the Financial Institution through the application. While in North America the ACH format is standard, the application can produce any international format required by international banks as required. 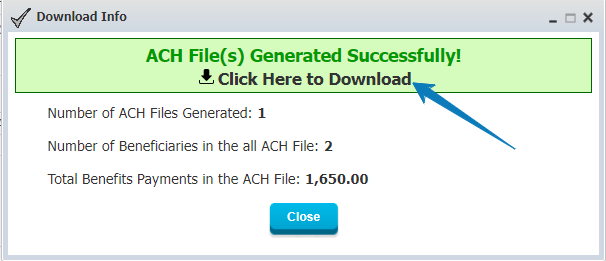 Figure 85: ACH File The above screen lets the user download the Trial ACH file so it can be checked for accuracy if required. Step 9: Social Security Benefit Payments Trial GL 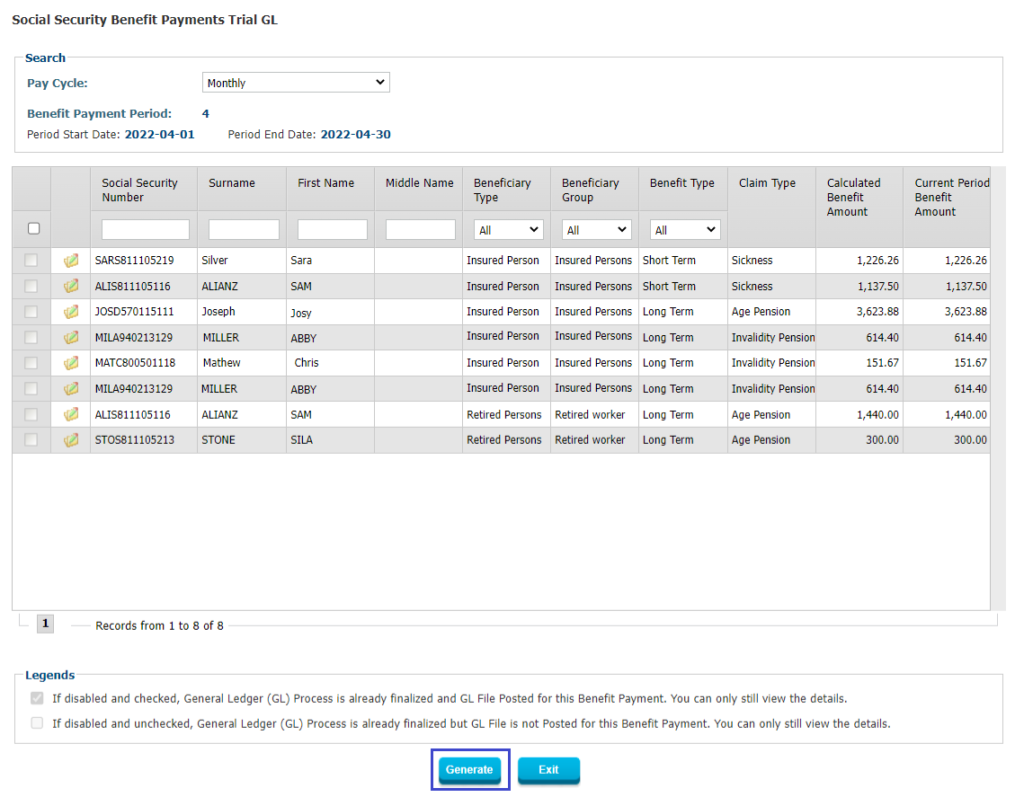 Figure 86: Social Security Benefit Payments Trial GL The last Trial Process to be run is that of the Trial GL, which provides the exact GL Journal Entries that will result from the Pay Cycle currently under way. The Trial GL gives the user the opportunity to verify all transactions as well as all GL accounts and other details to be used. 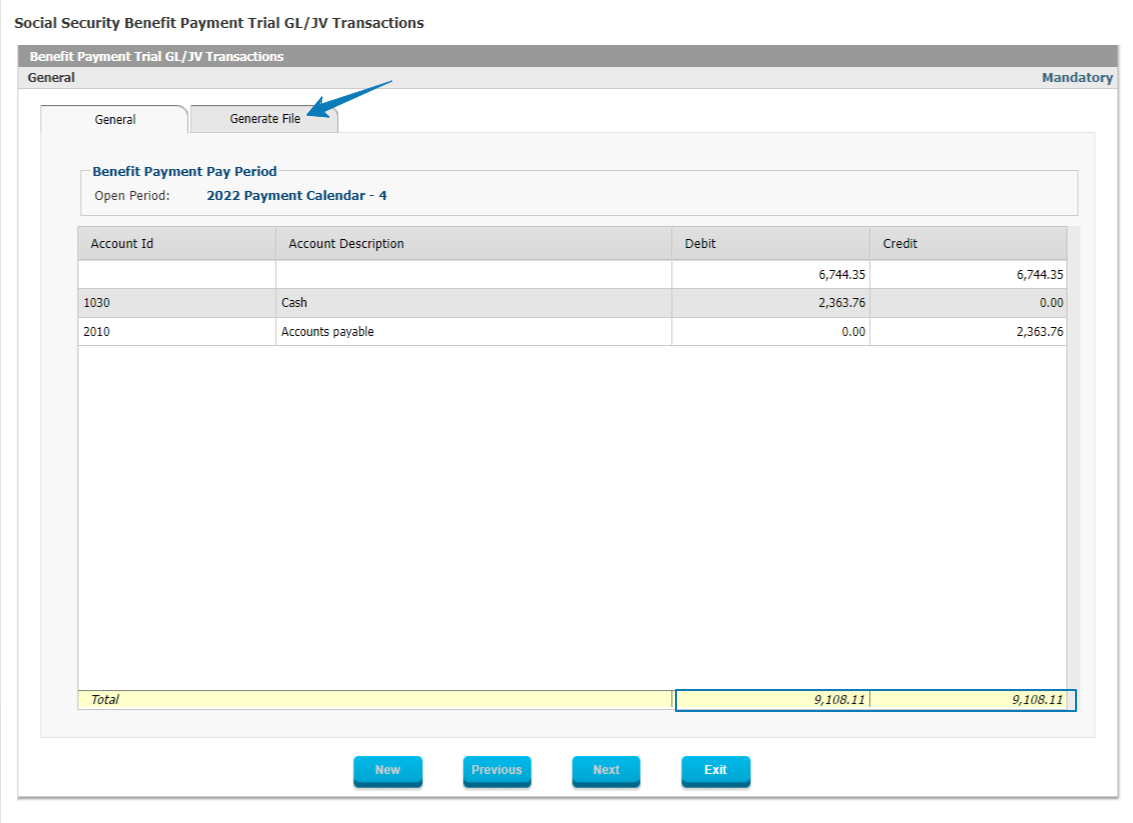 Figure 87: GL Journal Entries The GL Journal Entries produced as a result of the GL Trial Process can be verified at this point. Once that is done and verified and all information is correct, the user can proceed. If during the review of these Trial results it is found that some of the results are not what was expected, this can only be due to incorrect data submitted or incorrect policy setup, then the user can retrace their steps, fix the underlying issue and re-run the Trial Process for those transactions affected before proceeding to Final Steps.  Figure 88: GL Journal Entries File Format Interact SSAS will produce the exact File Format required to export the Journal Entries to the external General Ledger currently in use. This provides a perfect way to ensure that with careful review, the final output of the system is 100% correct as the user will have had many chances to spot and rectify any issues in advance. Step 10: Social security Benefit Payments Final Processing 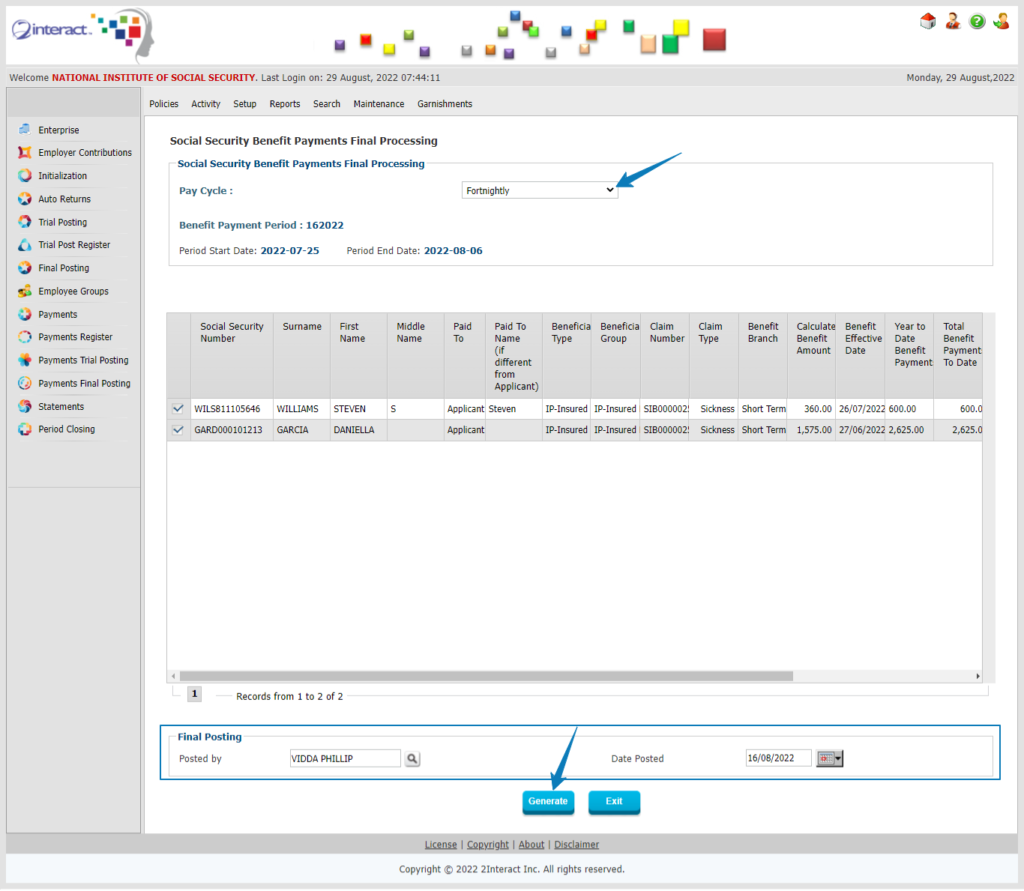 Figure 89: Social Security Benefits Payment Final Processing If the Benefits Payment Trial, the Check Trial (or ACH Trial) and the GL Trial details have all been carefully verified and confirmed to be correct, then the user can move on to the final steps (which are irreversible) by starting with the Benefits Payment Final Processing. 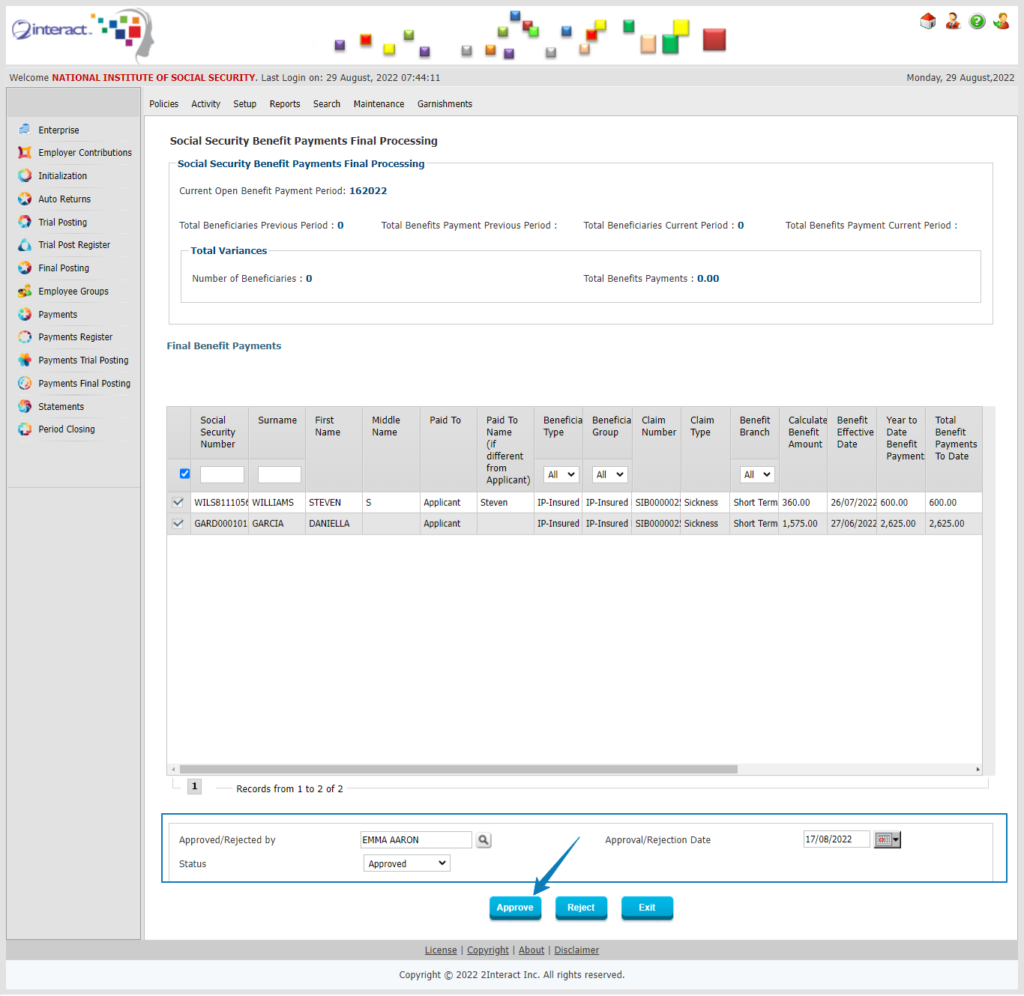 Figure 90: Final Benefits Payments When the Benefits Payments Final Processing has been run, the user will get a list of all payments and will be able to Approve them or Reject them individually or all together at once. The system will then also produce a Final Register for further reporting purposes. Step 11: Social Security Benefit Payments Final Register 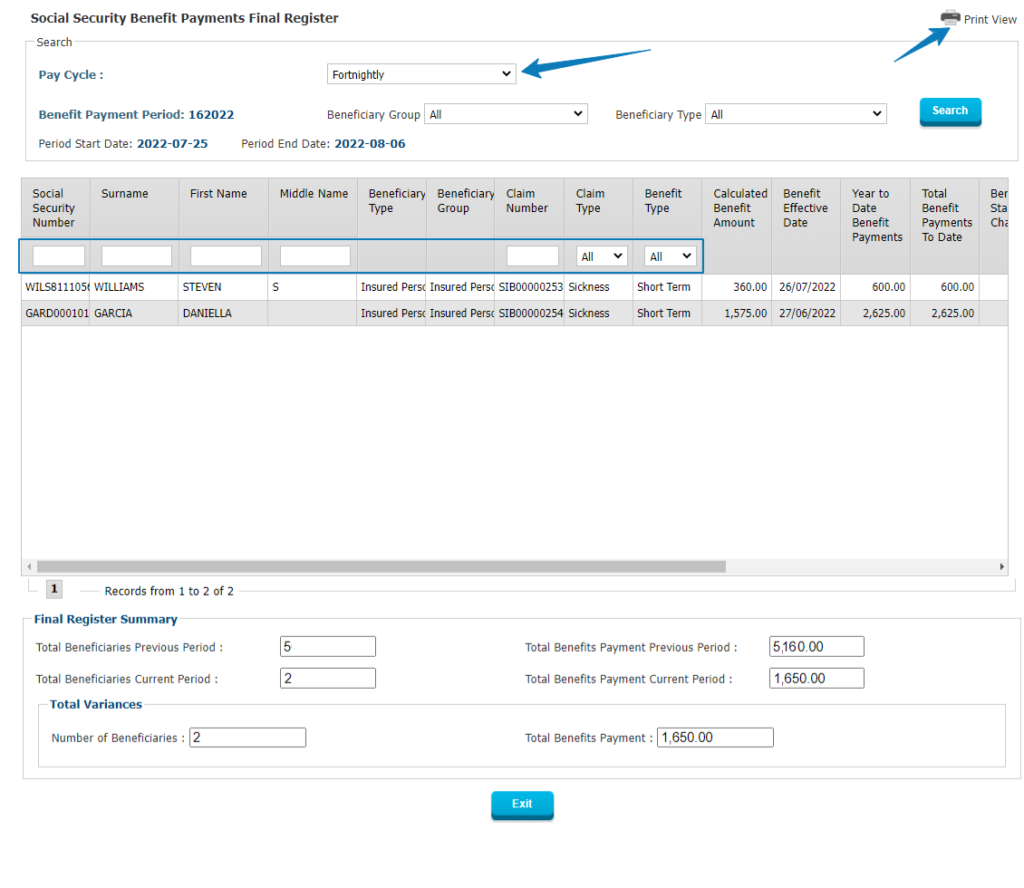 Figure 91: Social Security Final Benefit Payments Register The Final Benefit Payments Register will give the user a complete listing of all approved payments which are included in this Pay Cycle so any time it is necessary in the future to check which transactions were included in the Register all the required detail information will be available immediately. Step 12: Social Security Benefit Payments Final Check Register 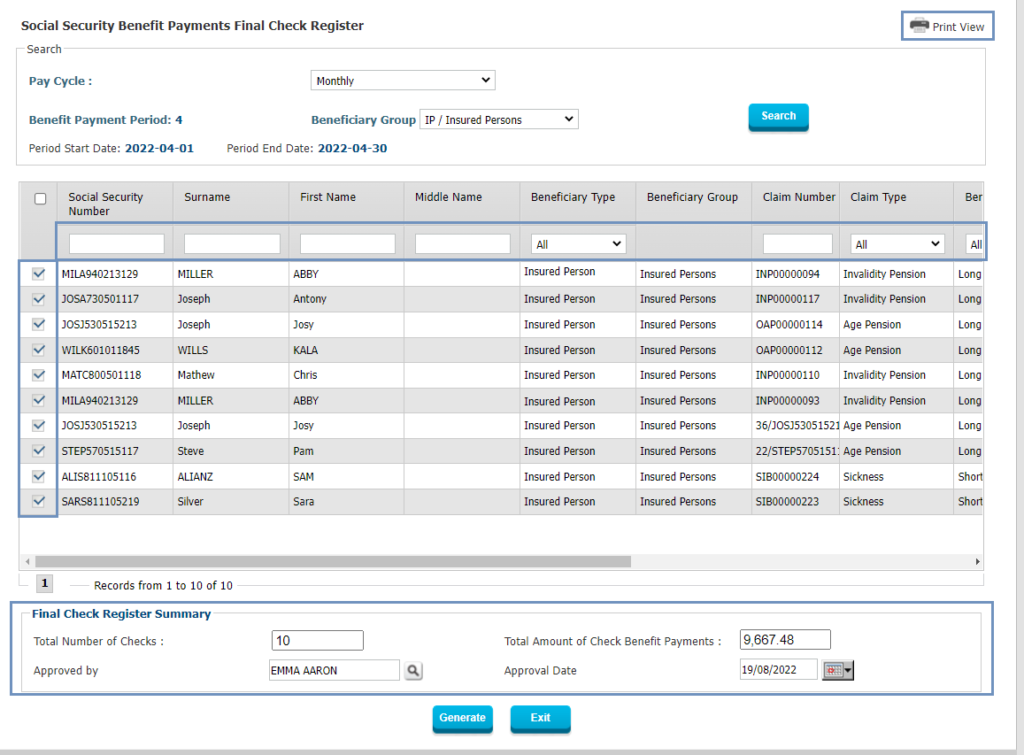 Figure 92: Social Security Benefit Payments Final Check Register Interact SSAS will next produce a Final Register of all Benefit Payments which will be paid by Check so that the user can check against this register and also use it afterwards to verify that all checks printed correctly and are of the same count and total. An Approval is required at this point in order to proceed with printing the Checks. Step 13: Social Security Benefit Payments Check Printing 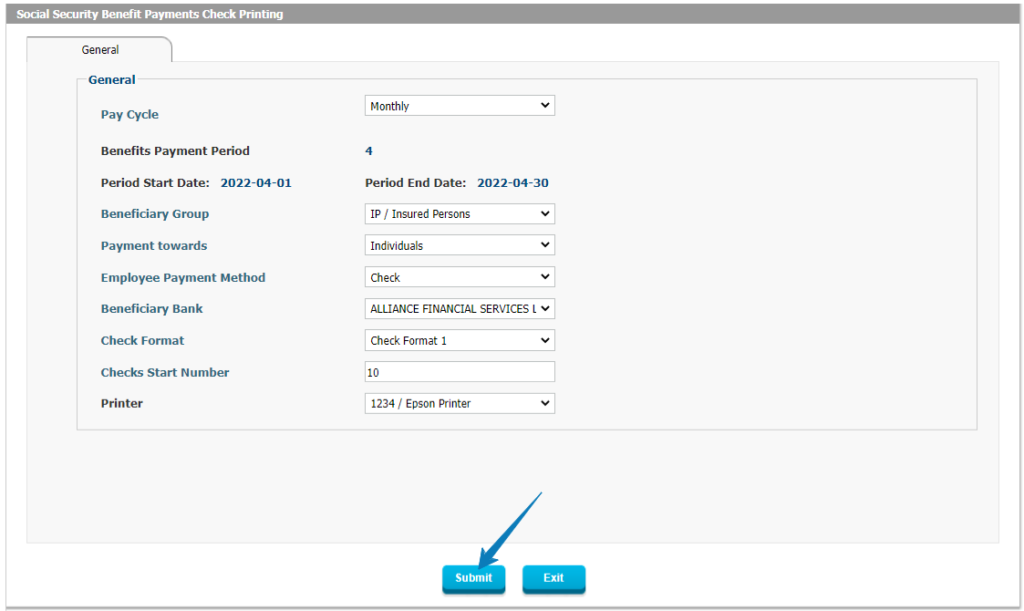 Figure 93: Check Printing Window At this point, the user can proceed with printing the Checks. This is done based on the exact requirements of each Bank, using the correct Check Format and Printer as show in the above screen. There is no limit on the number of Printers to be used or on the number and type of Check Formats which can be used. 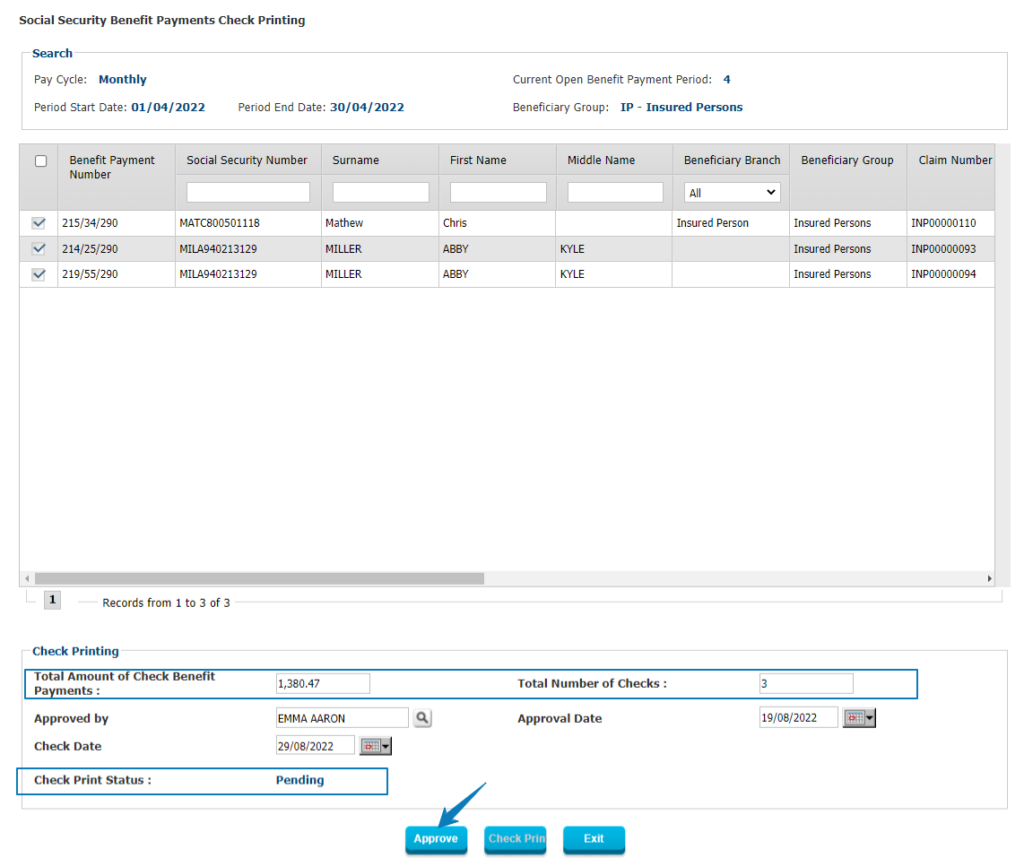 Figure 94: Social Security Benefit Payments Check Printing The above form shows the final step in Printing the Checks so that the user can Approve and proceed. Step 14: Voiding benefit payments check printing 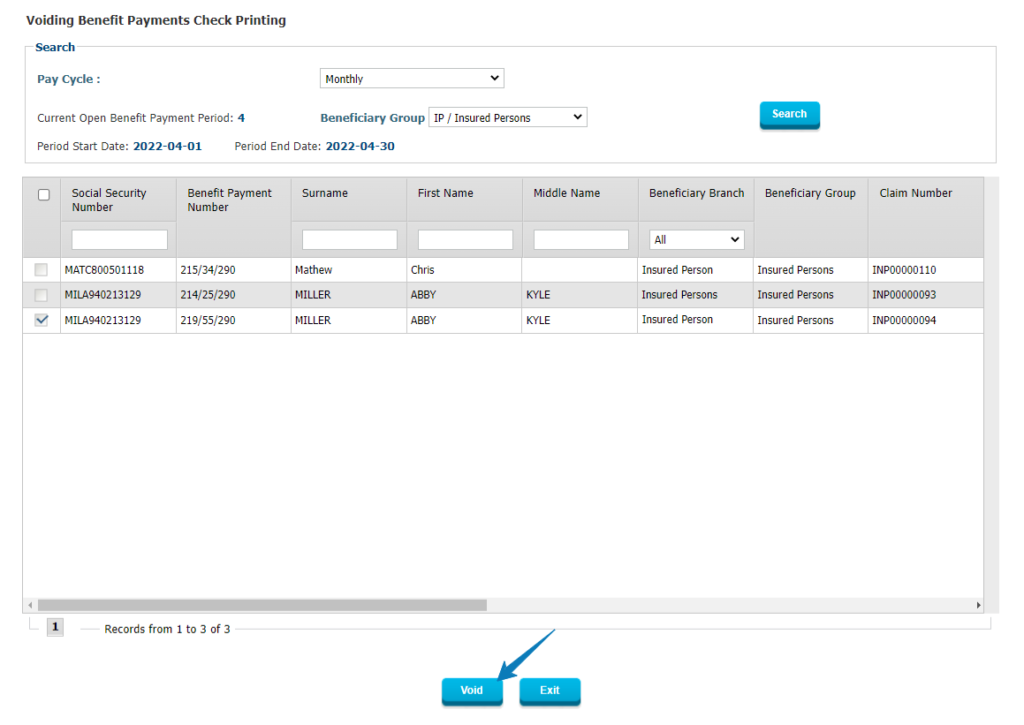 Figure 95: Voiding Benefit Payments Check Printing If during printer a mechanical problem occurs with the printer or the paper, or if for any other reason a Check needs to be voided after printing, the system allows the user to Void the Check with a simple process so that it is recorded with an audit trail to ensure it can also be verified what the exact process was regarding this particular Benefit Payment. 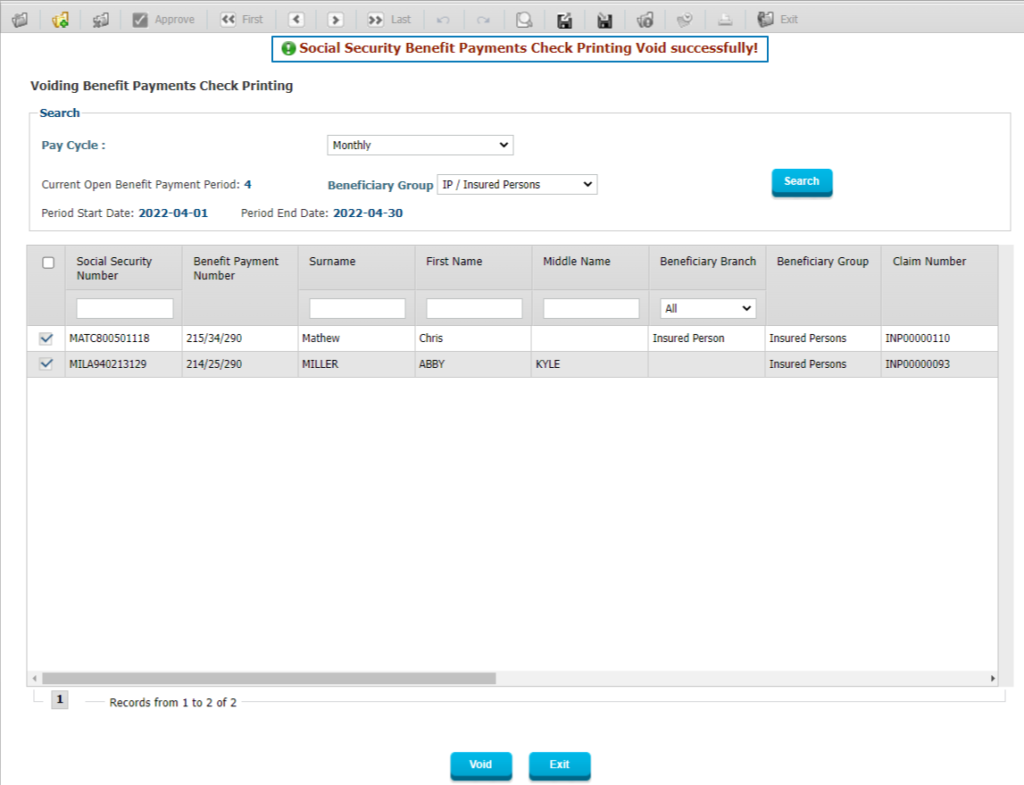 Figure 96: Confirmation of Voided Check The above screen shows the confirmation provided by the system that a Check has been Voided. Step 15: Social Security Benefit Payments Final GL 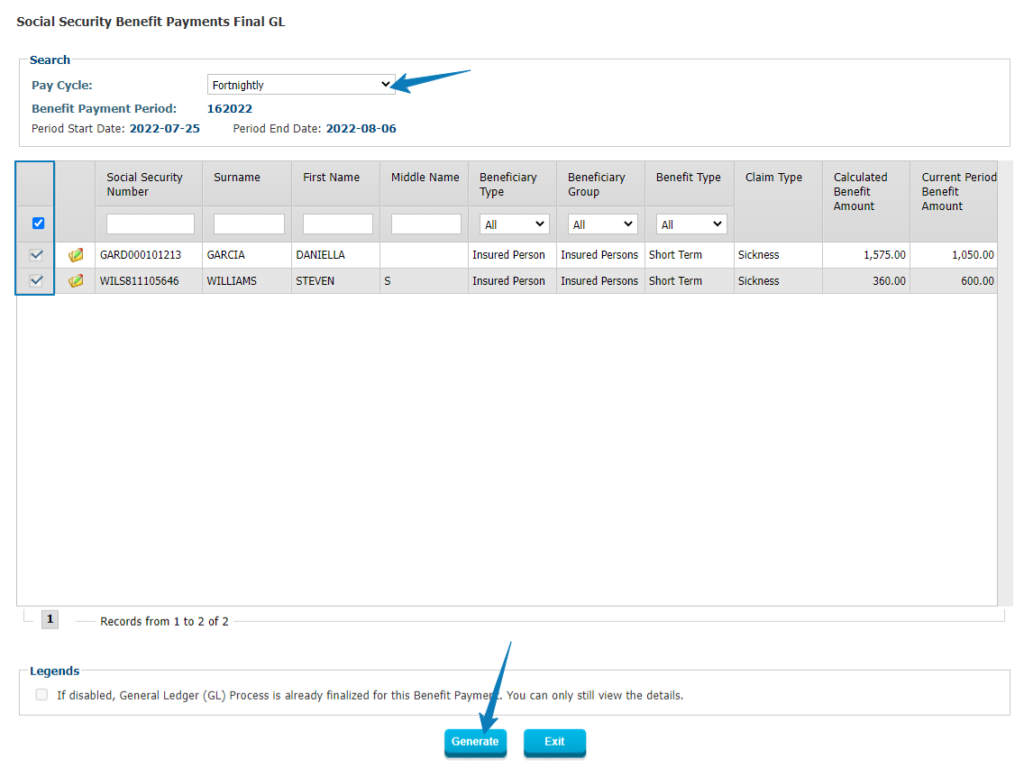 Figure 97: Social Security Benefit Payments Final GL The above form will allow the user to initiate the process to generate the Final GL Transactions related to the selected Benefit Payments. Step 16: Social Security Benefit Payments Final GL/JV Transactions 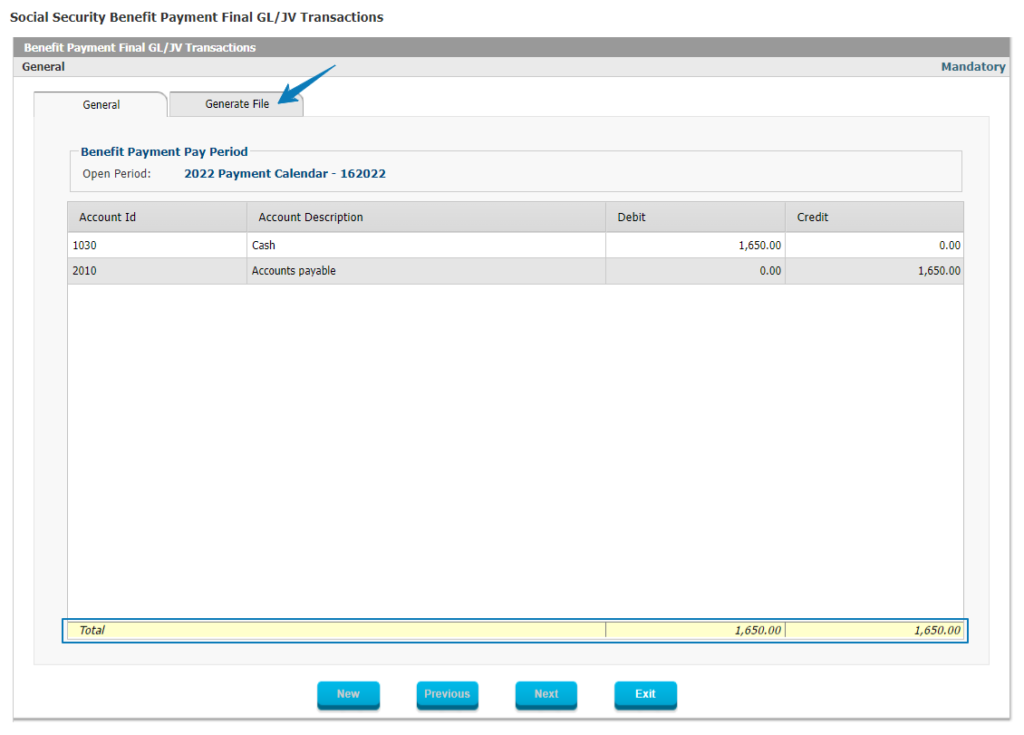 Figure 98: Benefit Payments Final GL Transactions Once the system has generated the Final GL Transactions they will be displayed for the user to review so they can be produced in the correct GL File Format afterwards 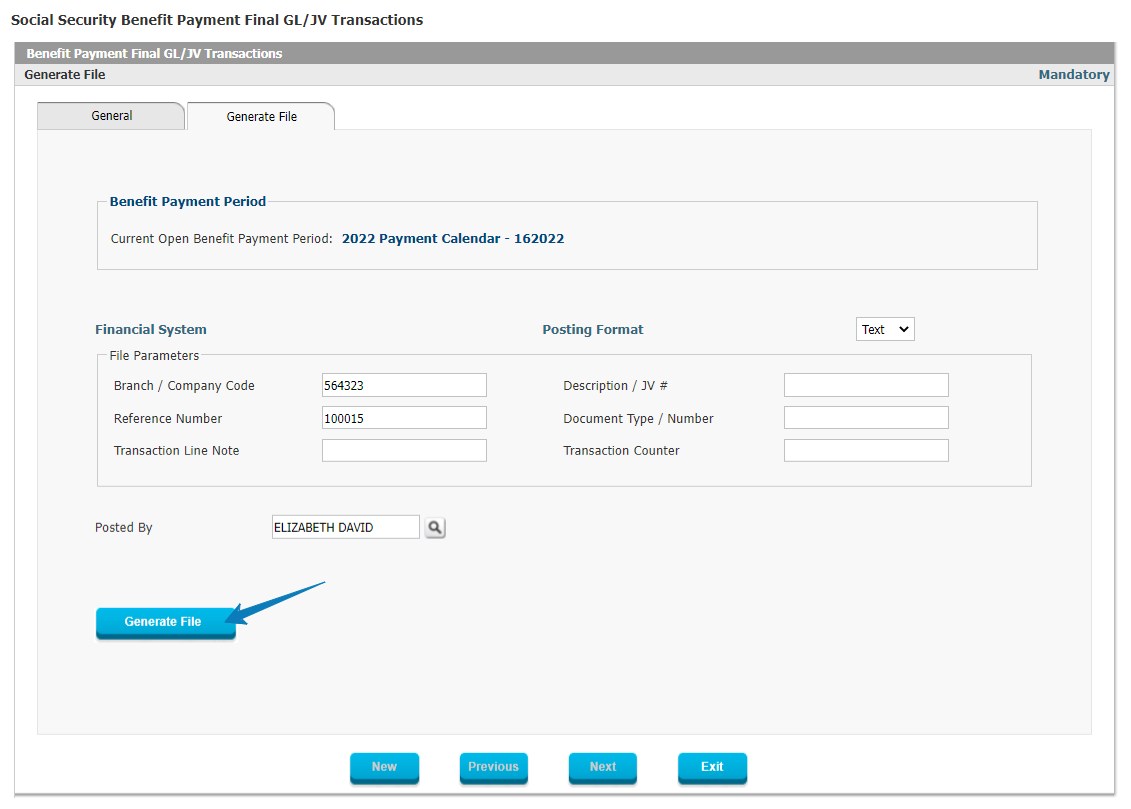 Figure 99: Benefit Payment Final GL Transactions The above form is used to generate the GL File which will be sent to the external General Ledger in the exact file format required by this General Ledger system. Step 17: Benefit payments period closing 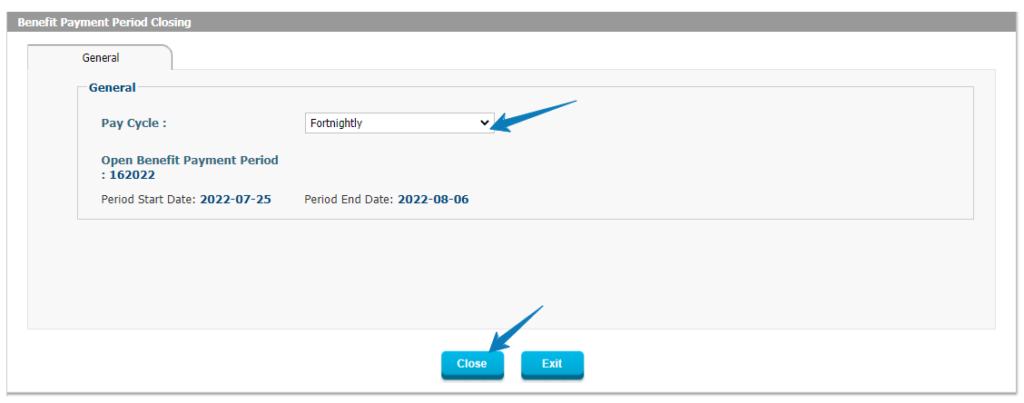 Figure 100: Benefit Payments Period Closing The above form enables the user to Close the Period for the Benefit Payments and open a new period. 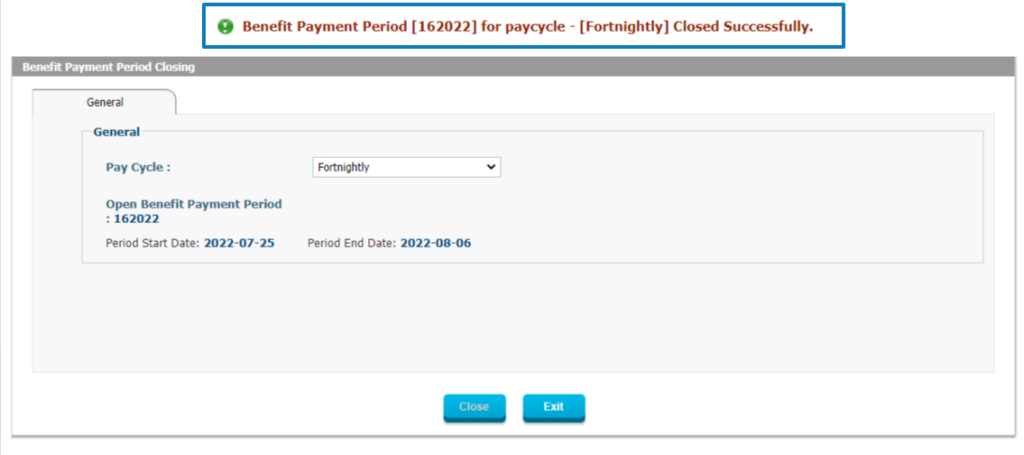 Figure 101: Benefit Payment Period Closing Confirmation Screen Step 18: Benefit Payment Statement 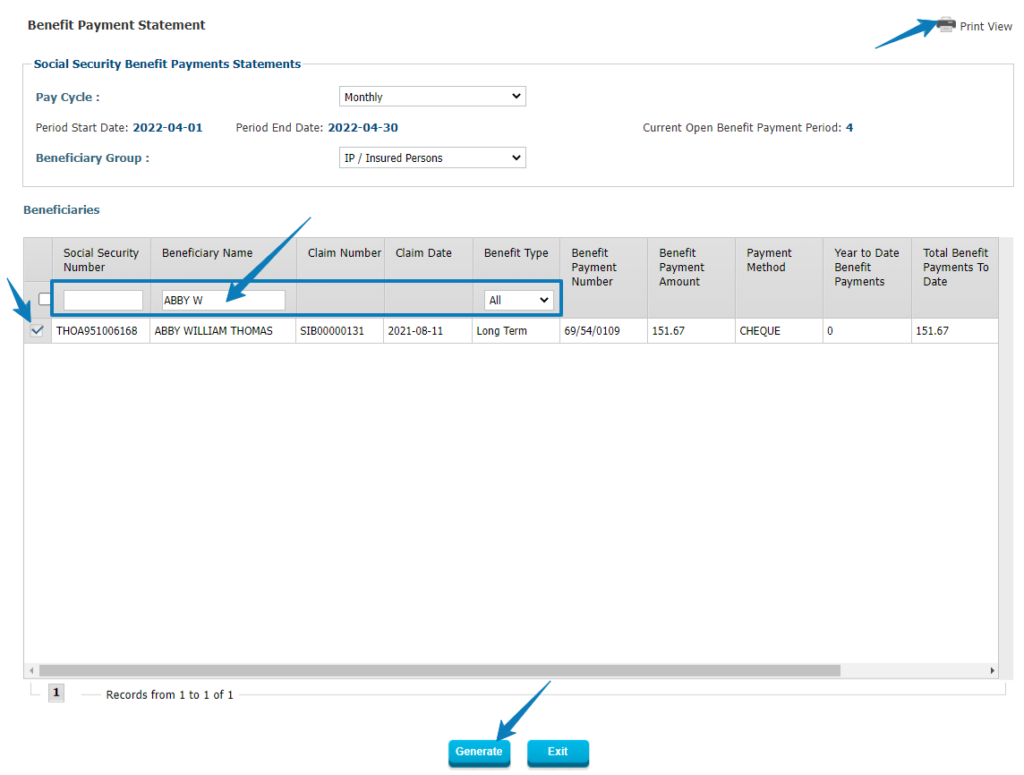 Figure 102: Benefit Payment Statement After all processes for Payments have been run and the period has been closed, the user can produce Benefit Payment Statements which will be made available to all Beneficiaries who have received a payment so their records are complete and they can verify themselves also what they were paid. 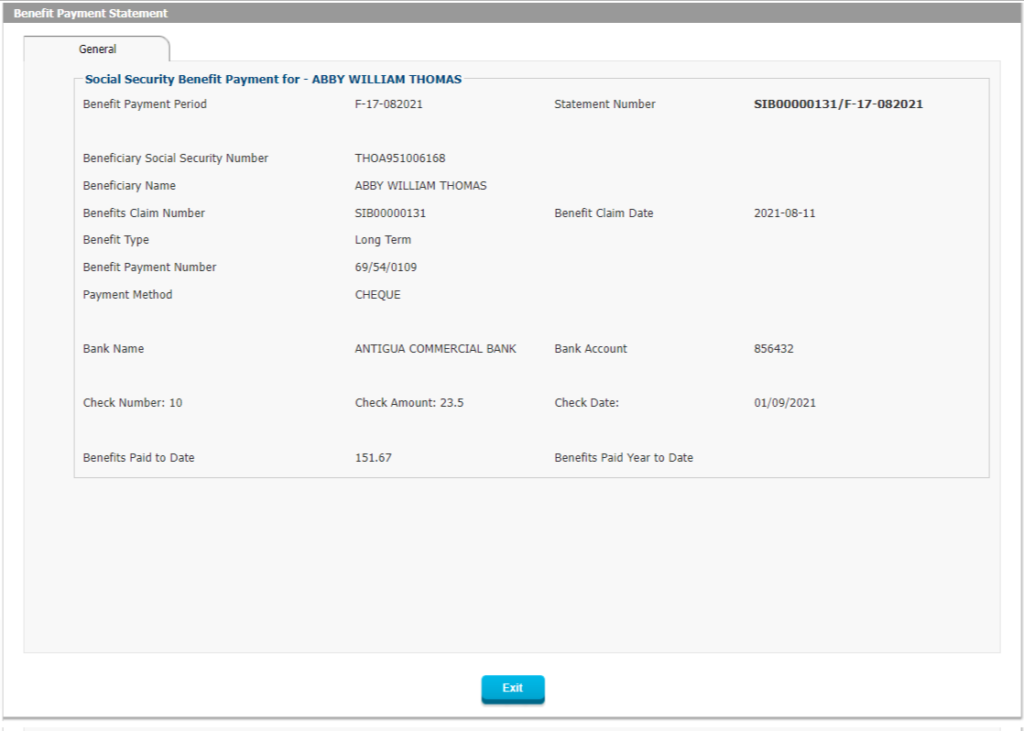 Figure 103: Benefit Payment Statement Compliance Management Interact SSAS Compliance Management supports the Social Security Administration to ensure that all external stakeholders are complying with the Social Security laws and regulations and this includes making sure that:
The Social Security Compliance Management process is the last process of the Social Security Administration System (SSAS), hence the following order of SSAS processes:
Actors The actors in the Social Security Compliance process/function include internal actors which consist of Auditors (Compliance Inspectors or Audit Officers) and Legal Officers. External actors include Employers, Healthcare Providers, and the Courts. Each of these actors have a specific role in the Compliance process (Figure-1): Auditors (Audit Officers) – Auditors are responsible for scheduling and conducting the compliance audits of the employers in accordance with specific rules and regulations and reporting of the findings of each audit and recommending what audit actions are to be taken. Other terms which may be used for a similar role are:
Legal Officers – Legal Officers are responsible for receiving the recommended audit actions and making the final decision on what action needs to be taken to correct the non-compliance of the employers. Other terms which may be used for a similar role are:
Employers – Employers are responsible for making all employees, wages, and contributions filings and payments records available to the Audit Officers (Auditors) and responding to any request of information from the auditors and implementing the recommended actions made by the auditors. If ordered by a Court, they must comply with the court orders including making payment for any unpaid contributions and fines. Courts – The courts are responsible for reviewing the social security audit actions and ordering the employers to comply with specific orders of the court which are resulting for the social security compliance audit actions and findings. 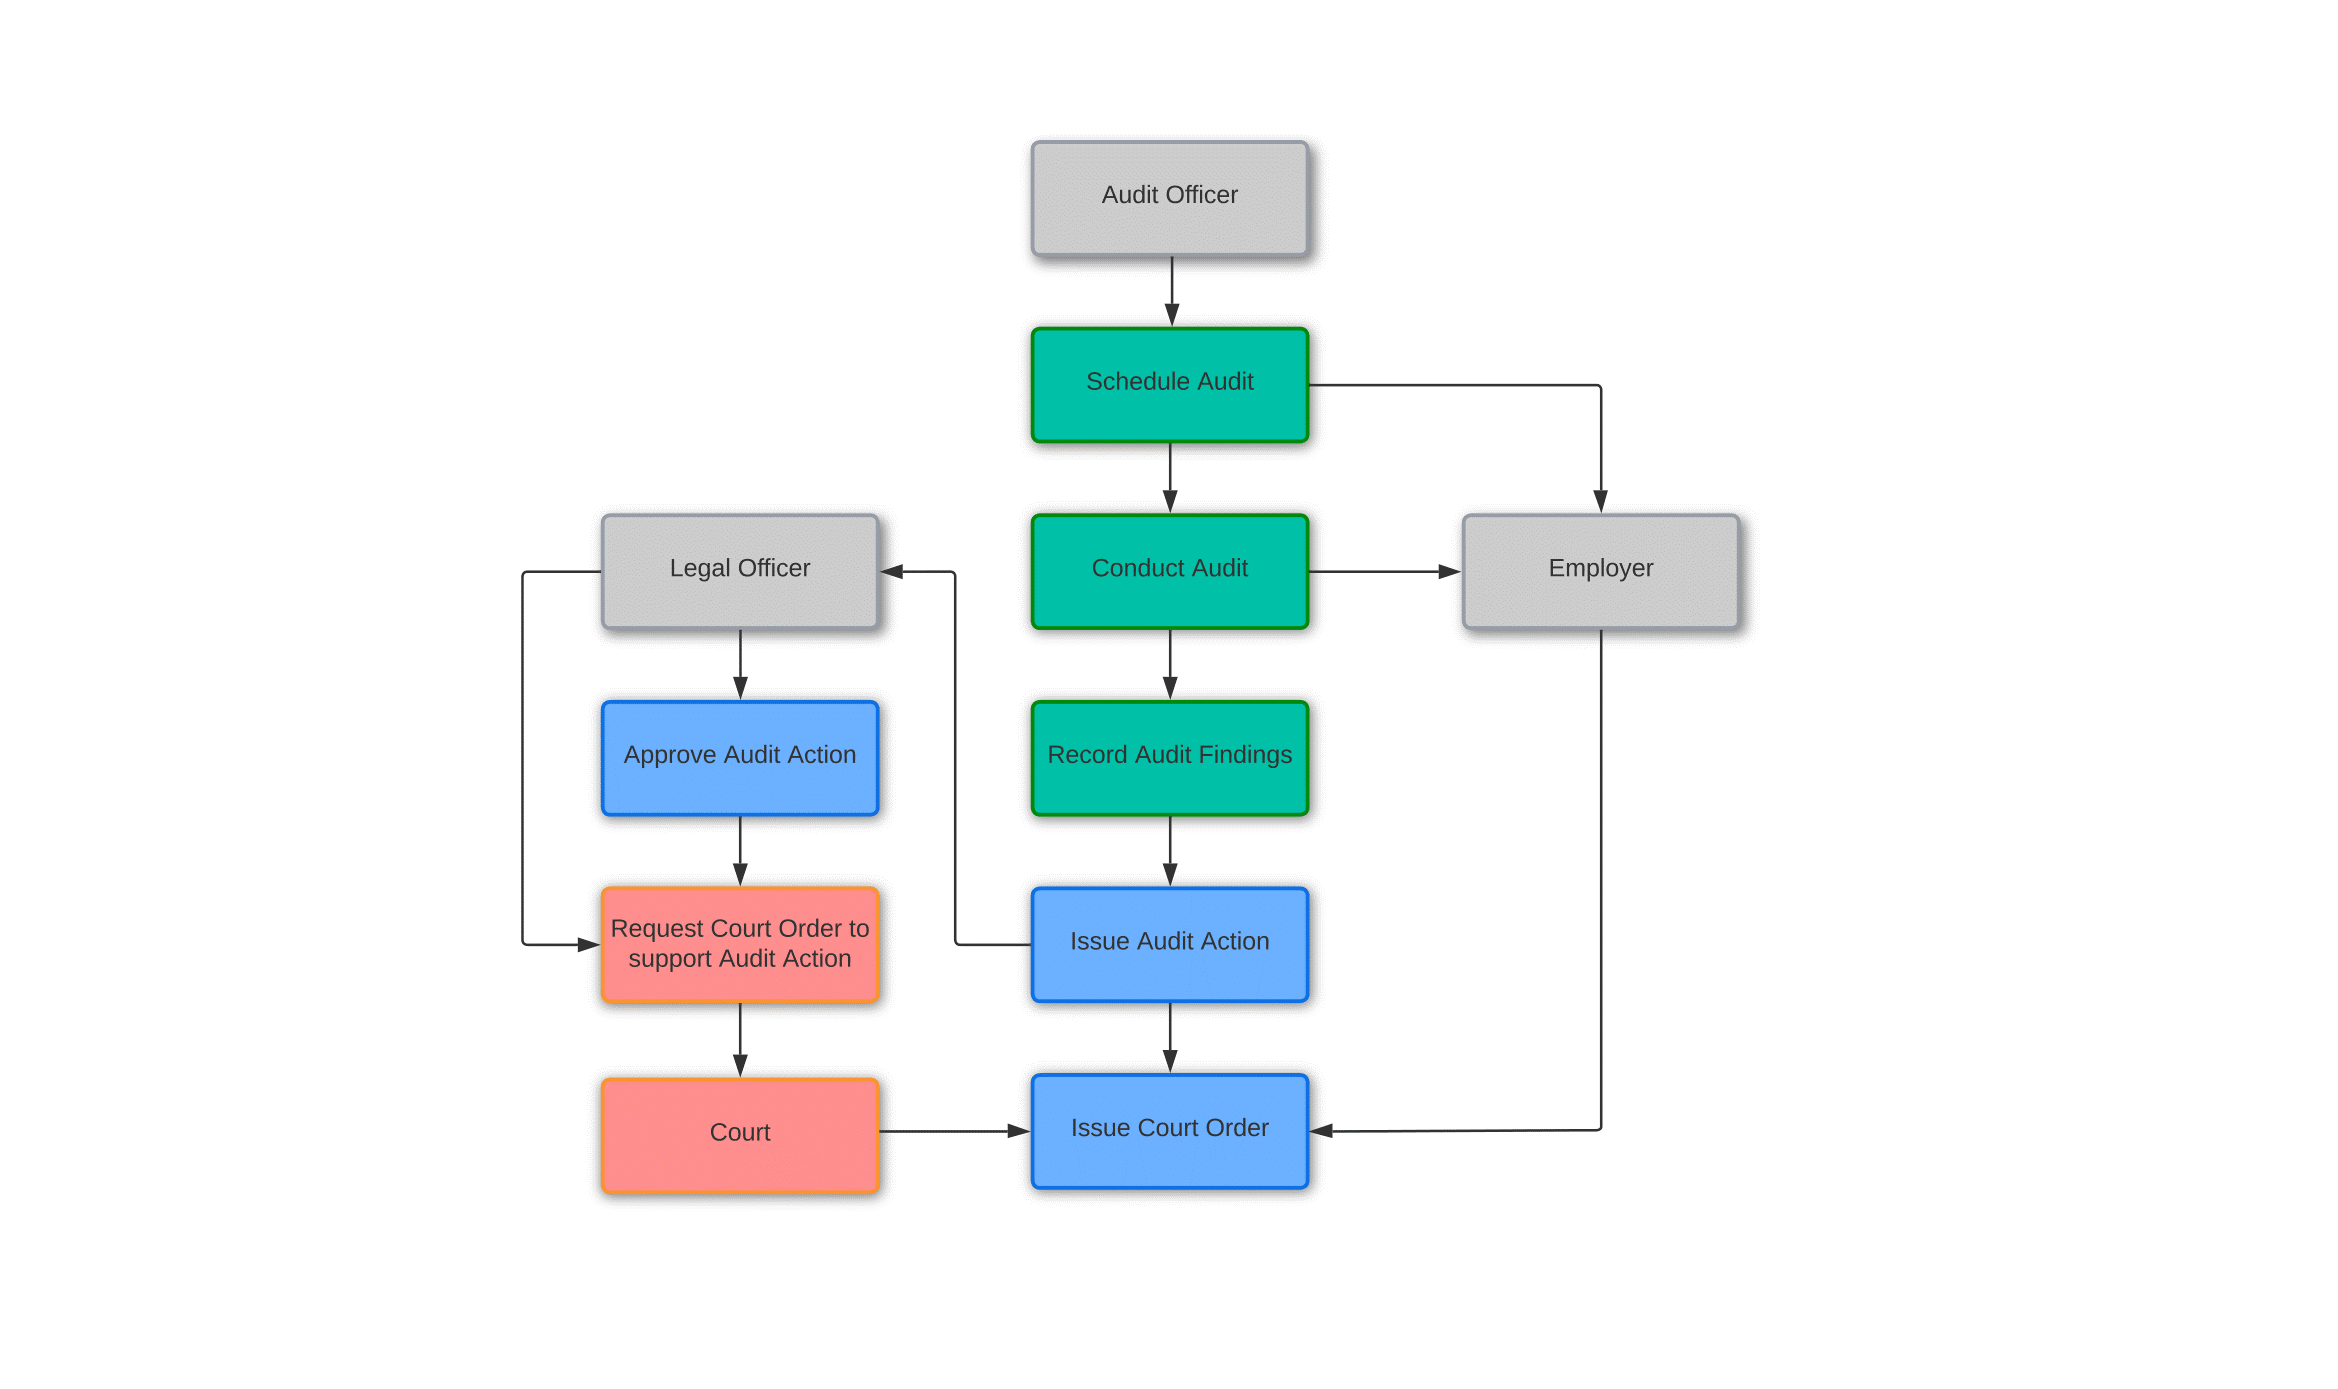 Figure 104: Compliance Audit Actors Workflow The workflow of the compliance process starts with defining the Audit Officers, Legal Officers, and the Courts, and then assigning employers to each Audit Officer. Each Audit Officer is assigned to a specific region and district in the country and a number of employers within the regions. Each audit officer is responsible for the compliance of a number of employers. Once the actors are defined, then the following processes take place (figure-2): Audit Scheduling (Schedule Compliance Audit) – This process consists of scheduling a compliance audit based on the predefined compliance audit cycle. Note however, not all social security organizations have a schedule for compliance audits. Some organizations may conduct compliance audits in an ad hoc manner based on the discretion of the audit officers. Compliance Audit – Once the audit schedule is defined, a Compliance Audit record is created and the employer is informed of the Audit Date and Time and Reason of the audit. Compliance Audit Checklist – On or before the date of the Audit, a Compliance Audit Checklist is printed to be used during the Audit visit by the Audit Officer. Compliance Audit – On the date of the compliance audit, the audit officer visits the employer and conducts the audit using the Compliance Audit Checklist and record his/her findings. Record Compliance Audit Findings – Once the audit is conducted, the audit officer will record the outcome of the audit as to whether the employer is compliant or not with the reason for non-compliance. Recommend Compliance Audit Action – Based on the audit findings, the auditor will recommend a compliance/audit action resulting from non-compliance. Review and Approve Compliance Audit Action – The management and the Legal Officer will review and approve the recommended Compliance Audit Action, and once approved to a notice of the recommended Compliance Audit action is sent to the employer to implement the issued Audit Action. Follow up on the Compliance Audit Action – An Audit officer will follow up with the employer to ensure that the Compliance Audit Action has been implemented by the employer. If not, the Audit Officer will send a notice to the Legal Officer to take further action. Court Issue Court Order to Employer – The court will review the non-compliance audit action and issue a court order to the employer to comply with the specific audit action. 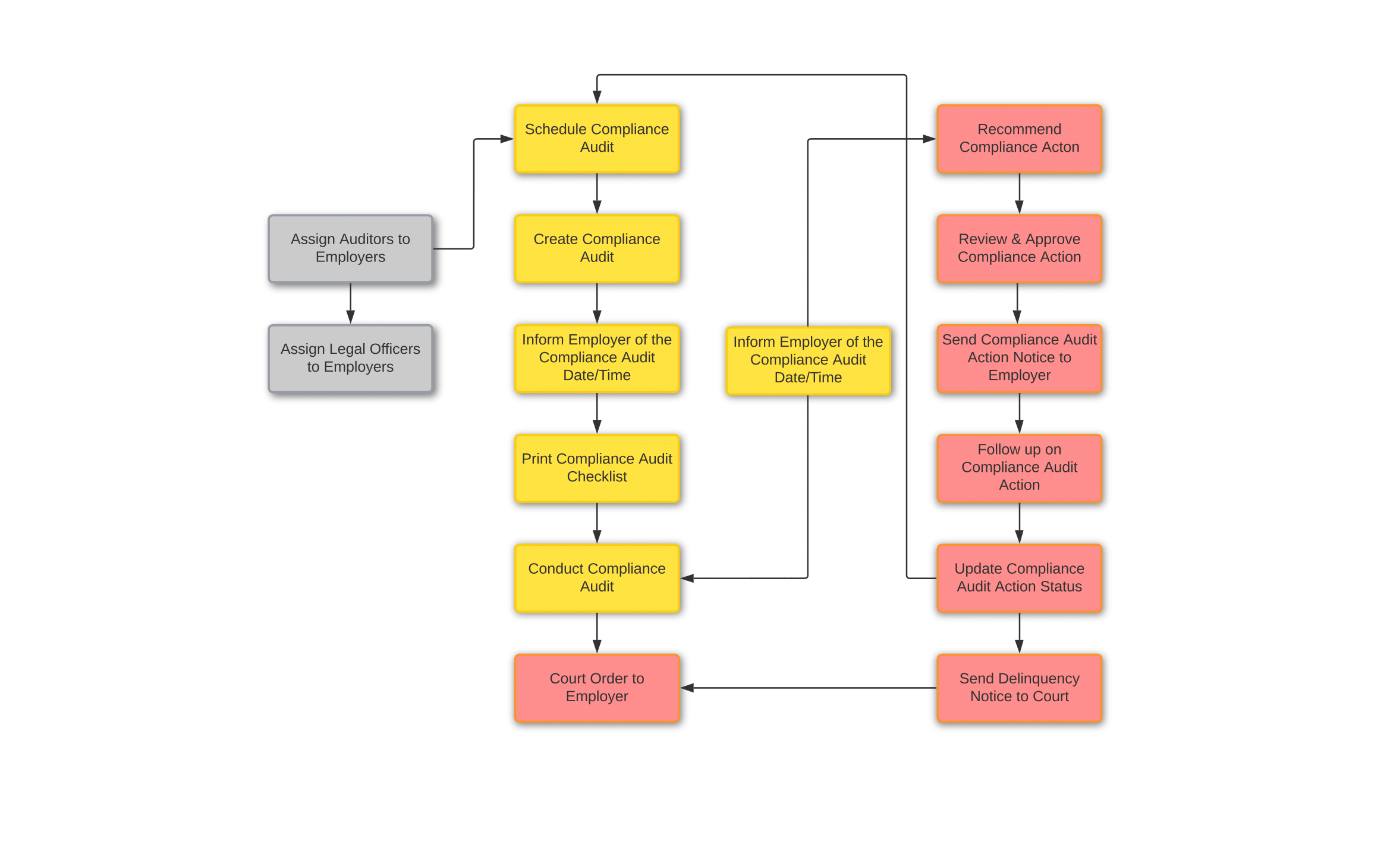 Figure 105: Compliance Audit Workflow Setup
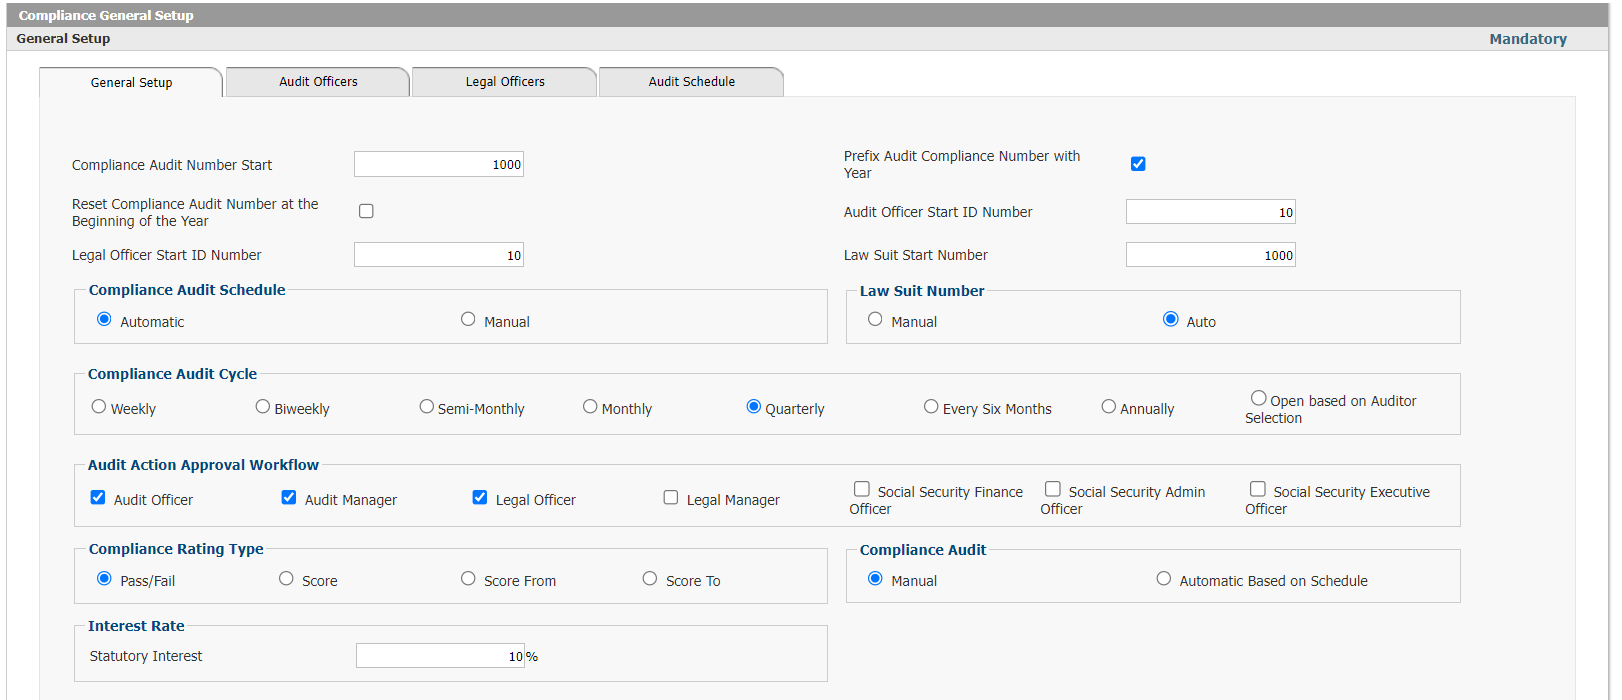 Figure 106: General Setup In the General Setup all the main rules are defined which will drive the basic logic, numbering standards, initial workflow and methods to be used such as
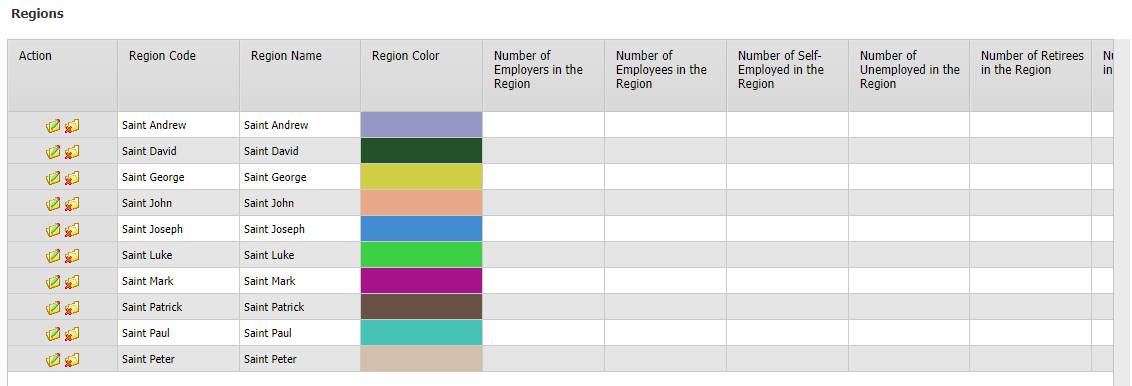 Figure 107: Regions Setup The user can define any number of Regions which will be associated with Districts and Cities as part of the classification of Employers for which Audit Officers will be responsible. 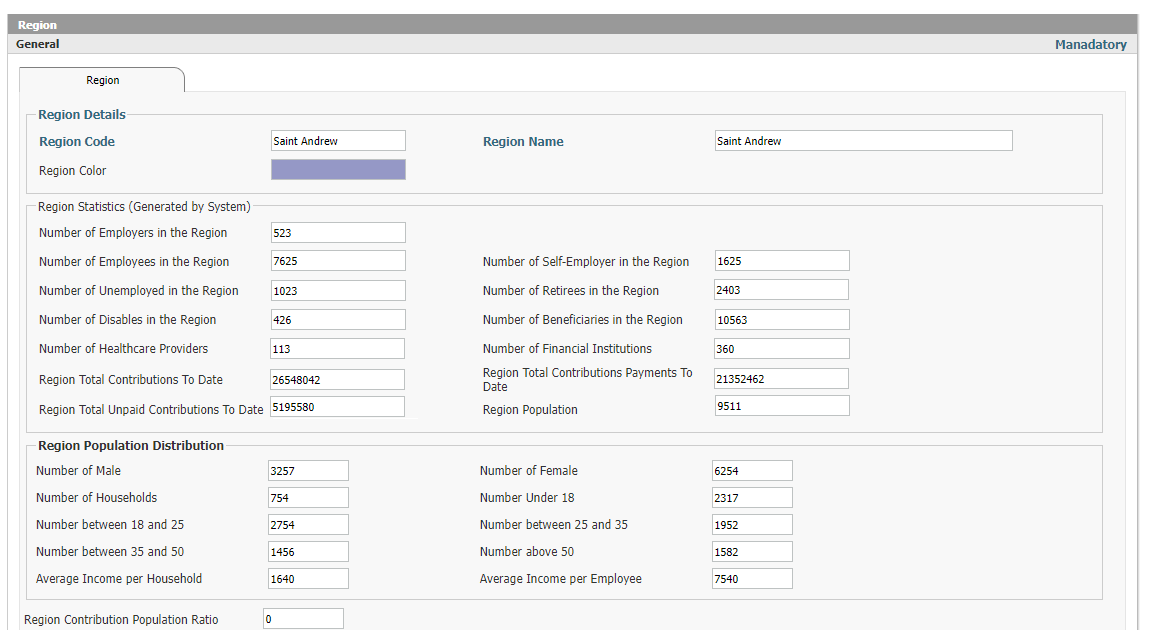 Figure 108: Region Definition The regions can be defined with a Code and a Name as well as a color which can be used for color coding in reports. Statistics are generated by the system by region.
 Figure 109: Districts List The system will display all the Districts defined, each District can be linked with a Region.  Figure 110: District Definition Defining a new District is done easily using a District Code and District Name as well as a Color for color coded reports.
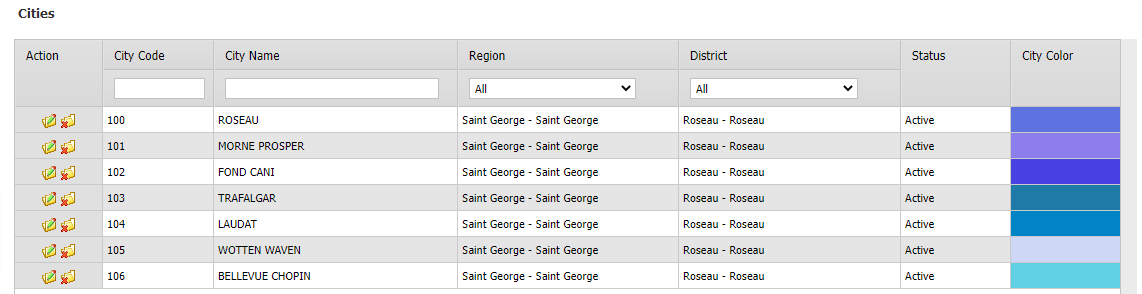 Figure 111: Cities List All Cities can be defined in Interact SSAS to allow for easy classification of Employers by location.  Figure 112: City Definition Cities can be defined with a City Code and City Name, after which they will be linked with a Region and District and a Color. The use of Codes ensures that even Cities with identical names can be classified correctly with the right Region and District.
 Figure 113: Zip Codes Zip Codes may be used to help in classifying employees, the system allows the user to define any number of Zip Codes. 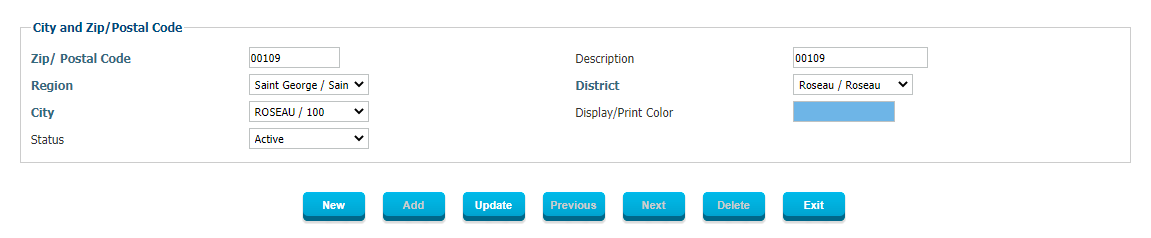 Figure 114: Zip/Postal Code Definition
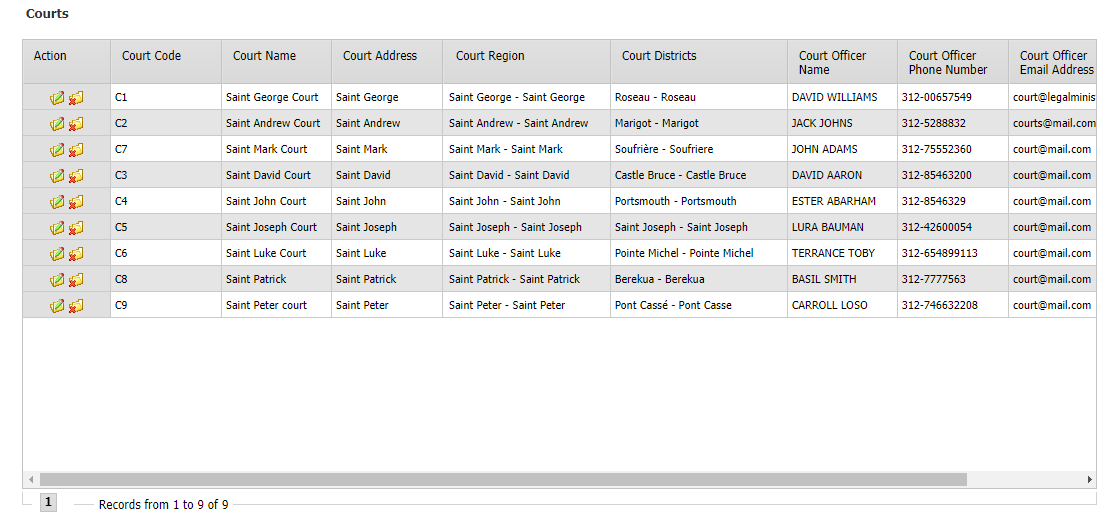 Figure 115: Courts Listing Since Courts are important Actors in the Compliance process, these will all be defined in the system. 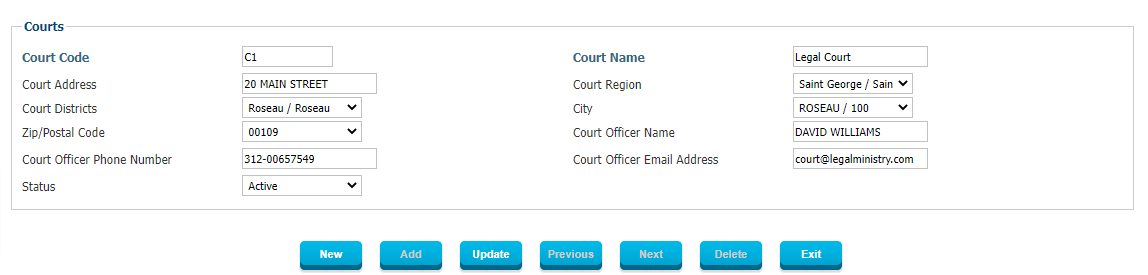 Figure 116: Court Definition Courts are defined with a Court Code and Court Name, as well as their address and the Court Officer.
 Figure 117: Audit Performance Cycle List Audit Performance Cycles are fully user-defined and can be setup as per the practice of the Social Security Administration. The system will then auto-create Audit Schedules based on these Cycles or can allow the Social Security Administration to set the dates for Audits manually.  Figure 118: Audit Performance Cycle Definition Different Audit Cycles can be associated with different Districts, Regions, Employer Groups, Employer Types etc., for maximum flexibility and efficiency.
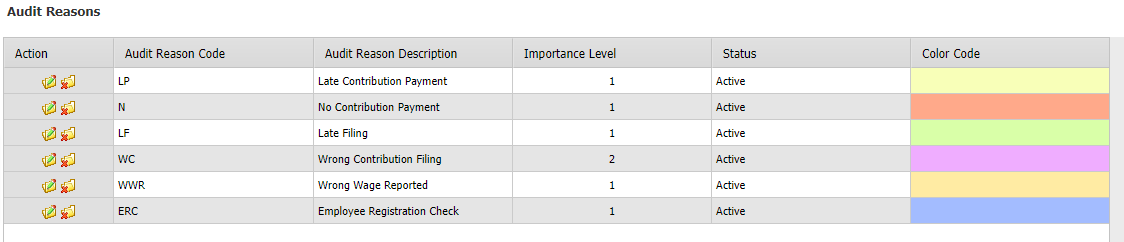 Figure 119: Audit Reasons Listing Depending on the Audit Policy Framework in use within the Social Security Administration, the user can define any set of Audit Reasons which can be invoked and shared with the Employer when an Audit is scheduled.  Figure 120: Audit Reasons Definition Defining new Audit Reasons is very simple in Interact SSAS and is done as usual with a Code and a Description/Name. In addition, this form allows the user to set an Importance Level for the Reasons and a Color Code.
 Figure 121: Audit Scope Items List The Scope of Audits will depend on the governing laws and regulations in the country as well as the local context. Therefore the entire framework is fully configurable and user-defined. Above you can see a set of Audit Scope Items which can then be included in any Audit.  Figure 122: Audit Scope Item Definition Defining Audit Scope Items is simple with an Item Code, an Item Description, Audit Reasons which are associated with it, and the Audit Scope Urgency Level as well as Color Coding for easy Reporting.
 Figure 123: Audit Documents List The user can define any Audit Documents which may be used in an Audit as evidence or to support a statement made by the Employer. This way reporting on such Audit Documents is standardized and streamlined. 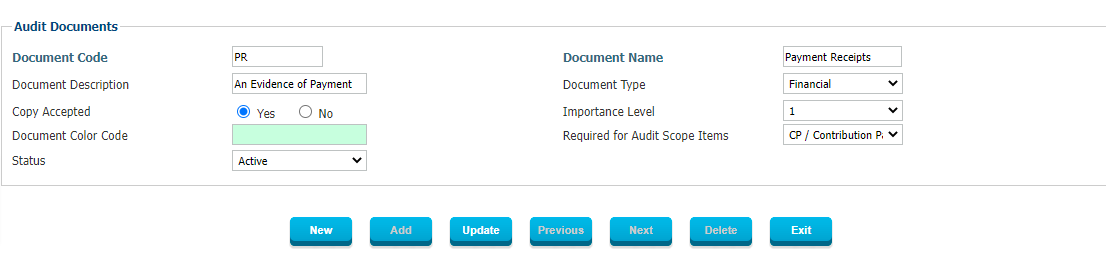 Figure 124: Audit Documents Definition Audit Documents can be defined with the Document Code and Document Name and Description, as well as classified based on their Type. The Audit Document can then be linked with the Audit Scope Items where it will be Required. Color coding is available as with most other definitions in Interact SSAS.
 Figure 125: Audit Types List In order to effectively manage and schedule the right Types of Audits, these should be classified by Type in order for the organization to be able to prioritize as required when scheduling. 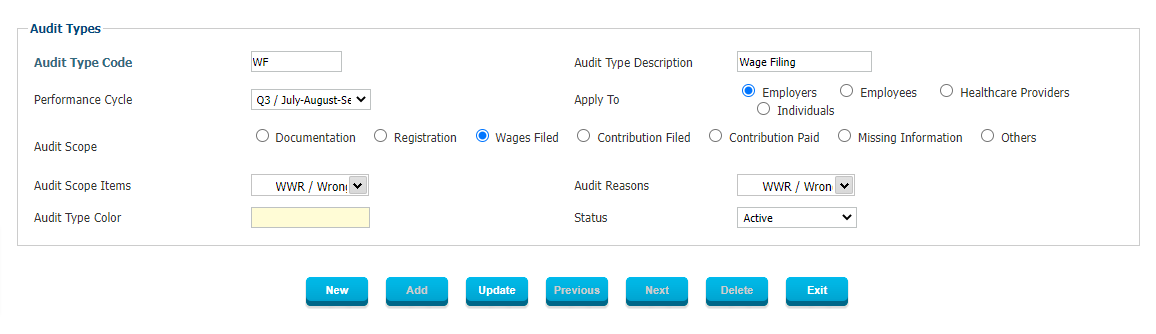 Figure 126: Audit Types Definition Each Audit Type can be defined with extensive information and linked with a specific Performance Cycle and with a particular Audit Scope.
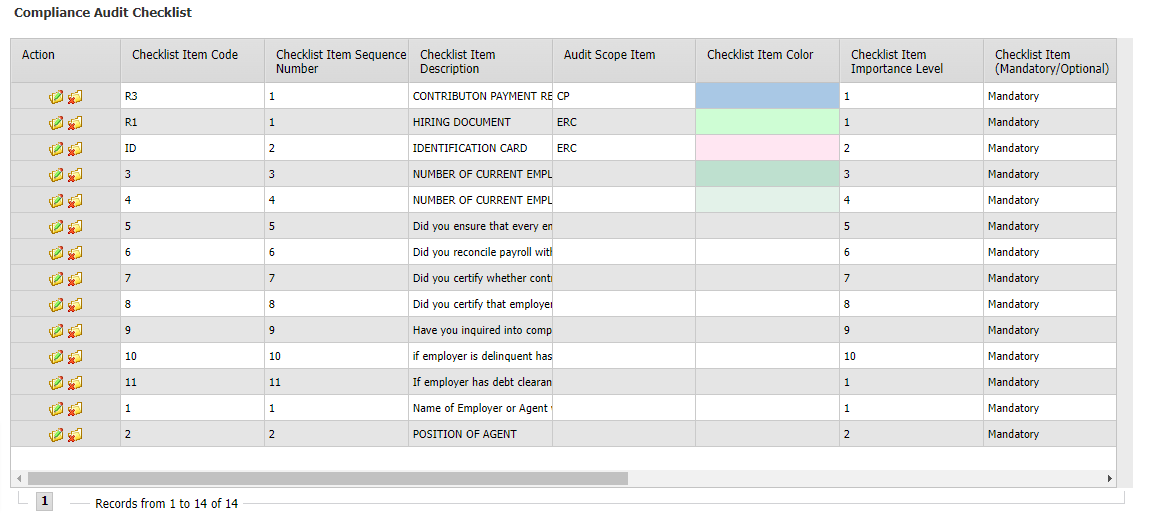 Figure 127: Compliance Audit Checklist Each Audit which is conducted will be based on a specific Compliance Audit Checklist, which will contain all the items that must be checked and verified during the Audit. The Audit Officer will be able to print the Audit Checklist and document all necessary elements that are verified during the Audit. 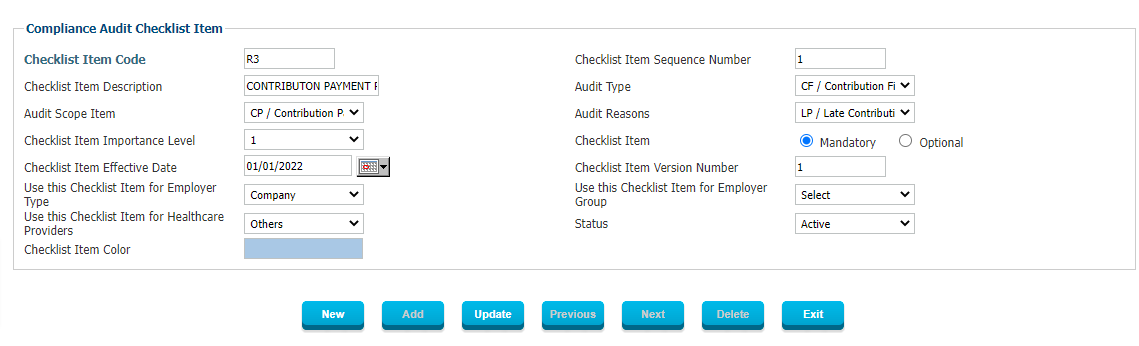 Figure 128: Compliance Audit Checklist Item Definition There is no limit on the number of Compliance Audit Checklist Items which can be defined. Each can be associated with an Audit Type, Audit Reasons, and linked with Employer Types, Employer Groups or Healthcare Providers.
 Figure 129: Audit Action Types List The Audit Actions which may result as the outcome of an Audit are fully configurable as part of the Audit Framework which the Social Security Administration wants to implement. 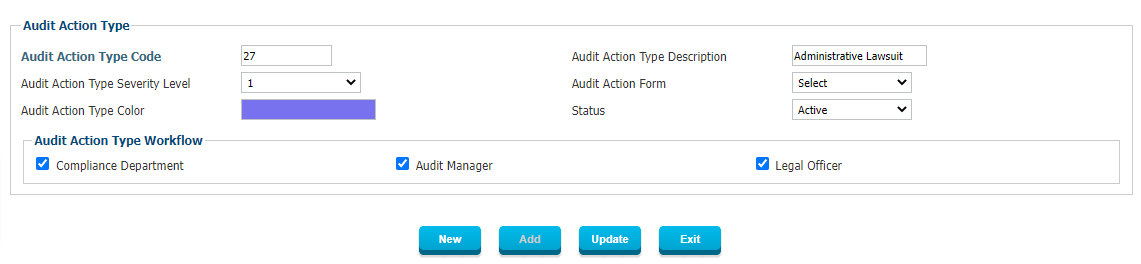 Figure 130: Audit Action Types Audit Actions Types can easily be defined with a Code & Description, associated with a Severity level, an Action Form and a Color. In addition, each type of Audit Action can be associated with a different Audit Action Type Workflow.
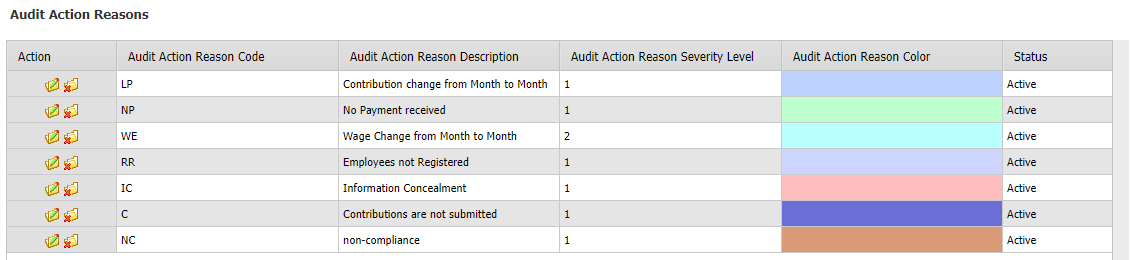 Figure 131: Audit Action Reasons List In order to take an Audit Action there will be a need to provide an official Reason, depending on the laws and regulations in the country and the policies in place at the Social Security Administration. The system will allow the user to define any number of Reasons which will be invoked when initiating an Audit Action.  Figure 132: Audit Action Reason Defining Audit Action Reasons can be done with a simple Reason Code, Reason Description and a Severity Level with Color Code.
 Figure 133: Audit Actions List Once the Audit Action Types and Audit Action Reasons have been defined, we can define the individual Audit Actions which fall under each Type. This way, the correct Audit Actions will be listed by the system when a user is managing a particular Audit Action Type. 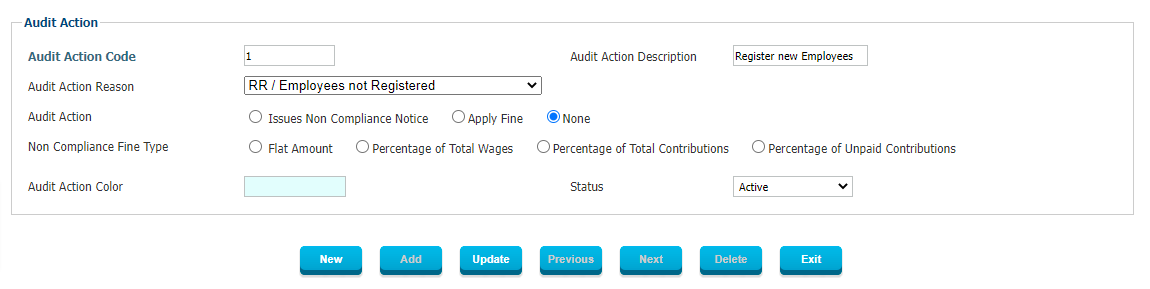 Figure 134: Audit Action Defining individual Audit Actions can be done using the simple form above which allows for the Audit Action Code and Description as well as various classifications to be setup.
 Figure 135: Lawsuit Reasons List One critical outcome of a Compliance Audit may be that the Social Security Administration will take legal action in court. In order to track the various Reasons for which such Lawsuits are initiated, the system uses a validated list of codified Lawsuit Reasons which can be configured as required.  Figure 136: Lawsuit Reason The definition of Lawsuit Reasons is a simple as all other definitions in Interact SSAS, using Reason Codes and Descriptions as well as Severity Levels and Color Codes.
 Figure 137: Lawsuit Types Since there may be different Types of Lawsuits, each for different Reasons, the system allows the user to define the Types of Lawsuits in the Compliance Framework. 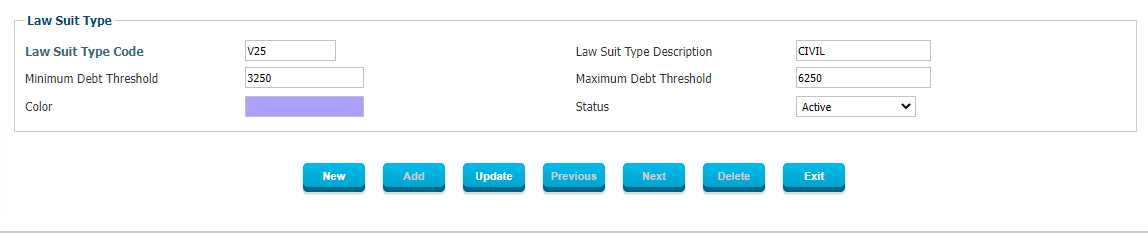 Figure 138: Lawsuit Types Definition Defining a new Lawsuit Type is simple with a Code and Description, together with the Minimum and Maximum Debt Threshold which may determine the type of Court and Lawsuit that will be initiated.
 Figure 139: Lawsuit Methods List The different Legal or Lawsuit Methods which may take place in the legal process can be defined so that the status can be tracked carefully  Figure 140: Lawsuit Method Defining the Lawsuit Method only requires a Code and Description.  Figure 141: Lawsuit Status Listing The manner in which to track the Status of a Lawsuit and the actual Status itself is fully configurable.  Figure 142: Lawsuit Status Definition Creating a Status with Code and Description is straight-forward.
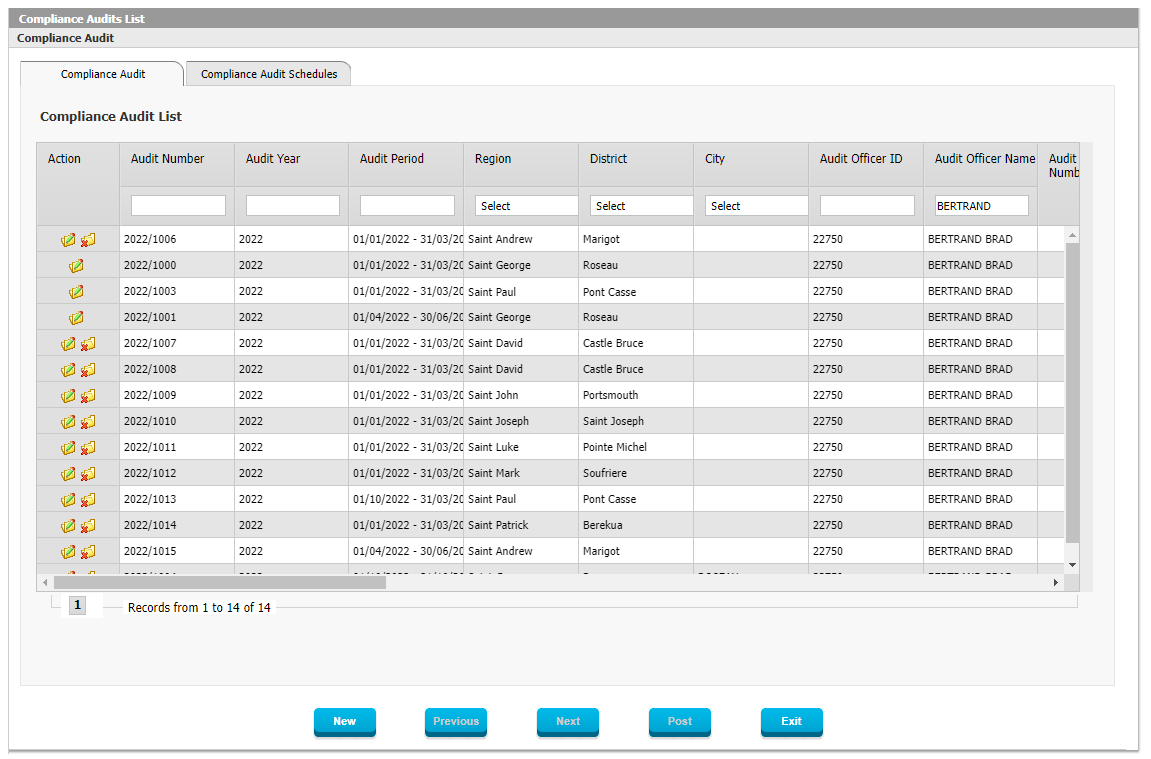 Figure 143: Compliance Audit List – Compliance Audit 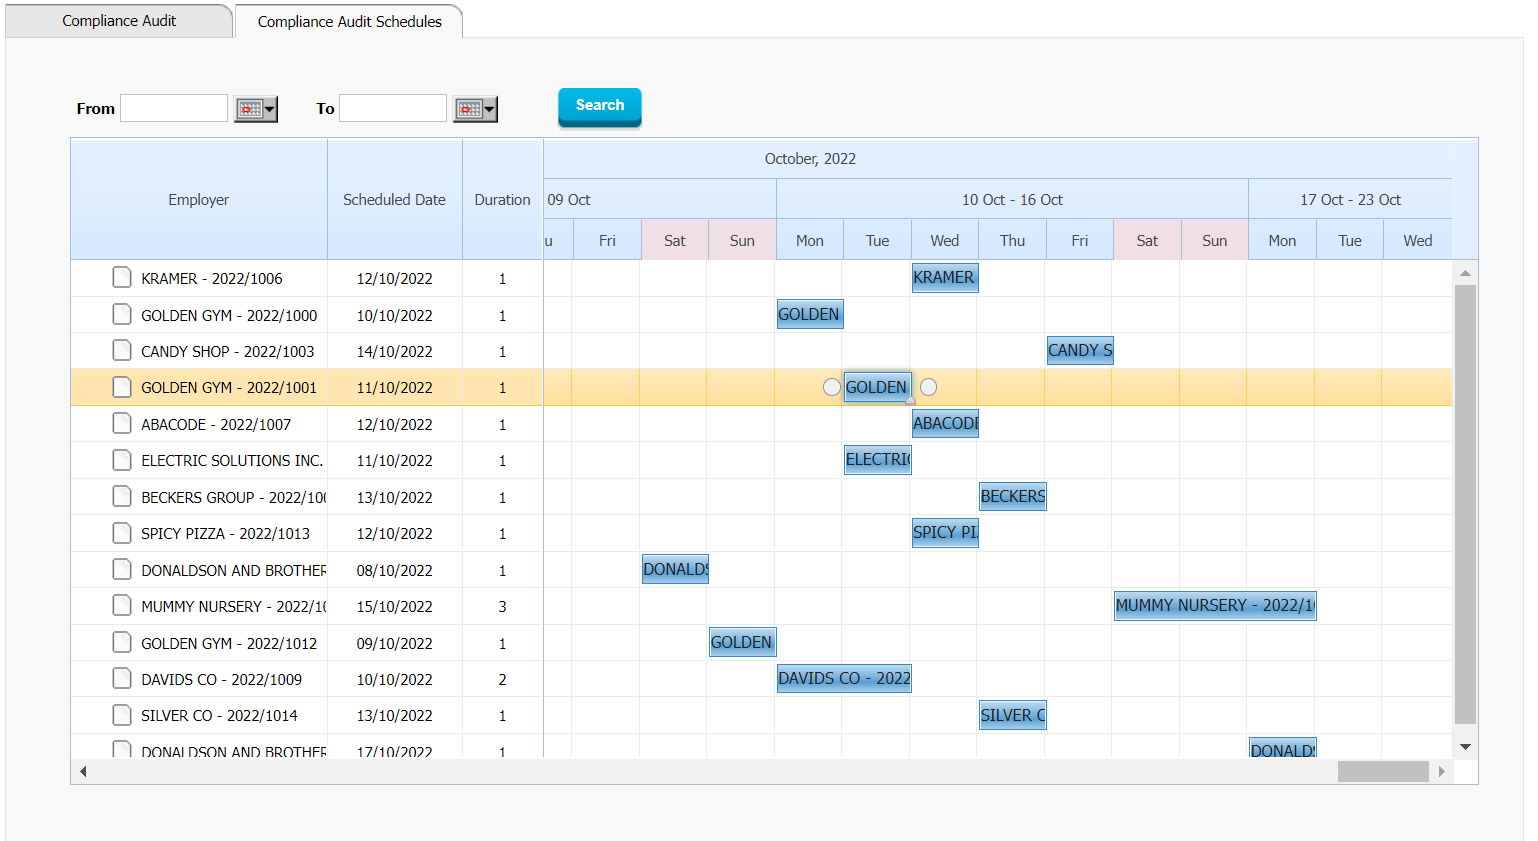 Figure 144: Compliance Audit List – Compliance Audit Schedules Audit Scheduling (Schedule Compliance Audit) – This process consists of scheduling a compliance audit based on the predefined compliance audit cycle. Note however, not all social security organizations have a schedule for compliance audits. Some organizations may conduct compliance audits in an ad hoc manner based on the discretion of the audit officers.
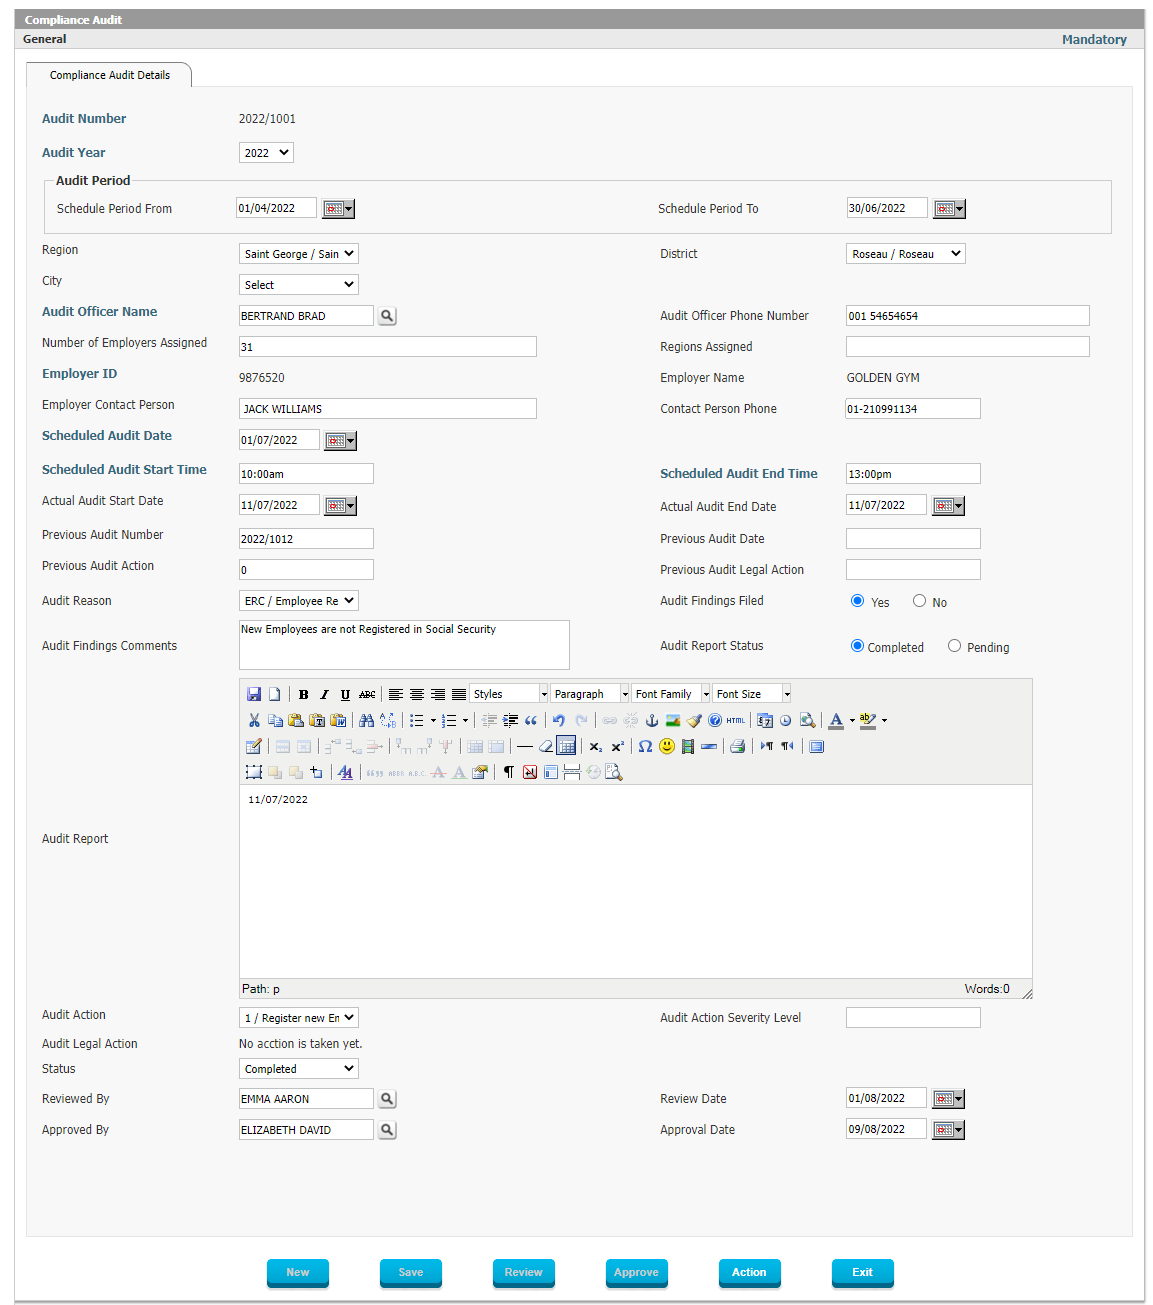 Figure 145: Compliance Audit Compliance Audit – Once the audit schedule is defined, a Compliance Audit record is created and the employer is informed of the Audit Date and Time and Reason of the audit.
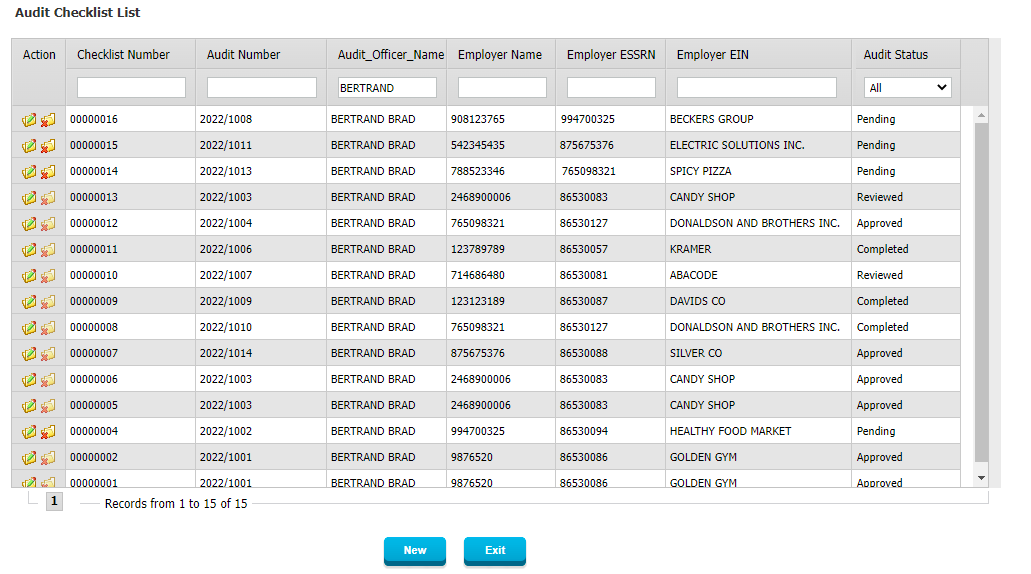 Figure 146: Audit Checklist List 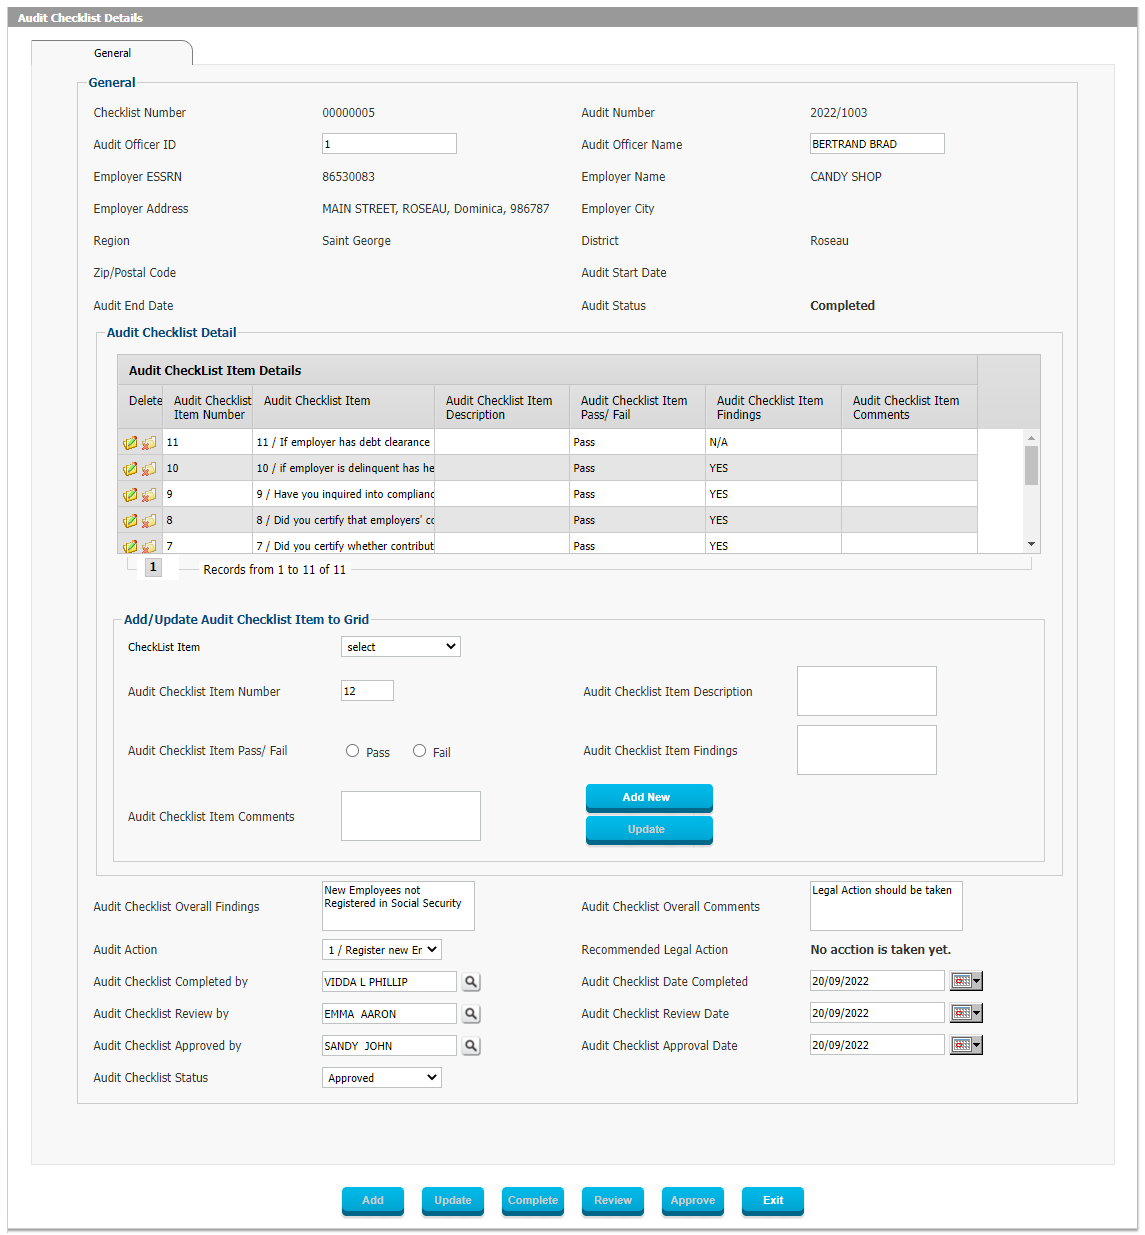 Figure 147: Audit Checklist Details Compliance Audit Checklist – On or before the date of the Audit, a Compliance Audit Checklist is printed to be used during the Audit visit by the Audit Officer.
 Figure 148: Audit Action List 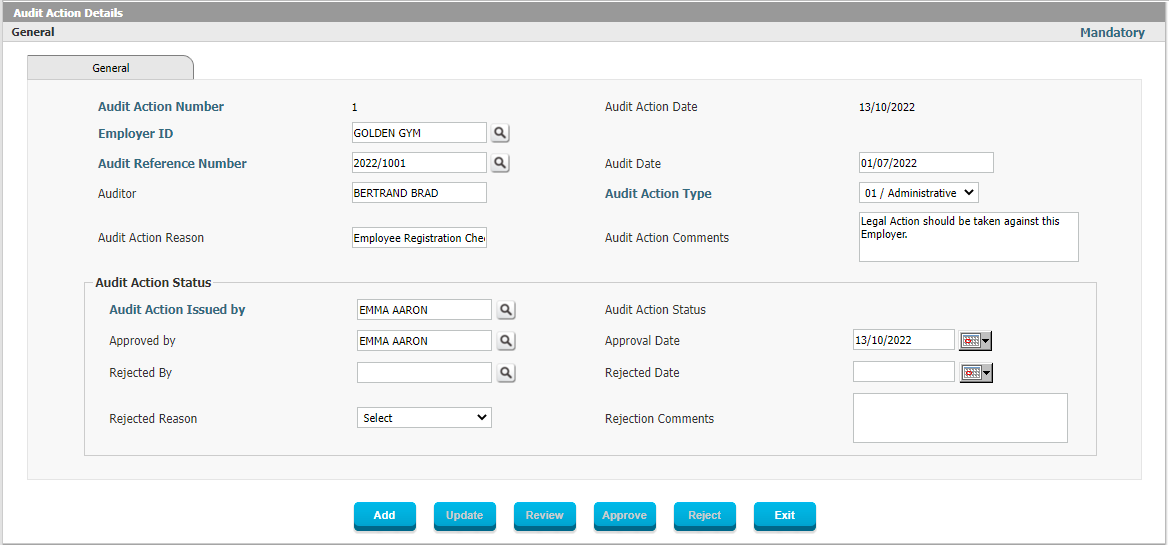 Figure 149: Audit Action Details Review and Approve Compliance Audit Action – The management and the Legal Officer will review and approve the recommended Compliance Audit Action, and once approved to a notice of the recommended Compliance Audit action is sent to the employer to implement the issued Audit Action.
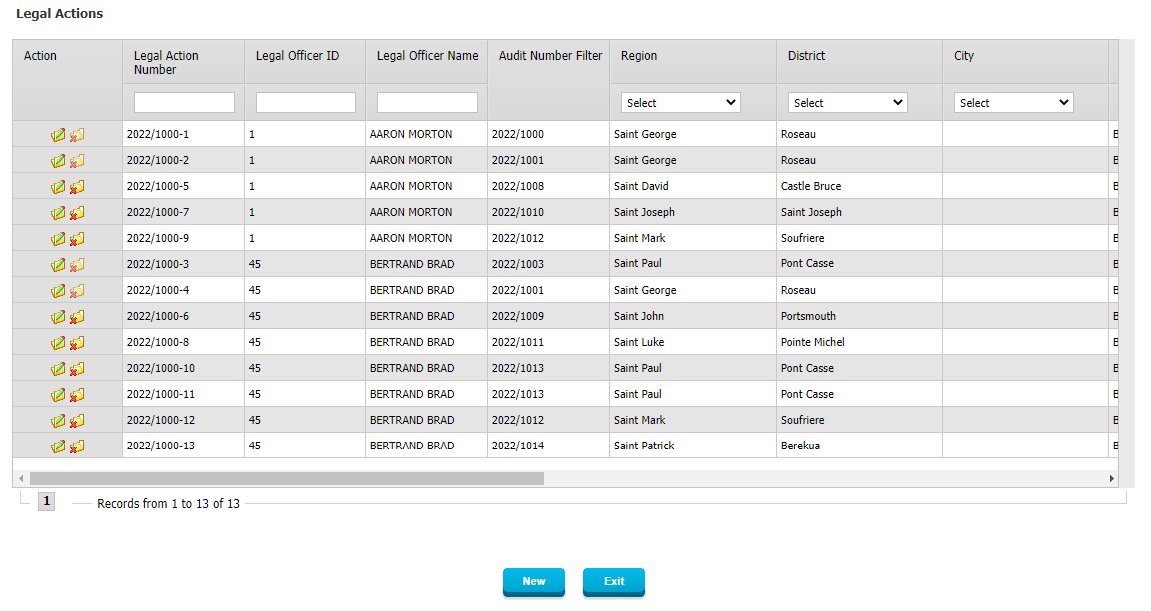 Figure 150: Legal Action List Follow up on the Compliance Audit Action – An Audit officer will follow up with the employer to ensure that the Compliance Audit Action has been implemented by the employer. If not, the Audit Officer will send a notice to the Legal Officer to take further action. 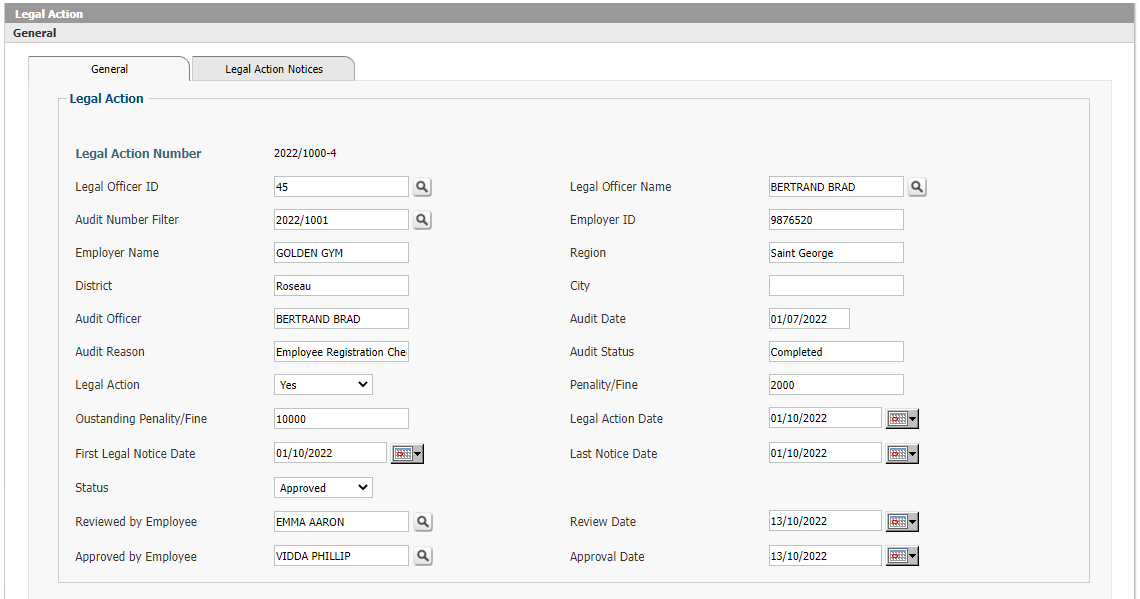 Figure 151: Legal Action – General 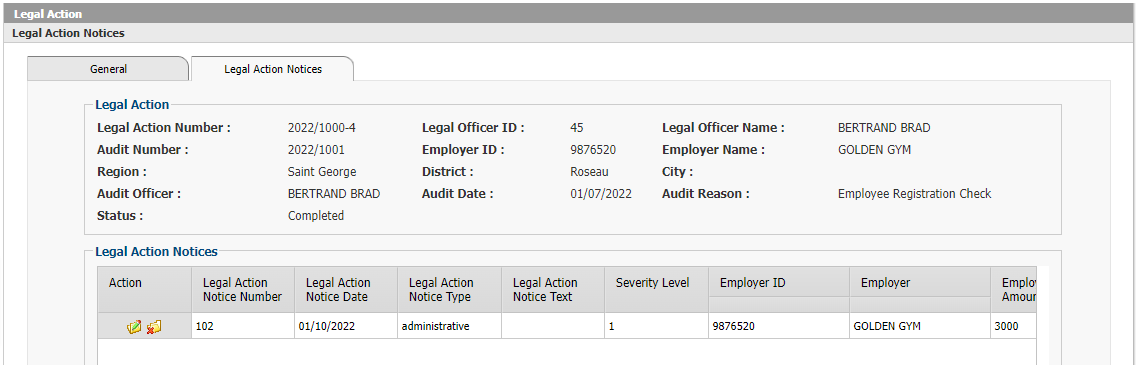 Figure 152: Legal Action – Legal Action Notices
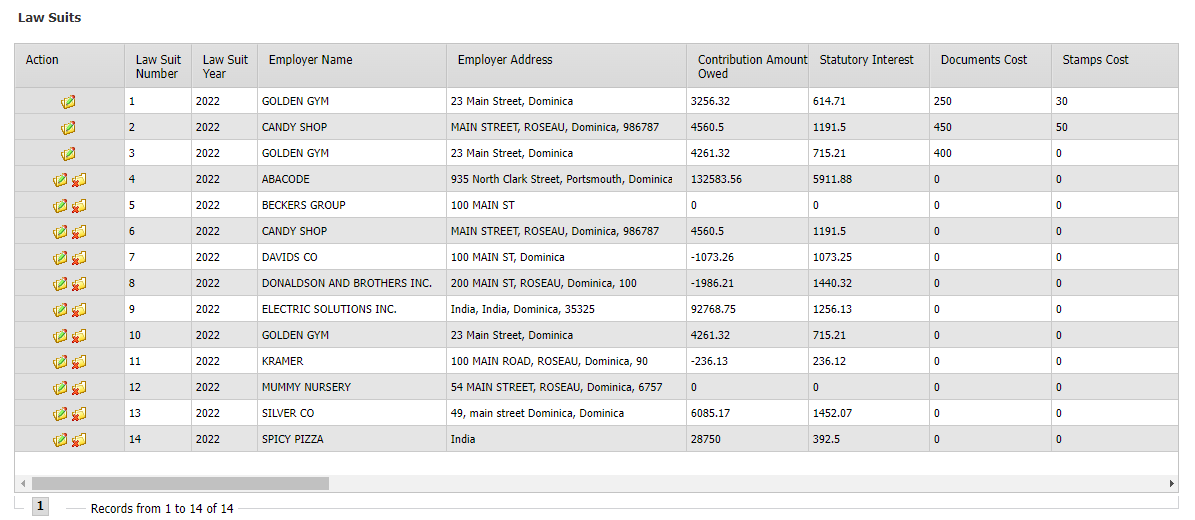 Figure 153: Lawsuit List 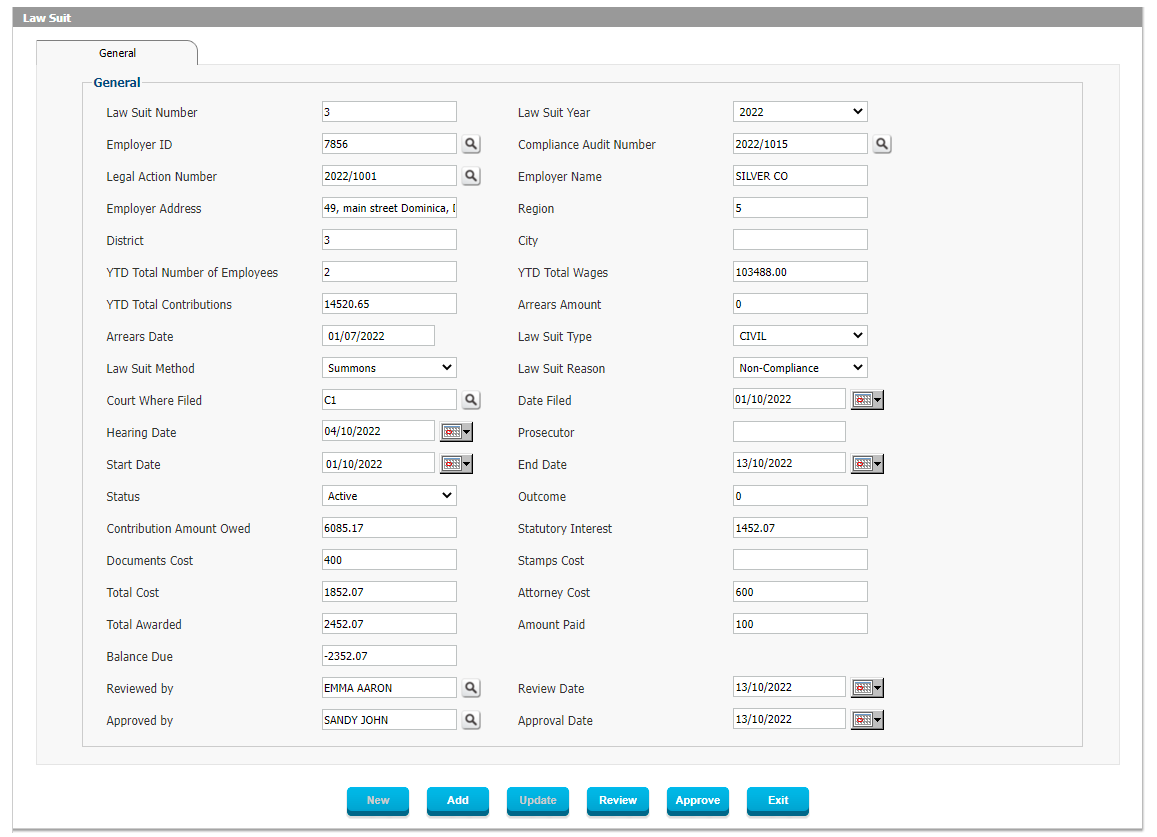 Figure 154: Lawsuit If the Employer is not taking Action as per the Audit Actions recommended, then the Social Security Administration will be forced to take Legal Action and after advising of the intent to do so, the Social Security Administration can initiate the Lawsuit and record all details in the system for reference and managing the case information. Step 7: Court Orders 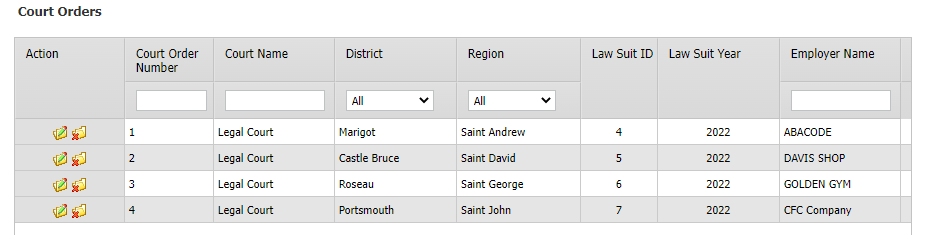 Figure 155: Court Orders List 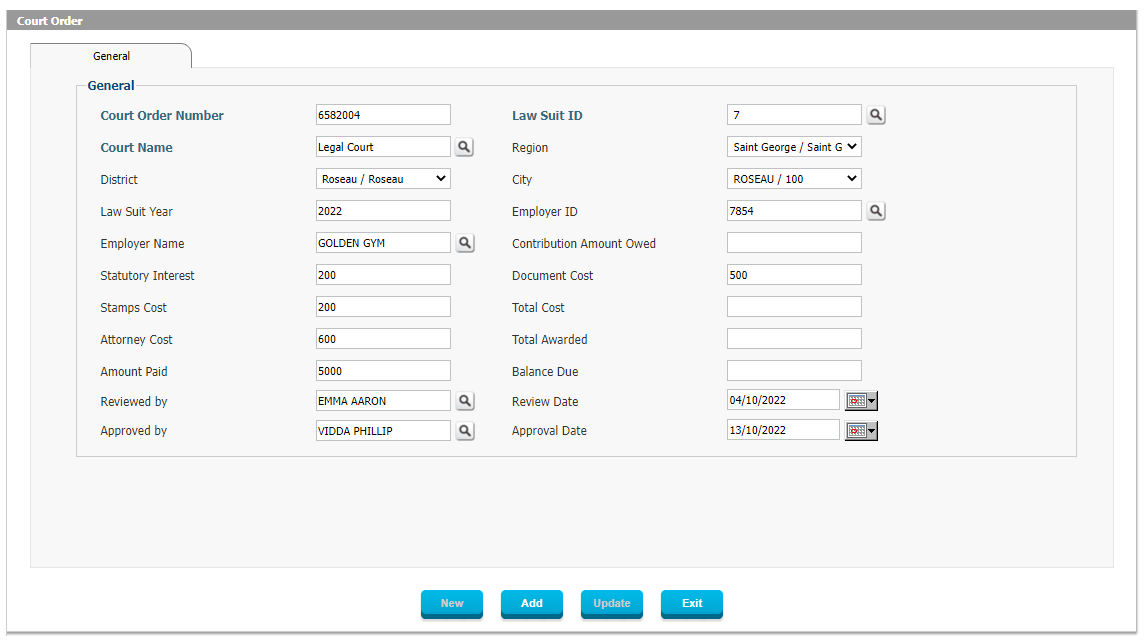 Figure 156: Court Order If after the filing of the Lawsuit the Employer remains non-compliant and the Social Security Administration prevails in Court, the Court will Order the Employer to comply. Delinquency Management
Delinquency Management is a key module in the Interact Social Security Administration System suite of products. It is specifically designed to be flexible enough to support differences in social security legislation for different countries. Its primary goal is to help international social security organizations improve compliance by allowing them to easily identify, track, and manage delinquent employers, healthcare providers, and individuals. Individuals determined to be Delinquent can be employees, self-employed, voluntary contributors, beneficiaries or pensioners, mostly due to fraudulent benefit claims. Through the seamless integration with Compliance Management, a Compliance Officer or Auditor can select an Audit Action outcome of marking an Employer, Healthcare Provider or Individual as Delinquent.
The reasons for marking someone Delinquent are fully configurable and vary based on the type of entity: 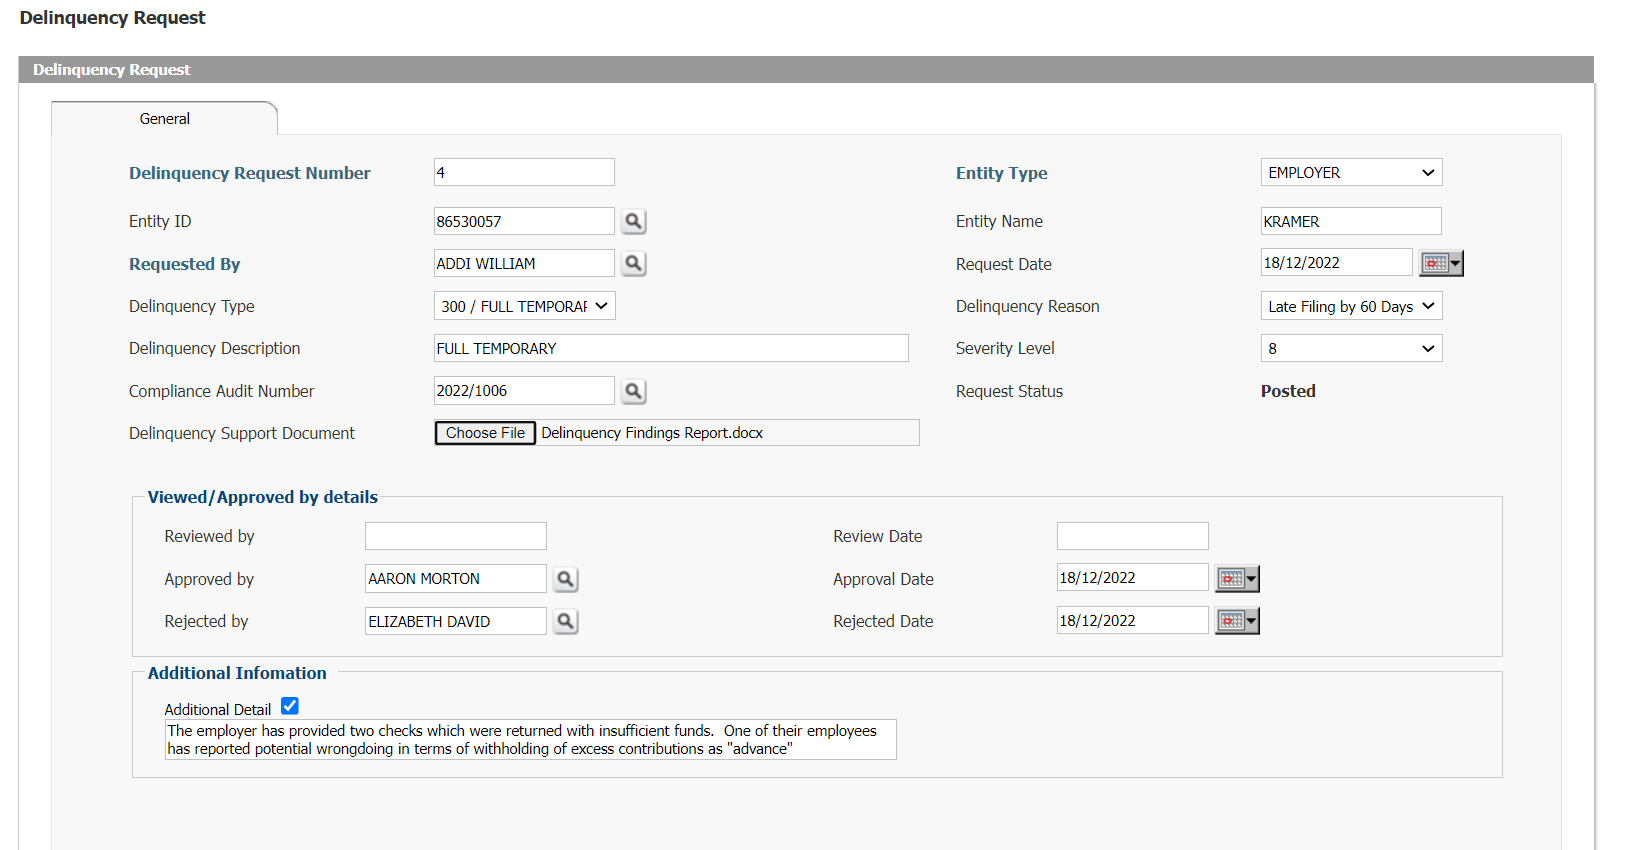 Figure 157: Delinquency Request The system can be set to automatically mark an employer as Delinquent, or this can be initiated manually through a Delinquency Request. Key Processes There are three ways in which a Delinquency is invoked: (2) Manually, a user who has uncovered a violation can manually create a Delinquency Request where he/she selects which Employer, Healthcare Provider or Individual should be set to Delinquent and includes the details of the Alleged Violation in the Delinquency Request. In this case the request goes through the workflow and once approved the selected entity will be marked as Delinquent. In addition, through the Compliance Audit Action in the Compliance Management module, an Audit Officer can select the Audit Action as Delinquent, and the system will mark the selected Employer as Delinquent. Delinquency Framework 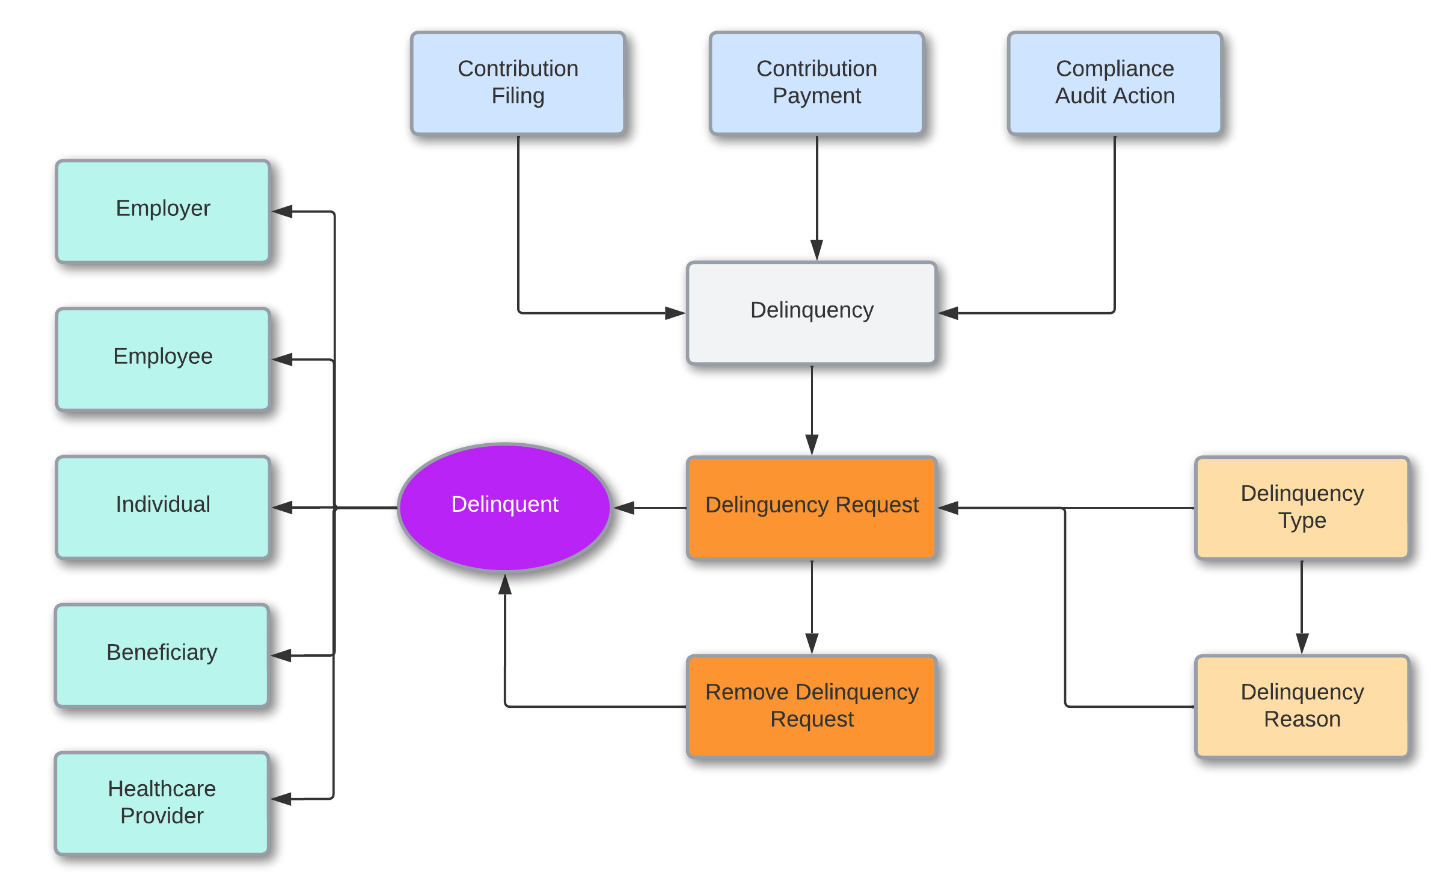 Figure 158: Delinquency Framework The basis of the Delinquency Framework shown is that the Delinquency can be triggered using two modes: an Automatic and a Manual Trigger. The Automatic Trigger of Delinquency is handled using specific Trigger Rules defined at the Setup of the Delinquency Module and at the Policy Level. Once the trigger rules are setup, the system will automatically trigger a delinquency event, which generates a Delinquency Request, and in turn an entity will be flagged as delinquent after review and approval of the Delinquency Request. Manually triggered Delinquency on the other hand is not linked to any process. In the manually triggered Delinquency, the user has to manually invoke the Delinquency Request and complete the request by selecting the concerned entity, the delinquency type, and delinquency reason. Once the request is reviewed and approved, the selected entity will become delinquent. Entities – The delinquency process applies to various entities including Employers, Employees, Individuals, Beneficiaries, and Healthcare Providers. Note that the automatic delinquency mode is only applied to Employers as the automatic delinquency is linked to Contribution Filing, Contribution Payment, and Compliance Audit Actions. While the manual delinquency mode is applicable to all entities. Removing/Revoking Delinquencies – Removing or Revoking a Delinquency process is used to remove an entity from the Delinquency List. Removing a Delinquency is a manual process, where the user has to submit a Delinquency Removal Request, and once the request is approved, the concerned entity will be removed from the delinquency pool/list. Removing an entity from the Delinquency List, does not delete/purge the Delinquency History of the delinquent entity. The delinquency history will remain, even if the Delinquency is removed. The delinquency removal applies only to the current state of the entity. 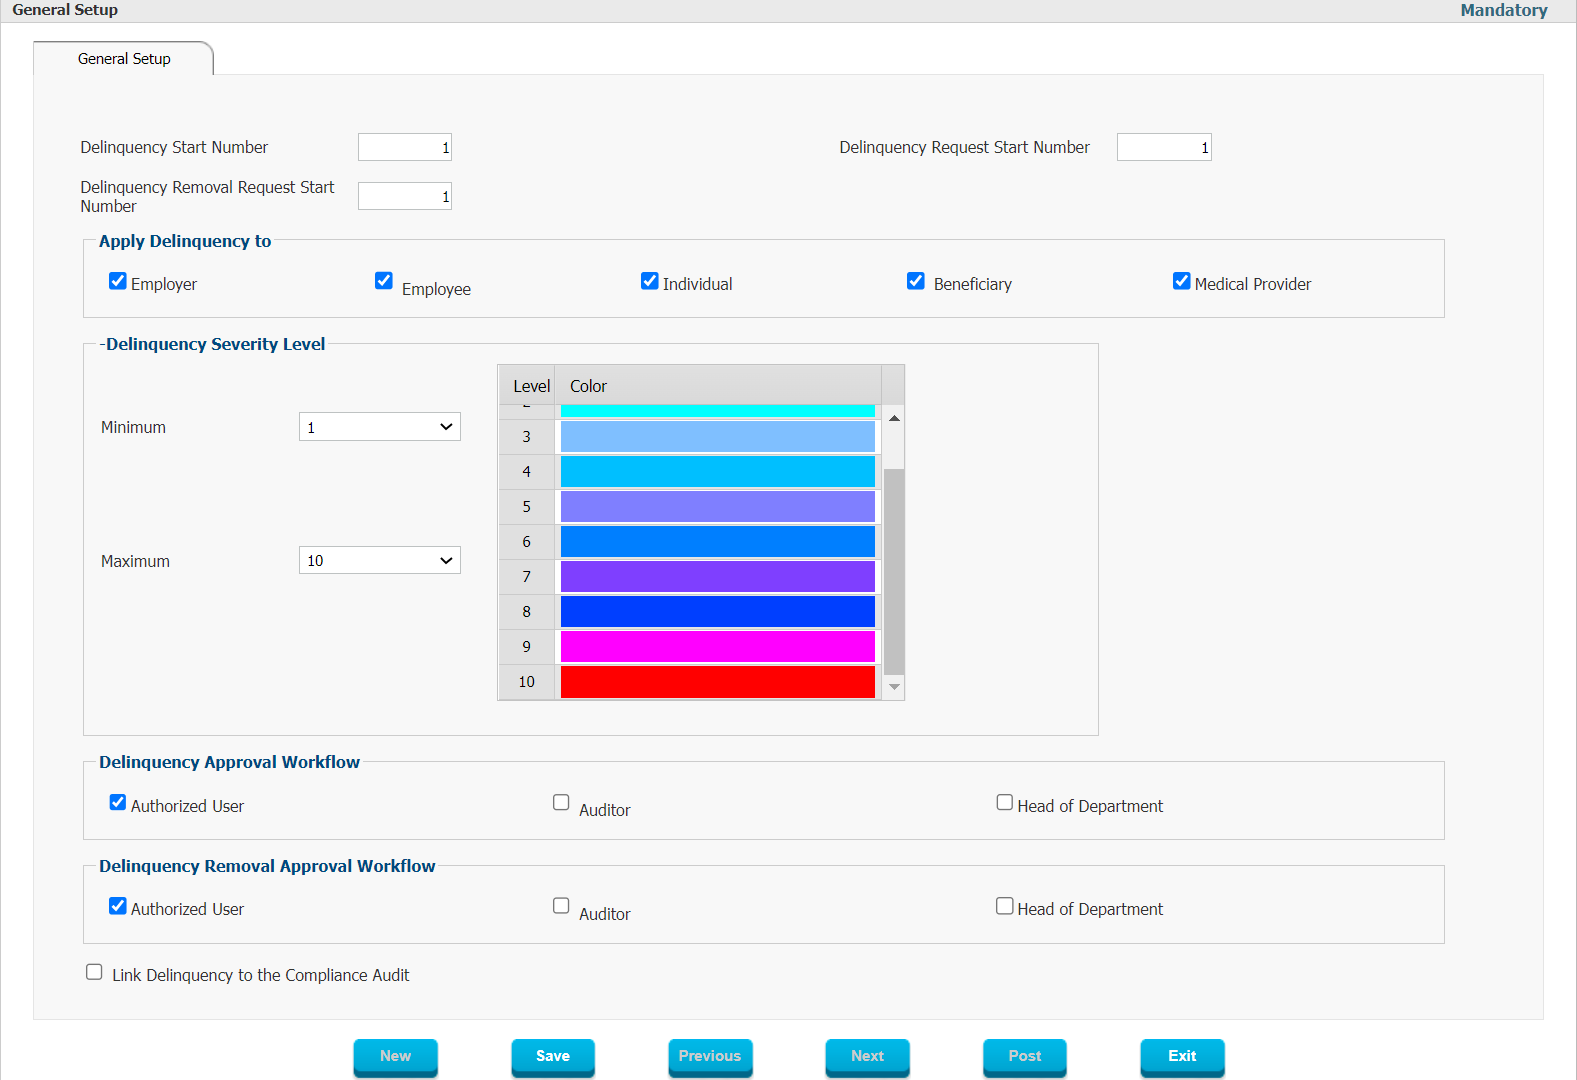 Figure 159: Configurable Setup for Delinquency Management 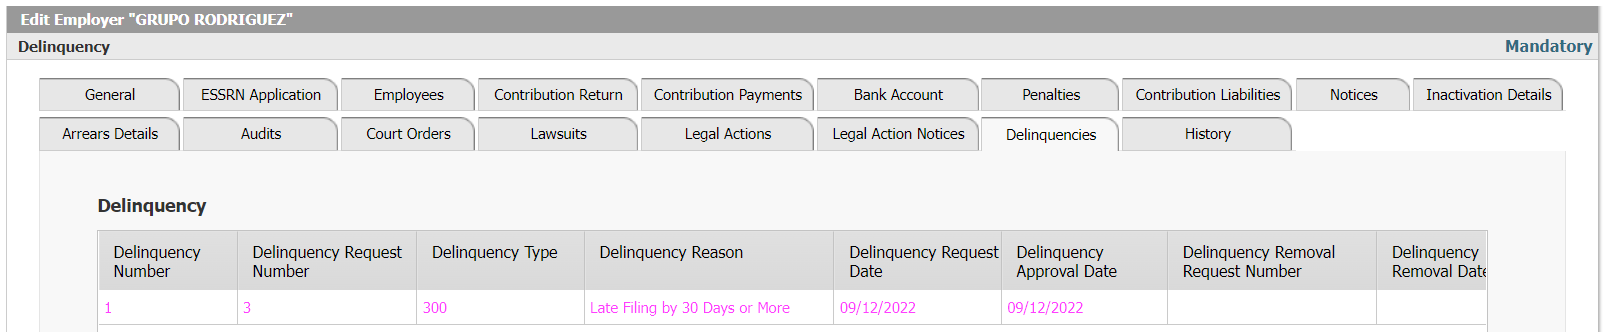 Figure 160: Delinquency Tab in Employer Record Medical Record ManagementSince Interact SSAS provides a single suite of modules which are all seamlessly integrated to streamline the processes of Social Security Administrations. This also applies to how Medical Records are managed as they can be crucial in determining eligibility for specific Medical Benefits.
In each case, a doctor will need to provide a Diagnosis and file it with the Social Security Administration so that this information can be treated confidentially and reviewed to ensure eligibility of a Claimant for the Benefit that is Claimed. Lastly, the system also provides a Medical Referee feature which allows the Social Security Officer to request another Opinion for a specific case in order to pay a Benefit Claim. The user can select a specific Medical Practitioner to be a referee.  Figure 161: Medical Doctor e-Services Home Screen Before an individual can claim any type of Medical Benefit, they will need to first have an (approved) Medical Certificate in the system which needs to be submitted together with the Medical Benefit Claim. In order to have this in the system, the individual will need to visit with a medical doctor who can enter the Patient Visit directly into the system so that the information will be validated immediately and is ready for submission with the Medical Claim. In the above screenshot you can see the Medical Doctor’s home screen where they will access the Patient/Medical Visit menu to be able to fill in the appropriate Medical Certificate.  Figure 162: Medical / Healthcare Provider Certificate In Figure 162 you can see the Medical Certificate as completed by the doctor, indicating the diagnosis, the visit details and the recommended Medical Benefit as well as the Start and End Date of the Incapacity Period as per the doctor’s finding. This same Certificate and any other follow up information will be on record with the Social Security Administration and will build a Medical Profile for the Individual which can be used by Doctors or Medical Boards in charge of reviewing important claims for Medical Benefits. A summary of the information will also be available on the Employee Electronic Record as shown below. Medical Visits 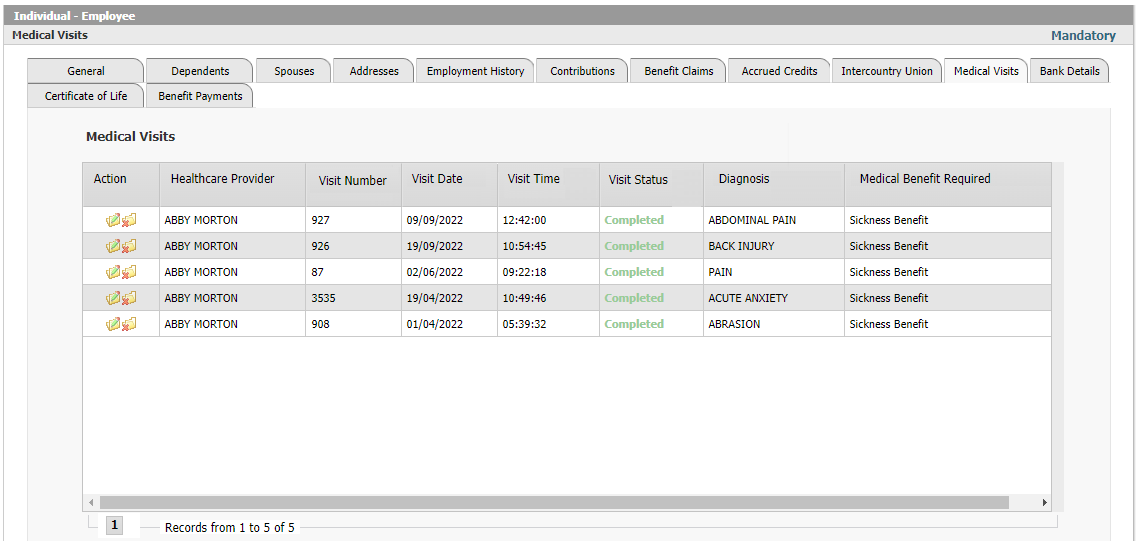 Figure 163: Employee Electronic Record – Medical Visits Details on Medical Visits are captured in the system in order to justify various Medical Benefits, including Sickness Benefits, Maternity Benefits, Invalidity and/or Disability Benefits. For this reason, the diagnosis reported by a Healthcare Provider will be transmitted directly from the doctor to the Social Security Administration. If required, the information can be available on the Employee Electronic Record online with access to more detailed reporting for authorized users.
Documents Management and TrackingAll transactions processed in Interact SSAS can be configured with specific mandatory or optional supporting documents to be uploaded with the transaction. Employees will find:
While Employers will find:
Every form that requires a document is always supported with a field to upload that document. For instance, Employee Profiles will have different supporting documents that should be uploaded such as when adding a Dependent, a School Certificate and Birth Certificate may be required. Other Documents can also be defined in Application form Setup which allows the User to define the Supporting documents that need to be attached with this Application form. 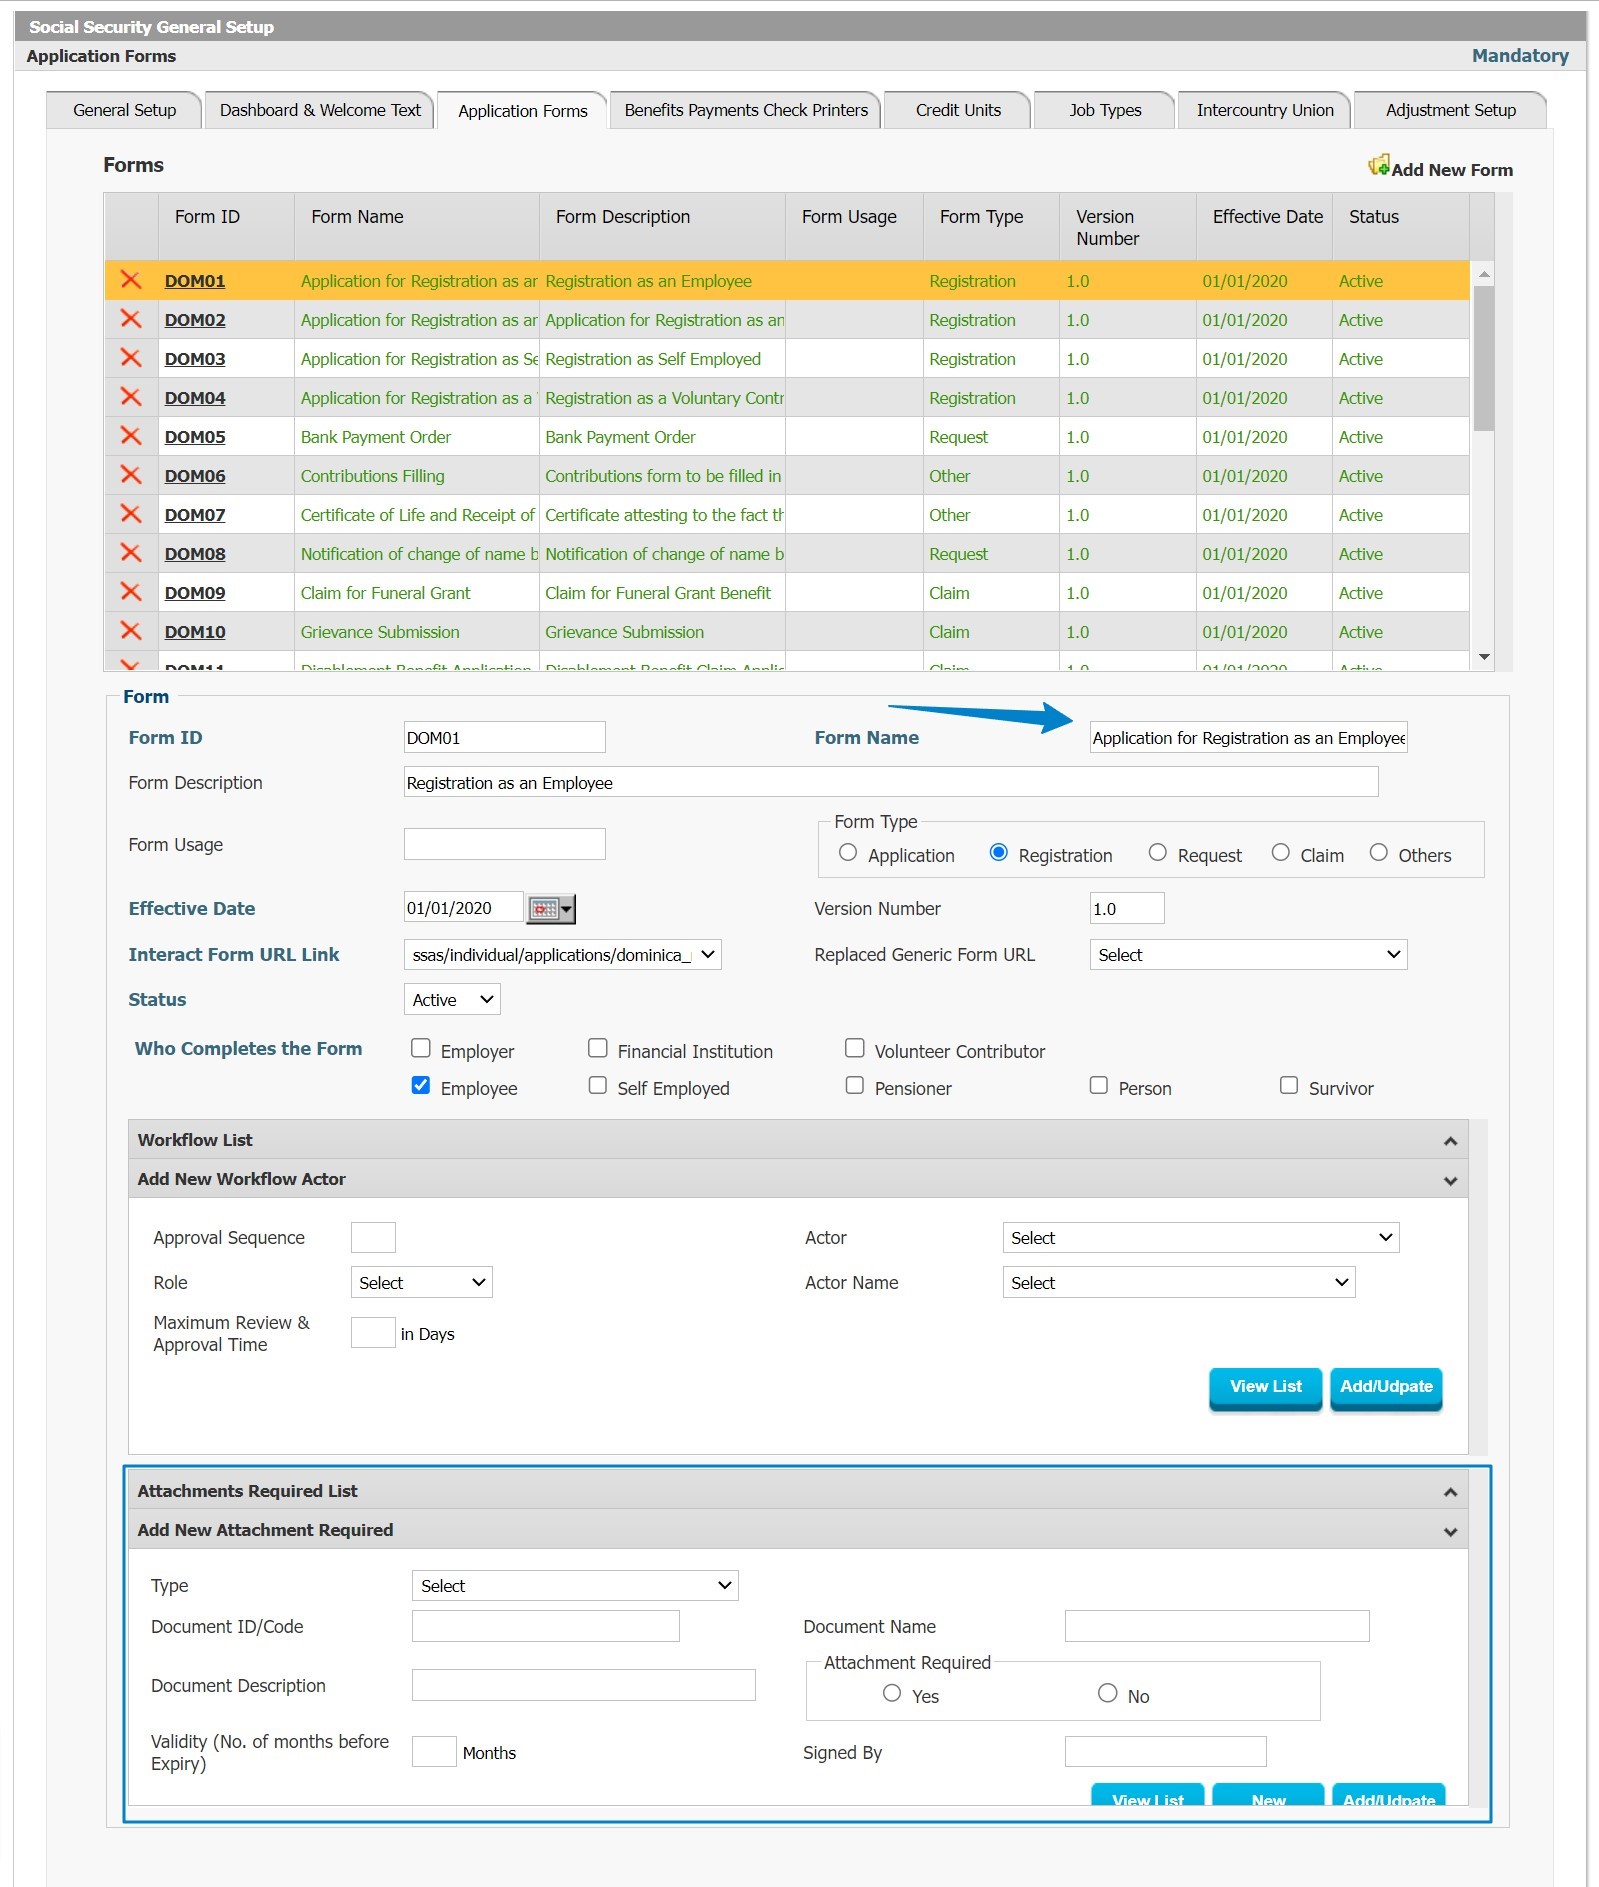 Figure 164: Attachment Requirements by Form GL InterfaceInteract SSAS provides a comprehensive GL Interface which provides the exact Journal Entries as per the Social Security Administration’s own Chart of Accounts structure and setup. Using the Interact SSAS GL Interface functionality, the General Ledger Journal Entries which result from the receipt of Contributions and the payment of Benefit Claims by the Social Security Administration can quickly be posted to an external General Ledger. In order for the system to produce the exact GL Journal Entries required, the user will first need to configure the GL interface parameters in the setup of Interact SSAS. Interact SSAS GL Accounts are defined in the financial setup and will need to be linked with the appropriate Social Security Contribution Policy and the right Benefit Entitlement Policies so the correct accounts will be used depending on the type of Contribution or Benefit Payment that is being processed. Interact SSAS will produce GL Journal Entries for all Contribution Payments processed in the system and for all Benefit Payments paid by the Social Security Administration. In each case it will first produce a Trial GL file for review and approval, prior to producing the Final GL Journal Entries. After receiving payments for Social Security Contributions, the payment processing includes a step for GL Trial Posting, during which time the application will generate the Journal Entries which result from the Contribution Payments received. The user will be able to review and verify the accuracy of these GL Journal Entries in ‘trial stage’. The system will then provide a GL file based on the setup and GL accounts provided and GL Template required by the Social Security Administration. Shortly, the System can be integrated with any financial system through a predefined template that is received from the client and provide the GL file based on that Template. GL Setup
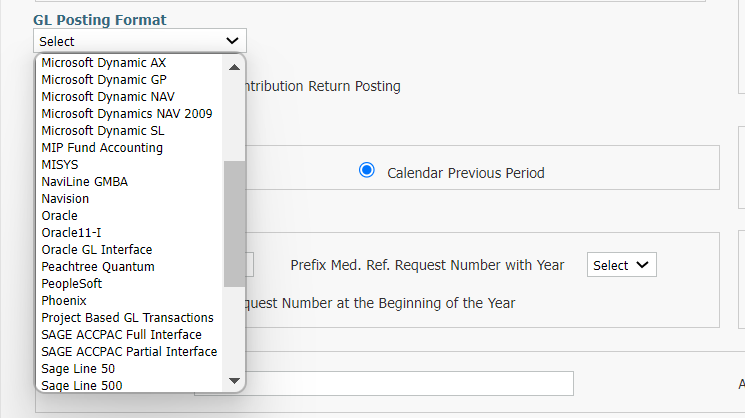 Figure 165: GL Interface Selection in General Setup Since Interact SSAS can support most commercial systems’ GL file formats out of the box, the user will first select their choice of General Ledger so that the correct file format will be used when generating the final GL File.
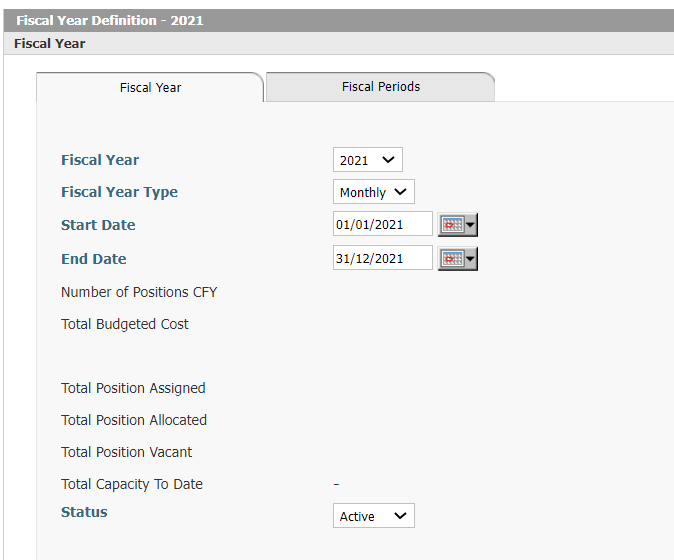 Figure 166: Definition of Fiscal Years in use at the Social Security Administration 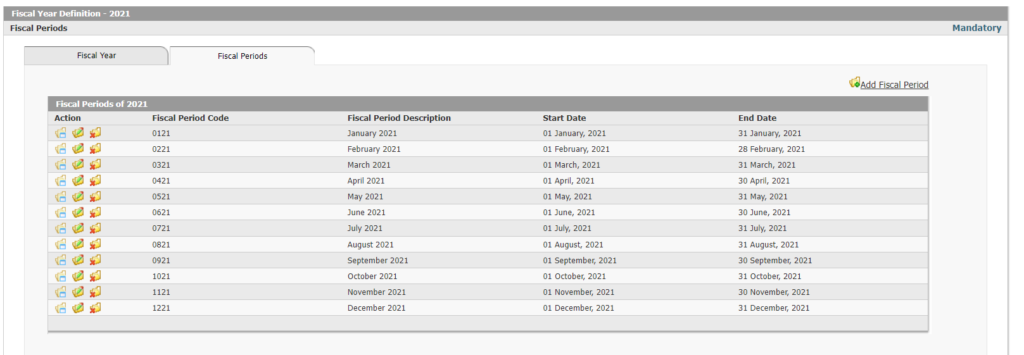 Figure 167: Fiscal Period Definition
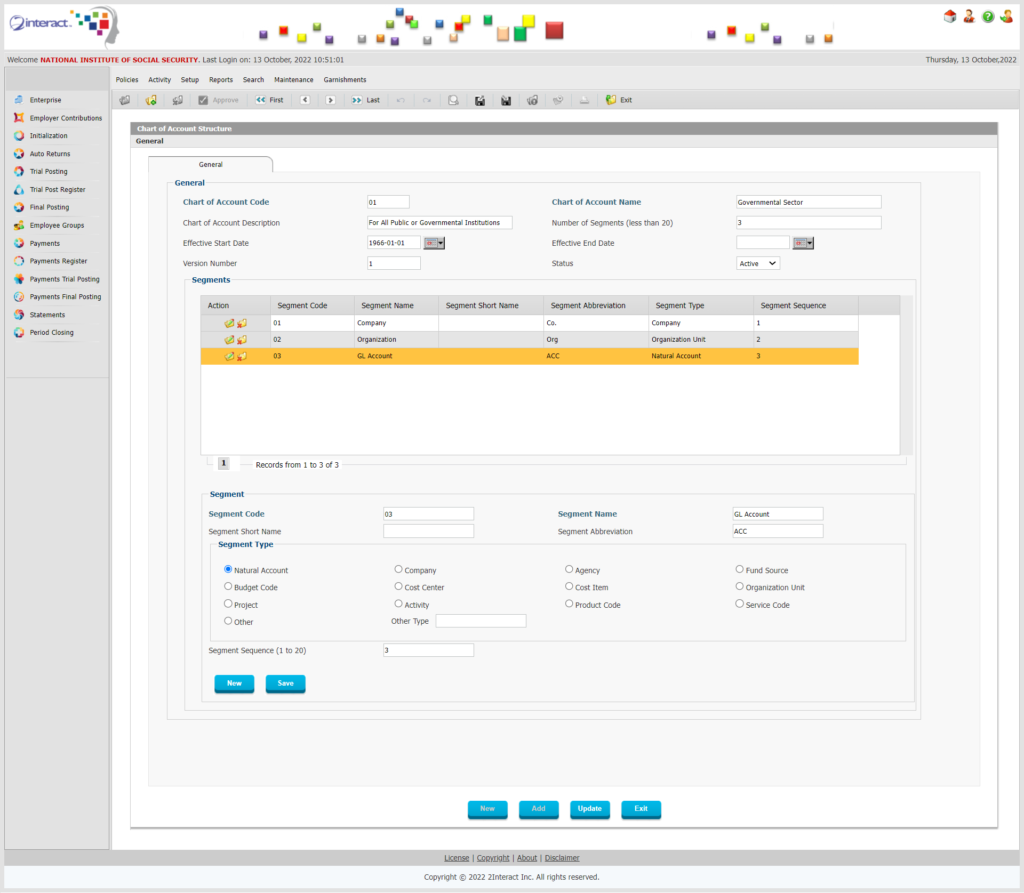 Figure 168: Chart of Account Structure Definition The structure of the Chart of Accounts to be used is fully configurable, whereby you can choose any number of segments, the purpose of each segment, the sequence, segment code and segment separator.
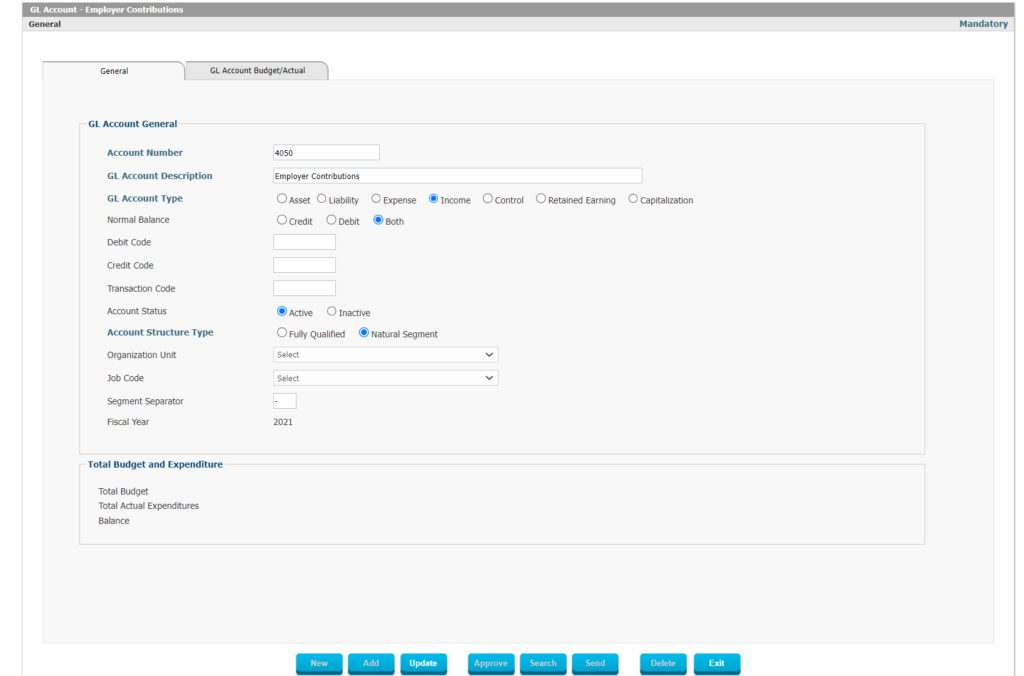 Figure 169: GL Accounts Definition Any GL Account can be defined which will be used for the GL Entries. GL Accounts can be asset, liability, expense, income, control, retained earnings and capitalization accounts.
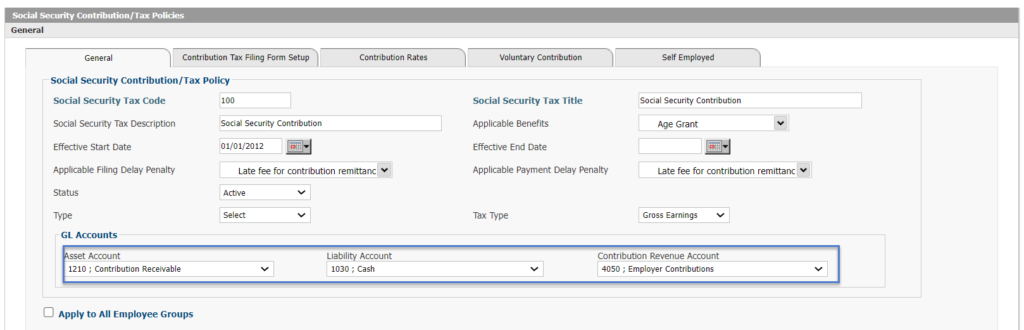 Figure 170: Linking GL Accounts with Social Security Contributions In order for Interact SSAS to use the correct GL Accounts for different Social Security Contributions, the system enables you to link the correct Asset, Liability and Revenue accounts to the Social Security Contribution defined. There is no limit to the number of different Social Security Contributions which you can define in the system (although usually only a small number will be in use) and each can be linked with different GL Accounts.
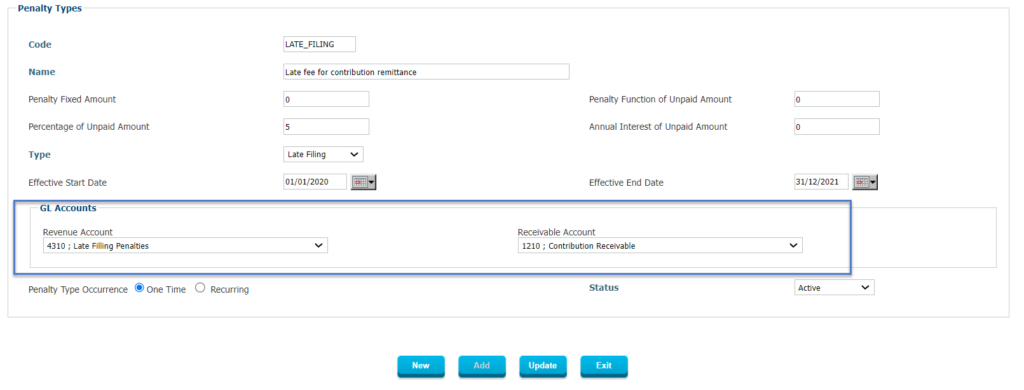 Figure 171: Penalty – GL Accounts Link Just like with the incoming Contribution Payments which the Social Security Administration receives, any Penalties which are paid by Employers for Late Filing or Late Payment will also need to be accounted for separately and may be booked with different GL Accounts. In order to be able to differentiate (and have clear financial reporting based on it later on), the user will need to associate correct GL Accounts also with each type of Penalty defined in the system.
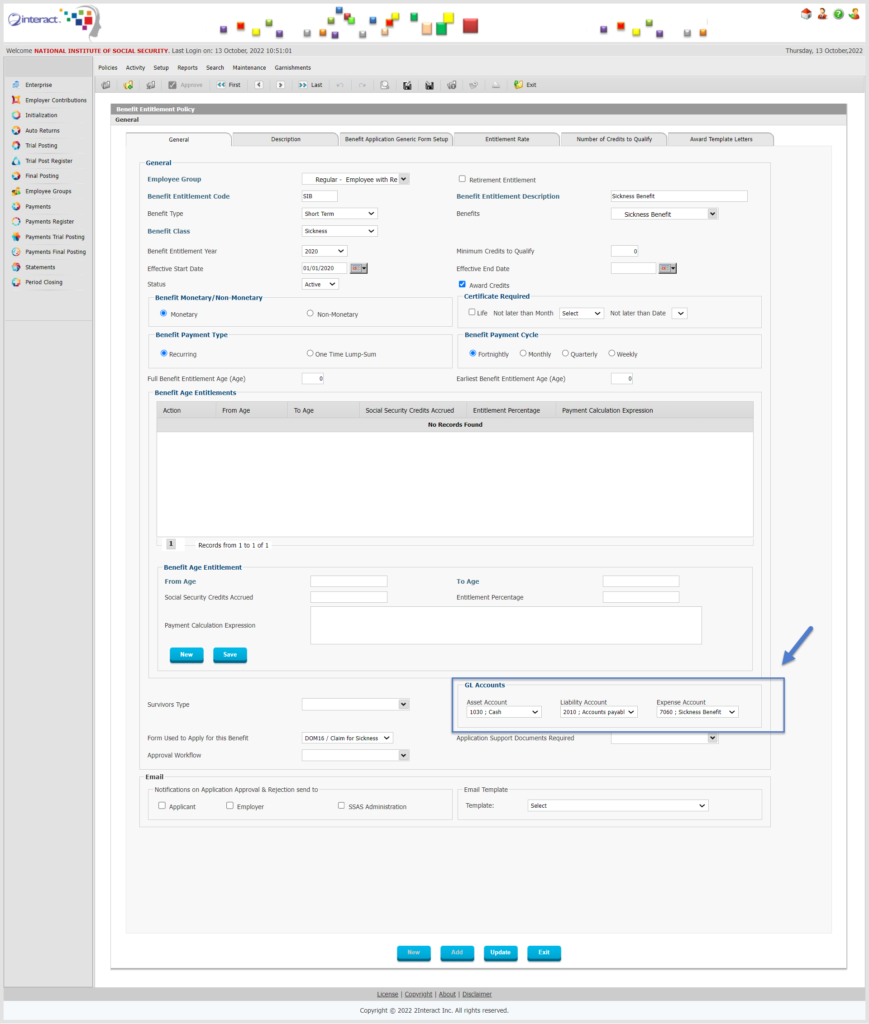 Figure 172: Benefit Entitlement Policy – GL Accounts Link In order for outgoing payments for Benefit Claims to be accounted for correctly, the associated Benefit Entitlement Policies for each Benefit Entitlement also need to be linked with the appropriate GL Accounts. Once the above setup is complete, the system will use the correct GL Accounts for all financial transactions in Interact SSAS based on the following GL Posting Process.
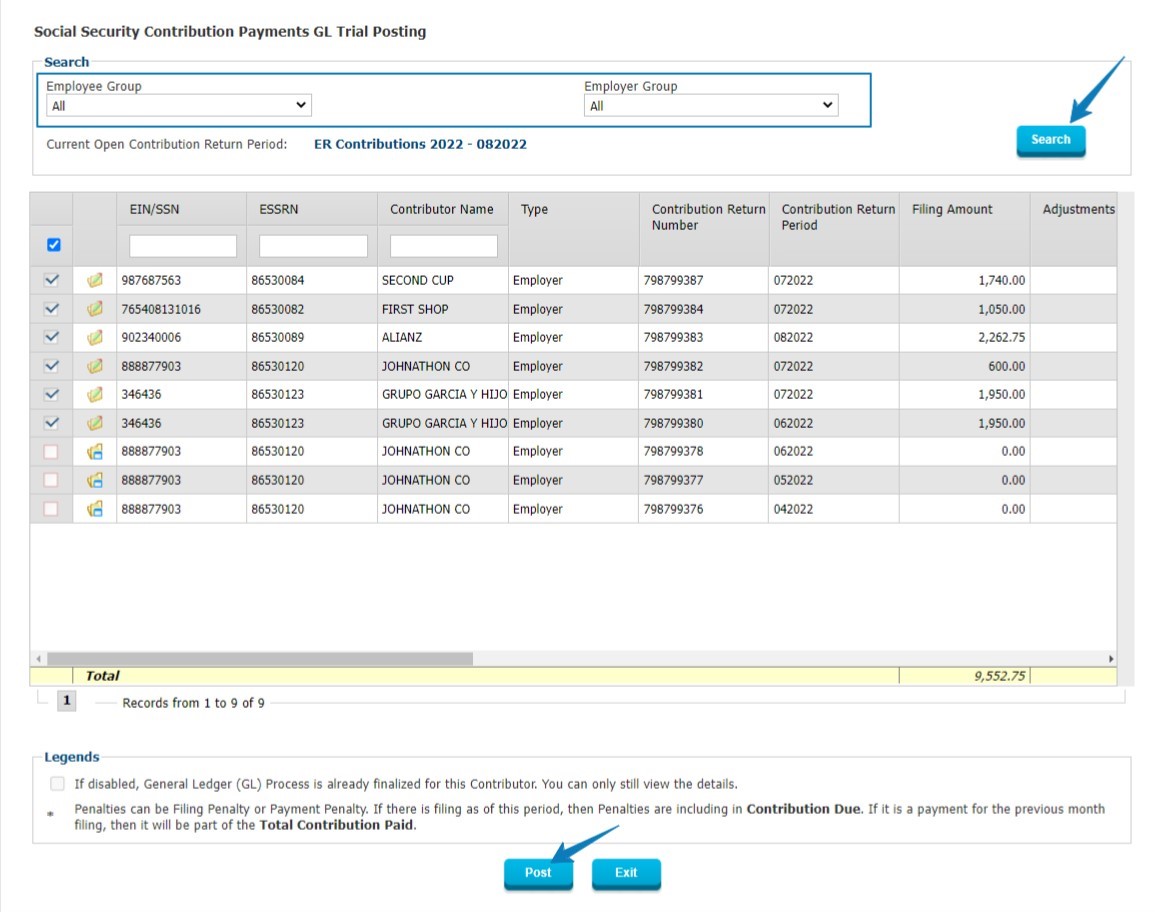 Figure 173: Contribution Payments Trial Posting Once Contribution Payments have been received and are being processed, the application will let the user generate the Trial GL entries for review.
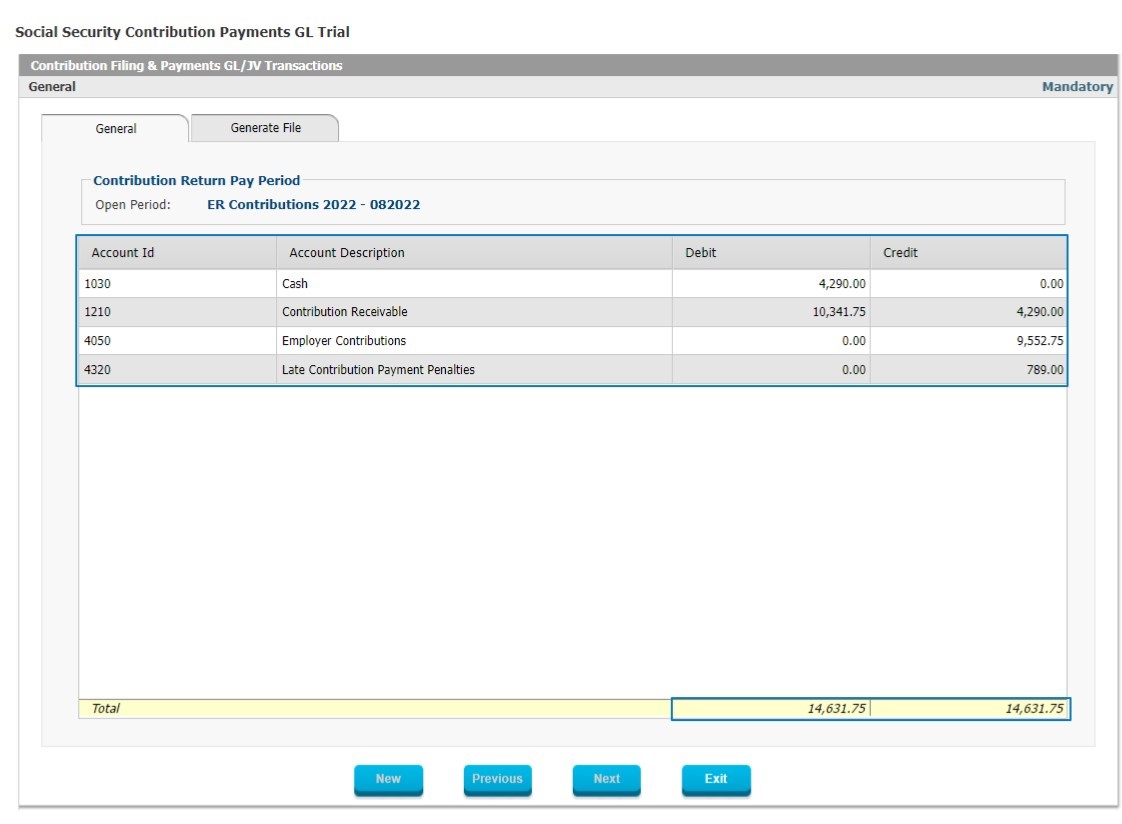 Figure 174: GL Journal Entries in Trial Stage The Trial GL file showing all details for the GL Journal Entries related to the payment of Contributions (and Penalties) so that these are accounted for correctly. If after review any inconsistencies are found, which will be due either to incorrect data submitted or a mistake or omission in the original GL setup, the user can address the cause of the inconsistency and regenerate the Trial GL until all Journal Entries are verified to be correct.
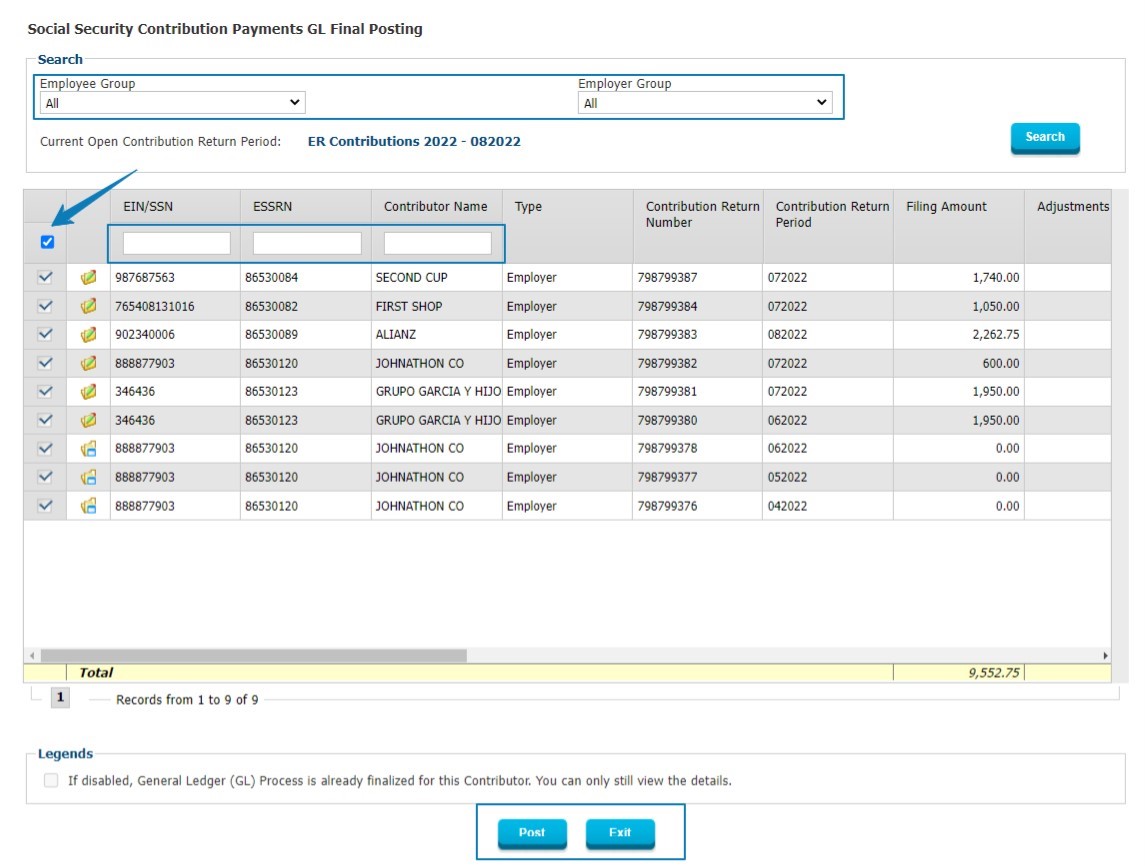 Figure 175: Final Posting of GL Entries This step will generate the Final GL Entries which can then be posted.
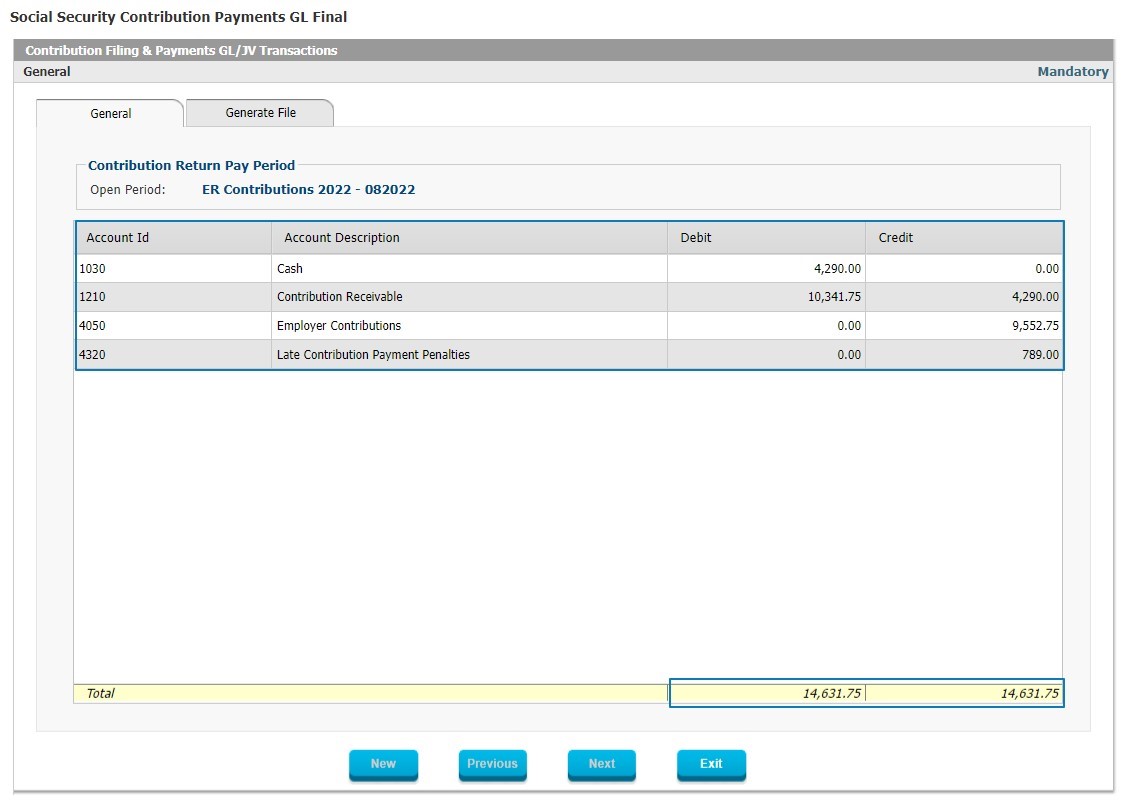 Figure 176: GL Final Posting This step will post the GL Journal Entries as final, no further changes are allowed at this point other than through standard adjustment processes.
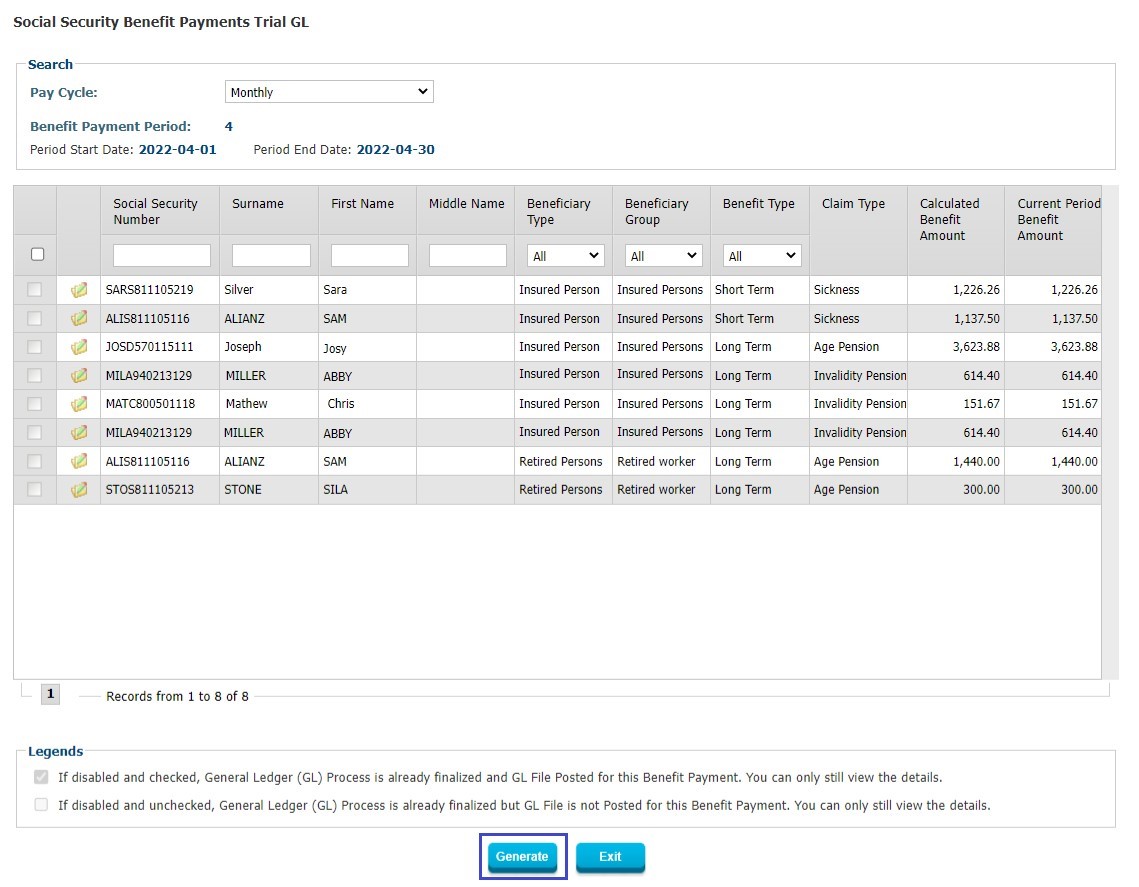 Figure 177: Social Security Benefit Payments – Trial GL In order to produce the Trial GL Journal Entries the user can select the Benefit Payments which they intend to proceed with in the current Pay Run and uncheck any that should be excluded. Once the “Generate” button is clicked, the application will start generating the correct Journal Entries associated with those Benefits.
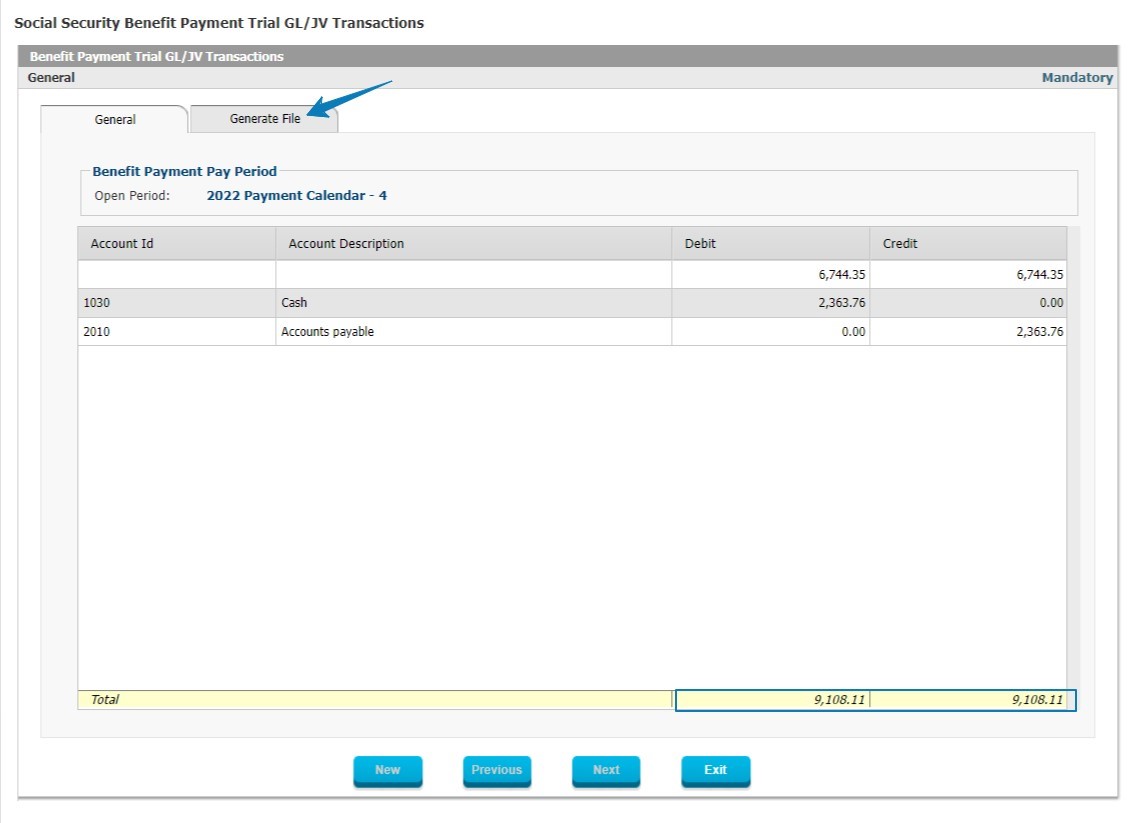 Figure 178: Social Security Payment Trial GL/JV Transactions The above form displays the actual GL Journal Entries in the first tab. In the second tab, the user can Generate the GL File.
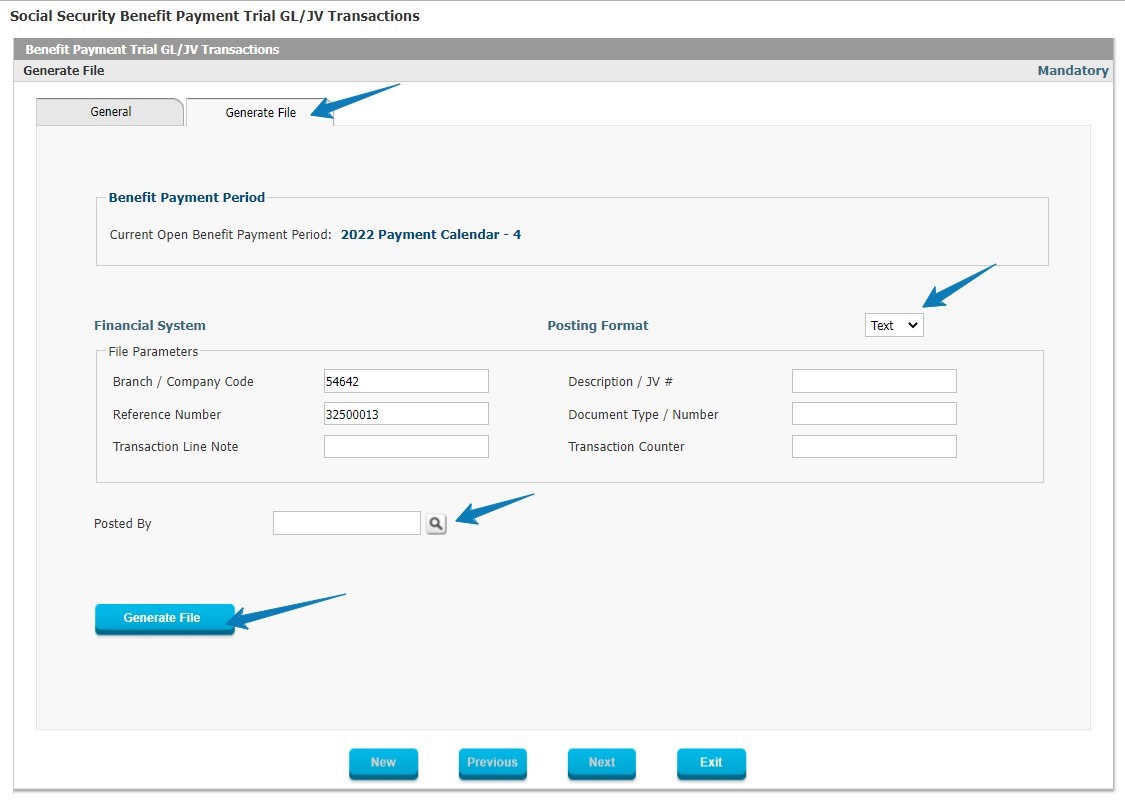 Figure 179: Benefit Payment Trial GL Transactions – Generate File Once the user presses the Generate button, the system will process and then display the Trial GL Transactions for further review and allow the user to generate a GL File which can be reviewed as it will be used later to post or import the GL File to an external Third-Party GL.
 Figure 180: Social Security Benefit Payment – Final GL Transactions In order to do Final Processing of GL Transactions, the user will choose to select all or individual Benefit Payments that are planned for final release in the current Pay Run. By clicking “Generate” the system will generate and list the resulting GL Journal Entries.
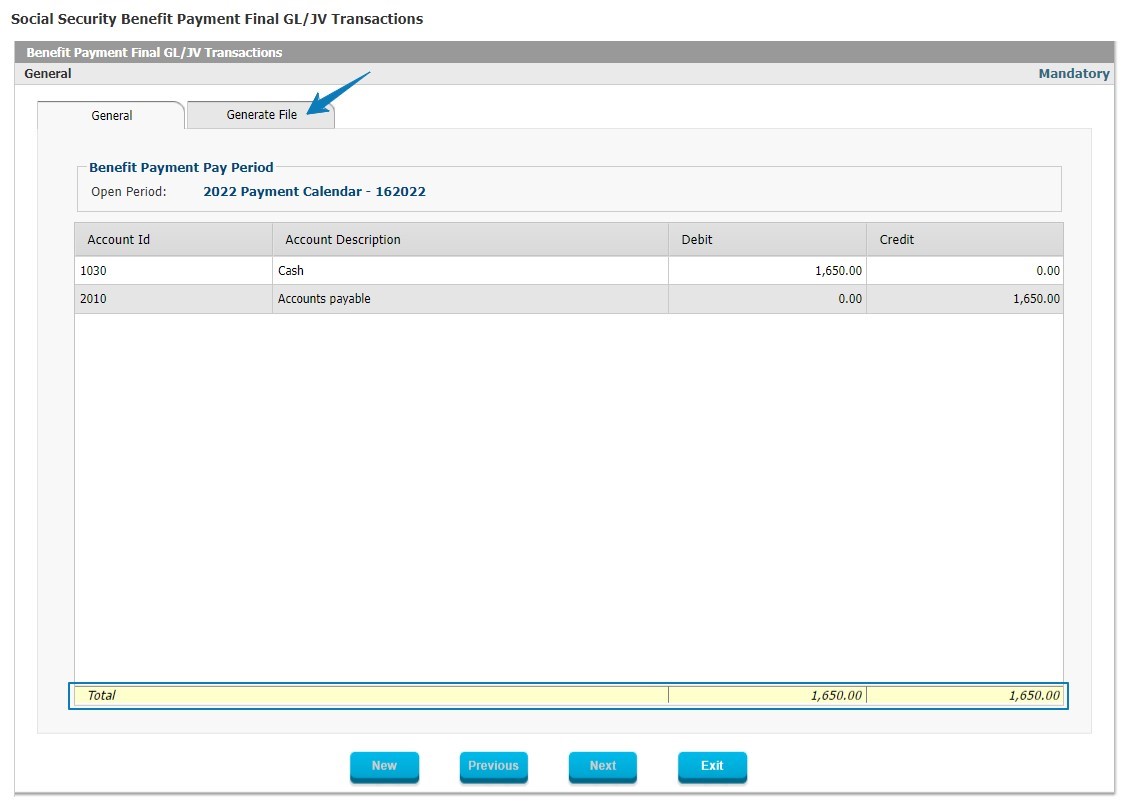 Figure 181: Social Security Benefit Payments Final GL Transactions After viewing the resulting Final GL Transactions, the user proceeds to the next tab to generate the correct Final GL File for the GL Interface.
 Figure 182: Social Security Benefit Payment Final GL Transactions Once the Trial GL Transactions and Trial GL File have been reviewed and found to be accurate, then the user can finalize the process of GL Transactions (after first processing the Final Benefit Payments and the Final Check Register and Final ACH File) by generating the Final GL Transactions and the Final GL File. Workbench Interact SSAS is designed to make it easy for users to quickly perform their tasks in the system and to see which tasks are pending so they know how to prioritize their work. Since the entire application is one single suite, all activities can be consolidated in one single Dashboard or Workbench where the transactions will be processed. Through the Granular User Access Control, the system manages which users can view which data. This also applies to the Dashboard below which will only display the activities for which a particular user is authorized. The functionality for this is quickly evolving as we introduce more features and options to improve the User Experience (UX). Upcoming updates will provide extensive flexibility to the User Interface to enable users to choose what should be displayed on the screen 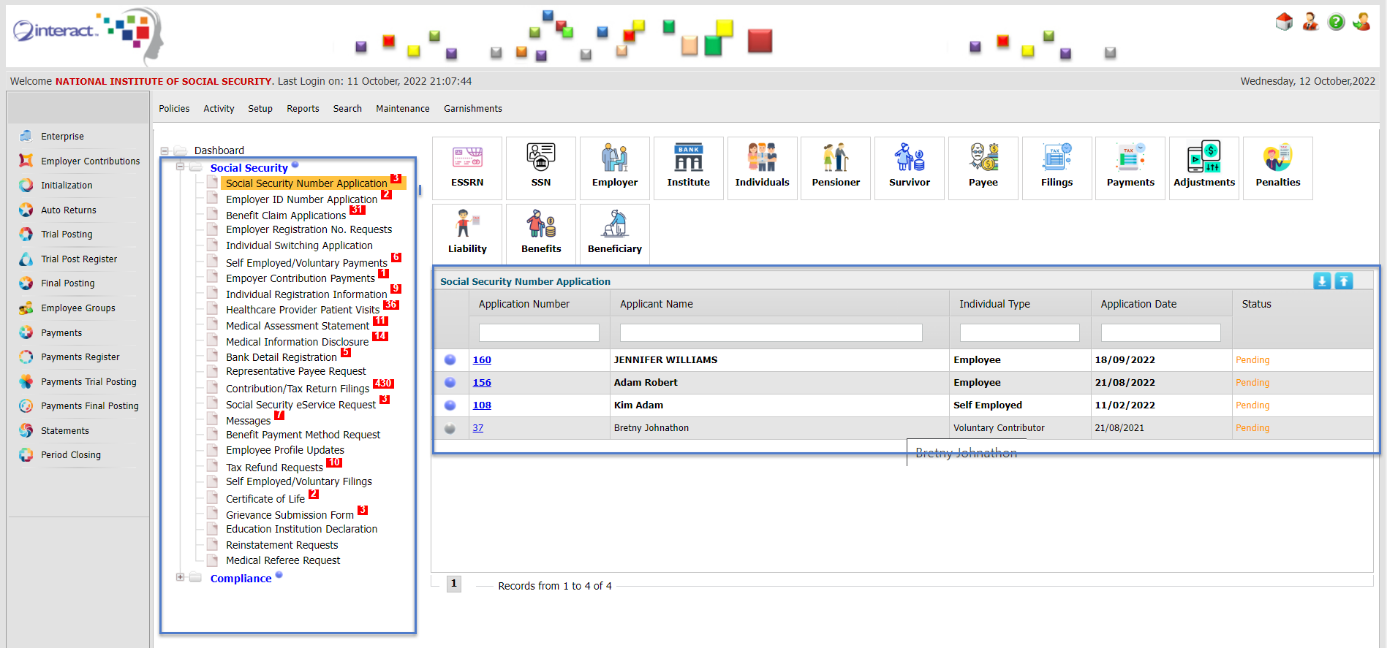 Figure 183: Dashboard / Workbench and Activity Grid Employer Electronic RecordOne of the key advantages of Interact SSAS is that it is an “all-in-one” suite of products, where all core functionality needed by Social Security Administrations is available out of the box in one single platform without the need for any interfaces between different modules. As a result, all data which is captured through any of the modules can be available in any other module when required. The Employer Electronic Record brings together all relevant information from across the system in regards to Employers registered with the Social Security Administration. It is a “multi-tab” electronic form which give instant access to any data that has already been collected on the Employer previously as well as any data that is produced by the system as a result of transactions processed. The Employer Electronic Record consists of the following tabs:
General  Figure 184: Employer Electronic Record – General The General tab provides in a single view all relevant numbers such as EIN and ESSRN number, the address and contact information but also details on the authorized representative for the firm, economic activity classification and a set of corporate documents that were attached during registration of the Employer. ESSRN Application  Figure 185: Employer Electronic Record – ESSRN Application The ESSRN Application provides the original record of the Employer Social Security Registration Number Application which was submitted upon registration of the Employer. As with all listings in Interact SSAS, the system will first list a summary and the user can then click on the details to see the full detailed long form of the ESSRN Application.  Figure 186: Employer Electronic Record – Employees The next tab in the Employer Electronic Record gives details about the Employees which are associated with the Employer. This ensures that anyone in the Social Security Administration who needs to see a listing of a particular Employer’s Employees can find them instantly. Note that listing offers filters and search boxes to search for any particular employee based on any criteria.
Contribution Returns  Figure 187: Employer Electronic Record – Contribution Return The Contribution Returns brings together all information about (Salary &) Contribution Filings and contains each and every filing that has been processed by the Employer before. It offers immediate access to a summary screen with further ability to drill down into the detailed filing itself so the user can find anything required.
Contribution Payments  Figure 188: Employer Electronic Record – Contribution Payments In the next tab under the Employer Electronic Record you’ll find the Contribution Payments. Again, you’ll be able to see a summary listing with the most vital information which most users may want to access instantly when they are trying to verify some information. If more details is required, the user can click and drill-down into the underlying transaction (i.e. the Contribution Payment receipt) or they can find additional information in related reports. The Contribution Payments tab provides summary columns which are searchable on the following items:
Bank Accounts 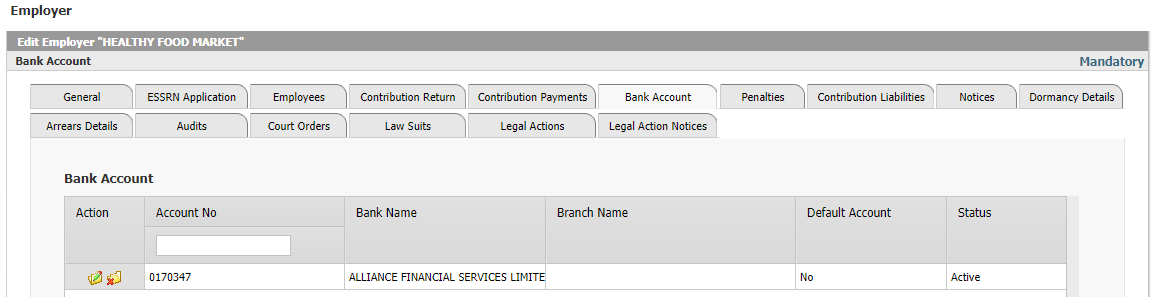 Figure 189: Employer Electronic Record – Bank Account Employers can have multiple Bank Accounts and all the accounts will be listed under the Bank Account tab. This provides details on:
Penalties 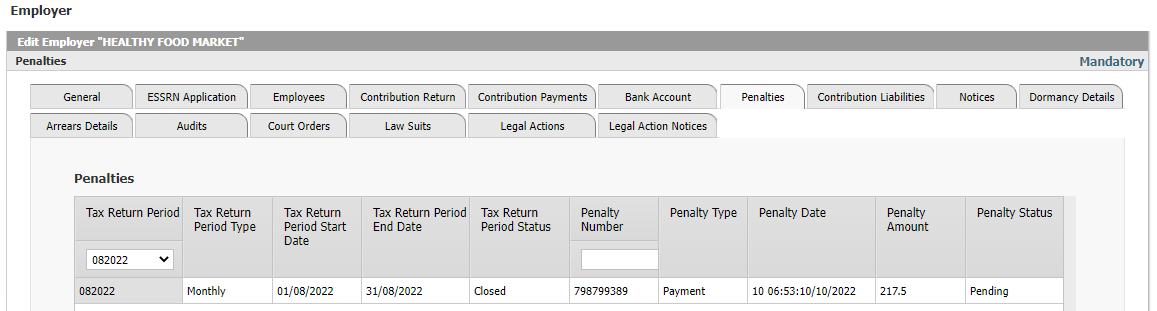 Figure 190: Employer Electronic Record – Penalties If an Employer has been subject to any Penalties for Late Filing or Late Payment of Contributions, these Penalties will have been assessed through the system and added to the outstanding amounts/liabilities. The information will be available in different areas in the system but will also be consolidated in the Employer Electronic Record. The system displays the following information for any Penalties:
Contribution Liabilities 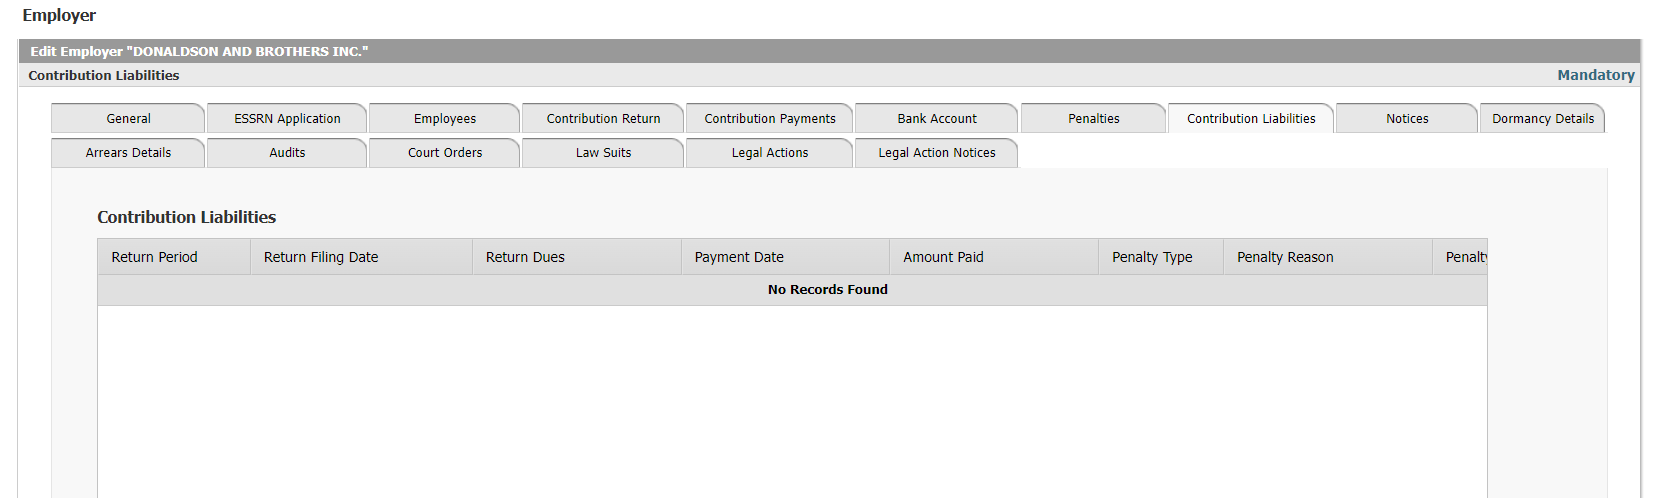 Figure 191: Employer Electronic Record – Contribution Liabilities If the Employer has any outstanding Contribution Liabilities, they will be listed here, as usual, in summary form, with more information available either through drill-down or in a separate report.
Notices 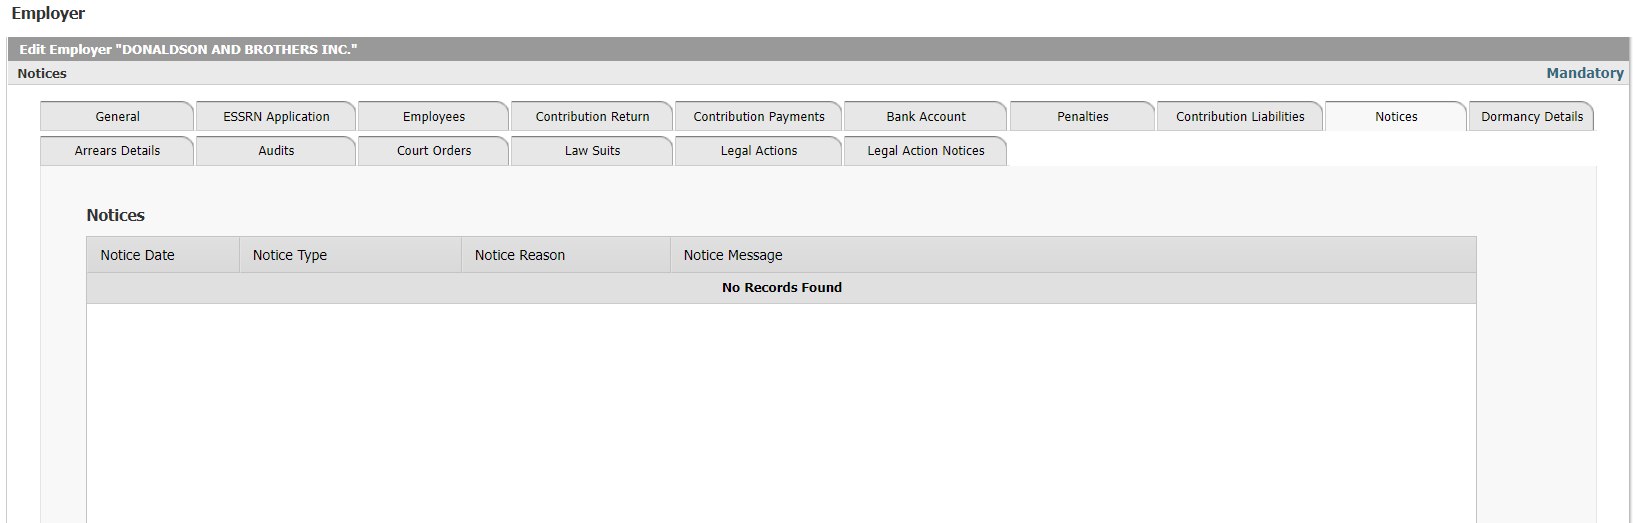 Figure 192: Employer Electronic Record – Notices Employers who have received official Notices from the Social Security Administration will receive them in their own e-Services portal (and by email) but the same notices will also be available for immediate viewing for any authorized user within the Social Security Administration.
Dormancy Details 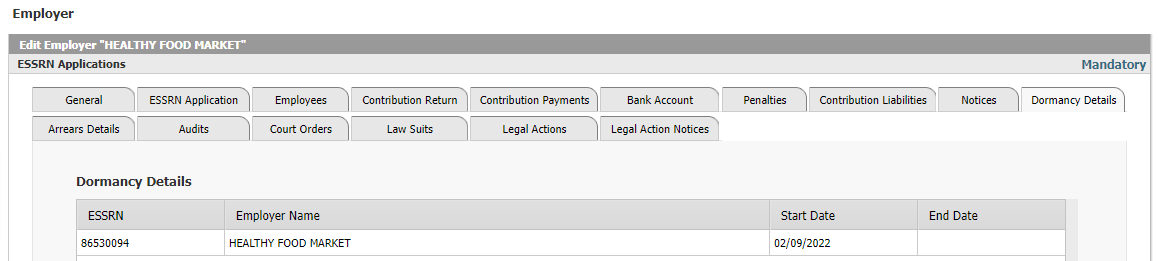 Figure 193: Employer Electronic Record – Dormancy Details It is important for the Social Security Administration to be able to track the status of all Employers and determine whether a certain Employer is still Active or whether they have become Inactive or Dormant. If the Employer’s status changes Dormant, it will show in the Employer- Dormancy Details Tab with Start and End Date so there is a clear record on when the status changed and for which period. Arrears Details 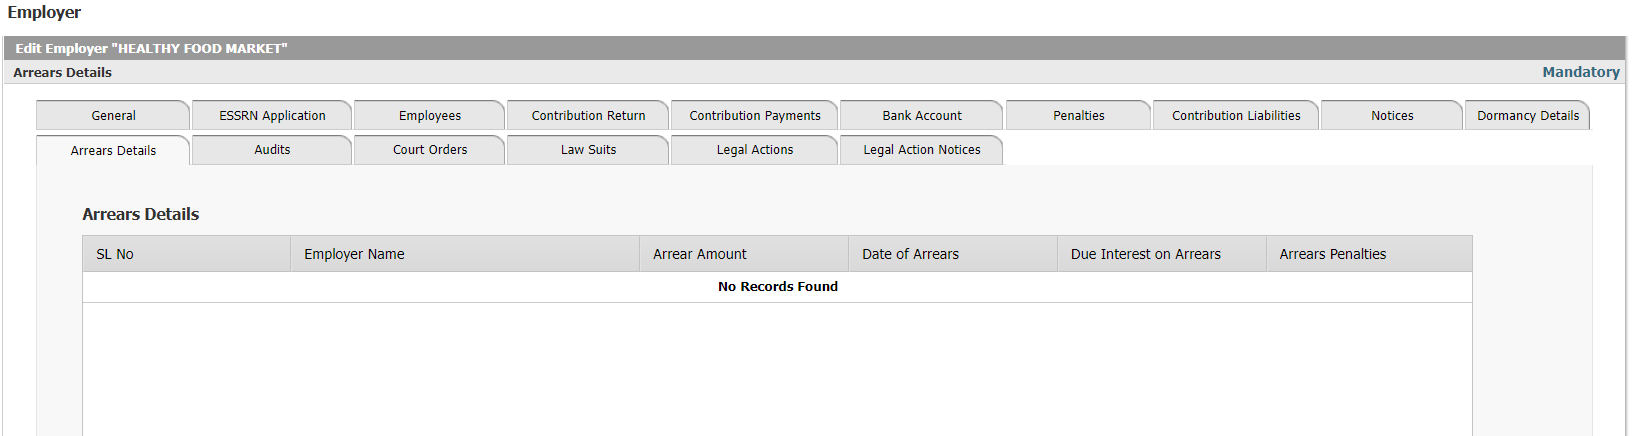 Figure 194: Employer Electronic Record – Arrears Details In order for Collection Officers to be able to manage Accounts Receivables from Employers, it is important that they have easy access to summary and detail information regarding all Arrears information for an Employer
Audits  Figure 195: Employer Electronic Record – Audits With Compliance being a key responsibility of the Social Security Administration, there is an entire Compliance Management module in Interact SSAS. This is where you will manage the various types of Audits, Audit Scopes, Legal Actions and Court Cases which may result from Non-Compliance. The summary of the Audits which have been conducted for a particular Employer will be listed in the above tab which is readily available under the Employer Electronic Record. You can find the following searchable columns there:
From here, the detailed Audit Report with Findings will be available with the click of a button. Lawsuits 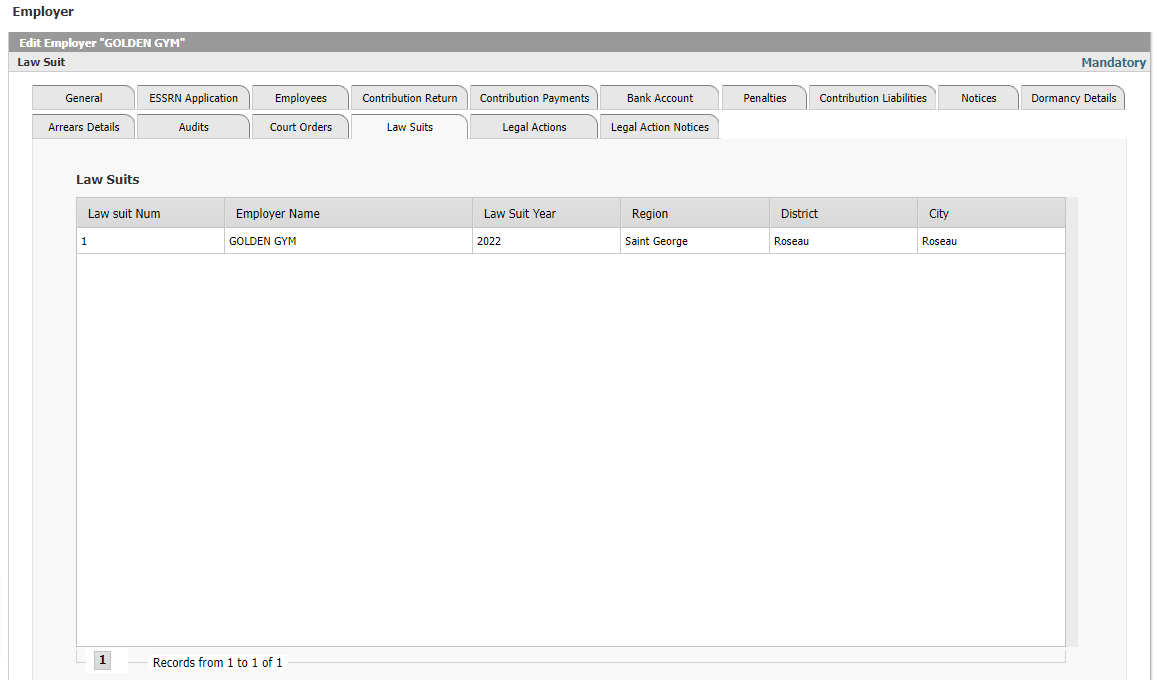 Figure 196: Employer Electronic Record – Lawsuits If there are any Lawsuits which have been filed against the Employer due to Non-Compliance, the user in the Social Security Administration can view an immediate history of them online in the Employer Electronic Record. This will show:
Additional information regarding the exact Lawsuits will be available in the Compliance module. Legal Actions  Figure 197: Employer Electronic Record – Legal Action If any Legal Actions have been taken against the Employer, this information will be shown under the Legal Actions tab with the following detail columns:
Legal Action Notices 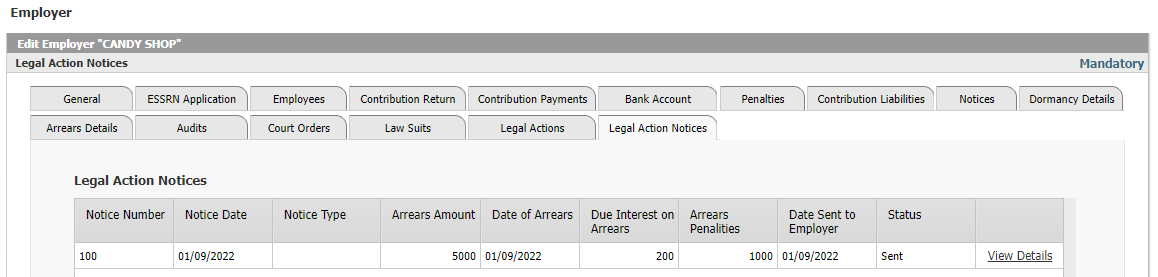 Figure 198: Employer Electronic Record – Legal Action Notices The Legal Action Notices which will have been sent in relation to each Legal Action will be viewable to the authorized user at the Social Security Administration in the Employer Electronic Record, this includes:
Individual Electronic RecordThe Employee Electronic Record consolidates all the information from across all Interact SSAS modules in one single location, the Employee Electronic Record. This multi-tab form provides the user with an immediate view of all critical summary information from all angles and all aspects related to social security on one particular Individual. If a user still needs further details after reviewing the summary information, they can view this by drilling down into the underlying transactions which generated the information itself or by running the applicable reports. The following tabs are included in the Employee Electronic Record: 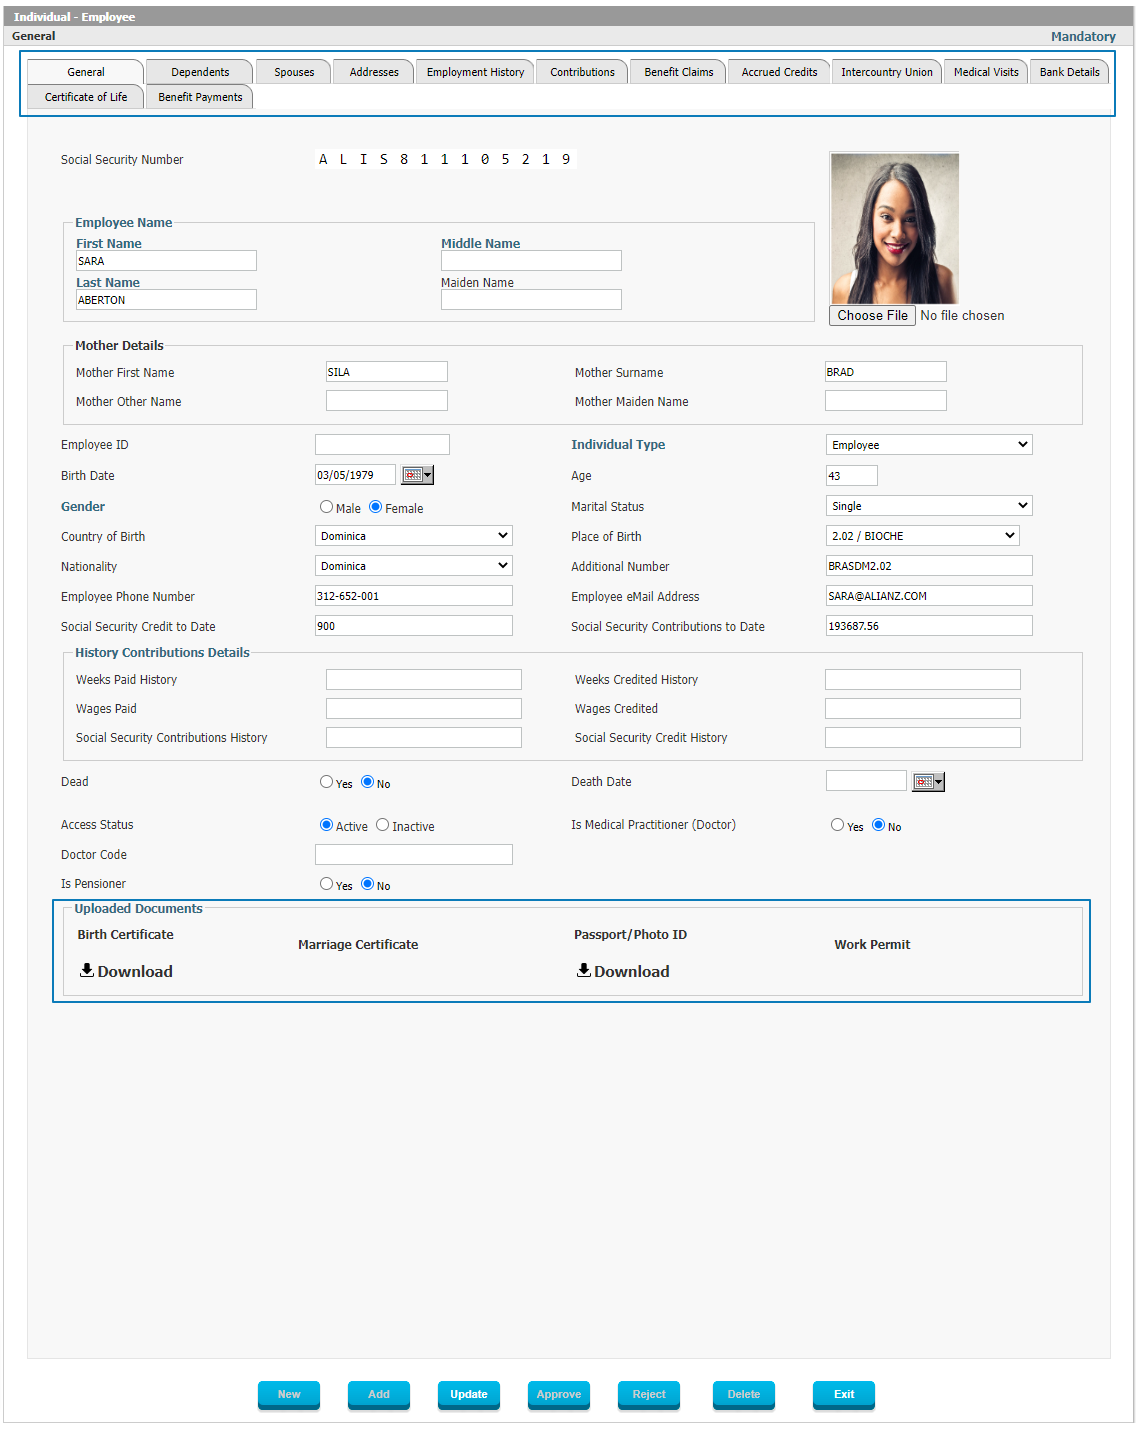 Figure 199: Employee Electronic Record – General The General Tab, covers the Employee’s Demographic Details such as Name, Mother’s Name, Address and Contact Information, various Social Security Numbers and Identification Numbers as well as a summary History of Contributions Details related data and attachments of supporting Documents. Dependents 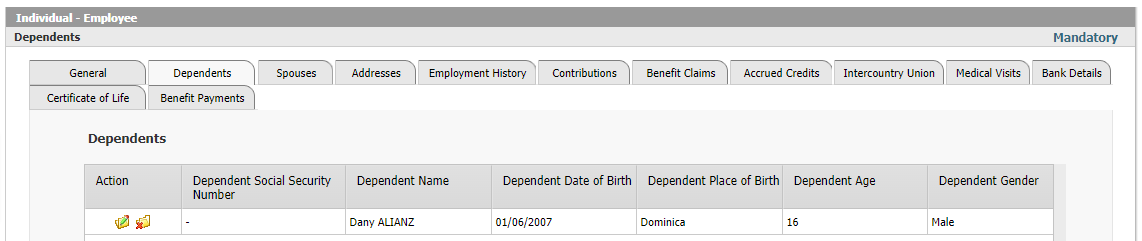 Figure 200: Employee Electronic Record – Dependents Since Dependent Information is critical information to capture and maintain in regards to social security matters, the next most important Tab in the Employee Electronic Record form is the Tab for Dependents. In this tab a summary is provided and the user can click on the record to drill down further and see more information. At the summary level, the following information is
Spouses 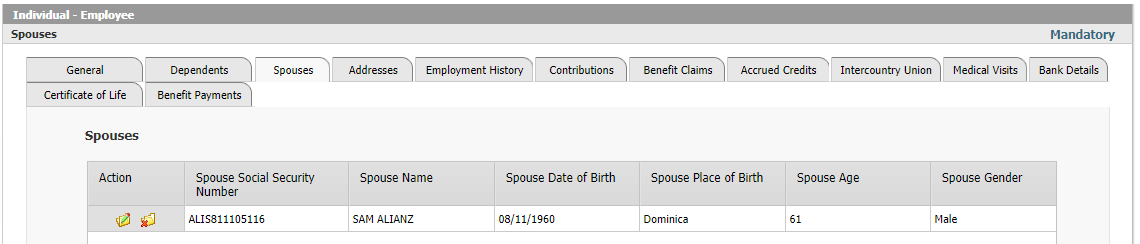 Figure 201: Employee Electronic Record – Spouses Current and Former Spouse information is available separately since a Spouse relationship may have other implications in a social security context. The system provides the following information:
As mentioned above, if the user needs to see further details, they can click on the record and obtain the additional information associated with this record as shown below: 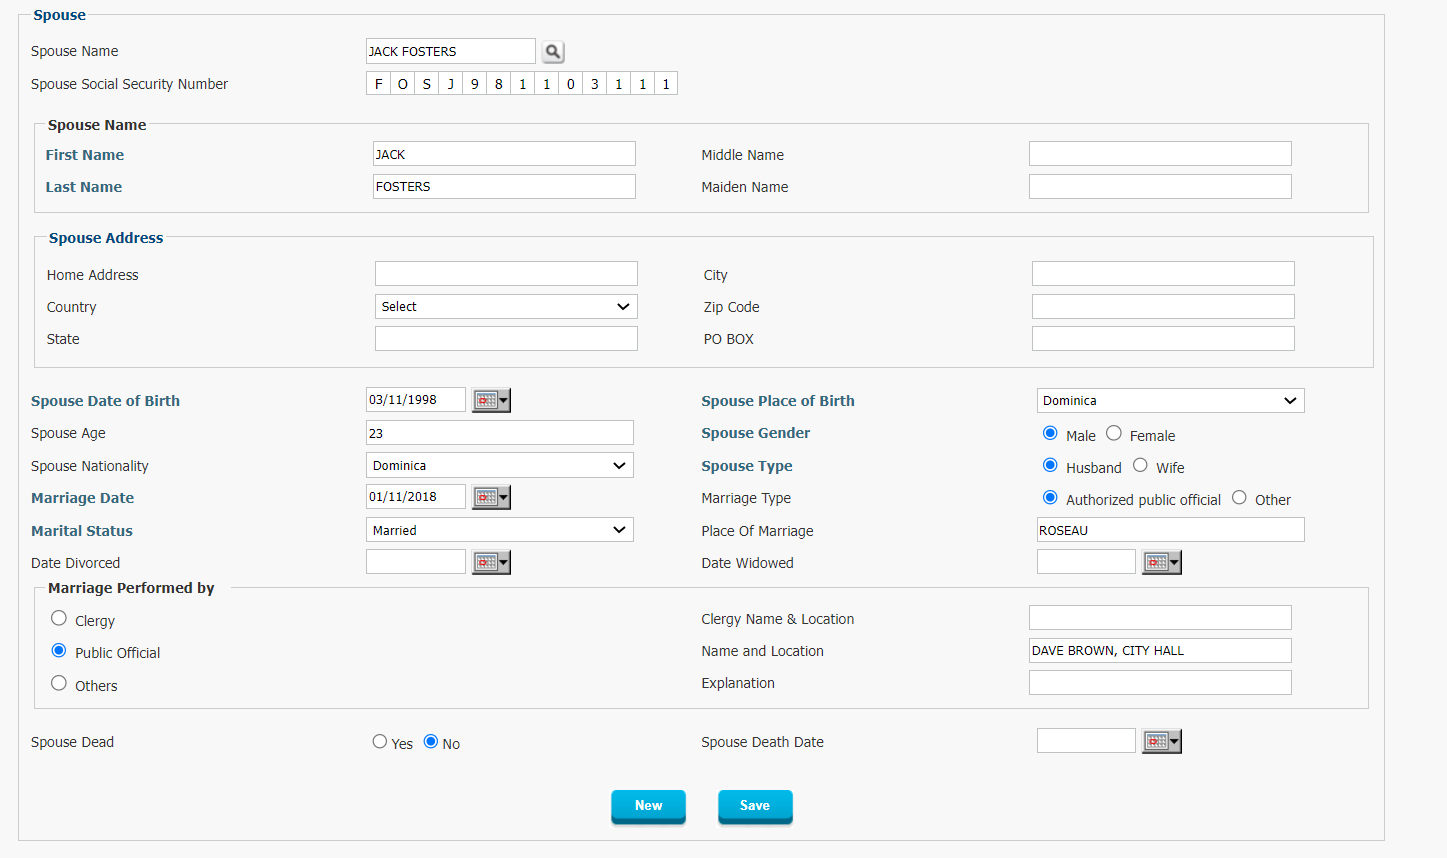 Figure 202: Detail on Spouse Addresses  Figure 203: Employee Electronic Record – Addresses An individual may have many addresses over a life-time and for various reasons a Social Security Administration may need to have the history of these Addresses available for consultation during investigations. Therefore, the address information is readily available in the Employee Electronic Record.
Employment History 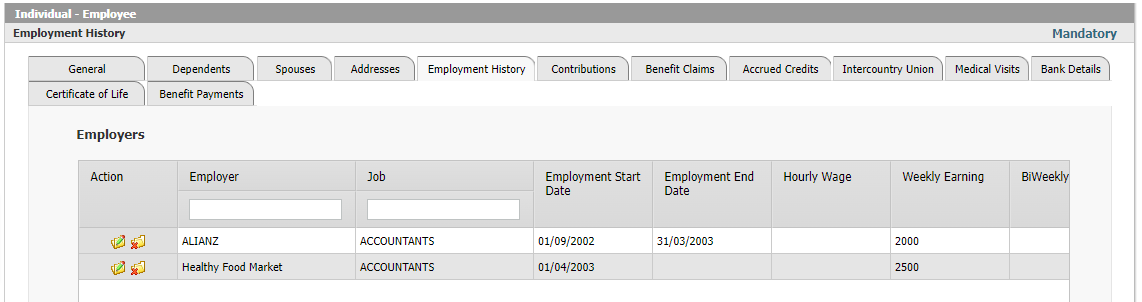 Figure 204: Employee Electronic Record – Employment History The data regarding Employment History of an Employee is updated automatically by the system, depending on the transactions processed in the system (i.e. Application to Register as Employee or an ESSRN filing by an Employer, etc.). The Employment History will show the following data:
Contributions 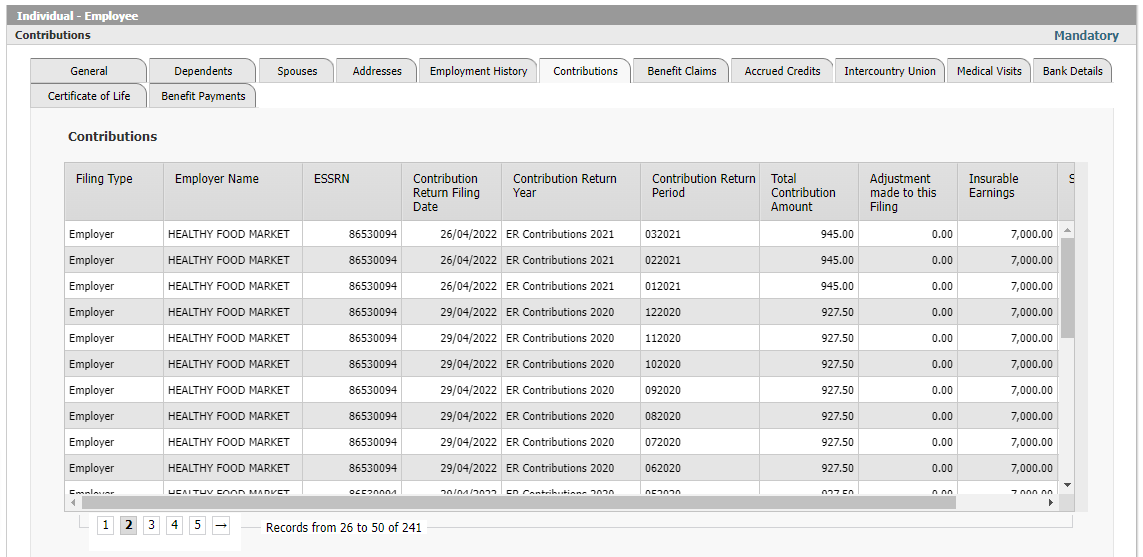 Figure 205: Employee Electronic Record – Contributions The Contributions Tab will show all relevant information regarding Contributions made by or on behalf of an Employee. All of the information will automatically flow from the Contributions Filing and Payment Management module in Interact SSAS. The following information will be displayed:
Benefit Claims 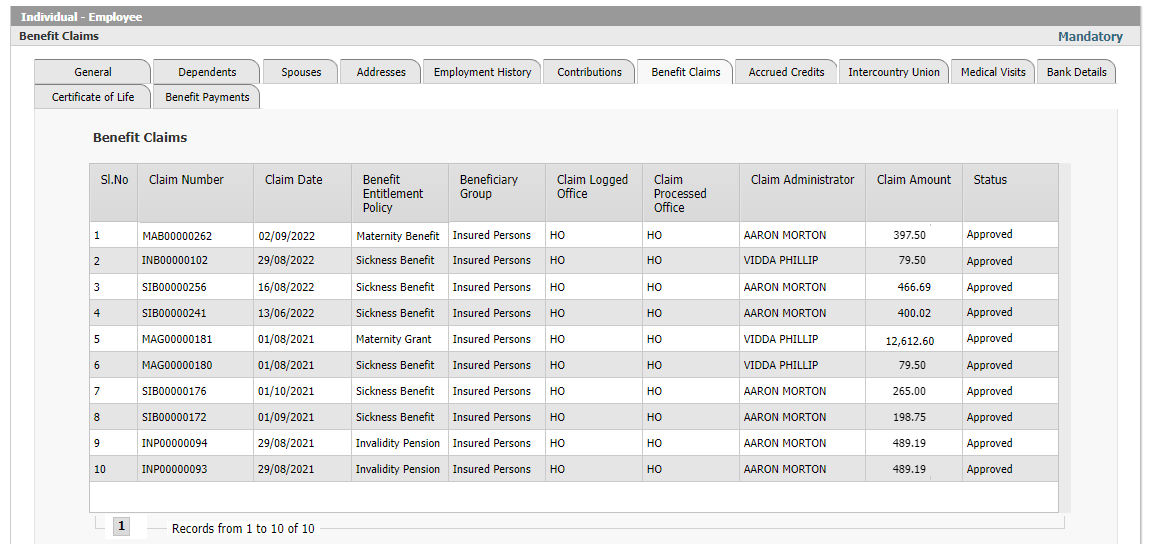 Figure 206: Employee Electronic Record – Benefit Claims Benefit Claims which have been filed through the Employee’s e-Services (or were filed manually and entered by a user at the Social Security Administration), can be seen in a summary overview under the Employee’s Electronic Record so that the user has immediate access and insight into the summary. If further detail is required they can drill-down and view the underlying claim transaction.
Accrued Credits 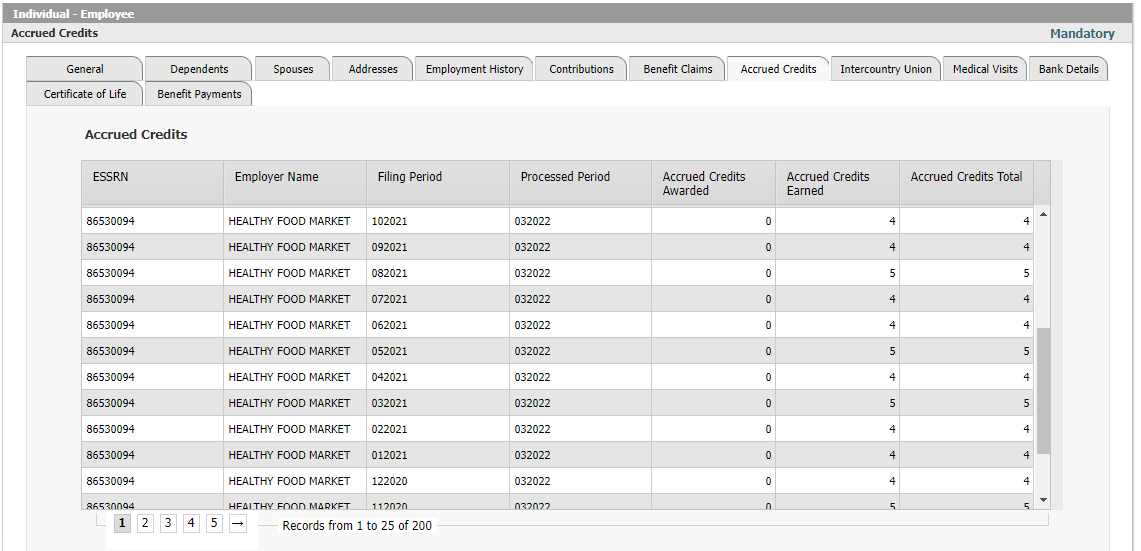 Figure 207: Employee Electronic Record – Accrued Credits The Accrued Credits which are earned as a result of contributions paid into the social security system, will be shown in various reports but are also visible immediately on the Employee’s Electronic Record for any user who needs to be able to access this information.
Medical Visits  Figure 208: Employee Electronic Record – Medical Visits Details on Medical Visits are captured in the system in order to justify various Medical Benefits, including Sickness Benefits, Maternity Benefits, Invalidity and/or Disability Benefits. For this reason, the diagnosis reported by a Healthcare Provider will be transmitted directly from the doctor to the Social Security Administration. If required, the information can be available on the Employee Electronic Record online with access to more detailed reporting for authorized users.
Bank Details  Figure 209: Employee Electronic Record – Bank Details This tab will display the Bank Accounts on record for the Employee, showing both Active and Inactive ones. The system lists the following columns:
Certificate of Life 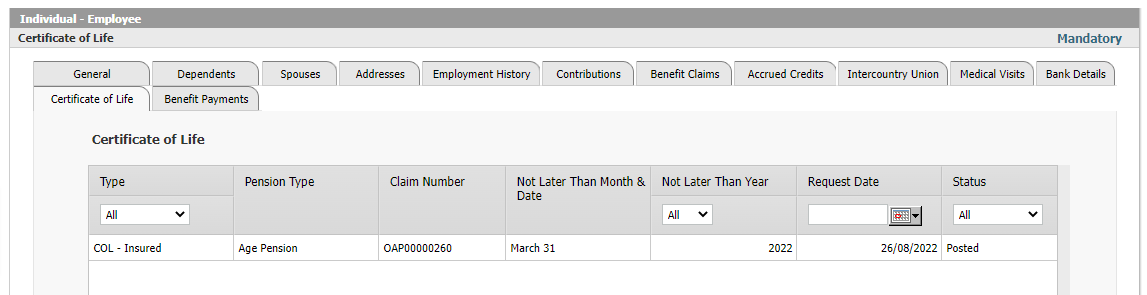 Figure 210: Employee Electronic Record – Certificate of Life Certificates of Life are required for Pensioners to continue receiving their Pension. The system therefore keeps track of exactly which Certificate has been filed when and how it was verified. The details shown in the summary include the following:
Benefit Payments 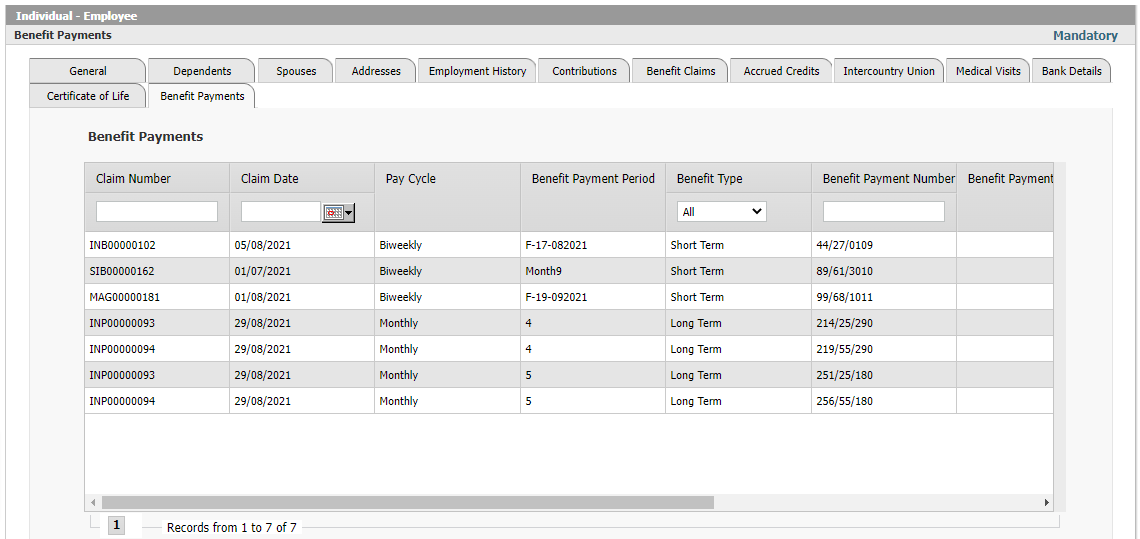 Figure 211: Employee Electronic Record – Benefit Payments Any Benefit Payments processed in the system will automatically be displayed in the Employee Electronic Record for easy reference of the user. The Benefit Payment details shown in the summary include the following:
Social Security Number Change History 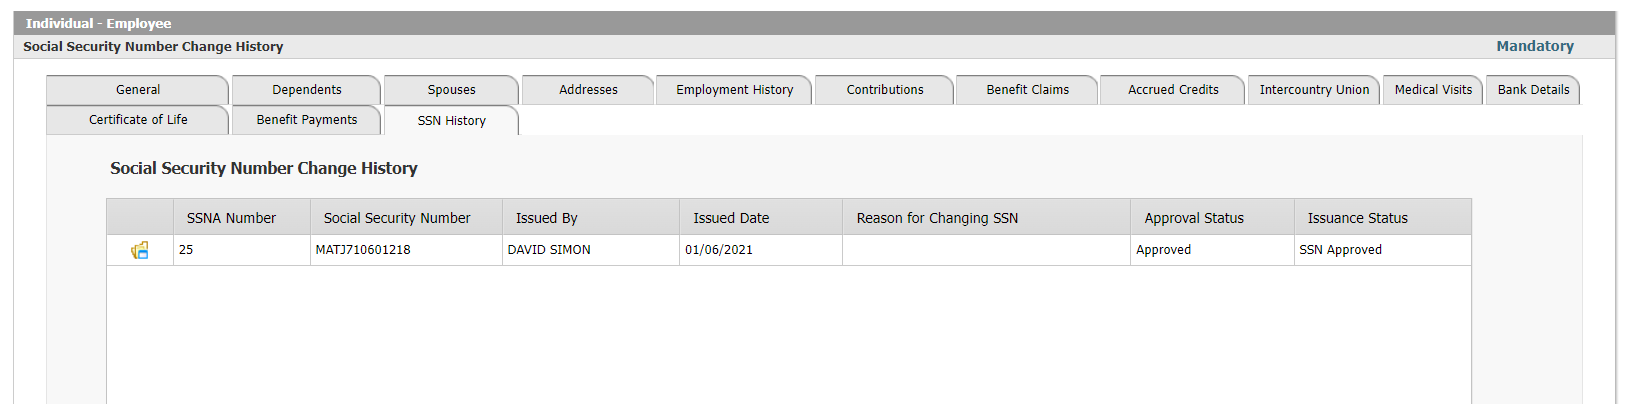 Figure 206: Employee Electronic Record – Benefit Claims Figure 212: Social Security Number Change History The system displays the following information:
Beneficiary Electronic RecordThis form covers the main details for a Beneficiary, specifically the Claims and Payments of Benefits. The General tab provides details such as the:
In addition, there are functions built-in that allow the Social Security Administration officer to Start/Restart, Stop or Suspend a Payment of a particular Benefit. Beneficiary Electronic Record – General 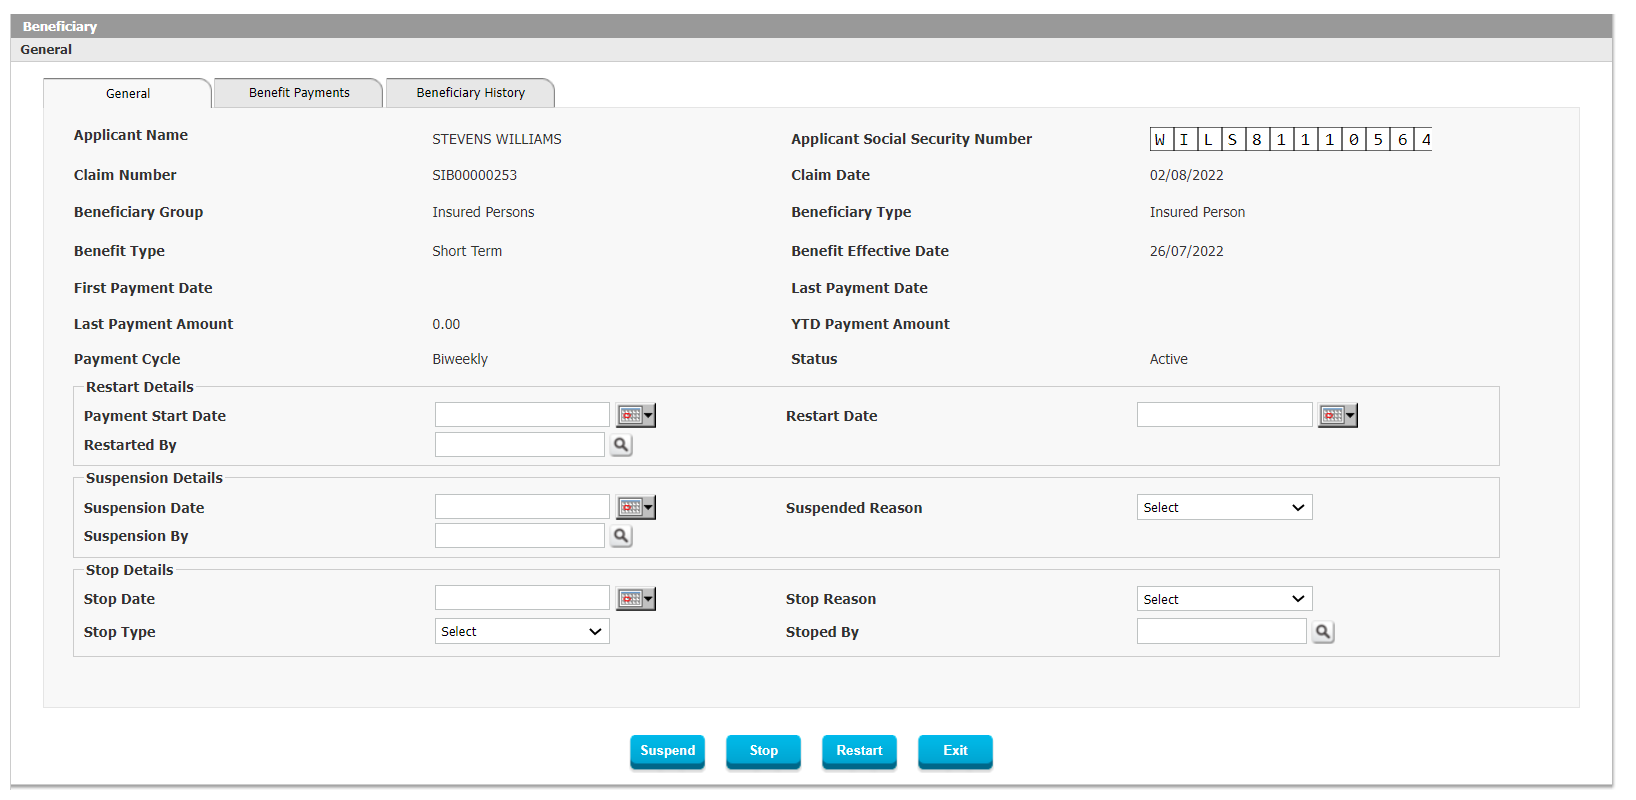 Figure 213: Beneficiary Electronic Record – General Benefit Payments 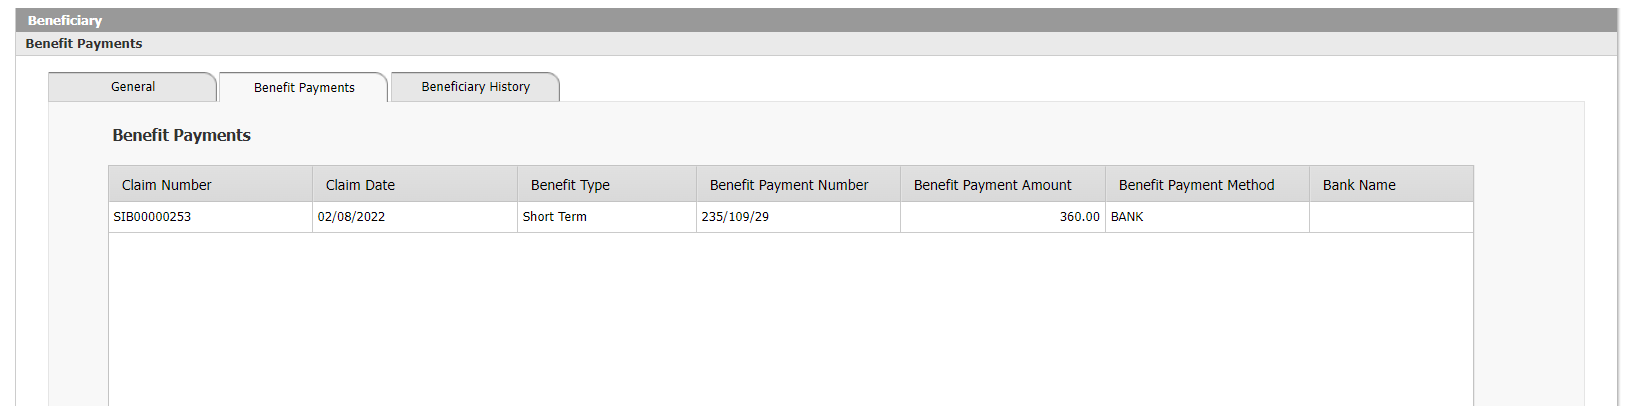 Figure 214: Benefit Payments In the same Beneficiary Electronic Record, you’ll find all summary information regarding Benefit Payments which have been released to the Beneficiary so far.
Beneficiary History 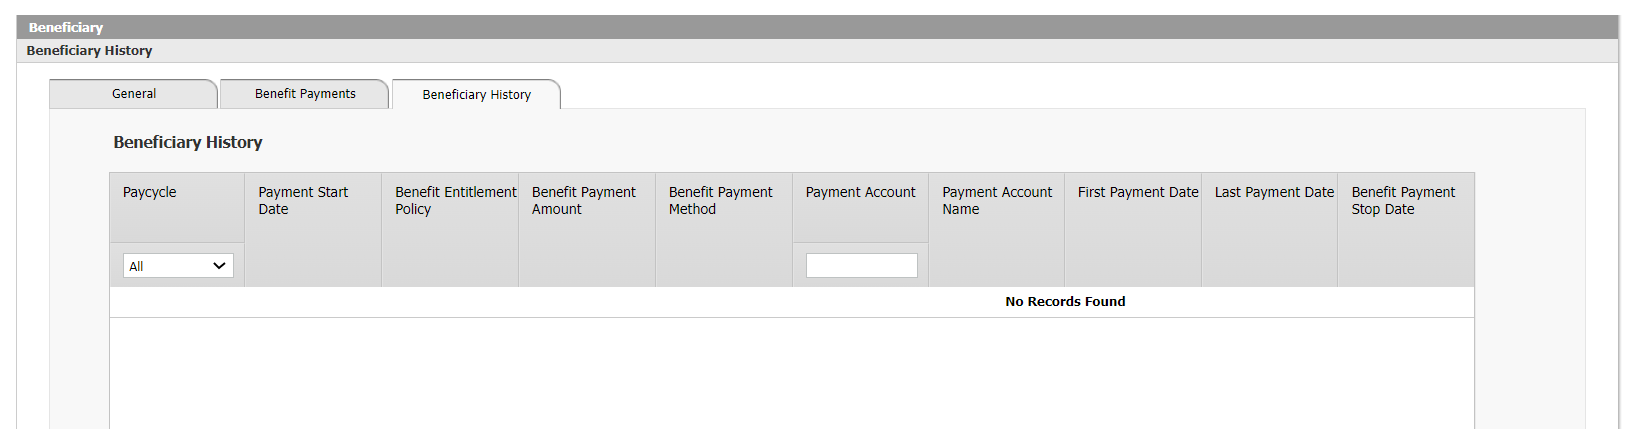 Figure 215: Beneficiary History Finally, the Beneficiary History tab will provide additional details regarding all individual payments that have been released to the Beneficiary. This will include the following:
The above is a general summary overview of a Beneficiary Electronic Record, but a more detailed record exists for Pensioners and Survivors as shown below. Pensioner Electronic Record 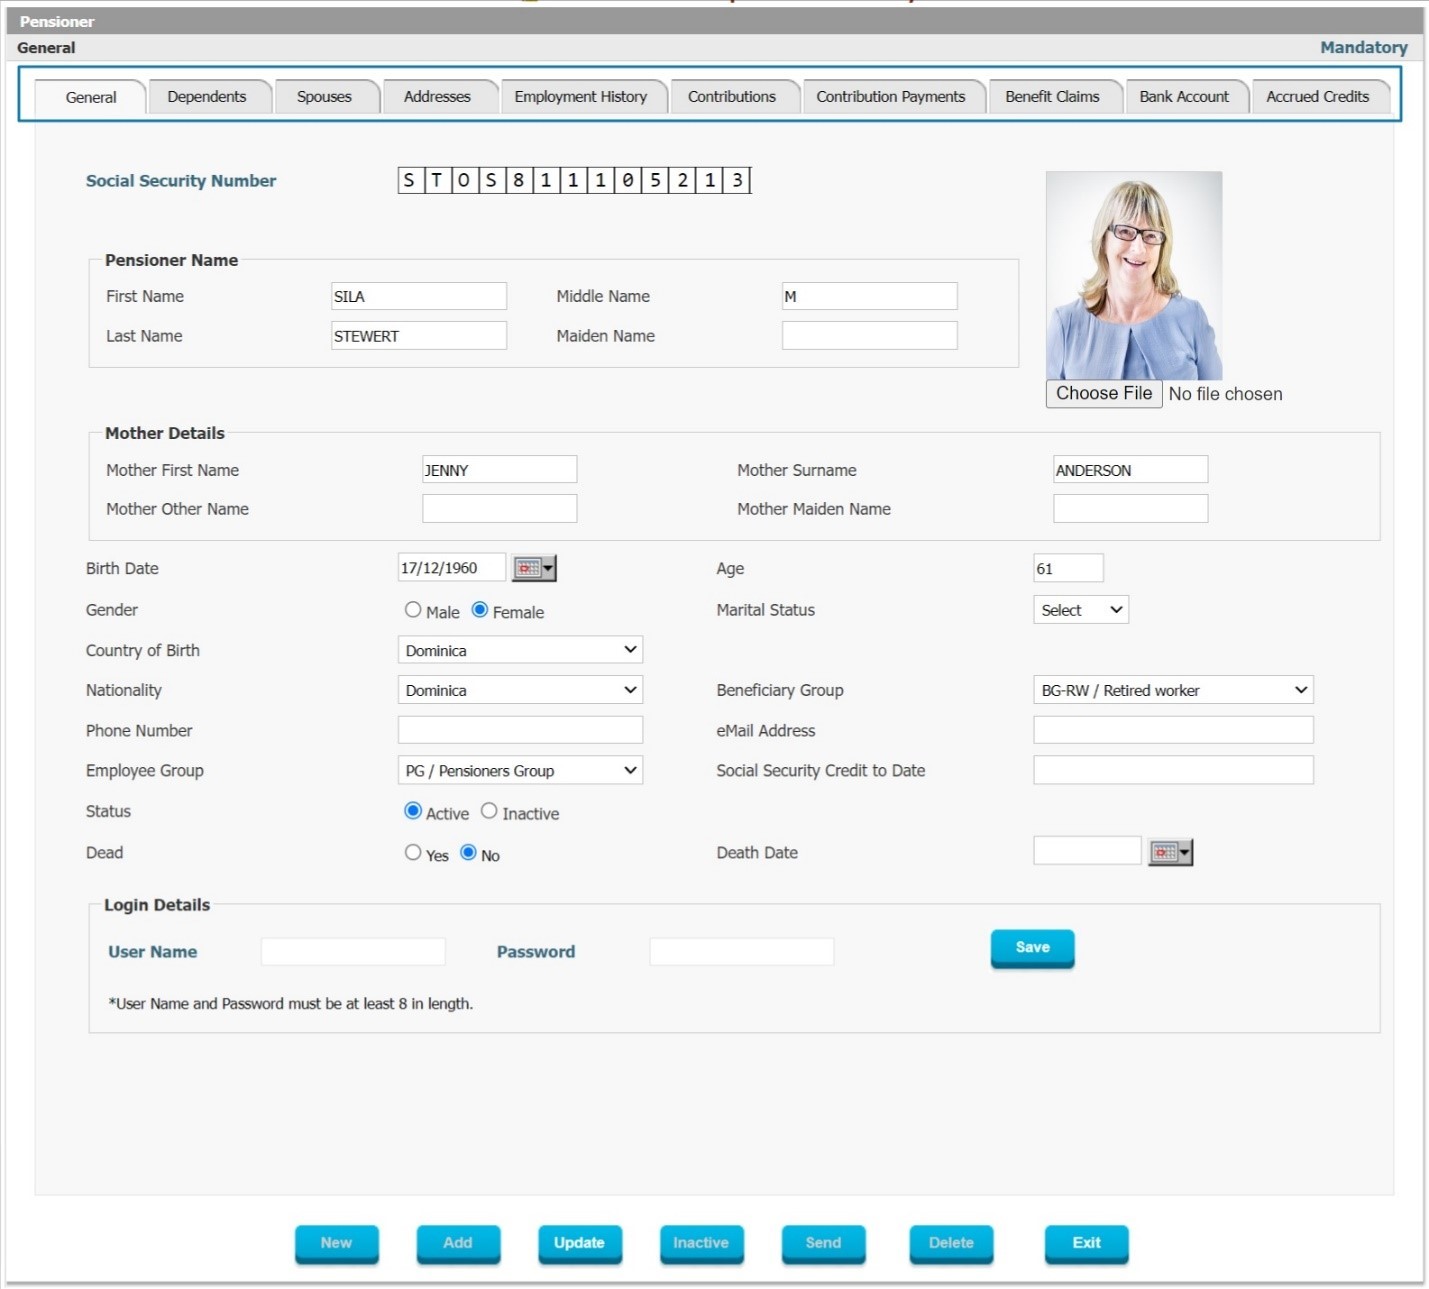 Figure 216: Pensioner Electronic Record – General The General tab in the Pensioner Electronic Record provides the standard demographic details and Social Security Number of the Pensioner, including the Classification in Beneficiary Group and/or Employee Group and information about Social Security Credits Earned to Date. Dependents 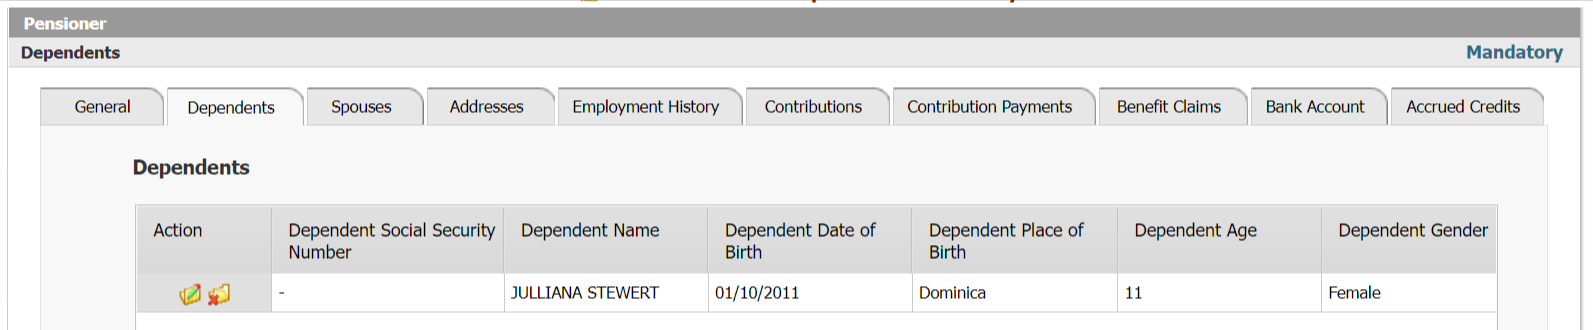 Figure 217: Pensioner Electronic Record – Dependents Since Dependent Information is critical information to capture and maintain in regards to social security matters, the next most important Tab in the Pensioner Electronic Record form is the Tab for Dependents. In this tab a summary is provided and the user can click on the record to drill down further and see more information. At the summary level, the following information is provided:
Spouses  Figure 218: Pensioner Electronic Record – Spouses Current and Former Spouse information is available separately since a Spouse relationship may have other implications in a social security context. The system provides the following information:
 Figure 218: Pensioner Electronic Record – Addresses An individual may have many addresses over a life-time and for various reasons a Social Security Administration may need to have the history of these Addresses available for consultation during investigations. Therefore, the address information is readily available in the Pensioner Electronic Record.
Employment History  Figure 219: Pensioner Electronic Record – Employment History The data regarding Employment History of a Pensioner is updated automatically by the system, depending on the transactions processed in the system (i.e. Applications to Register as Employee or an ESSRN filing by an Employer, etc.). The Employment History will show the following data:
Contributions 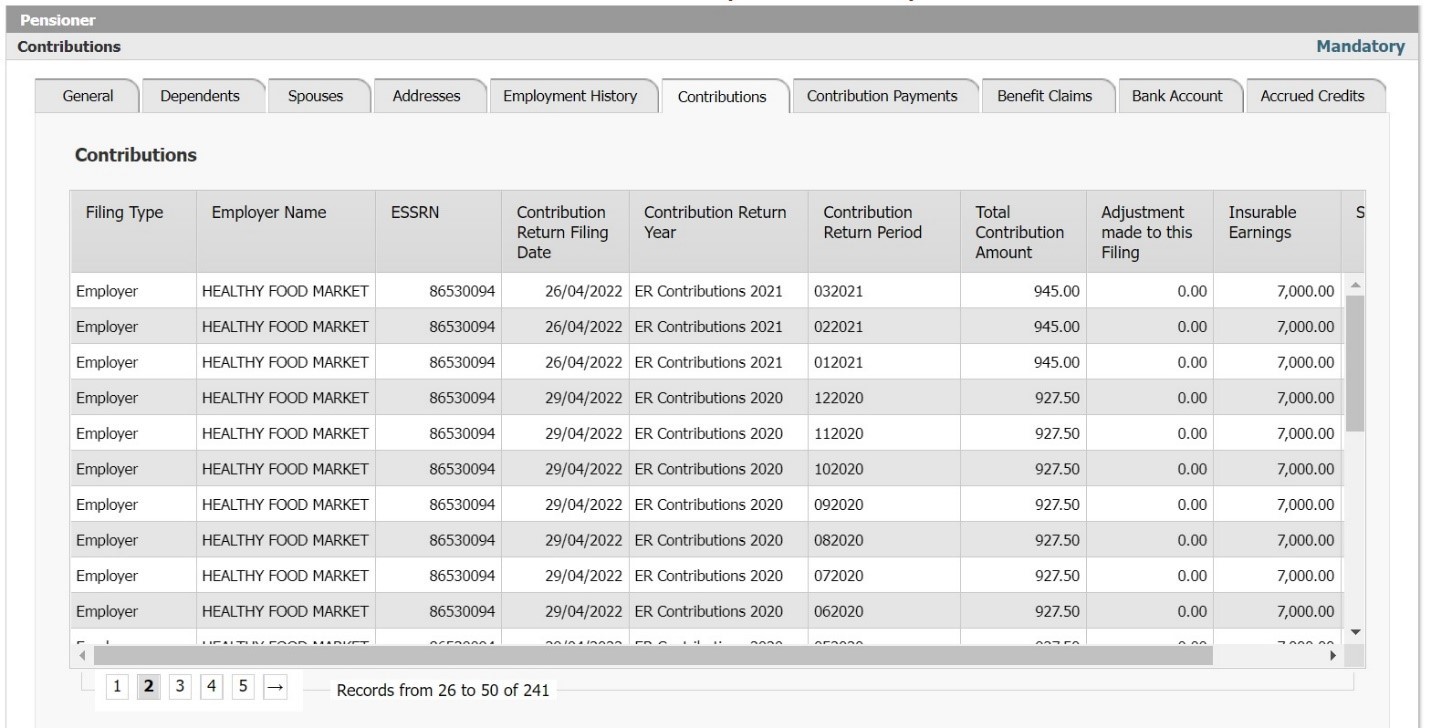 Figure 220: Pensioner Electronic Record – Contributions The Contributions Tab will show all relevant information regarding Contributions made by or on behalf of the Pensioner while the Pensioner was still Employee. All of the information will automatically flow from the Contributions Filing and Payment Management module in Interact SSAS. The following information will be displayed:
Benefit Claims  Figure 221: Pensioner Electronic Record – Benefit Claim Any Benefit Claims in the lifetime of the Pensioner will be shown in the system here and can be viewed quickly for verification. Benefit Claims which have been filed through the former Employee’s e-Services (or were filed manually and entered by a user at the Social Security Administration), can be seen in a summary overview under the Pensioner’s Electronic Record so that the user has immediate access and insight into the summary. If further detail is required, they can drill-down and view the underlying claim transaction.
Bank Account  Figure 222: Pensioner Electronic Record – Bank Account This tab will display the Bank Accounts on record for the Pensioner, showing both Active and Inactive ones. The system lists the following columns:
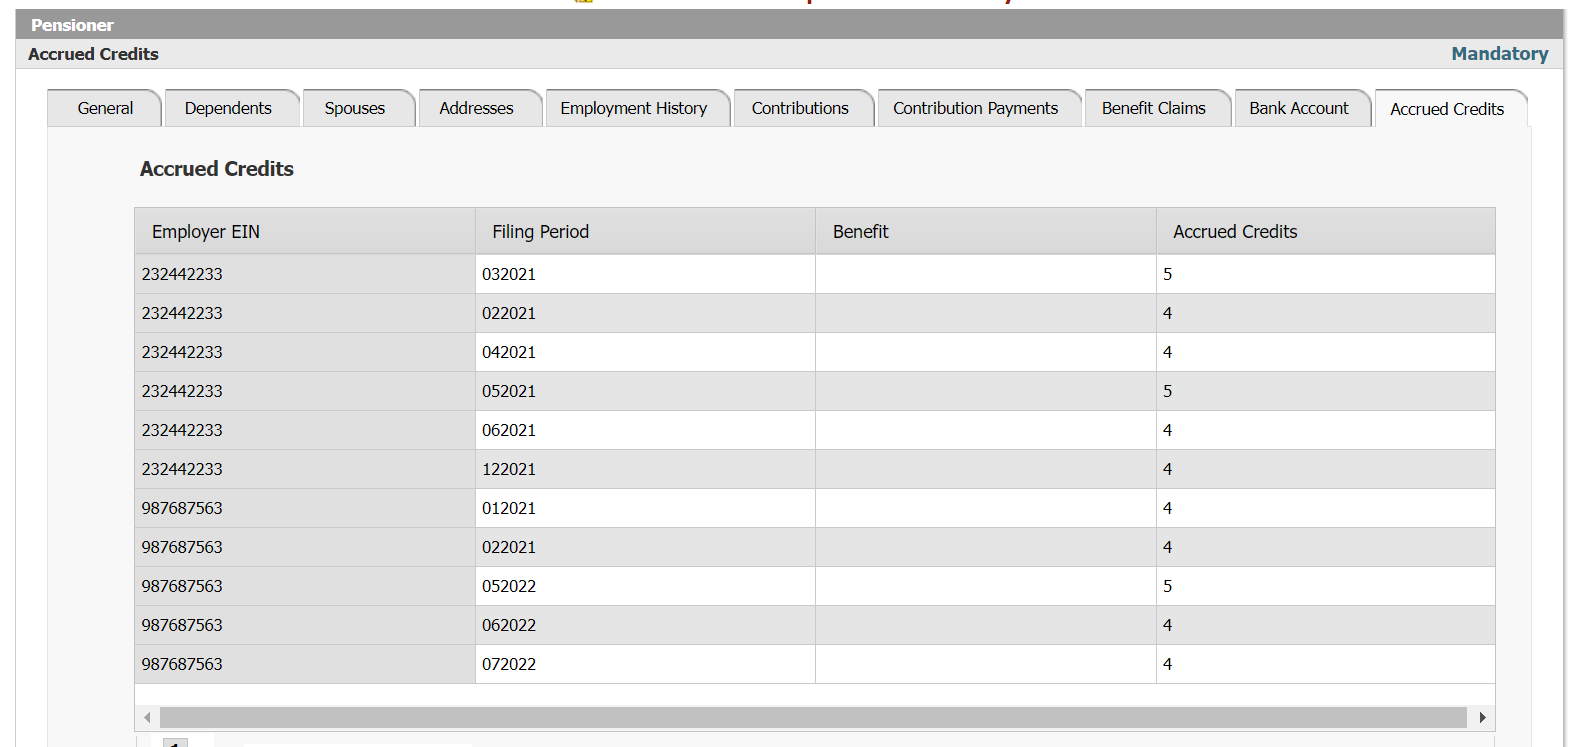 Figure 223: Pensioner Electronic Record – Accrued Credits The Accrued Credits which are earned as a result of contributions paid into the social security system, will be shown in various reports but are also visible on the Pensioner’s Electronic Record for any user who needs to be able to access this information.
Survivor Electronic Record 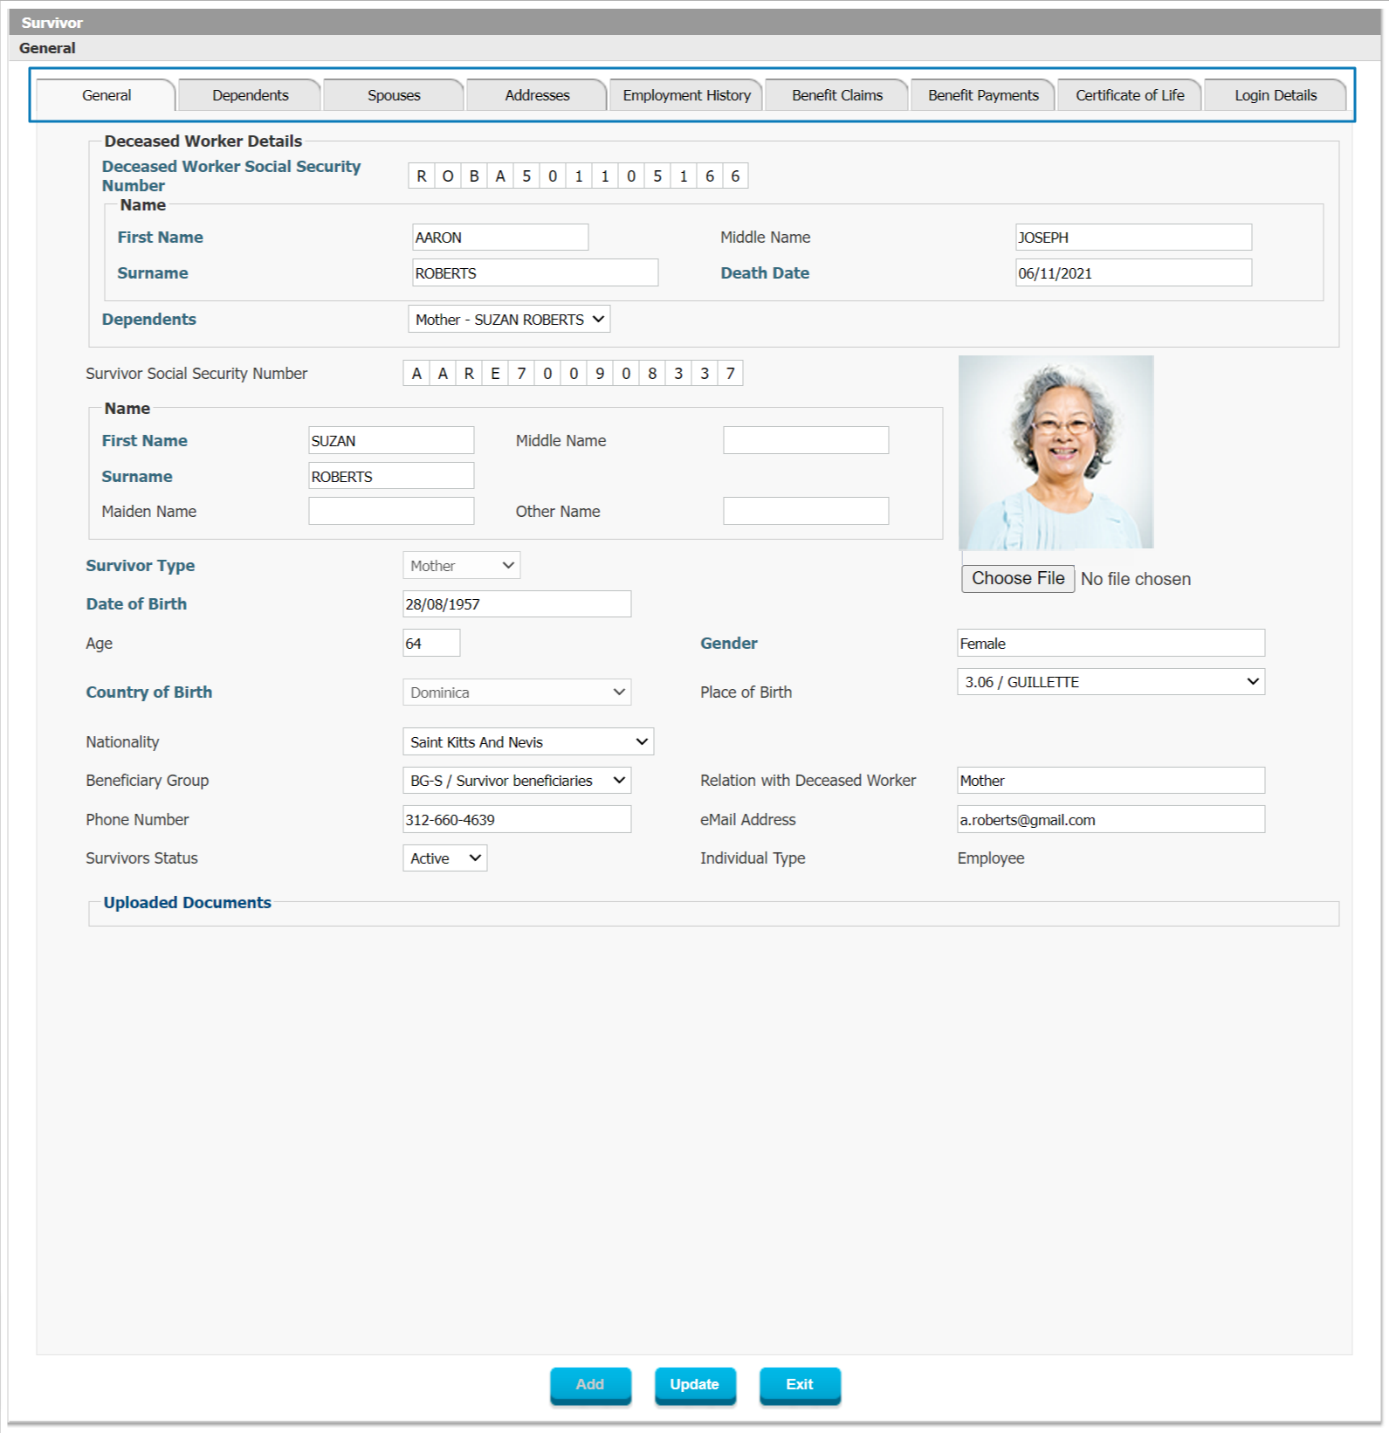 Figure 224: Survivor Electronic Record – General The Survivor is also a unique type of Beneficiary for which the relationship and details of the Deceased Worker need to be documented in addition to the demographic and other details of the Survivor.
Dependents 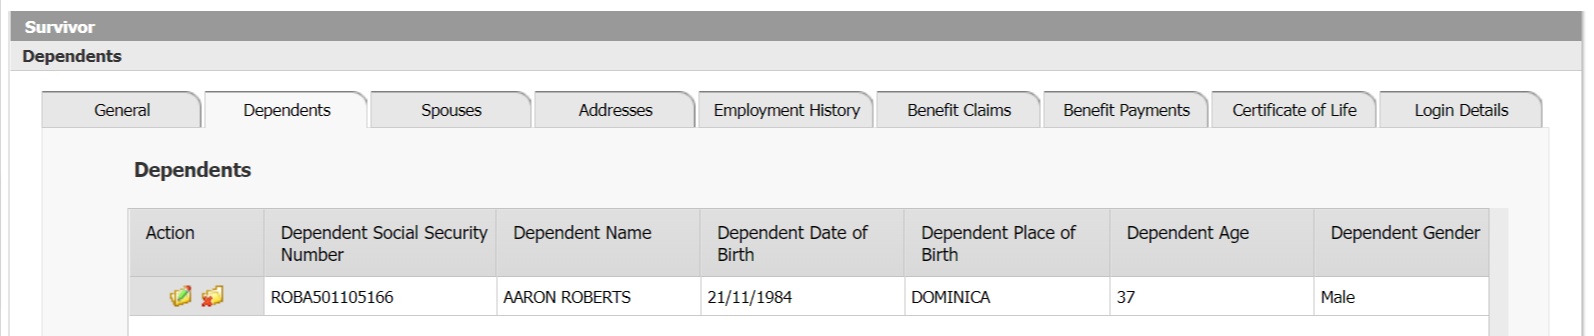 Figure 225: Survivor Electronic Record – Dependents Since Dependent Information is critical information to capture and maintain in regards to social security matters, the next most important Tab in the Survivor Electronic Record form is the Tab for Dependents. In this tab a summary is provided and the user can click on the record to drill down further and see more information. At the summary level, the following information is provided:
Spouses 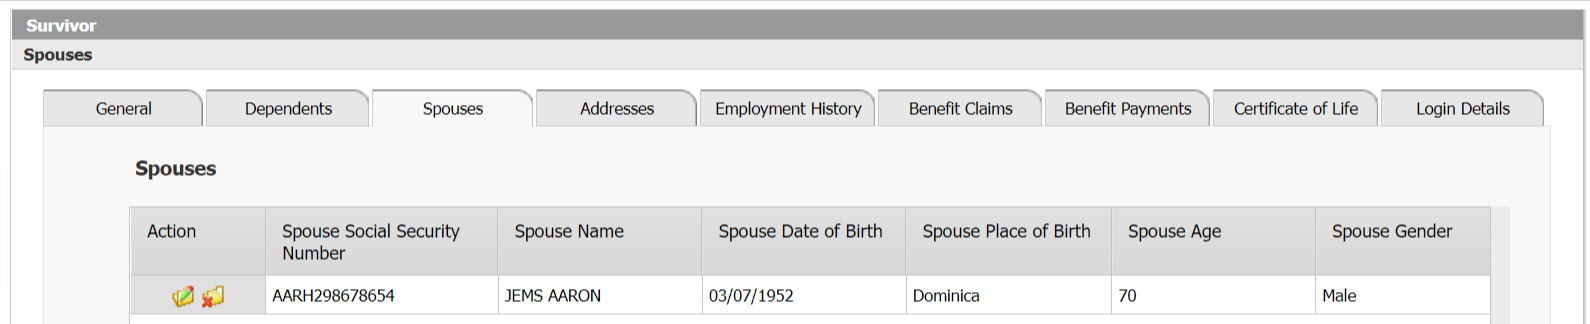 Figure 226: Survivor Electronic Record – Spouses Current and Former Spouse information is available separately since a Spouse relationship may have other implications in a social security context. The system provides the following information:
Addresses 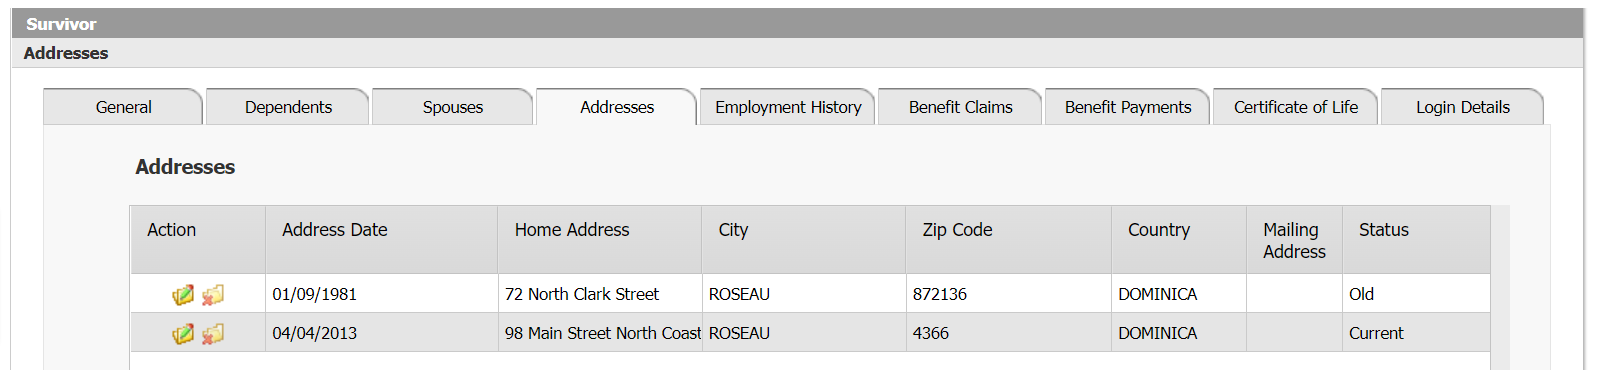 Figure 227 Survivor Electronic Record – Addresses An individual may have many addresses over a life-time and for various reasons a Social Security Administration may need to have the history of these Addresses available for consultation during investigations. Therefore, the address information is readily available in the Survivor Electronic Record.
Employment History 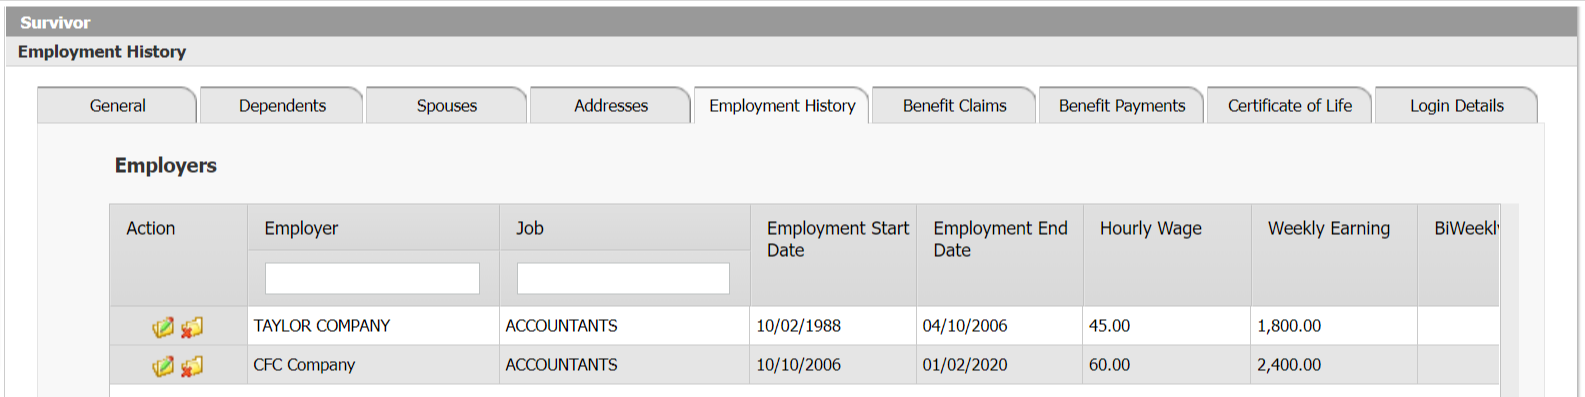 Figure 228: Survivor Electronic Record – Employment History The data regarding Employment History of an Survivor is updated automatically by the system, depending on the transactions processed in the system (i.e. Application to Register as Employee or an ESSRN filing by an Employer, etc.). The Employment History will show the following data:
Benefit Claims 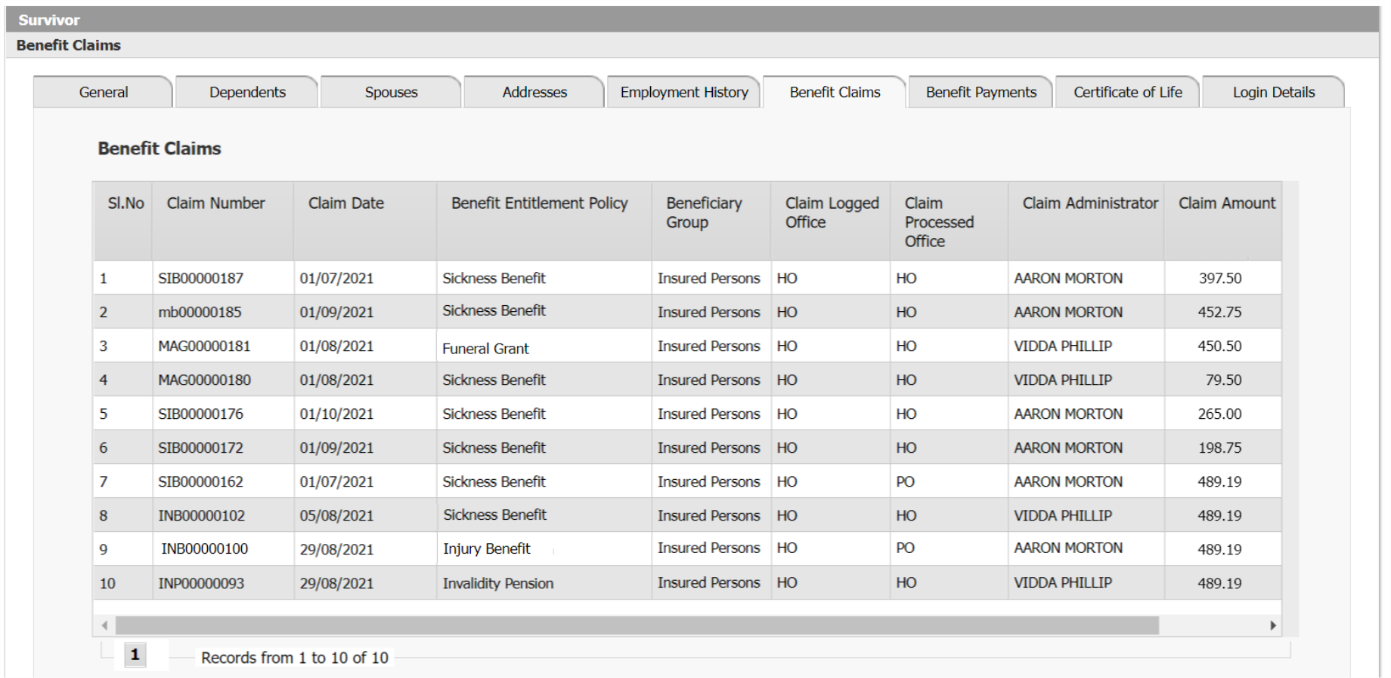 Figure 229: Survivor Electronic Record – Benefit Claims Benefit Claims which have been filed through the Survivor’s e-Services (or were filed manually and entered by a user at the Social Security Administration), can be seen in a summary overview under the Survivor’s Electronic Record so that the user has immediate access and insight into the summary. If further detail is required they can drill-down and view the underlying claim transaction. The Benefit Claims tab shows the following information:
Certificate of Life 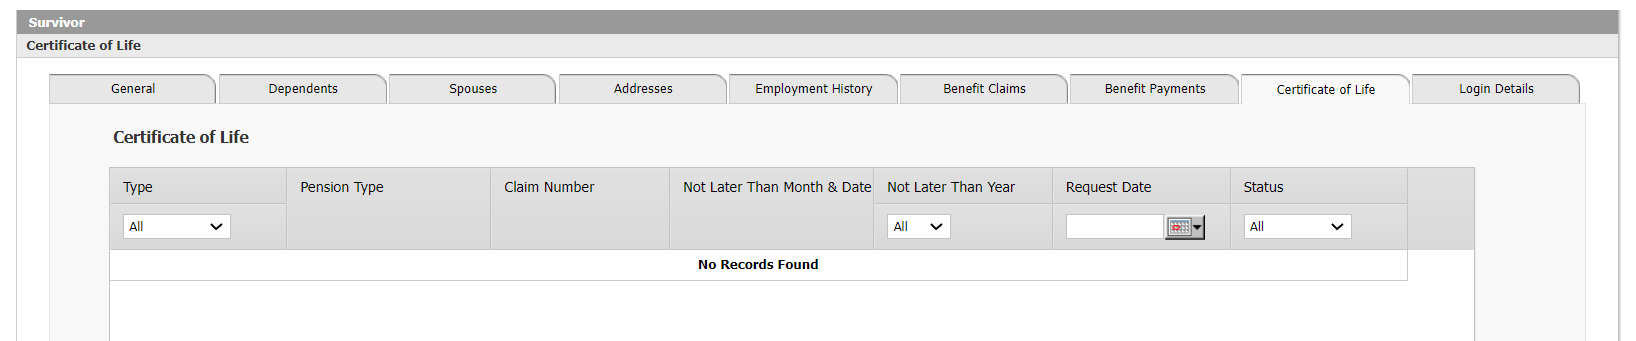 Figure 230: Employee Electronic Record – Certificate of Life Certificates of Life are required for Pensioners and those receiving a Survivor’s Pension to continue receiving their Pension. The system therefore keeps track of exactly which Certificate has been filed when and how it was verified. The details shown in the summary include the following:
Benefit Payments 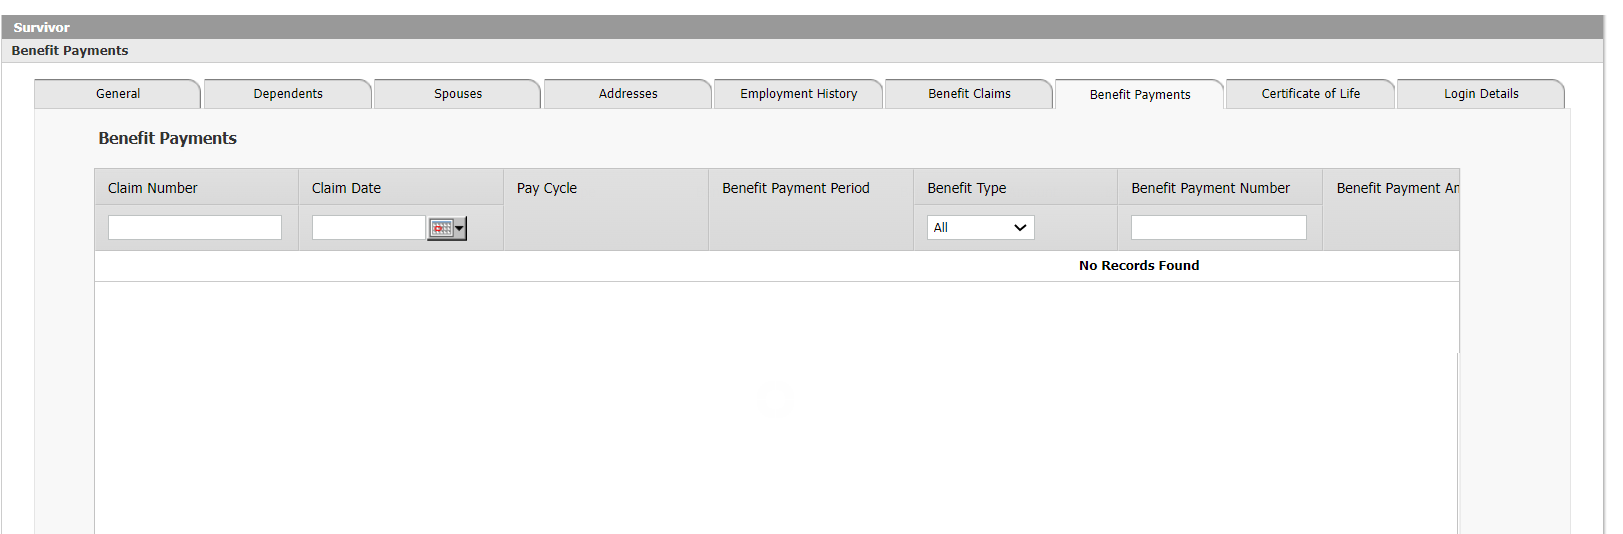 Figure 231: Employee Electronic Record – Benefit Payments Any Benefit Payments processed in the system will automatically be displayed in the Beneficiary Electronic Record for easy reference of the user. The Benefit Payment details shown in the summary include the following:
Login Details  Figure 232: Survivor Electronic Record – Login Details In the Login Details, an authorized user can manage the user credentials for the Survivor so the Survivor can access the e-Services Portal. E-ServicesInteract SSAS is a portal application which manages all aspects of a Social Security Administration’s business operational needs. Through its online services (“e-Services”), all stakeholders can access all functionality relevant for them so they have access to the services of the Social Security Administration, 24 hours a day, 7 days a week. Depending on their exact profile and role in the system, different users will have different access. The access to e-Services starts with an e-Services Access Request and once the access has been approved, the user can log into their e-Services and see a history of transactions, initiate new transactions or message with the Social Security administration. e-Services are available for:
e-Services Registration 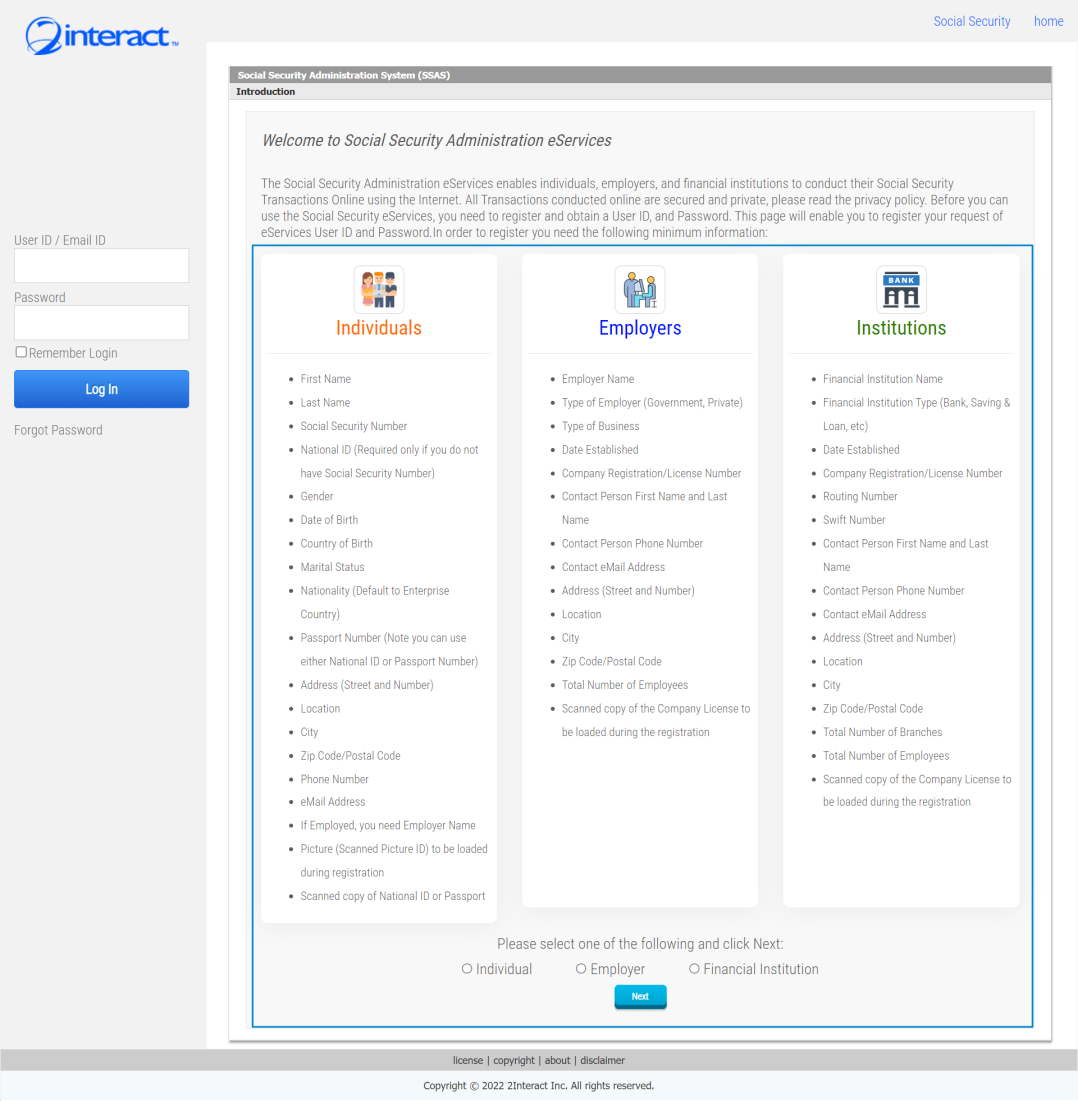 Figure 233: e-Services Registration General Form 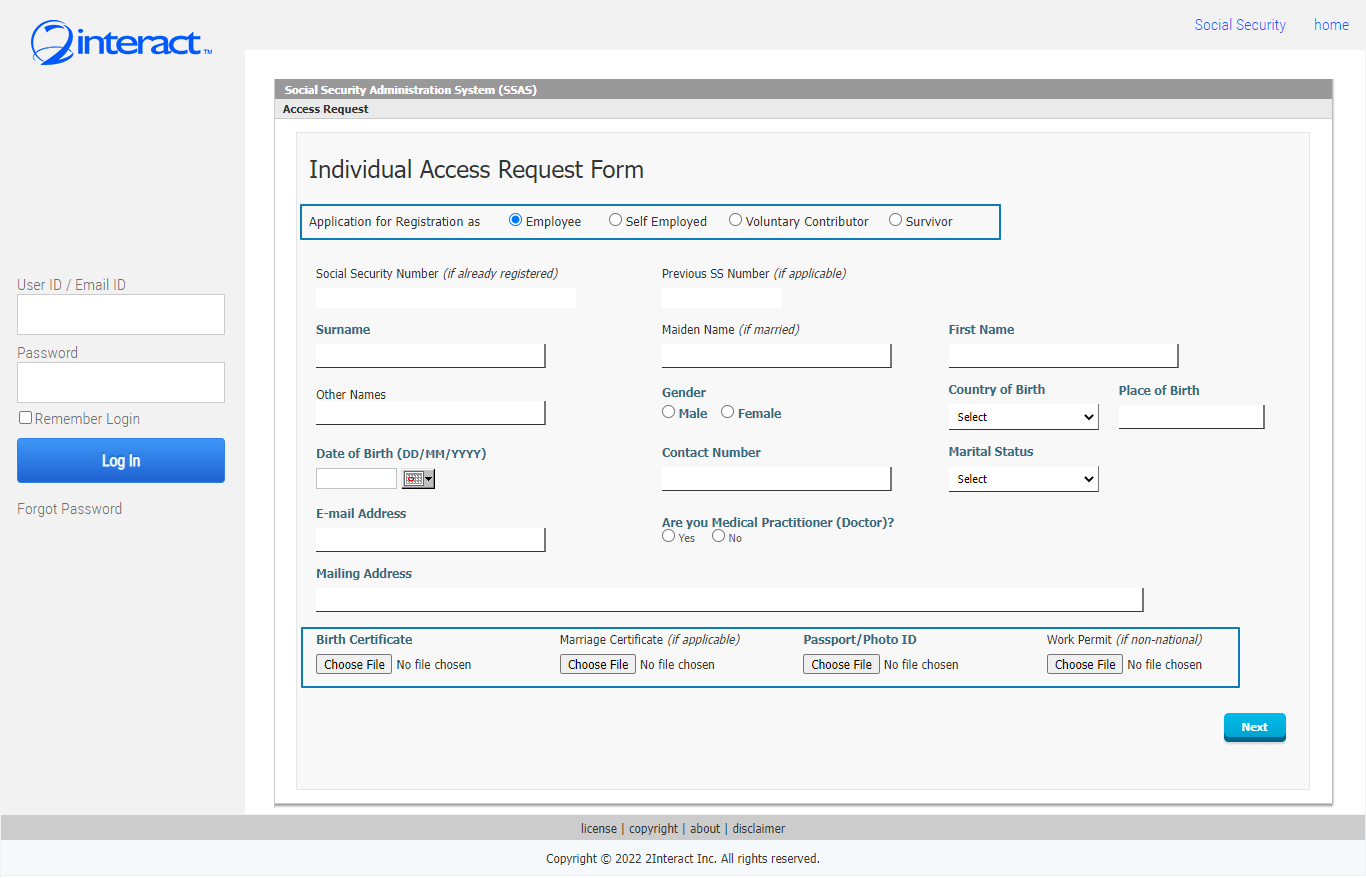 Figure 234: e-Services Registration for Individuals Individuals can register for e-Services either as employees, self-employed, voluntary contributors or survivors. The applicant will be able to attach any mandatory documentation to ensure that all information needed by the authority is available. 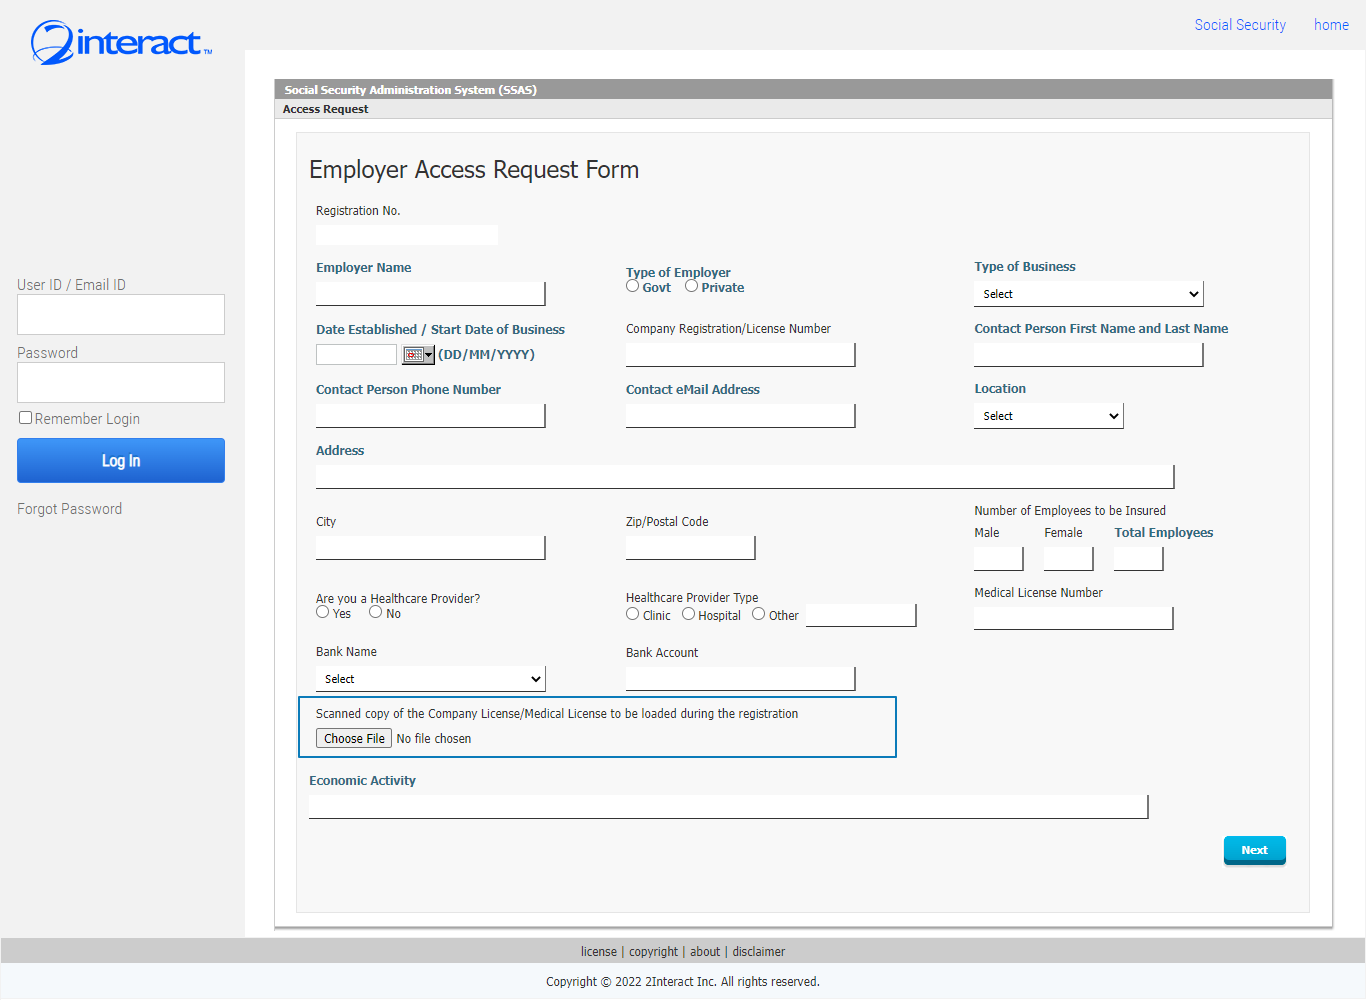 Figure 235: Employer e-Services Access Request Employers can also register for e-Services so they can dramatically reduce their administrative workload by handling all their work with the Social Security Administration online and benefiting from the seamless integration of all the modules so that minimal data-entry is required for any process they are involved in. Individual e-Services 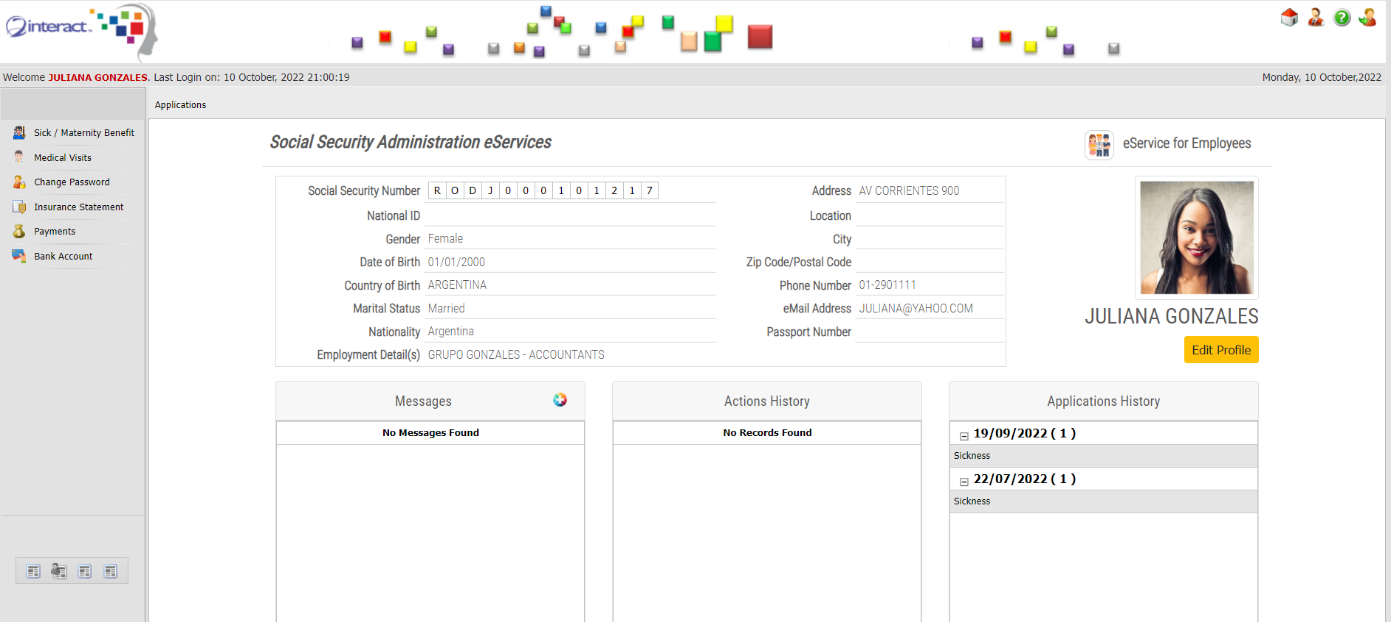 Figure 236: Employee e-Services In the above figure we can see the e-Services access for a regular employee. You can see that they can access Messages from the Social Security Administration, see all their Actions History and view all Applications that have been processed or are pending. 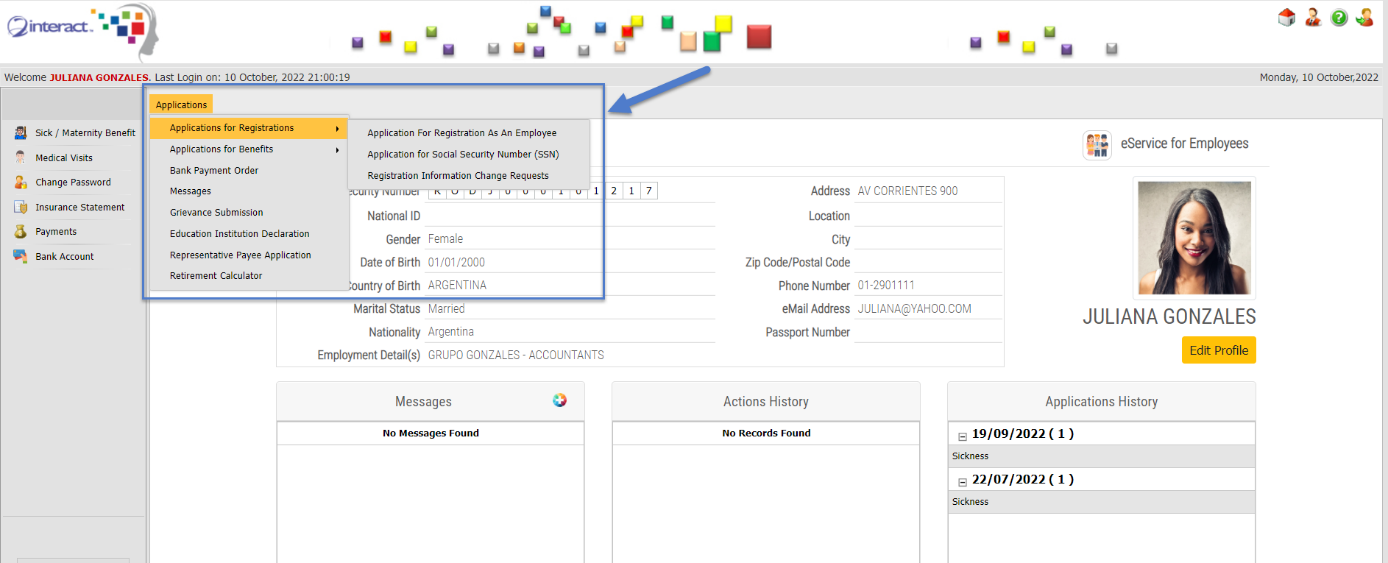 Figure 237: Employee e-Services – Applications for Registration All important registration options are available in the employee e-Services portal. Including the following:
These are further shown below: Application for Registration as an Employee 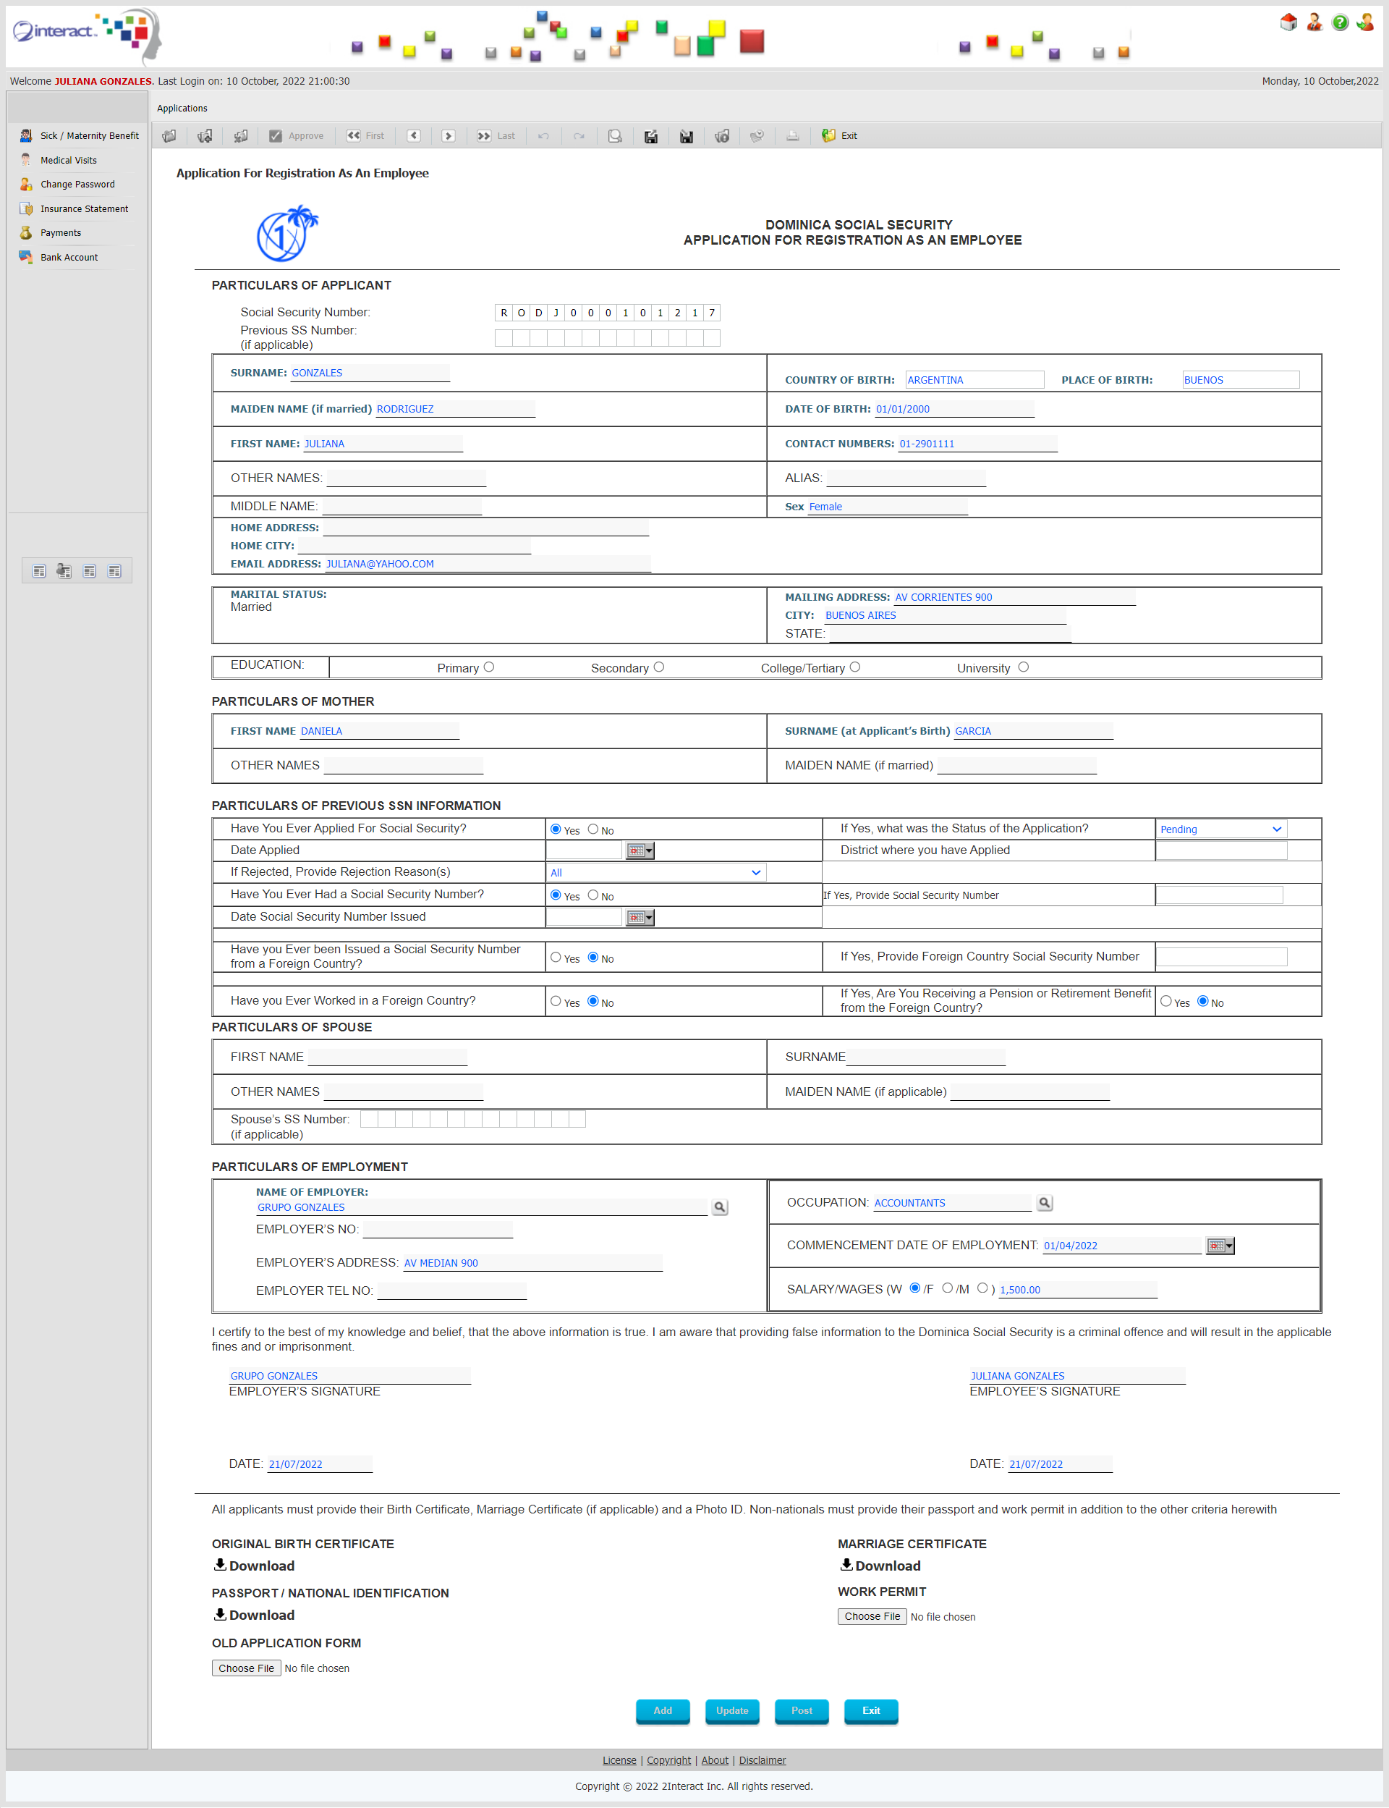 Figure 238: Application for Registration as an Employee The above Application shows the form to register an Employee with an Employer, initiated by the Employee themselves. All necessary information is there. The system will auto-populate what is already known about the Employee and the Employee can just fill in the blanks and select the name of the Employer before entering details about the Job Title, Starting Date, Salary and Pay Frequency. Application for a Social Security Number 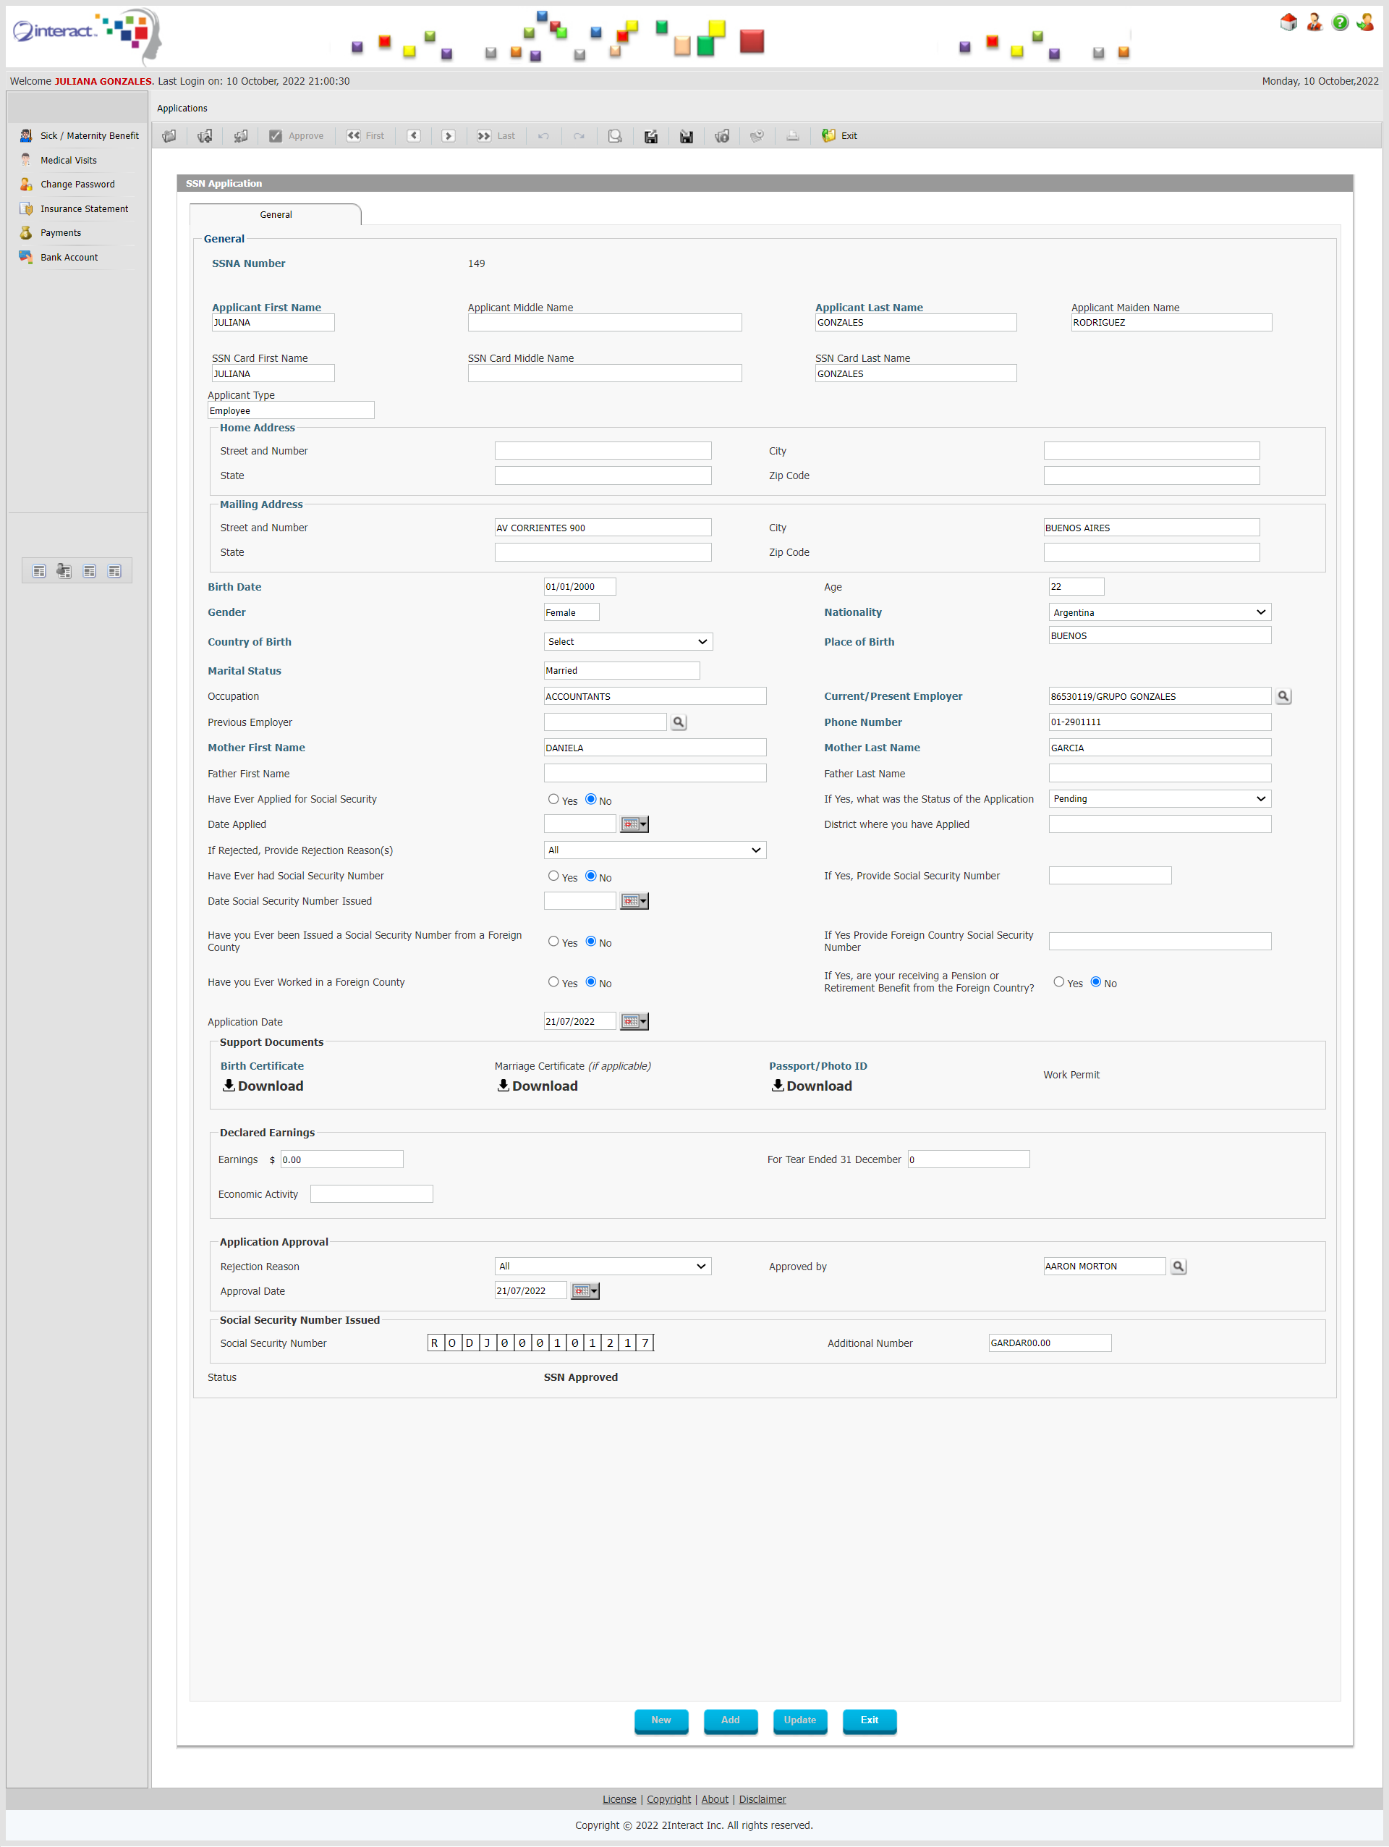 Figure 239: Application for Social Security Number The above application can be used to request a SSN directly by an individual or it will be generated and filled in automatically by the system once an individual applies to be registered with an Employer. Registration Change Request 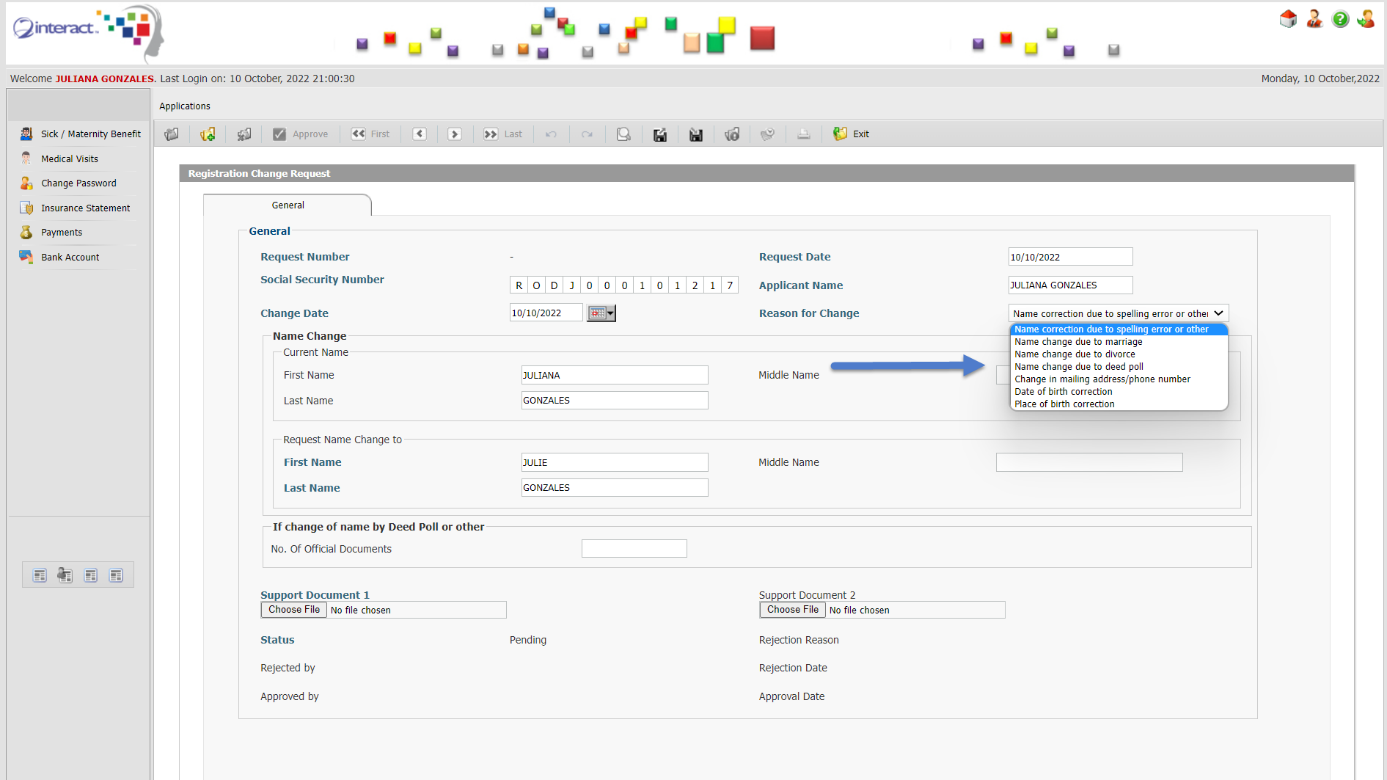 Figure 240: Information Change Request If an individual finds that any of their information on record with the Social Security Administration is incorrect, they can submit a request for Information Change. Changes can be requested for different purposes, the standard ones include:
For each of the above reasons, the dynamic form will change and display the relevant fields to be corrected.  Figure 251: Individual Profile – Bank Details The Bank Details tab will list all Bank Details information for Bank Accounts associated with this Individual and allows the user to drill down in the information to see further details and verify accuracy.  Figure 252: Individual Profile – Certificate of Life The Certificate of Life tab will list all Certificate of Life information associated with this Individual and allows the user to drill down in the information to see further details and verify accuracy.  Figure 253: Individual Profile – Benefit Payments The Benefit Payments tab will list all Benefit Payments historical information associated with this Individual and allows the user to drill down in the information to see further details and verify accuracy.  Figure 254: Grievance Submission A Grievance Submission form can be used by an Individual to submit any type of Grievance and describe the issue in detail. The system will route the Grievance to the appropriate user in the Social Security Administration and then allow the authorized users to review the Grievance and determine the course of action.  Figure 255: Education Institution Declaration Confirmation of Enrolment at an Educational Institution will be submitted by schools in order for students to continue to qualify for Survivor Pensions when applicable. In such cases, the original form can be submitted on paper and then recorded by an authorized user in the Social Security Administration so that the Individual’s record will be properly flagged as updated with the Education Institution Declaration and the Individual can continue to receive their benefits. 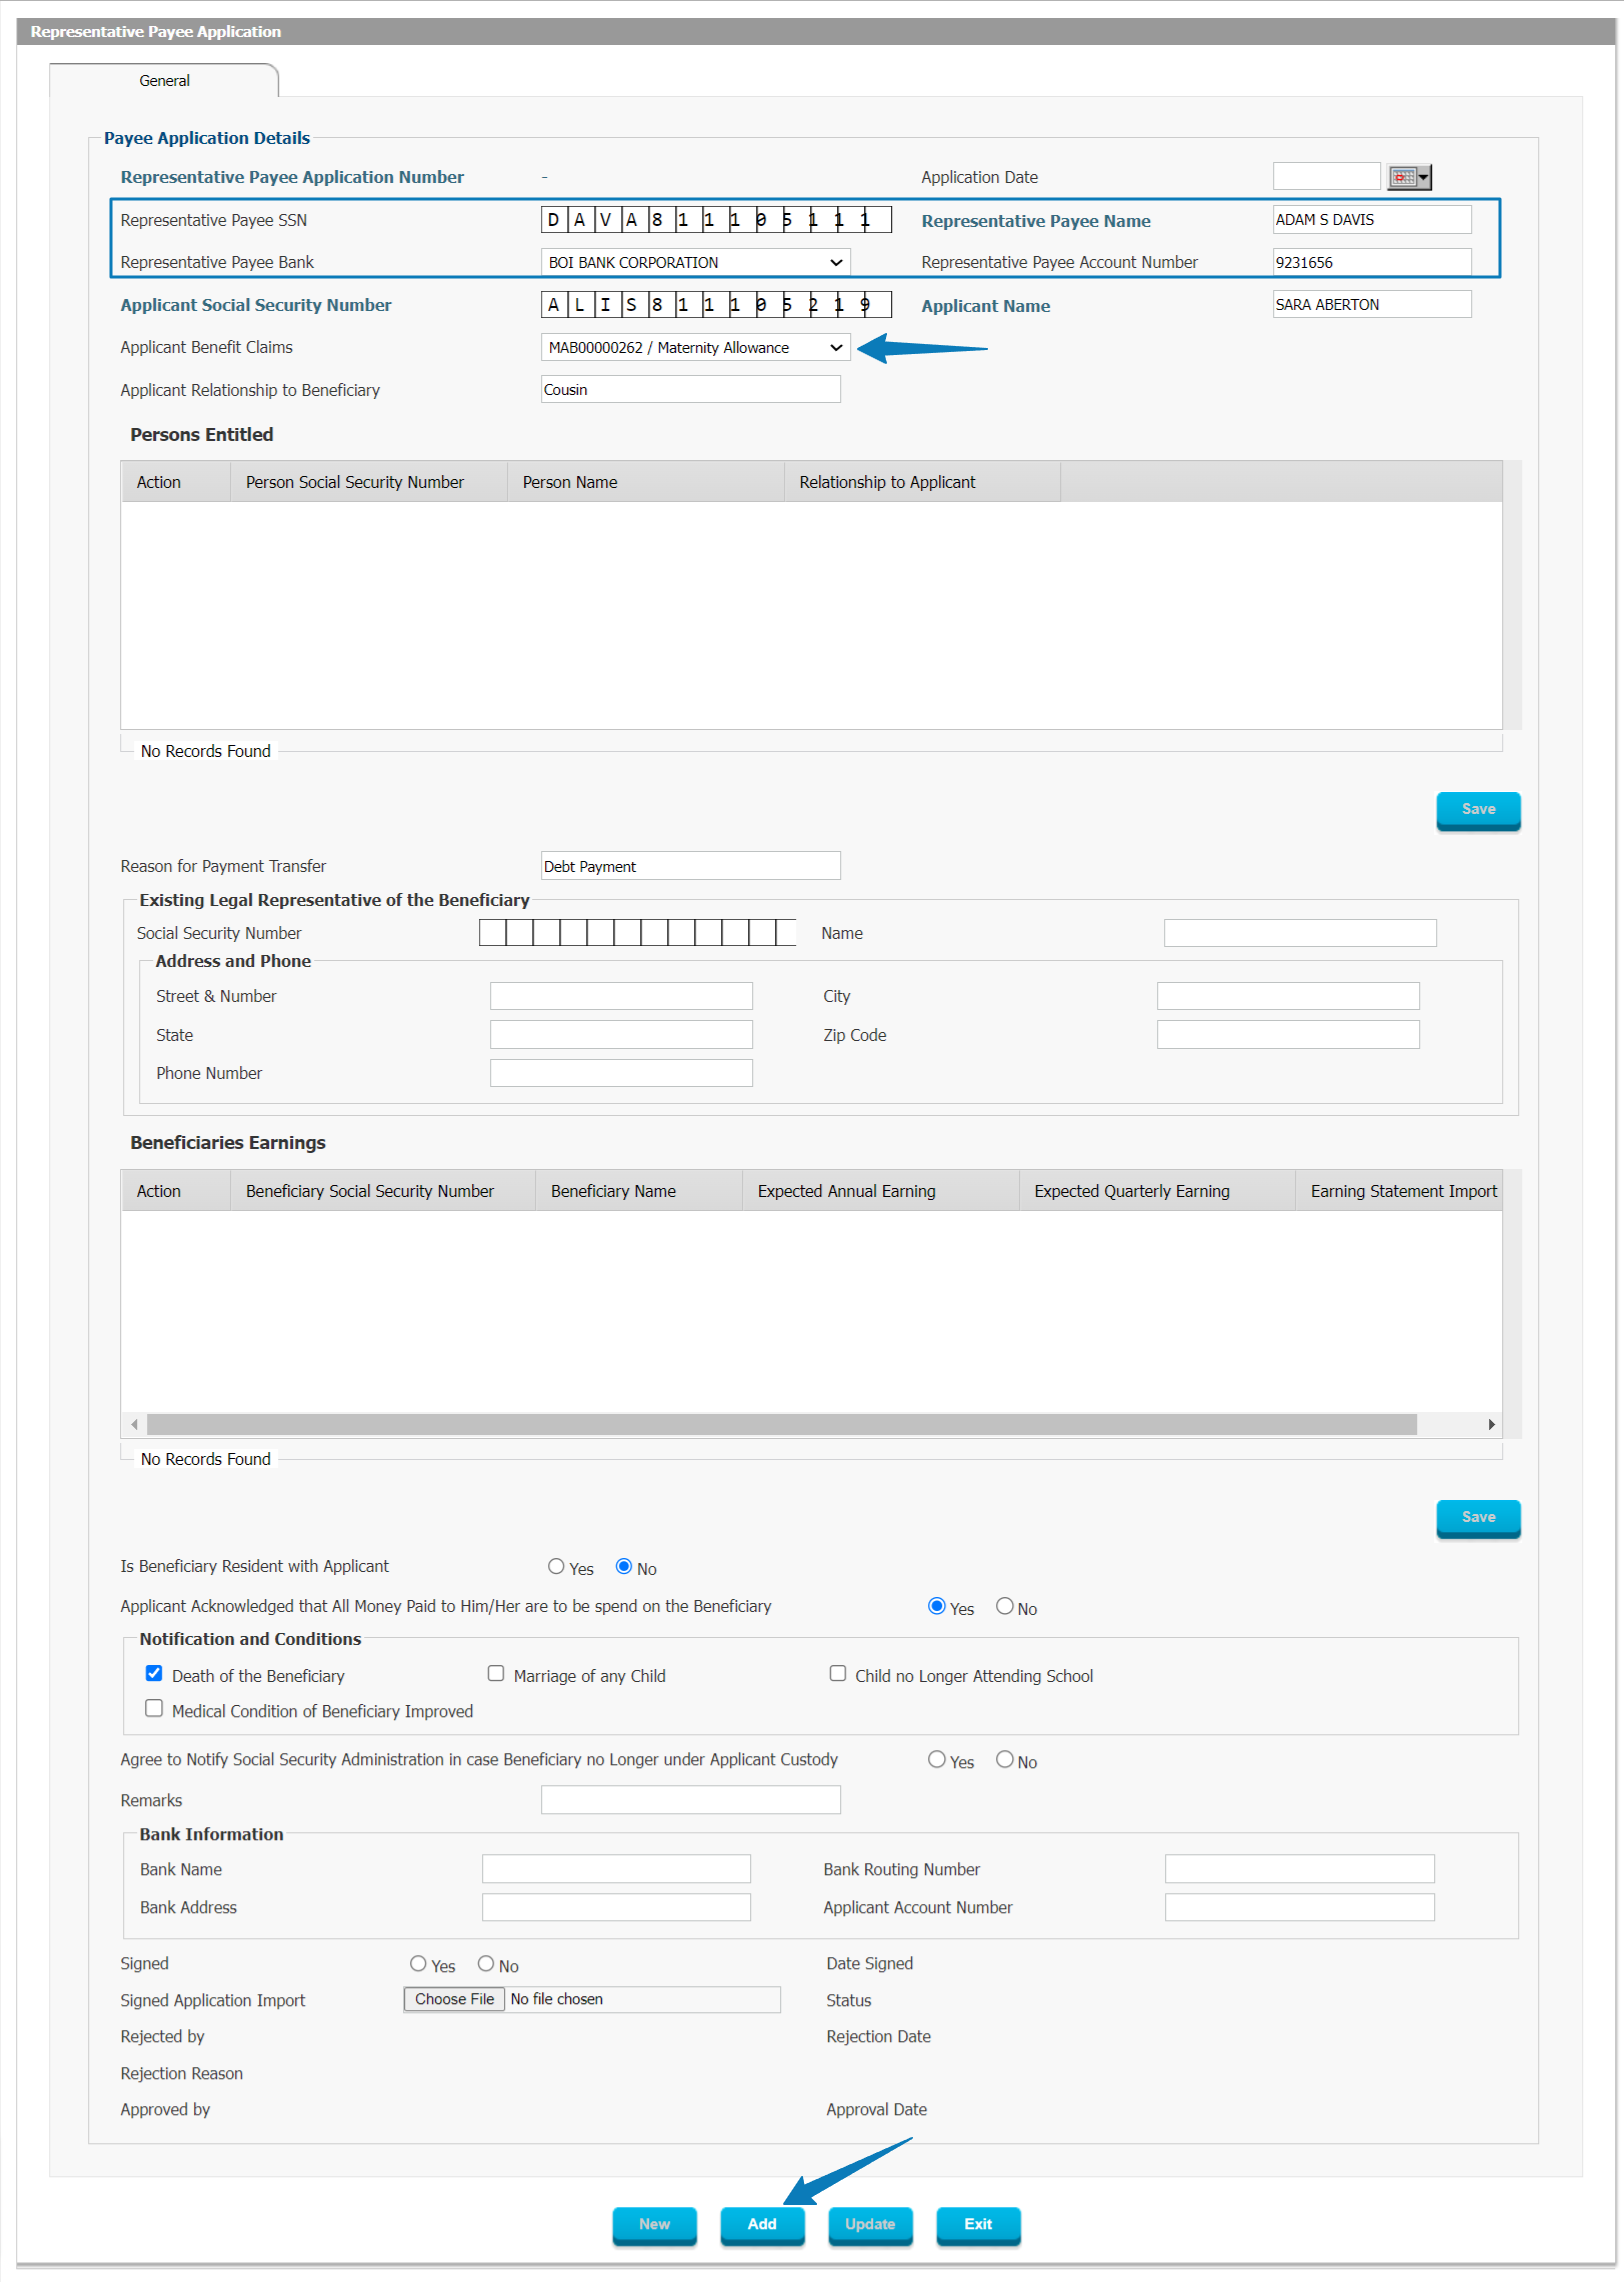 Figure 256: Representative Payee Application Representative Payee Applications are used to nominate another person (a third party) to receive benefits on behalf of an Individual, usually due to the Individual temporarily or permanently lacking access to a Bank Account, or being legally declared unfit to handle financial matters. The Representative Payee Application can be submitted online by the Individual or in paper hardcopy form and then recorded in the system for processing purposes. 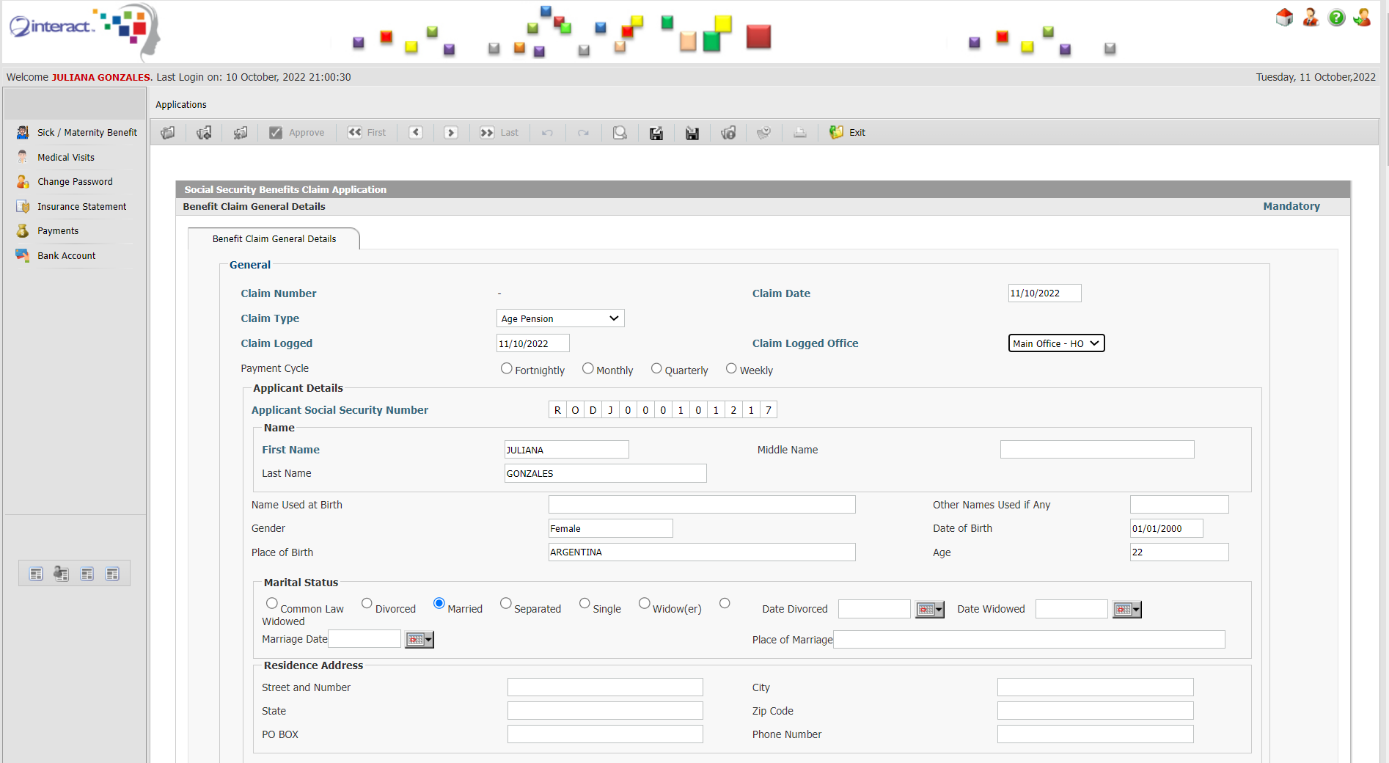 Figure 257: Benefit Claim Application One of the main uses of the e-Services will be for Individuals to be able to submit Benefit Claims online so that such claims can be easily processed without the need for data-entry by the Social Security Administration. Benefit Claims forms are dynamic and will capture the data relevant for the particular type of Benefit Claim as well as the mandatory Supporting Documents associated with the particular type of Benefit that is being claimed. Once the Individual submits the Claim, it will automatically be routed to the appropriate user in the Social Security Administration and processed by them. The Individual will be able to track the status of their Benefit Claim throughout the entire cycle. 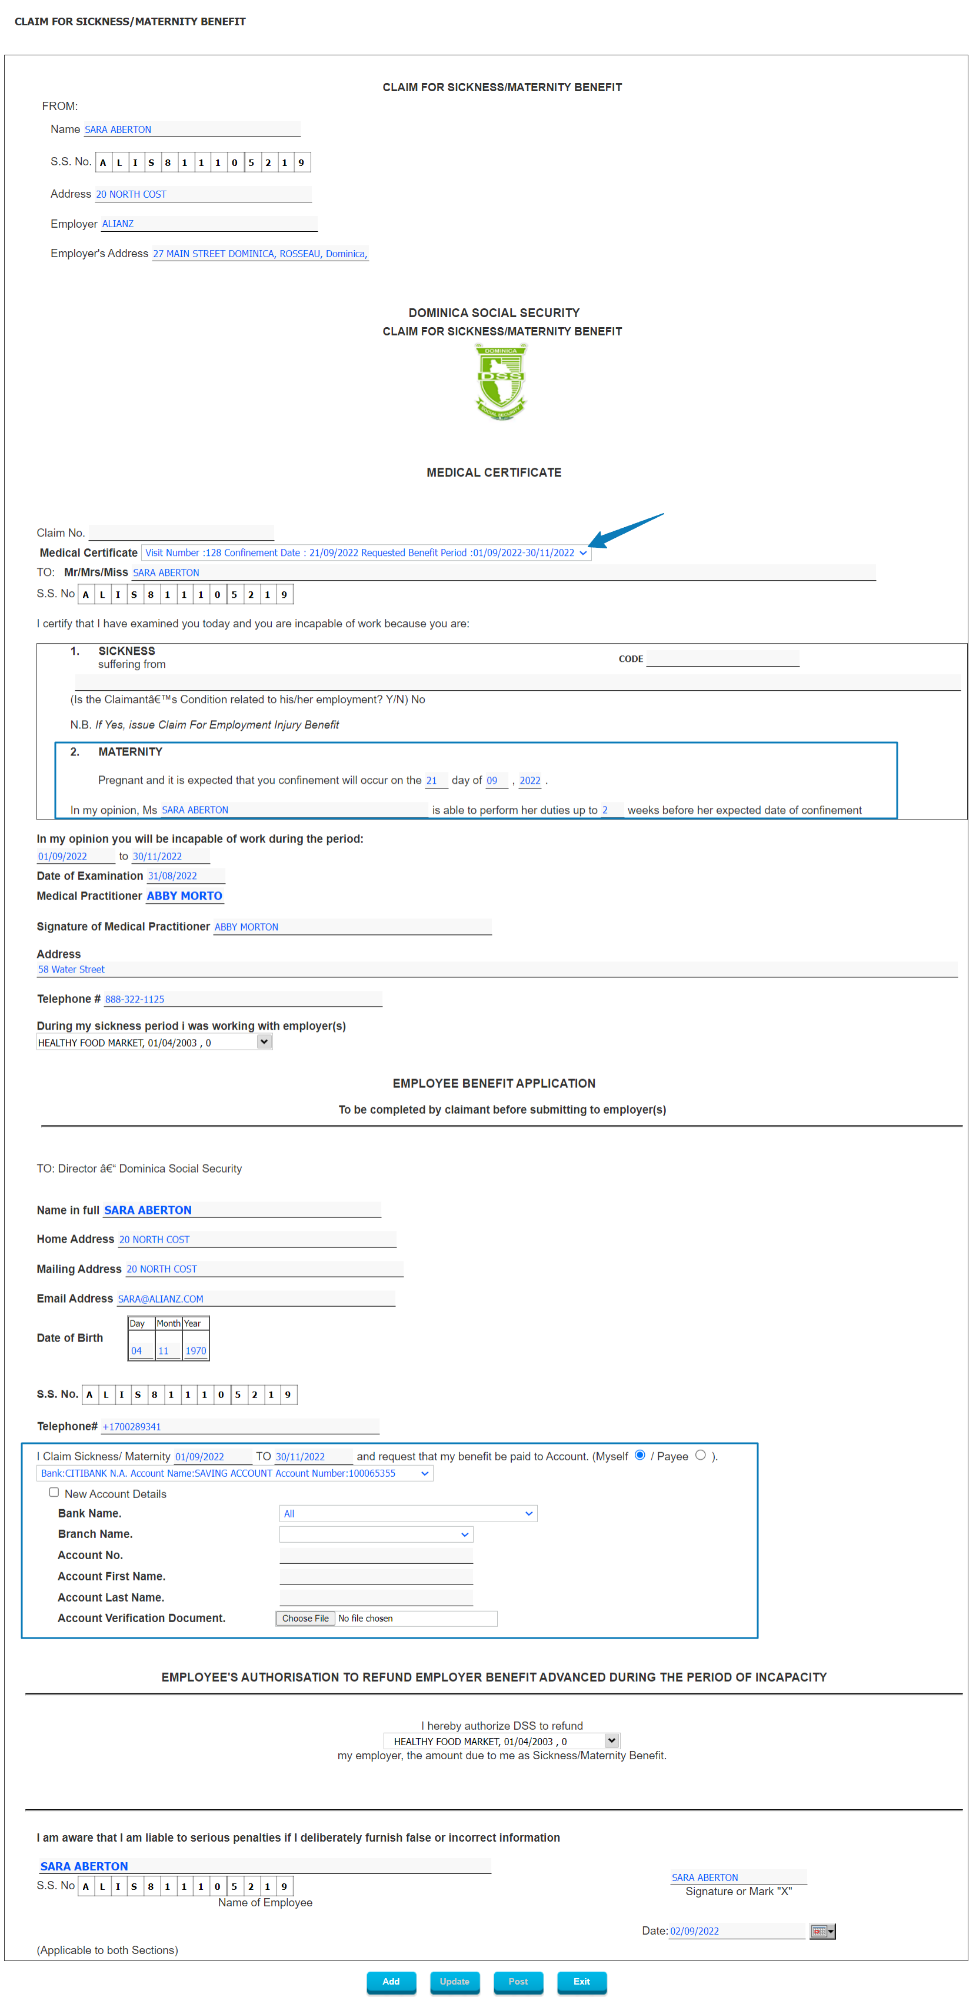 Figure 258: Sickness/Maternity Benefit Claim Figure 258: Sickness/Maternity Benefit Claim For unique types of Benefit Claims, such as Sickness and Maternity benefits, the system can present custom forms which are specifically developed based on a country’s standard method of processing such Benefit Claims. The Sickness or Maternity Benefit claim will be routed to the appropriate user in the Social Security Administration as per the configured workflow. Depending on the laws and regulations in effect, it may be a mandatory requirement for a Sickness or Maternity Benefit claim to be accompanied by a Medical Certificate. This can be achieved by allowing Medical Practitioners to submit their Diagnosis with any other necessary information to justify the request for a Medical Benefit. 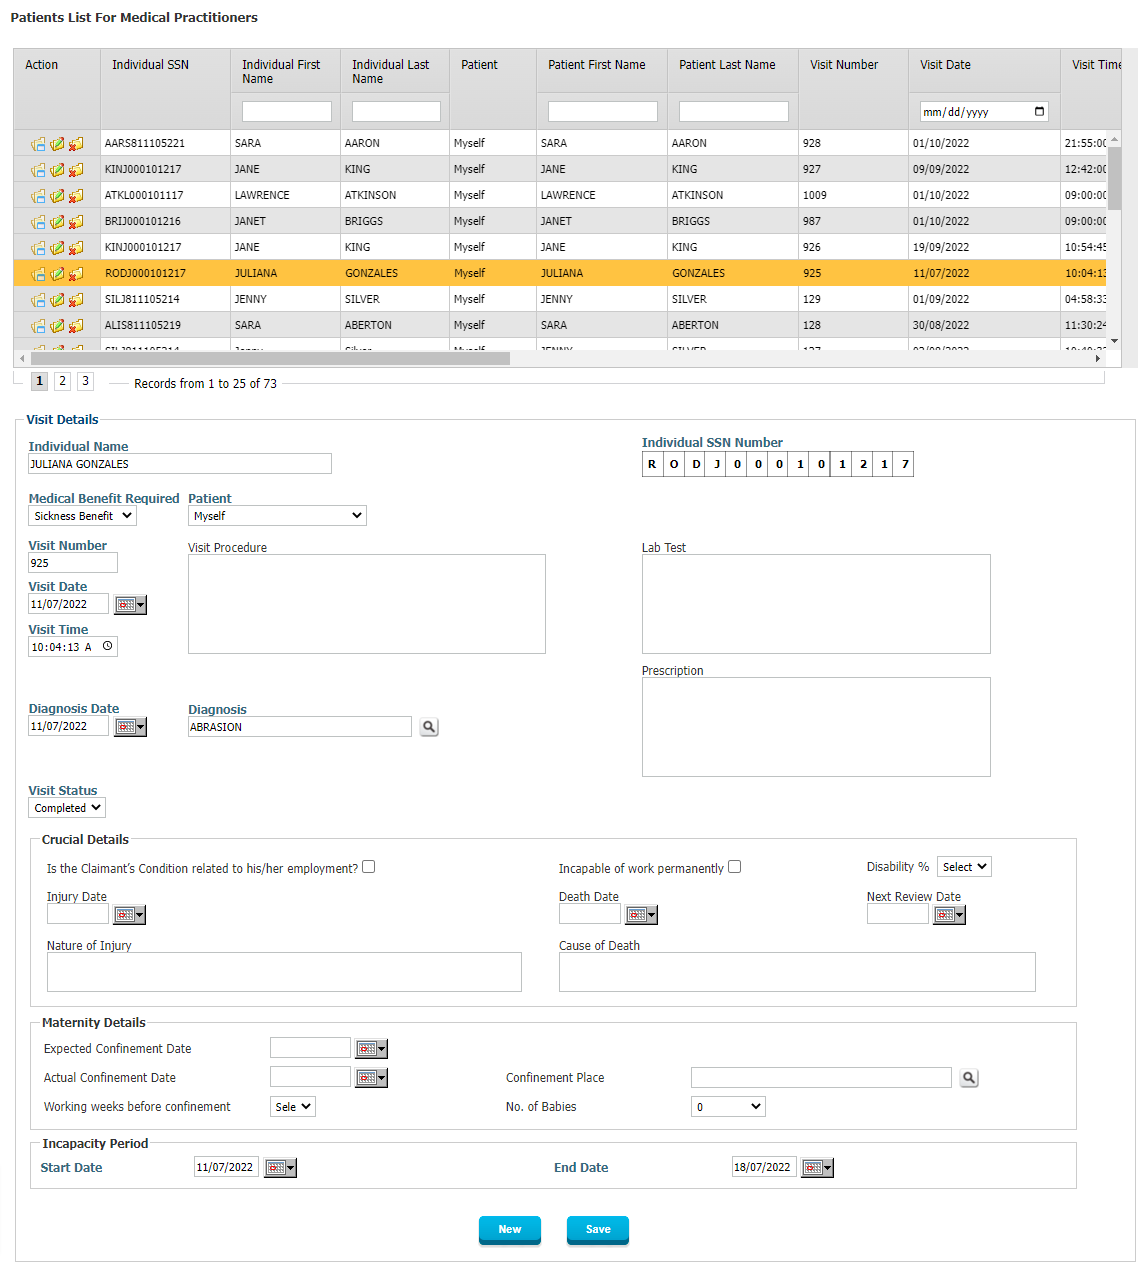 Figure 259: Medical/Patient Visit The Medical or Patient Visit form captures all necessary information to allow the Social Security Administration to subsequently process the Medical Benefit Claim. 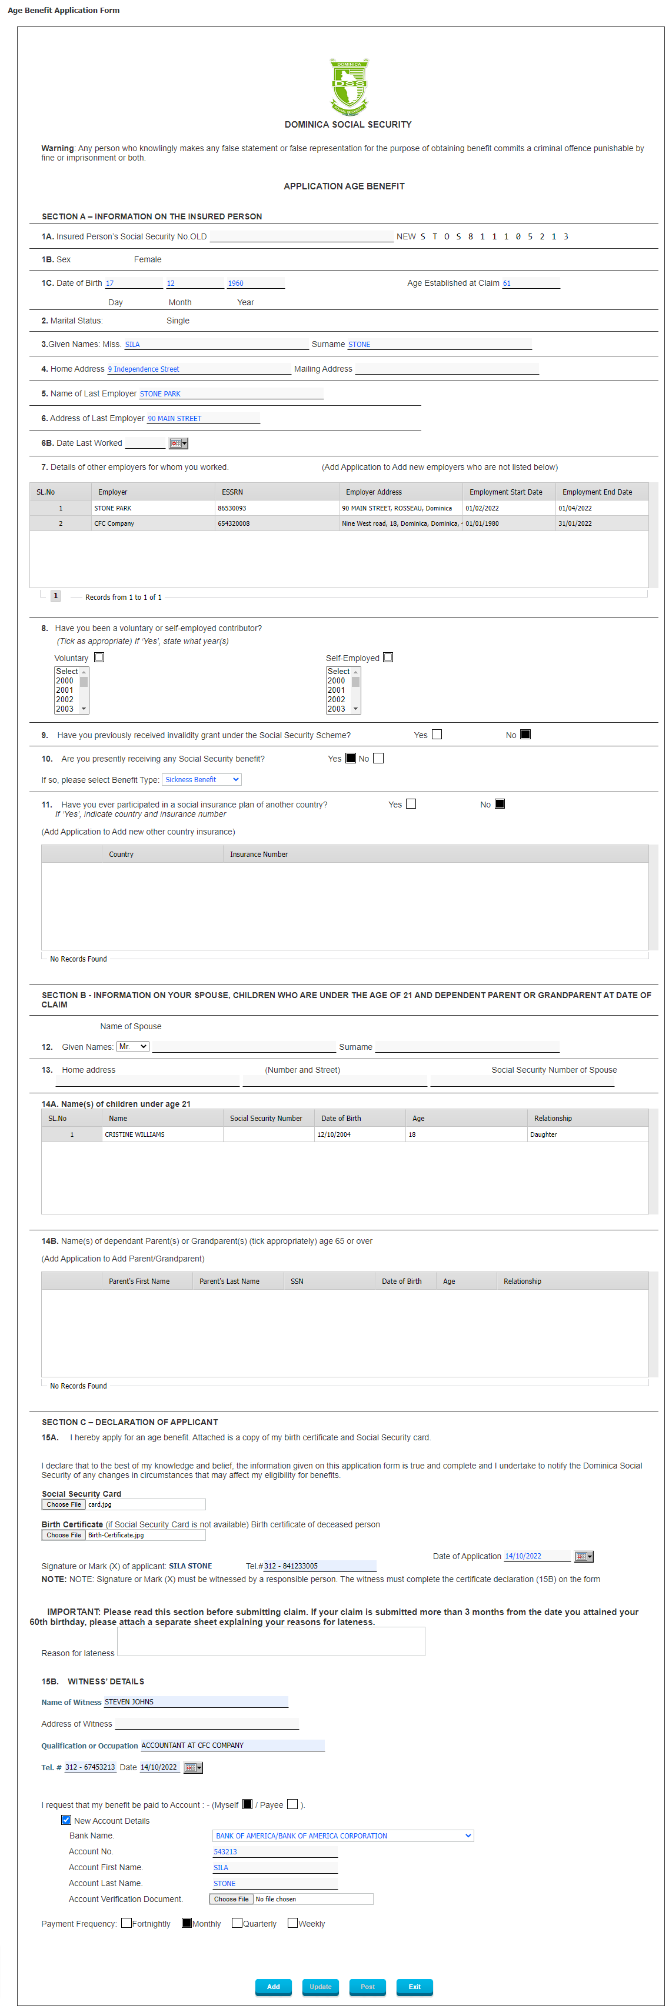 Figure 260: Age Benefit Application Form Another unique benefit application is the Application for an Age Benefit. This form is again specific to a particular country’s laws and regulations pertaining to Age Benefits. All information will be captured in this form so that the entire Benefit Claim process can be managed with the data which is submitted in this process. 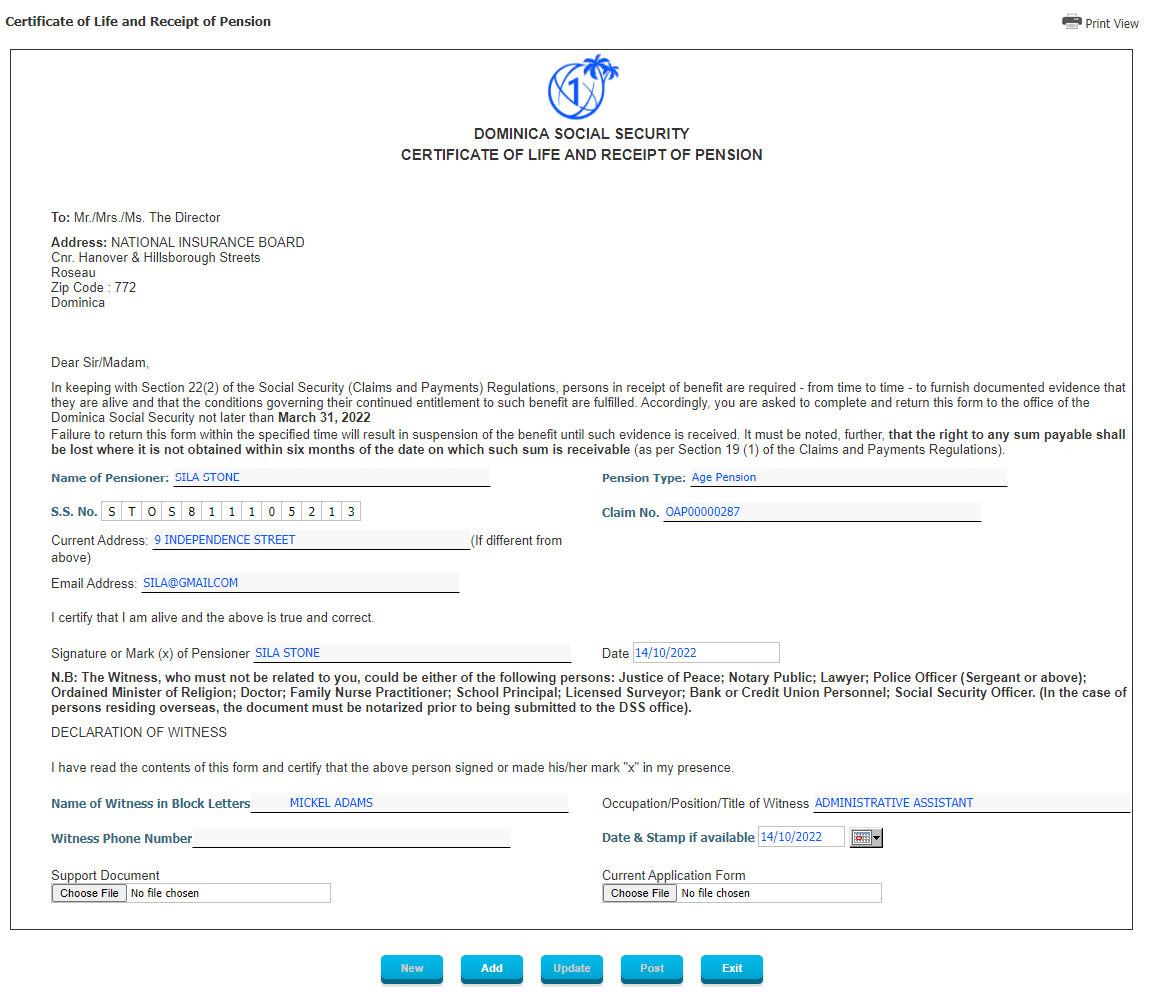 Figure 261: Certificate of Life and Receipt of Pension Similar to Educational Institution Declarations, Individuals may need to provide a Certificate of Life as proof of life to continue to automatically receive their Pensions. The form can be submitted as a hardcopy form and entered by the Social Security Administration or it can be submitted online through the e-Services. 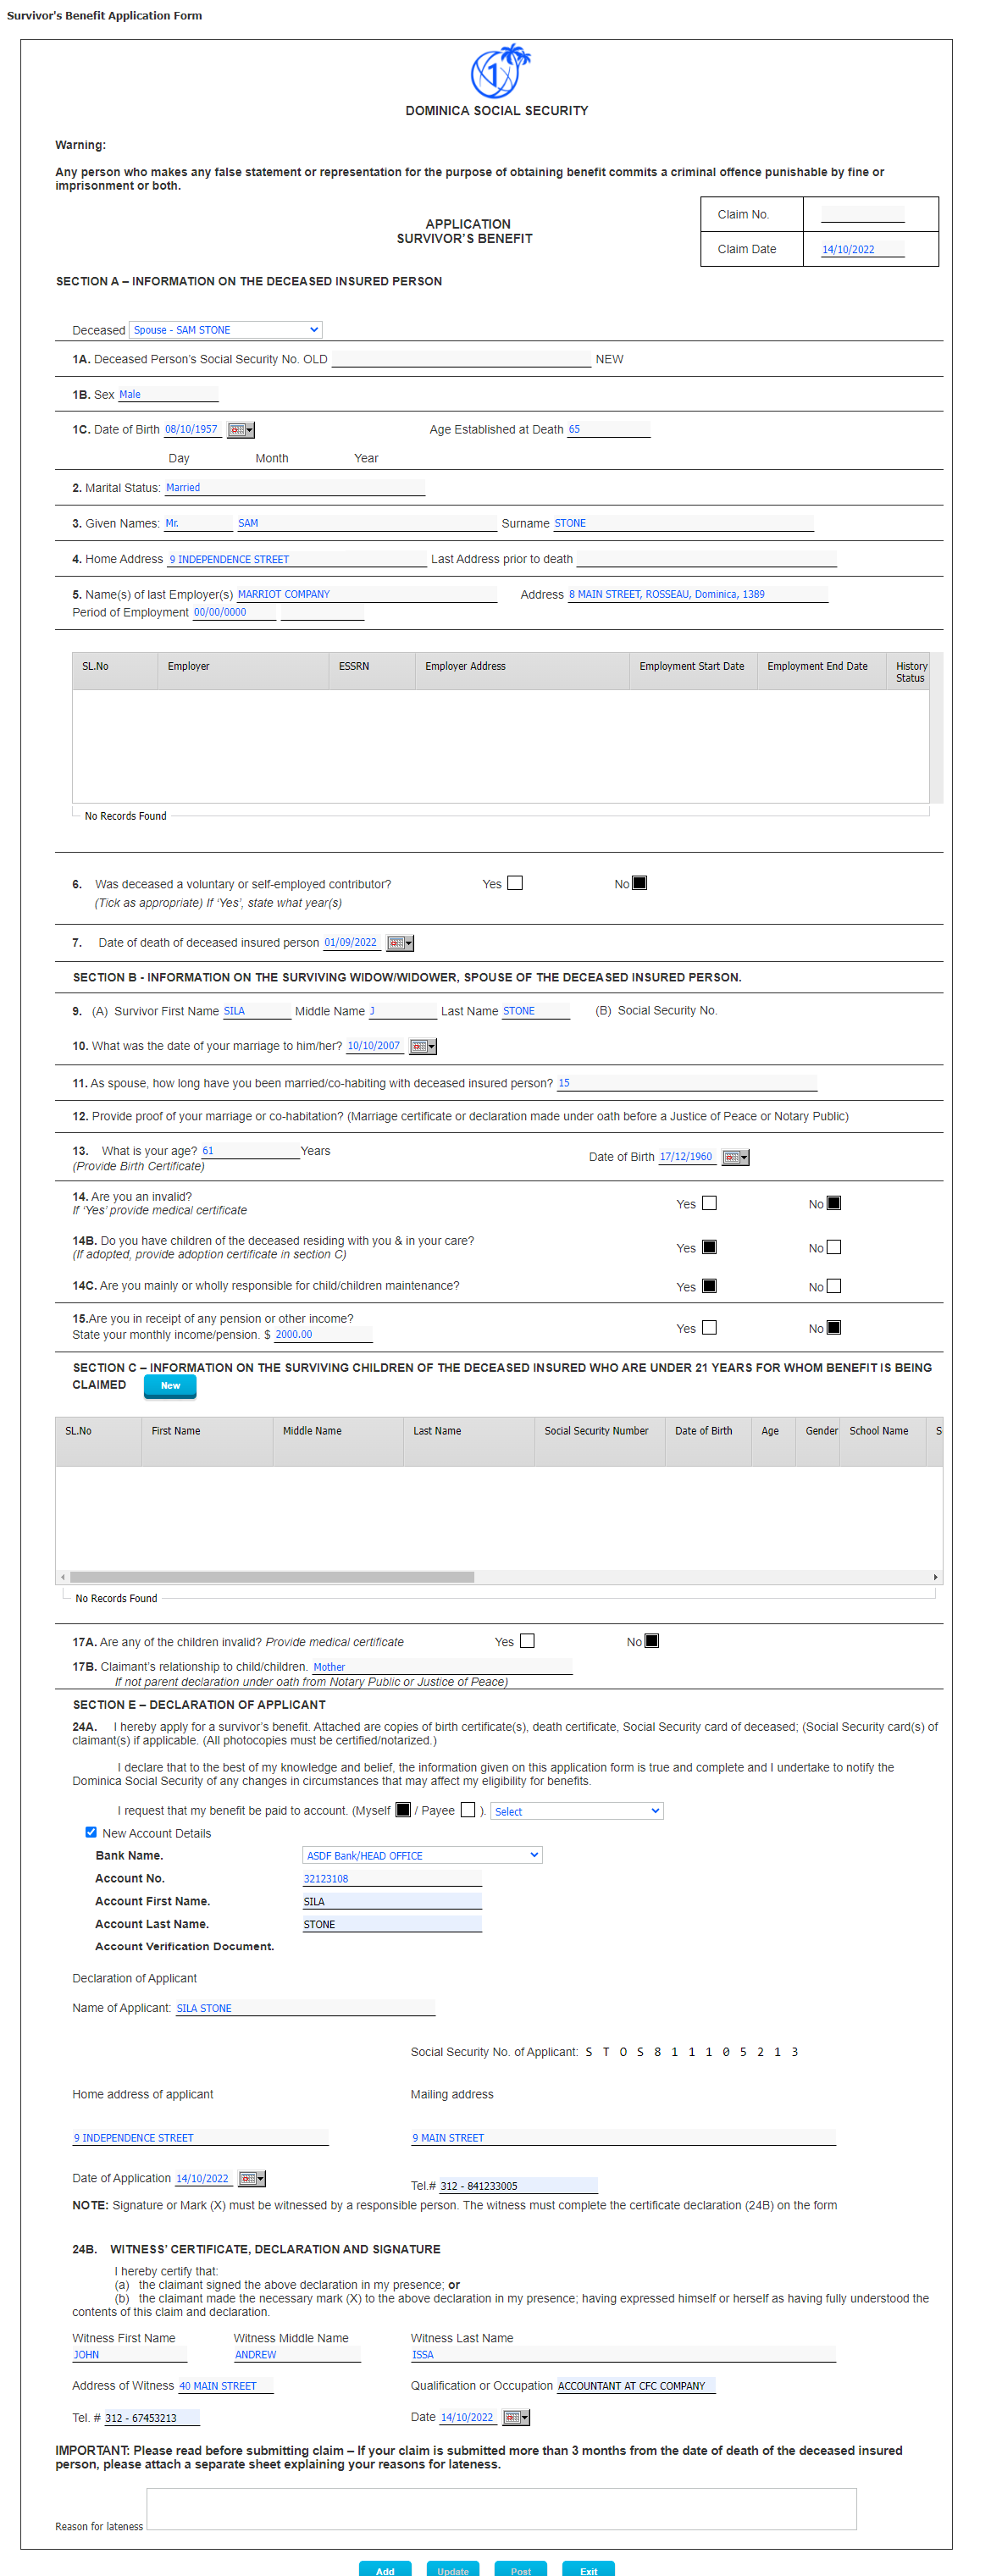 Figure 262: Survivor’s Benefit Application Form A Survivor’s Benefit Application will allow Survivors to claim their Survivor Benefit through the e-Services portal. The majority of the data will be auto-populated by the system based on what’s already known about the Survivor. Employer e-Services Employers will be able to conduct all transactions which they normally would do with the Social Security Administration using the e-Services portal for Employers. This includes:
The module is seamlessly integrated with all other modules in Interact SSAS so that minimal to no data-entry is required.  Figure 263: Application of Registration as an Employer Once an Employer has received access to the e-Services portal, they can do the Registration as an Employer for which they will receive an Employer Social Security Registration Number or ESSRN. This ESSRN Application Form will contain information about the company’s owners, banking information and details about the initial Employees already employed by this Employer. Once the ESSRN application is submitted it will be routed automatically to the Social Security Administration for processing. There the authorized user will issue an ESSR Number for the Employer. All data included in the ESSRN Application, such as owner information, banking information and all Employees listed under the Employer, will automatically be updated in the system and associated with the employer where relevant without the need for any data-entry. 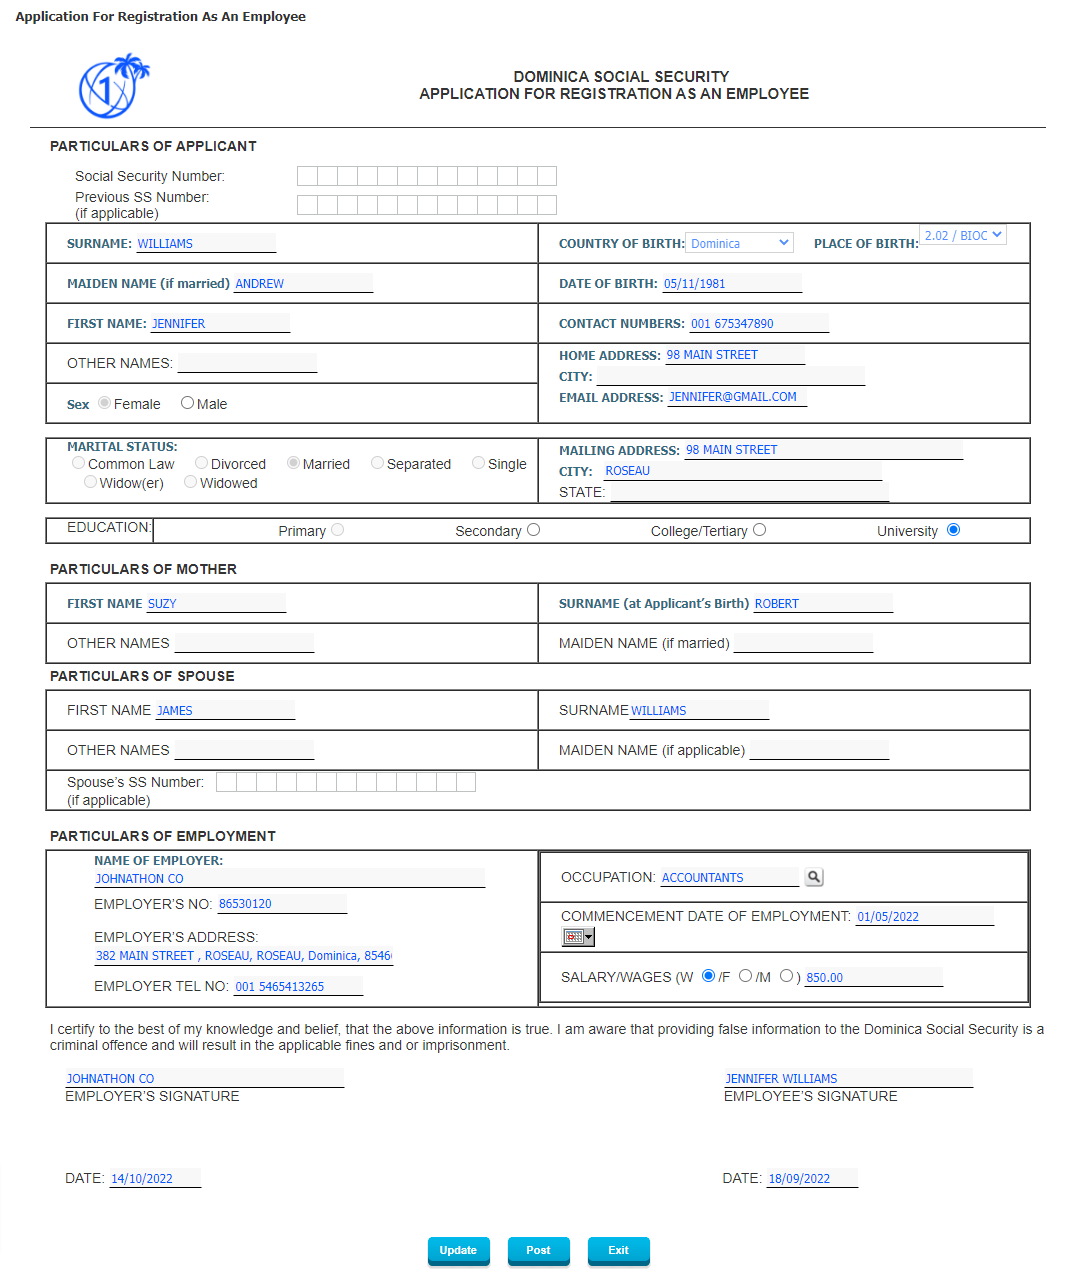 Figure 264: Application for Registration as an Employee Employers will receive the Applications for Registration as an Employee which are filled in and submitted by their new employees through their new Employees’ e-Services. All the Employer needs to do is to review and then Post the Application so it will be sent on to the Social Security Administration and is processed.  Figure 265: Claim for Sickness or Maternity Benefit Claims for Sickness or Maternity Benefits will be routed via the Employer, if applicable based on the local laws and regulations, so that the Employer can confirm the Employee’s Last Day of Work before the Sickness Claim and the Employer can also indicate if any particular amounts were paid to the Employee already during the Period of Sickness (Period of Incapacity) which may result in the Social Security Administration needing to either Refund the Employer or reduce the Sickness Benefit paid to the Employee. 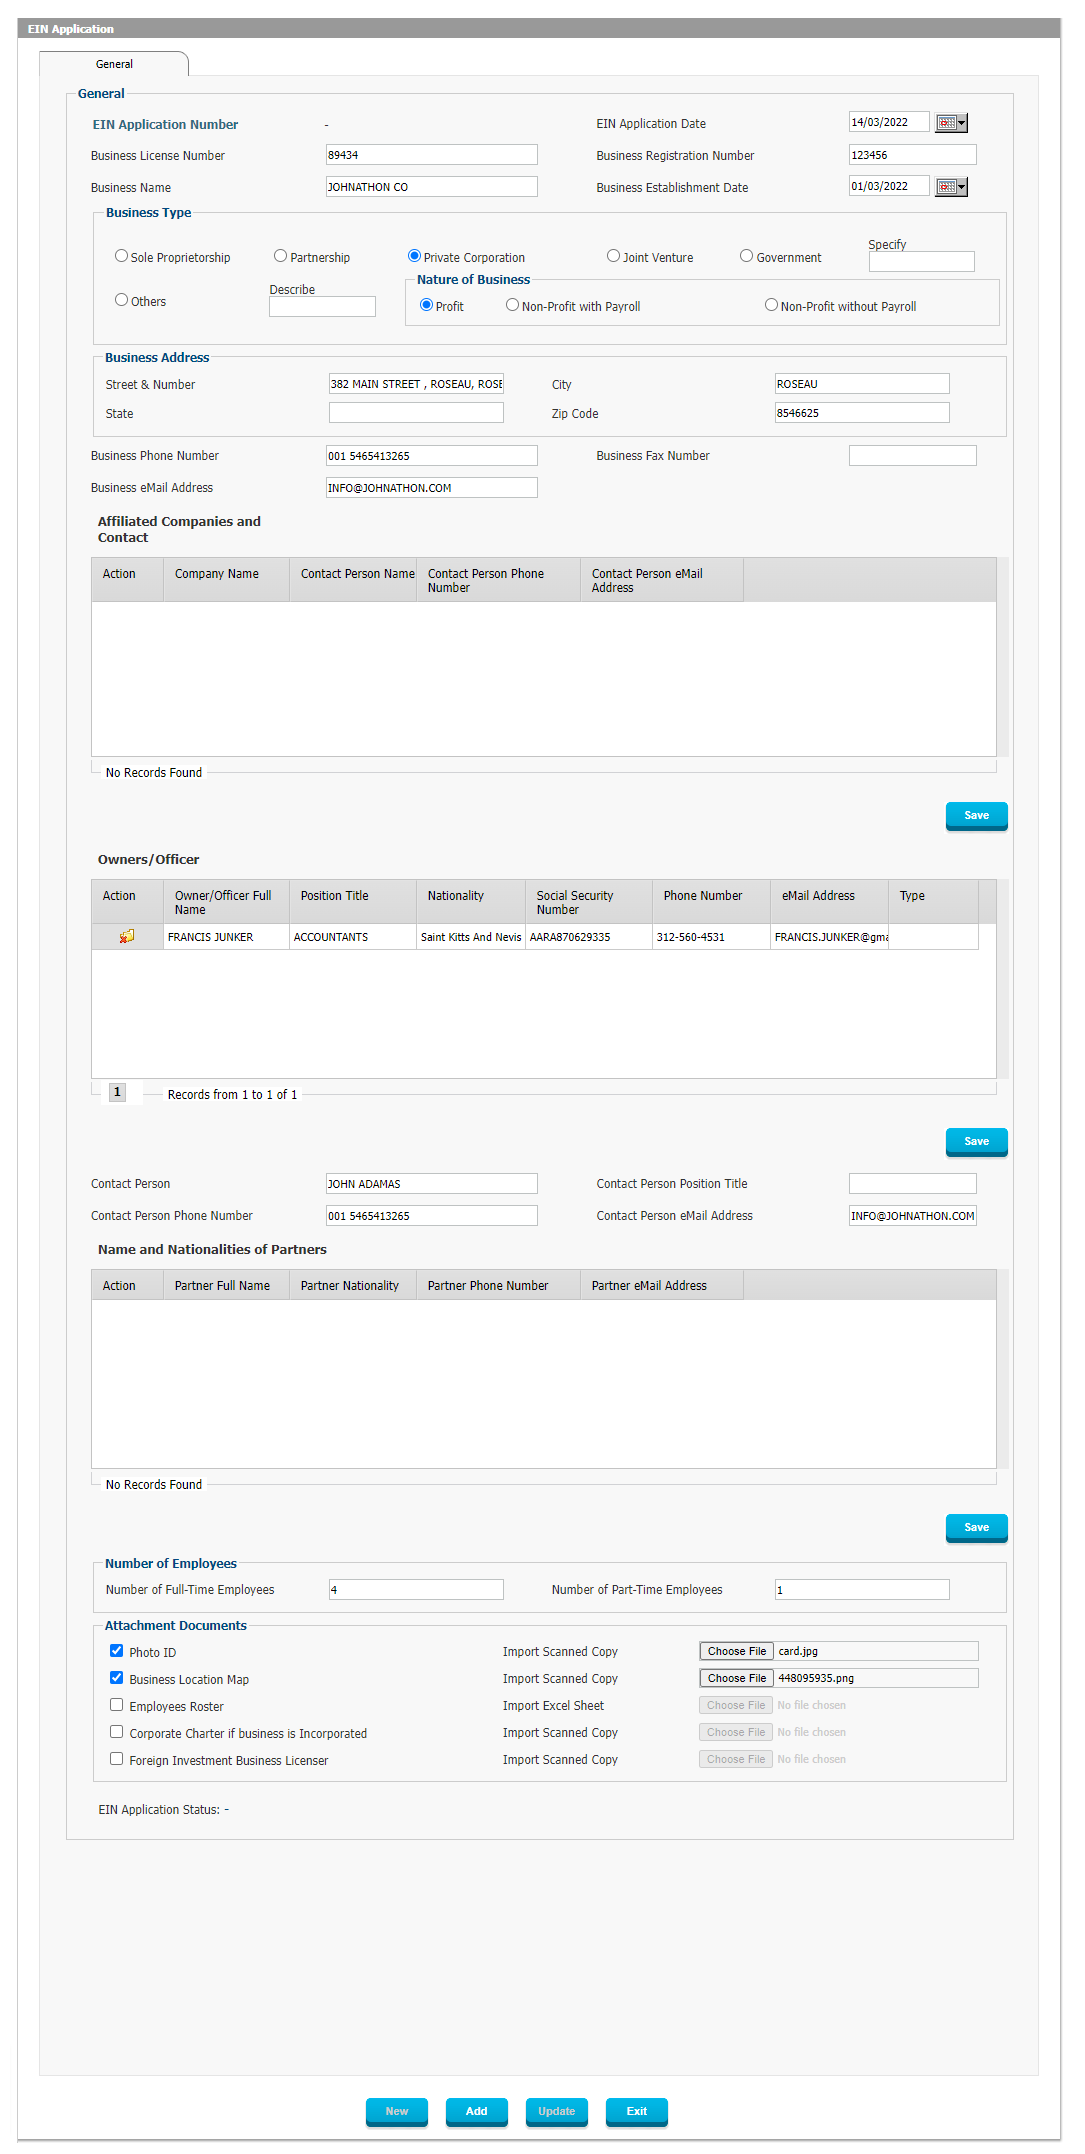 Figure 266: EIN Application An Employer Identification Number application can be submitted online through the Employer’s e-Services. Similar to the ESSRN Application process, it will capture information regarding the employer’s ownership structures, including shareholders and officers, as well as details about affiliated entities and other details. Once the EIN Application has been submitted and is processed by the Social Security Administration, the system will update all records for the Employer with the submitted details and the user can submit an Employer Identification Number which can be used for all transactions with the Social Security Administration. 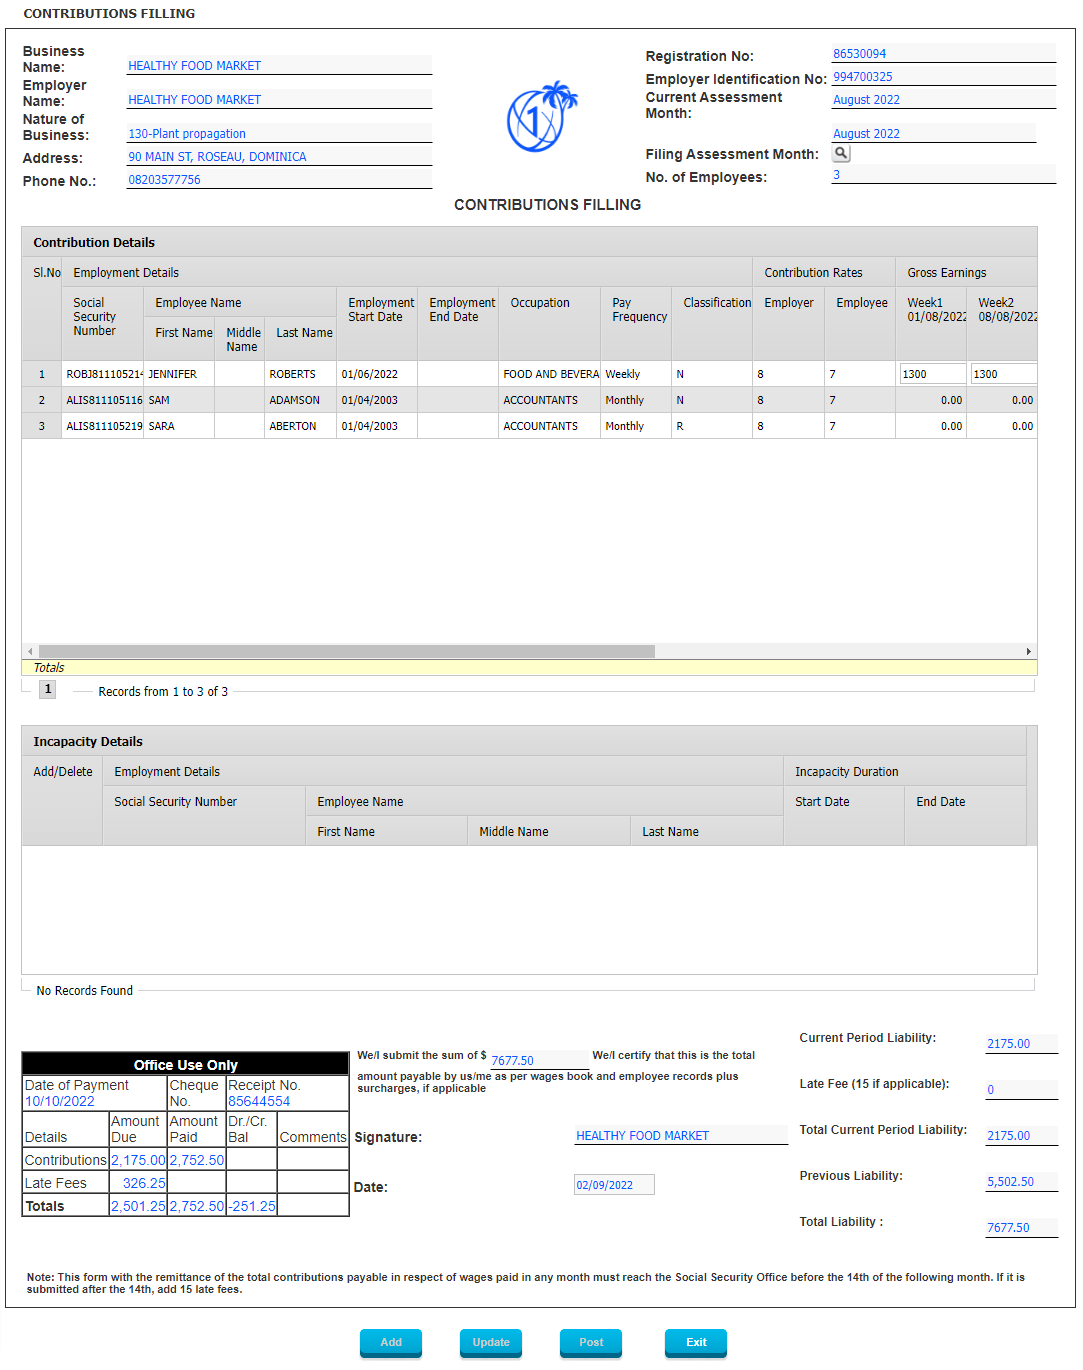 Figure 267: Contribution Filing One of the key benefits of e-Services for Employers is that all Salary & Contribution Filing can be done online and that this requires minimal effort on the side of the Employer since all data already known to the system in terms of Employees, Employee Classification, Salary, Contribution Rate etc., is automatically populated by the system and all that is required is for the employer to review, edit for exceptions and submit the Contribution Filing as is. 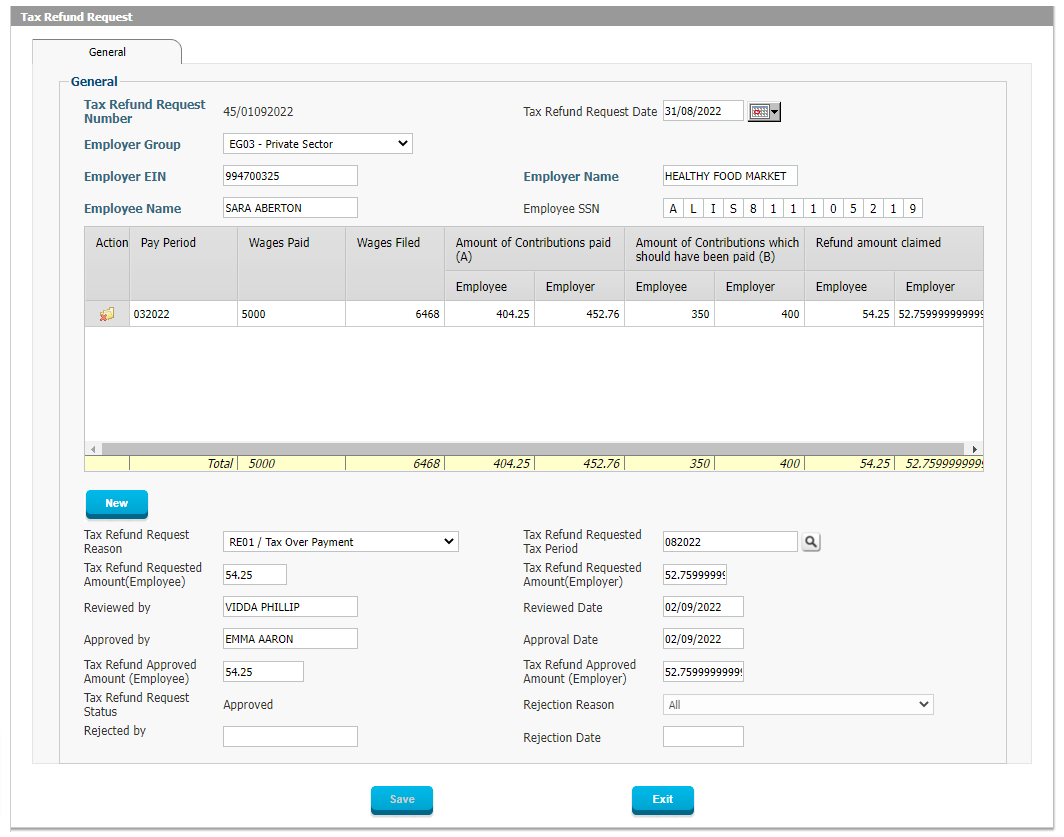 Figure 268: Contribution Refund Request Employers may also want to choose to request a Contribution Refund in case they accidentally overpaid Contributions for a specific Employee due to a clerical error or for any other reason. The system will allow the Employer to report the correct Contributions due and the system will then automatically calculate the difference between the Contributions actually paid and those which should have been paid. Any Refunds that are calculated and approved as a result of this process can either be credited to the Employer’s account or be paid to their bank account or issues via check. 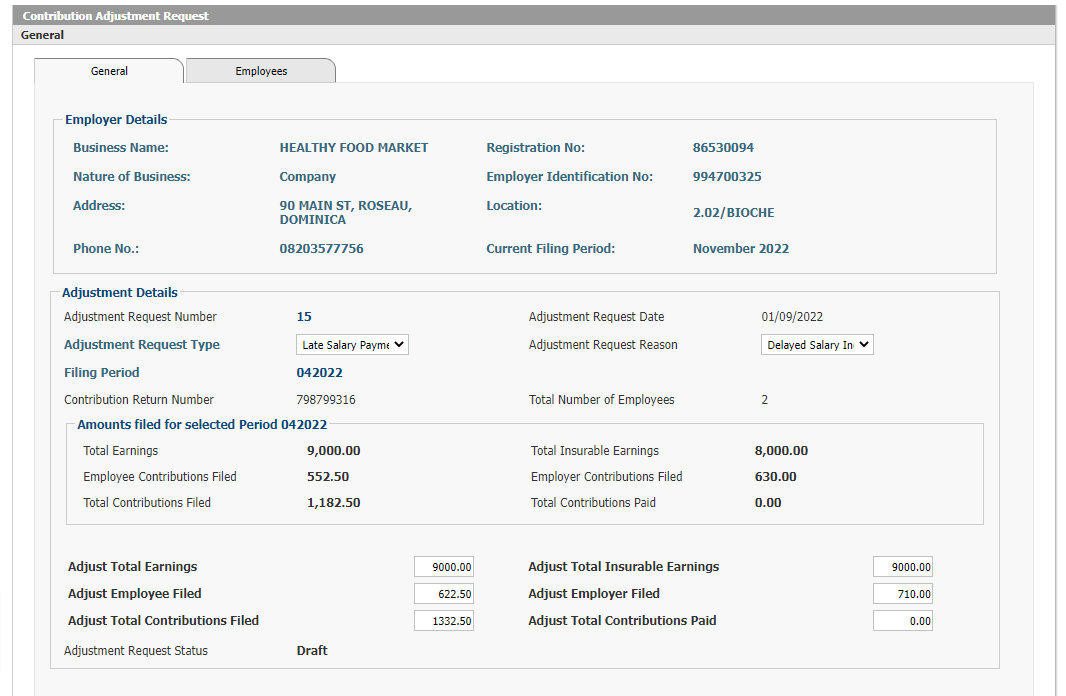 Figure 269: Contribution Adjustment Request – General 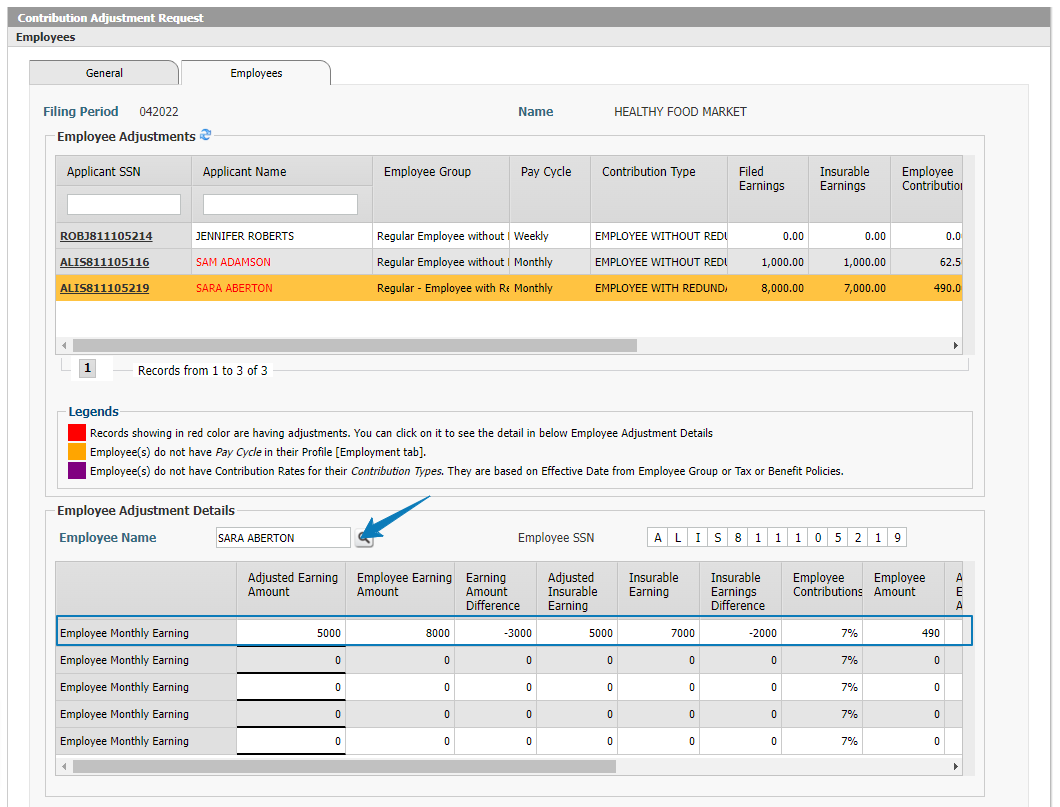 Figure 270: Contribution Adjustment Request – Employees If an adjustment is needed after a Contribution Filing has already been processed and gone through Final Processing, then the system allows the Employer to submit the details regarding the correct Contributions for any particular Contribution Filing Period and it will then calculate the resulting adjustment required. The resulting Adjustment will automatically be applied to any future Contribution Filing for the same Employee to ensure that the Employee’s Contributions are accurate in the aggregate.  Figure 271: Contribution Return Filing Import Contribution Returns can also be imported for Employers who have many exceptions and do not want to manually edit exceptions for employees’ whose salaries may vary each month due to overtime or other reasons. In such cases, the employer can export the data from their existing payroll system and import it in a specific format on their e-Services portal without having to manually key in any data.  Figure 272: Contribution Return Filing Penalties In case the Employer incurred any penalties due to late filing of Contribution Returns, these will be shown in the e-Services portal so the employer can view the details about the Penalties and pay them if they have not been paid.  Figure 273: Tax Payment Penalties Similar to the Penalties which are applied due to Late Filing, there are also Penalties which may be applied due to Late Payment of Contributions. Such Penalties will be shown in the e-Services portal for the Employer to review and settle if they are not yet settled.  Figure 274: Change Password If an Employer wants to change their Password for accessing the e-Services account, they can do so themselves by using the Change Password feature in the e-Services portal. 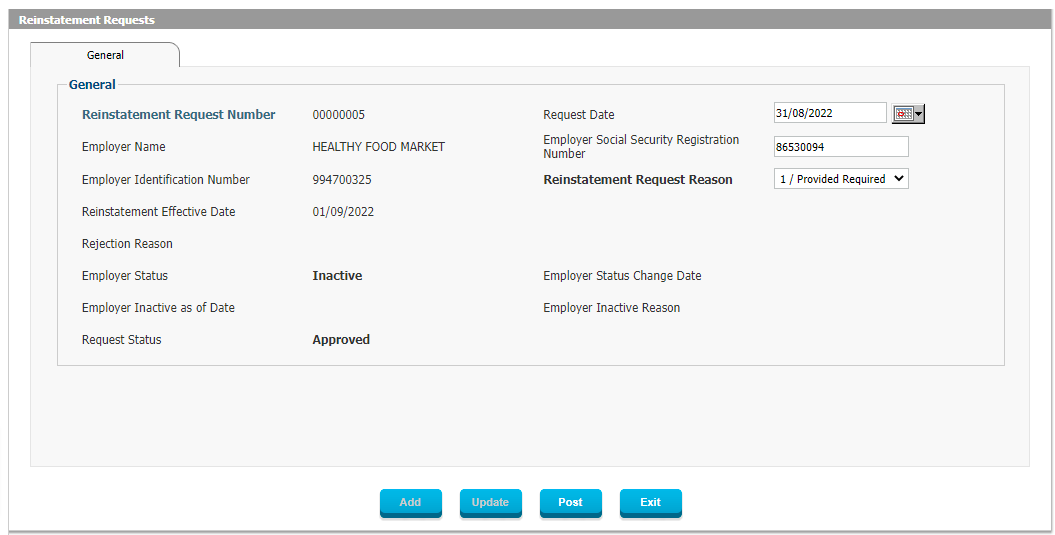 Figure 275: Reinstatement Request Employers who have had their status change to Dormant, Suspended or Inactive, can ask to be Reinstated, based on the rules and regulations in place and send their request online through e-Services.  Figure 276: Messages Employers can communicate with the Social Security Administration through the online Messaging capability which will track all Messages and their responses.  Figure 277: Employer Profile– General Employers can also access their own Employer Profile or Employer Electronic Record, and there they can find extensive information on all their transaction history with the Social Security Administration. This includes the following items which are all further described in the figures below.
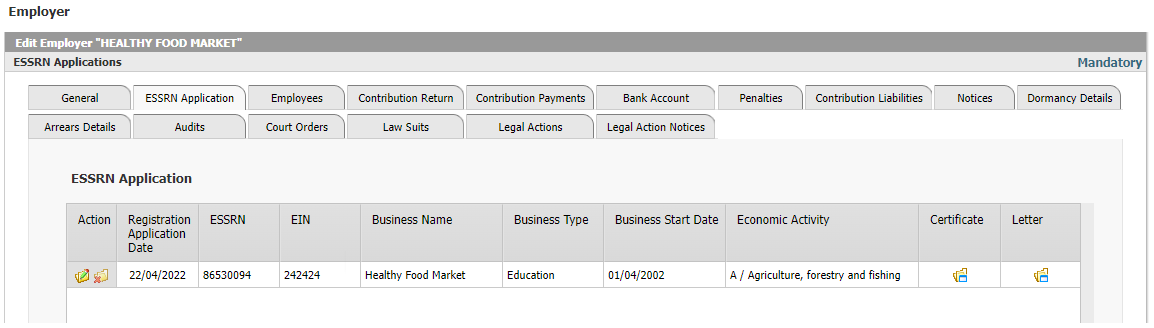 Figure 278: Employer Profile– ESSRN Application ESSRN Application will remain on file and available for viewing by the Employer as well as the Social Security Administration. The user can view the summary at once and see the details and the entire original application by clicking on the View button. 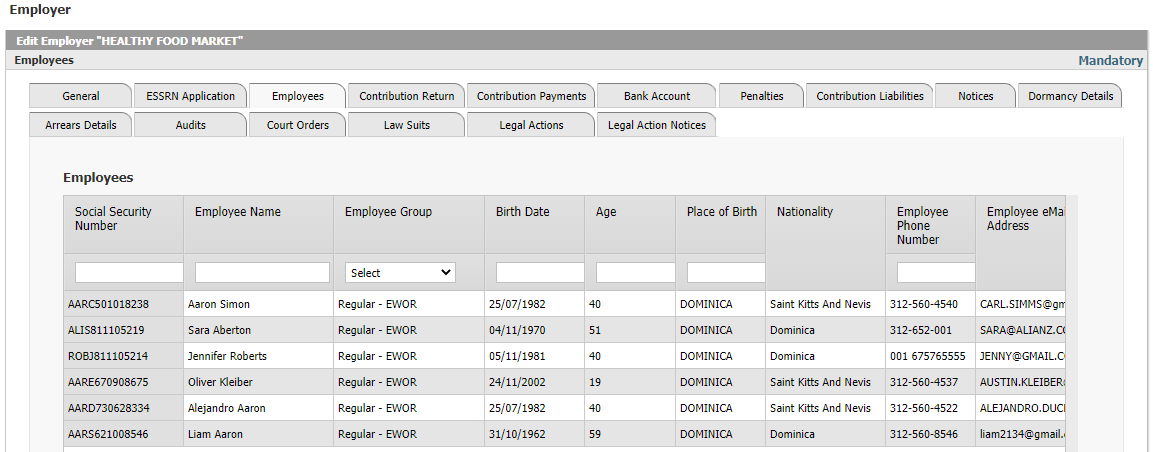 Figure 279: Employer Profile- Employees A listing of all Employees associated with the Employer is available in the Employer Electronic Record, including all key essential information to identify the employee. 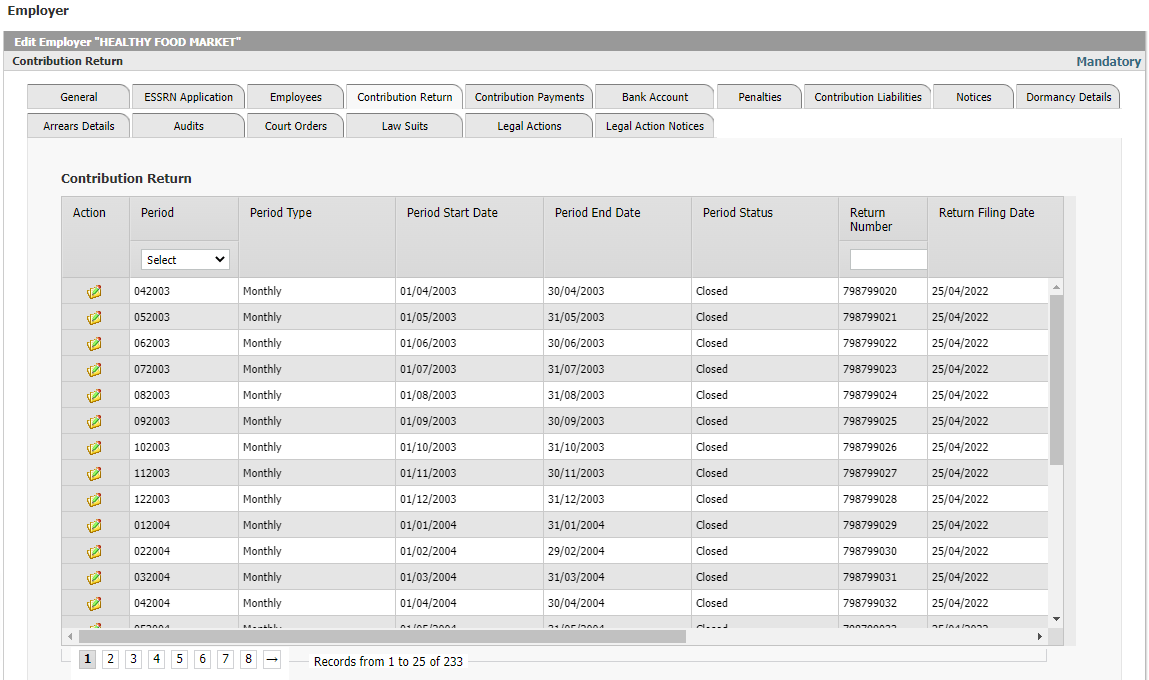 Figure 280: Employer Profile– Contribution Return All prior Contribution Returns are available on the Employer Electronic Record so the Employer will always have the ability to go back and review records for any reason. The summary is shown in the rows in the figure above, and the detail can be obtained by clicking on the View button. 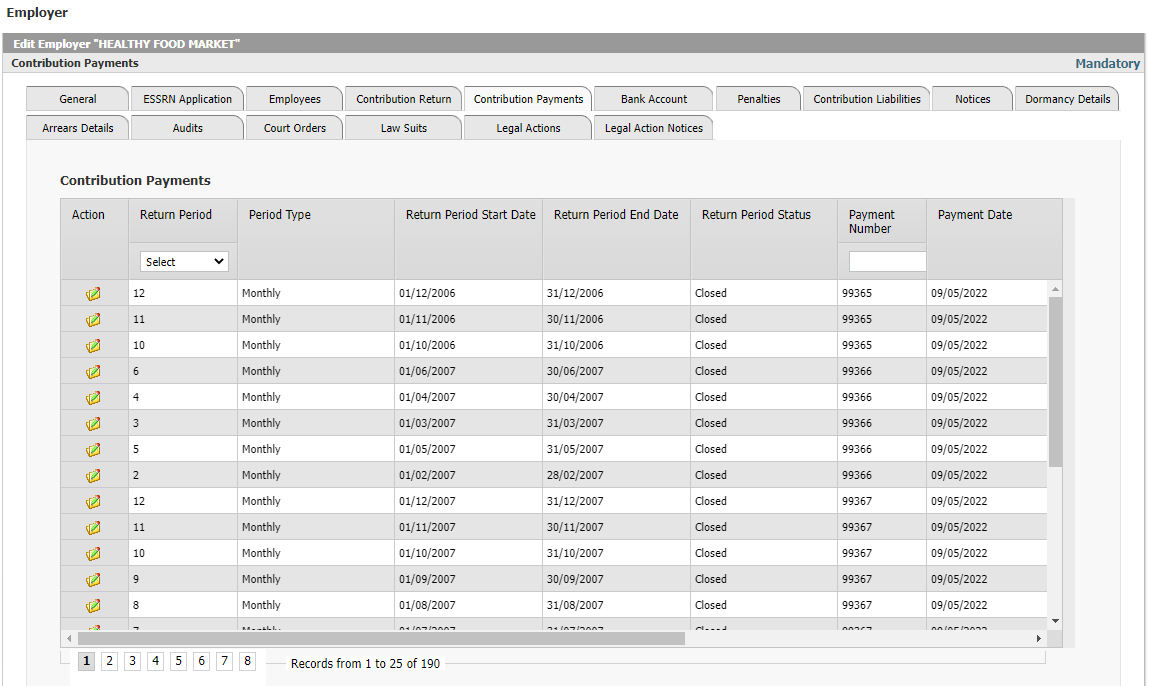 Figure 281: Employer Profile- Contribution Payments All information regarding prior Contribution Payments is available so the Employer can check history any time required, and can drill down into detail by clicking on the View button.  Figure 282: Employer Profile– Bank Account This tab shows all Bank Accounts which are associated with the Employer, so the Employer is always clear about which Bank Accounts the Social Security Administration will be using for any direct deposits that are to be done to an Employer’s Account. If multiple accounts are on record, they will all be shown.  Figure 283: Employer Profile– Penalties A history of assessed Penalties will be available under this tab so that the Employer can investigate themselves if necessary to find out the details.  Figure 284: Employer Profile– Dormancy Details Status changes of Employers, including Dormancy Status, will be tracked and retained for review at any time, and all history will be shown in the Employer Electronic Record. 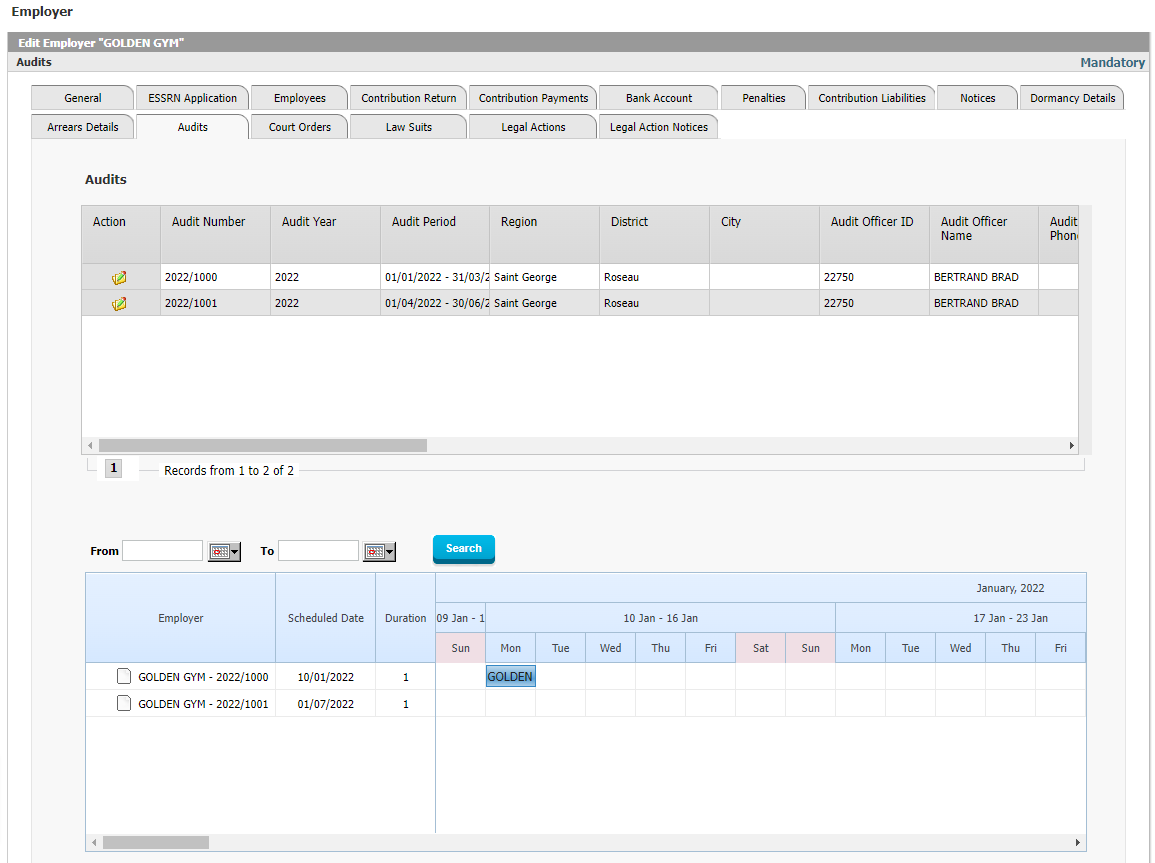 Figure 285: Employer Profile– Audits Employers can see the record of Audits which have taken place, as well as the official findings of those Audits.  Figure 286: Employer Profile– Lawsuits A history of all Lawsuits related to the Employer is available on the Employer Electronic Record. 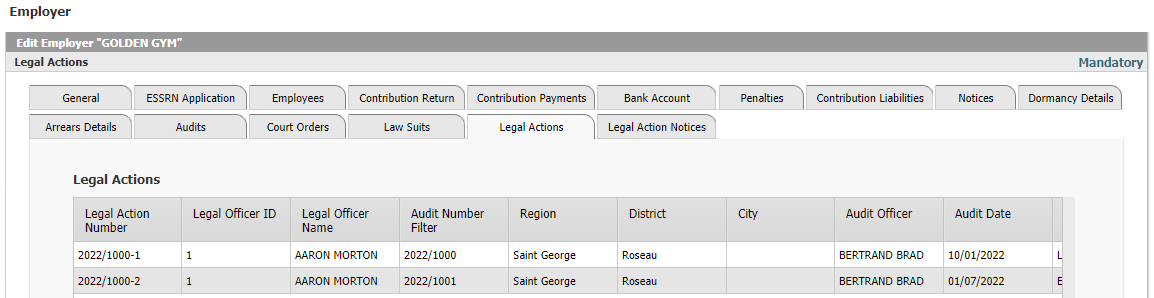 Figure 287: Employer Profile– Legal Action A history of all Legal Actions taken against the Employer will be shown on the Employer Electronic Record.  Figure 288: Employer Profile– Legal Action Notices All Legal Action Notices are available on the Employer Electronic Record. Voluntary Contributor e-Services Figure 289: Voluntary Contributor e-Services Voluntary Contributors have their own personalized e-Services Access which gives them the ability to File their Contributions as per the rules applicable to Voluntary Contributors, and allows them submit Representative Payee Information, Bank Account Information and other options. ReportingInteract SSAS comes with countless reports and KPIs to enable the Social Security Administration to more effectively manage its operations and financial responsibilities. These reports include powerful audit reports to see which changes were made when and by who, comparison reports to find possible errors and spot non-standard changes in contributions or payments, and many reports to give a clear insight into the data that is being maintained by the SSA. The following are some of the reports that will be produced by the system (each come with many parameters and filters and granular access control to manage confidentiality and all reports can be exported to Word, Excel and PDF):
Registration Reports
Contribution Reports
Statistical Reports
Legal, Arrears and Compliance Reports
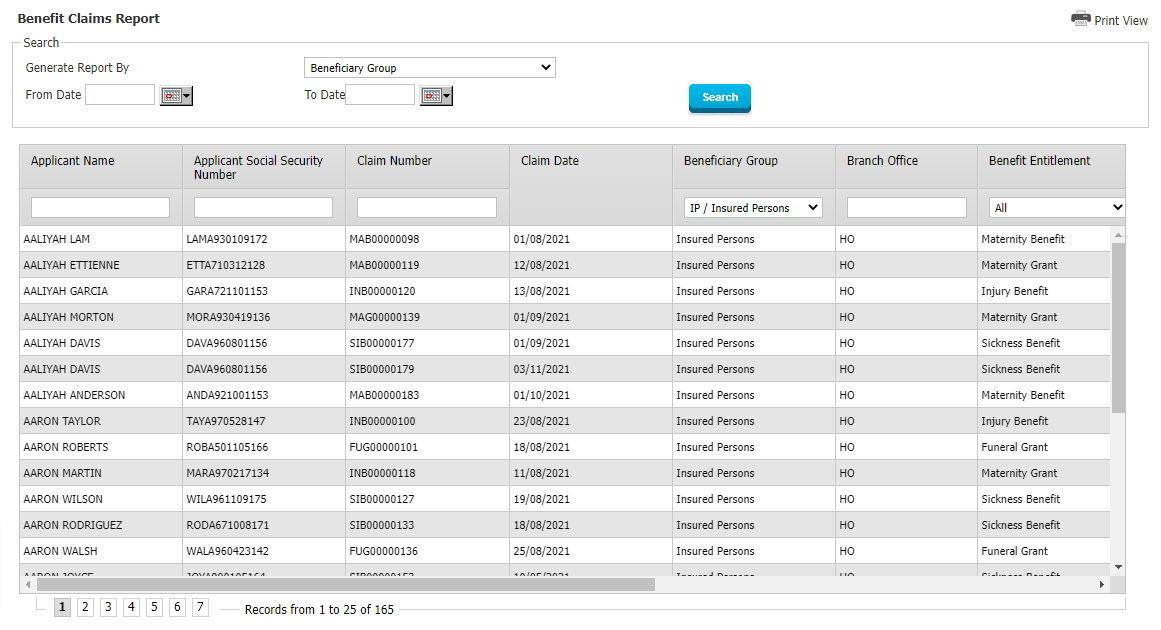 Figure 290: Claims and Benefit Reports – Benefit Claims Report 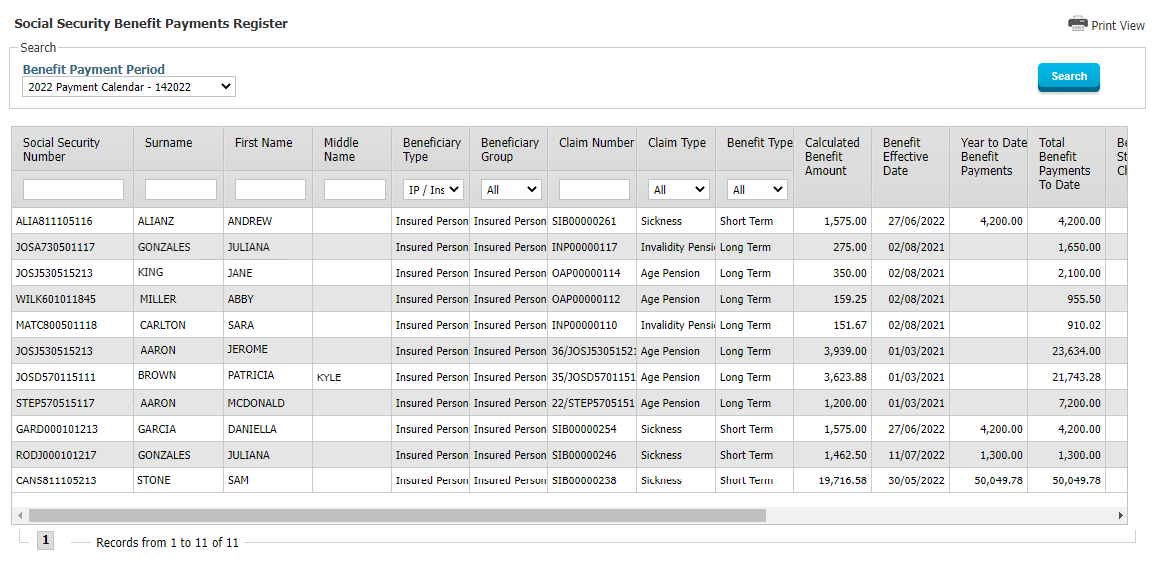 Figure 291: Claims and Benefit Reports – Social Security Benefit Payment Report 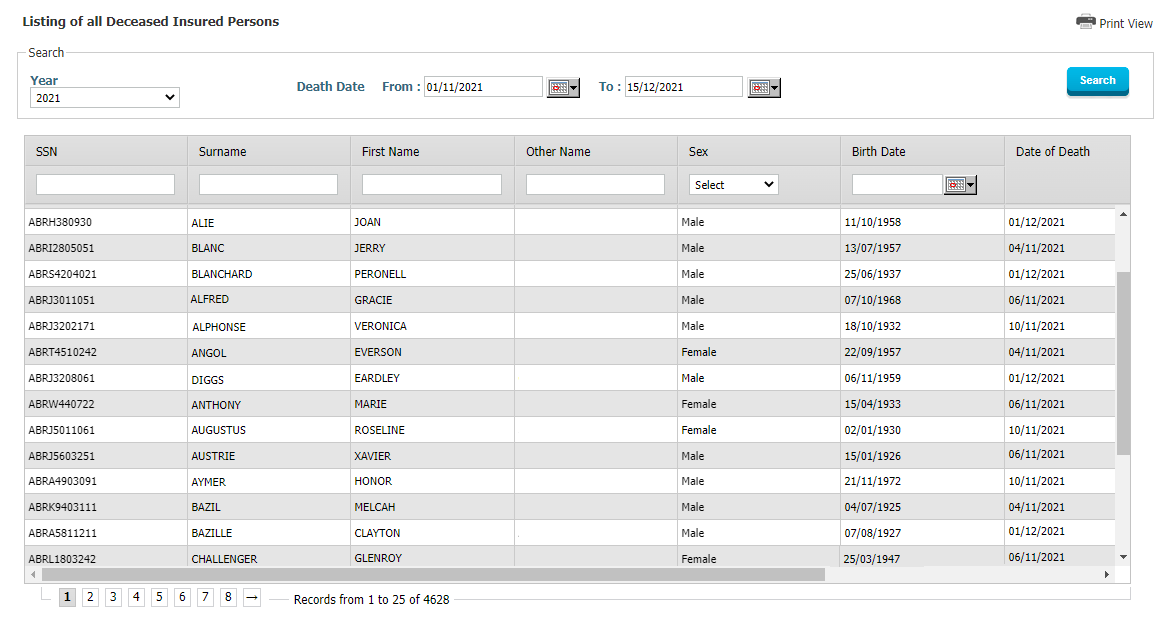 Figure 292: Registration Reports – Listing of all Deceased Insured Persons 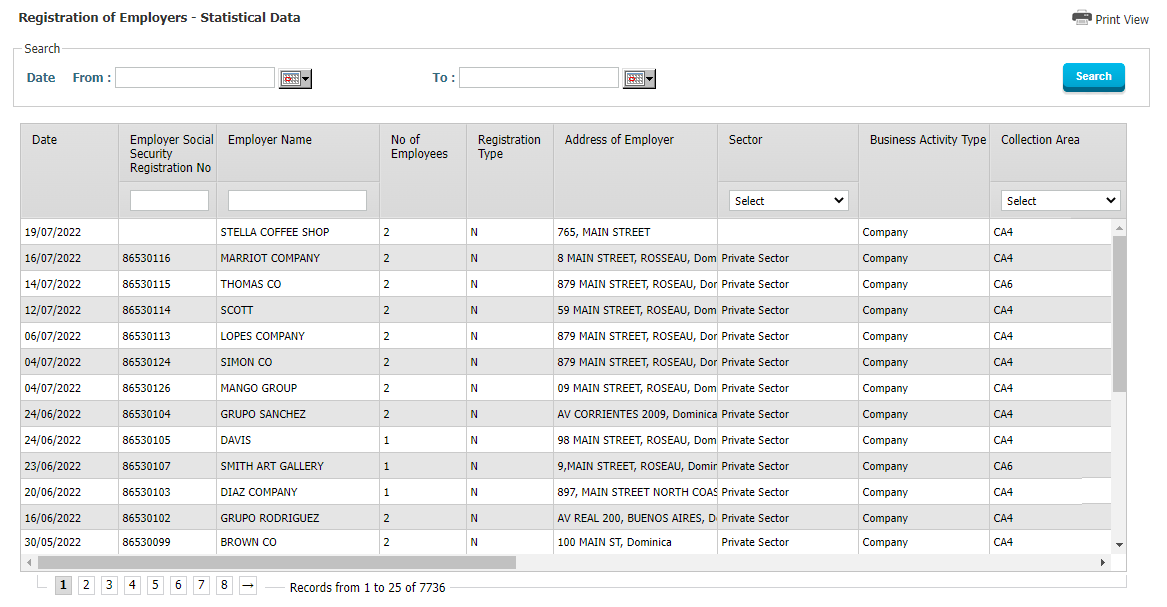 Figure 293: Registration Reports – Registration of Employers – Statistical Data 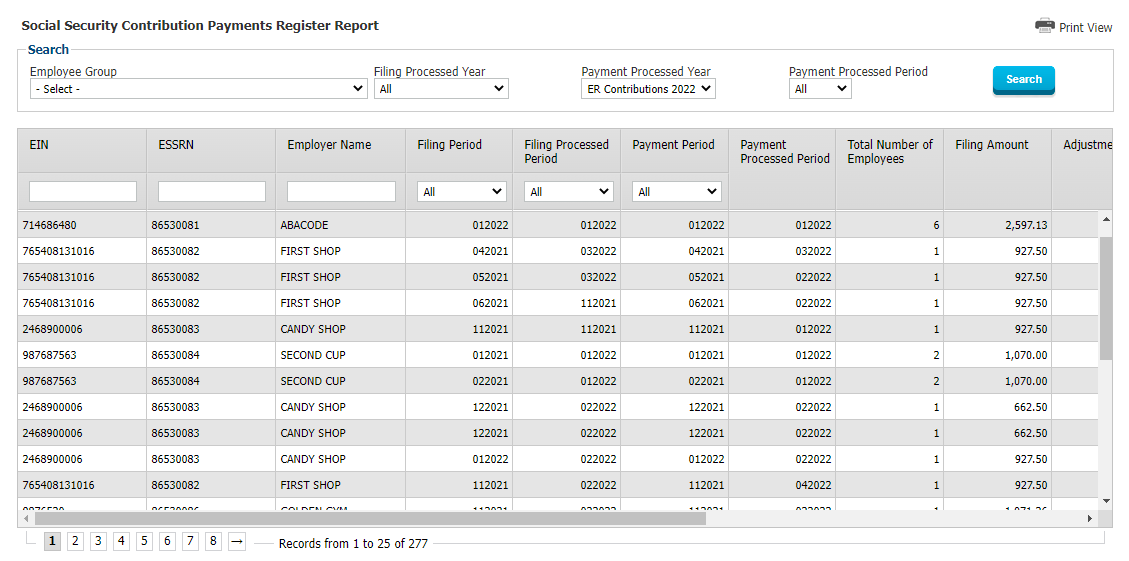 Figure 294: Contribution Reports – Social Security Contribution Payments register 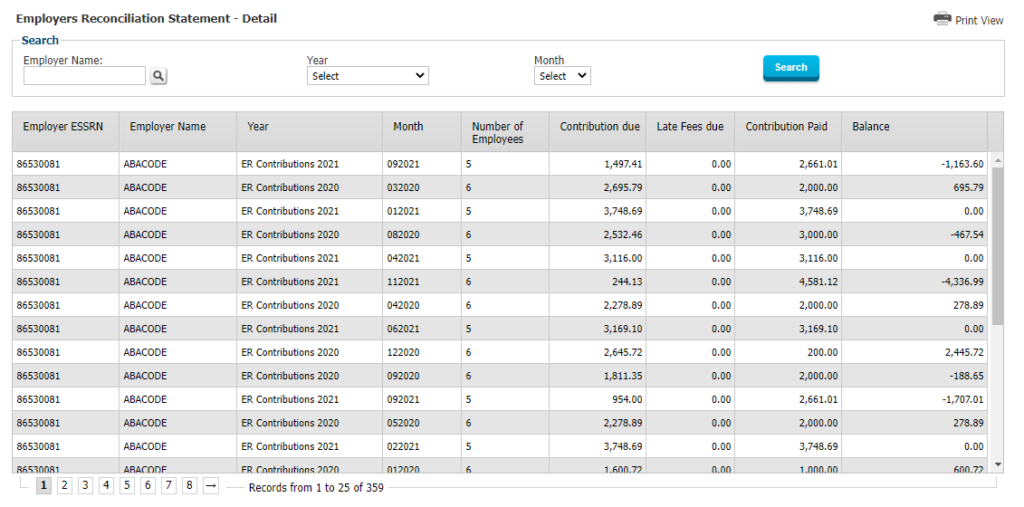 Figure 295: Contribution Reports – Employers Reconciliation Statement – Detail 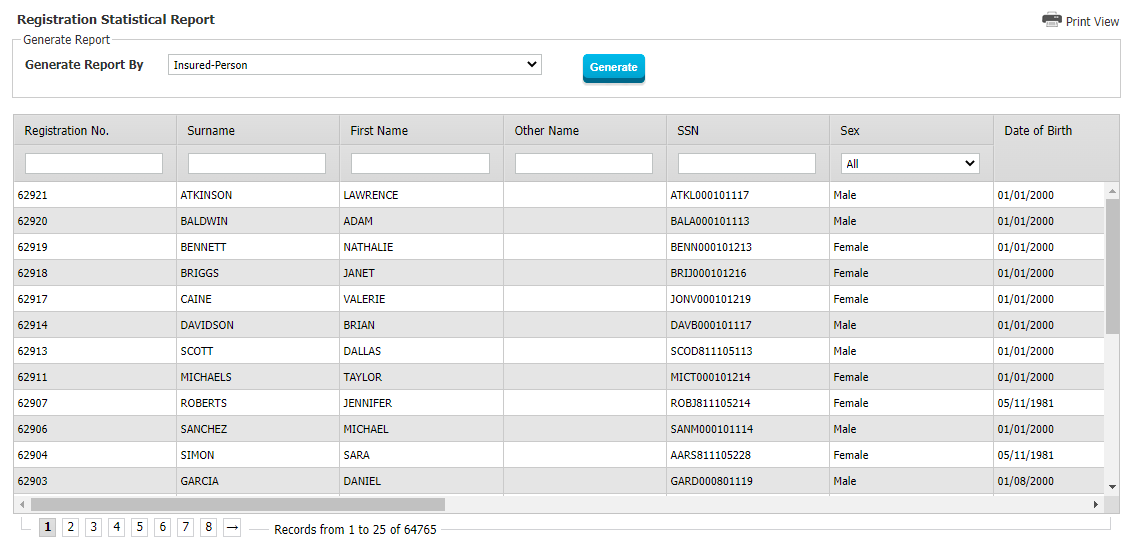 Figure 296: Statistical Reports – Registration Statistical Report 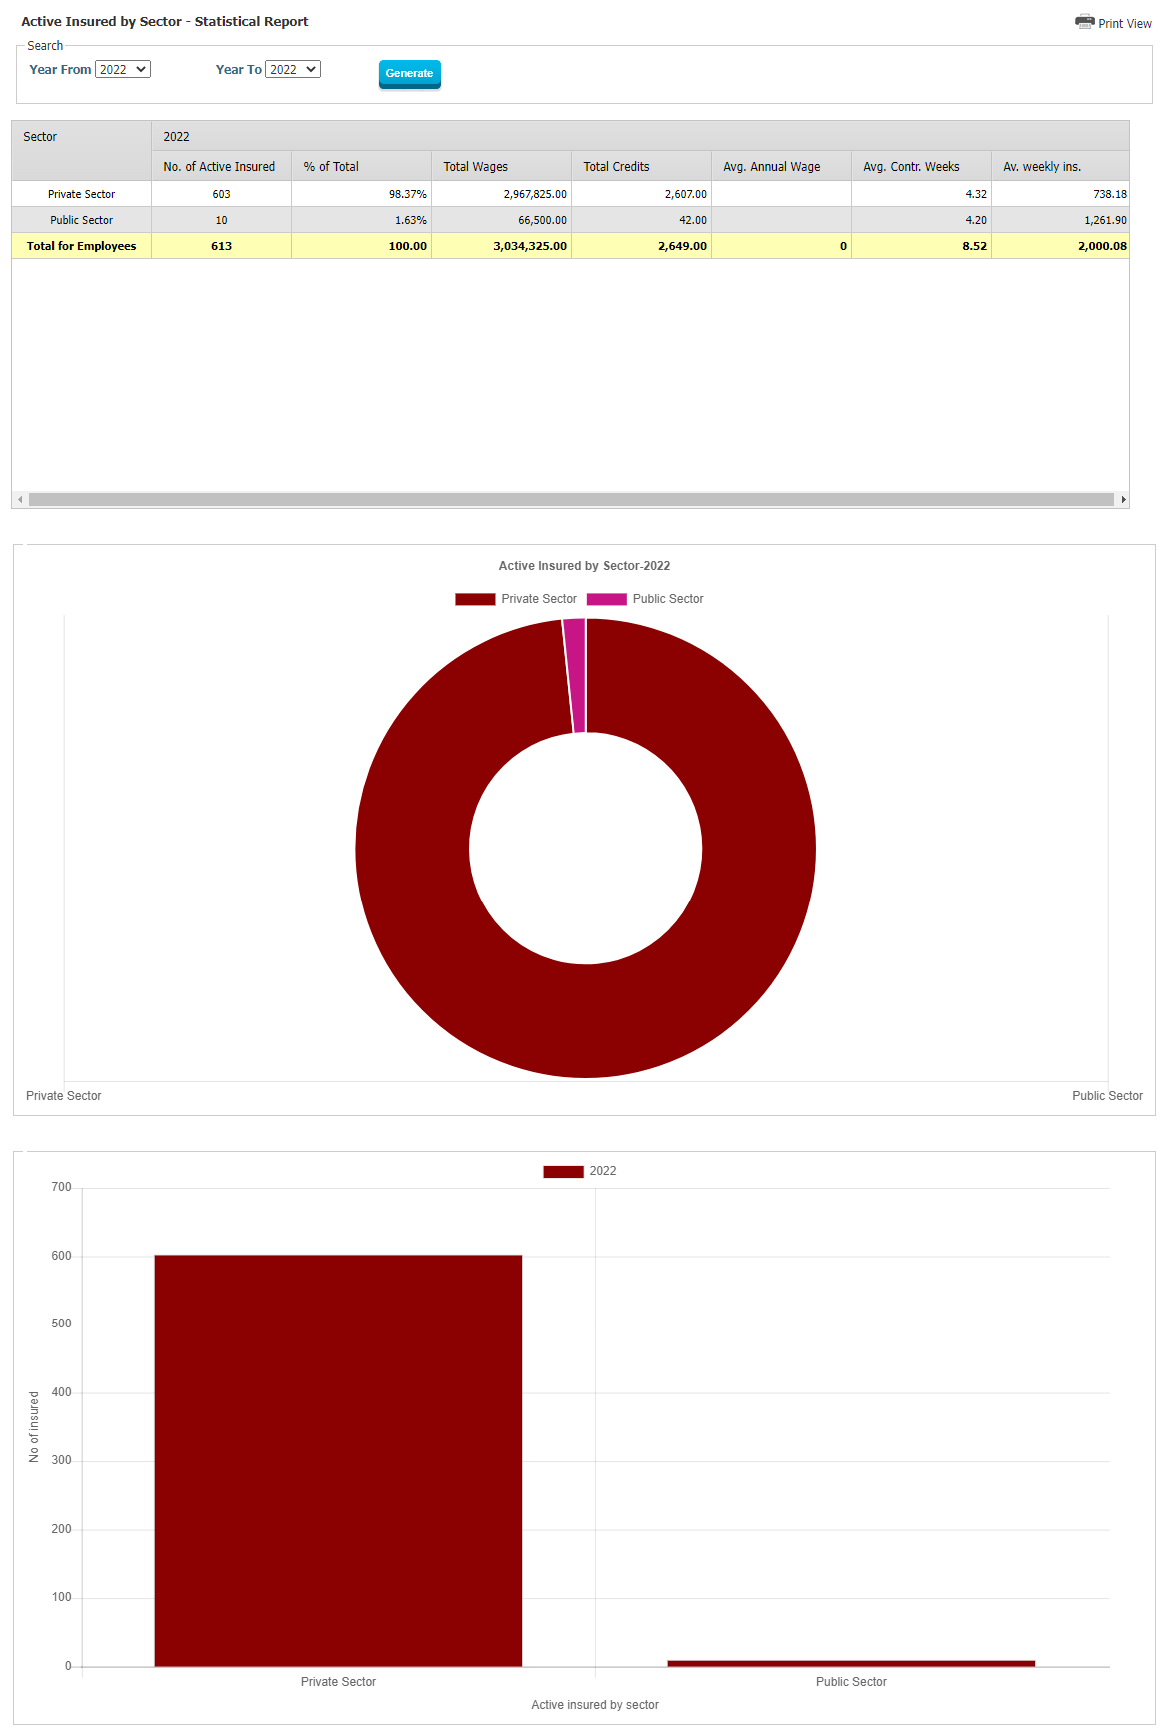 Figure 297: Statistical Reports – Active Insured by Sector – Statistical Report 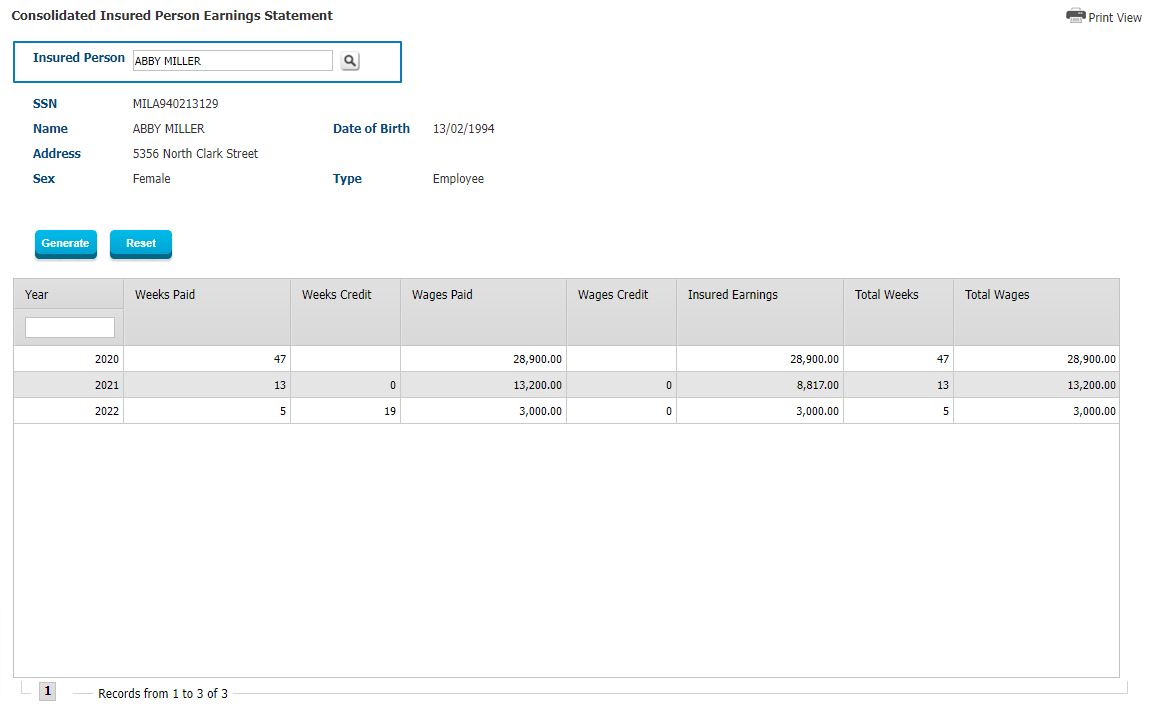 Figure 298: Legal, Arrears and Compliance Reports – Consolidated Insured Person Earnings Statement 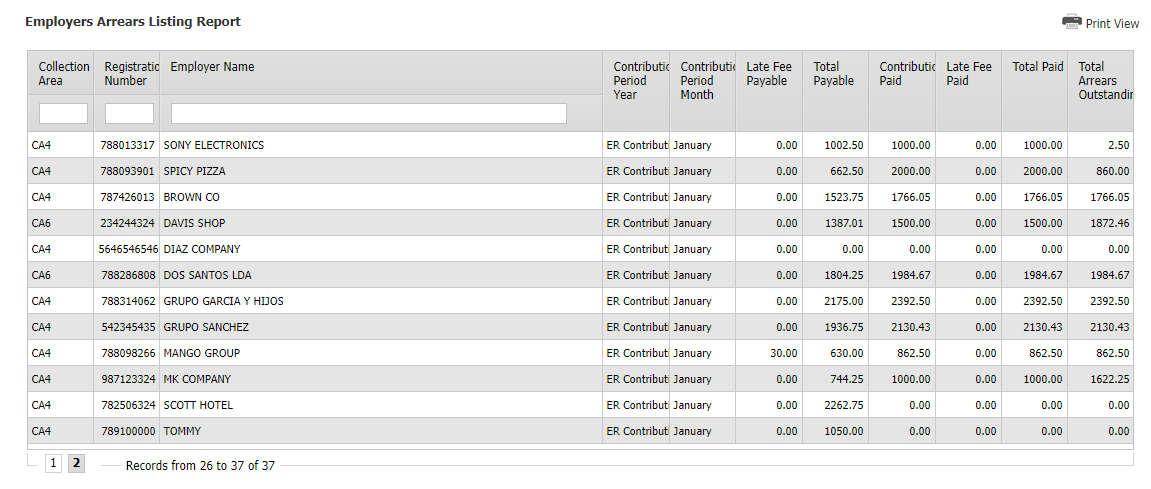 Figure 299: Legal, Arrears and Compliance Reports – Employers Arrears Listing Report |
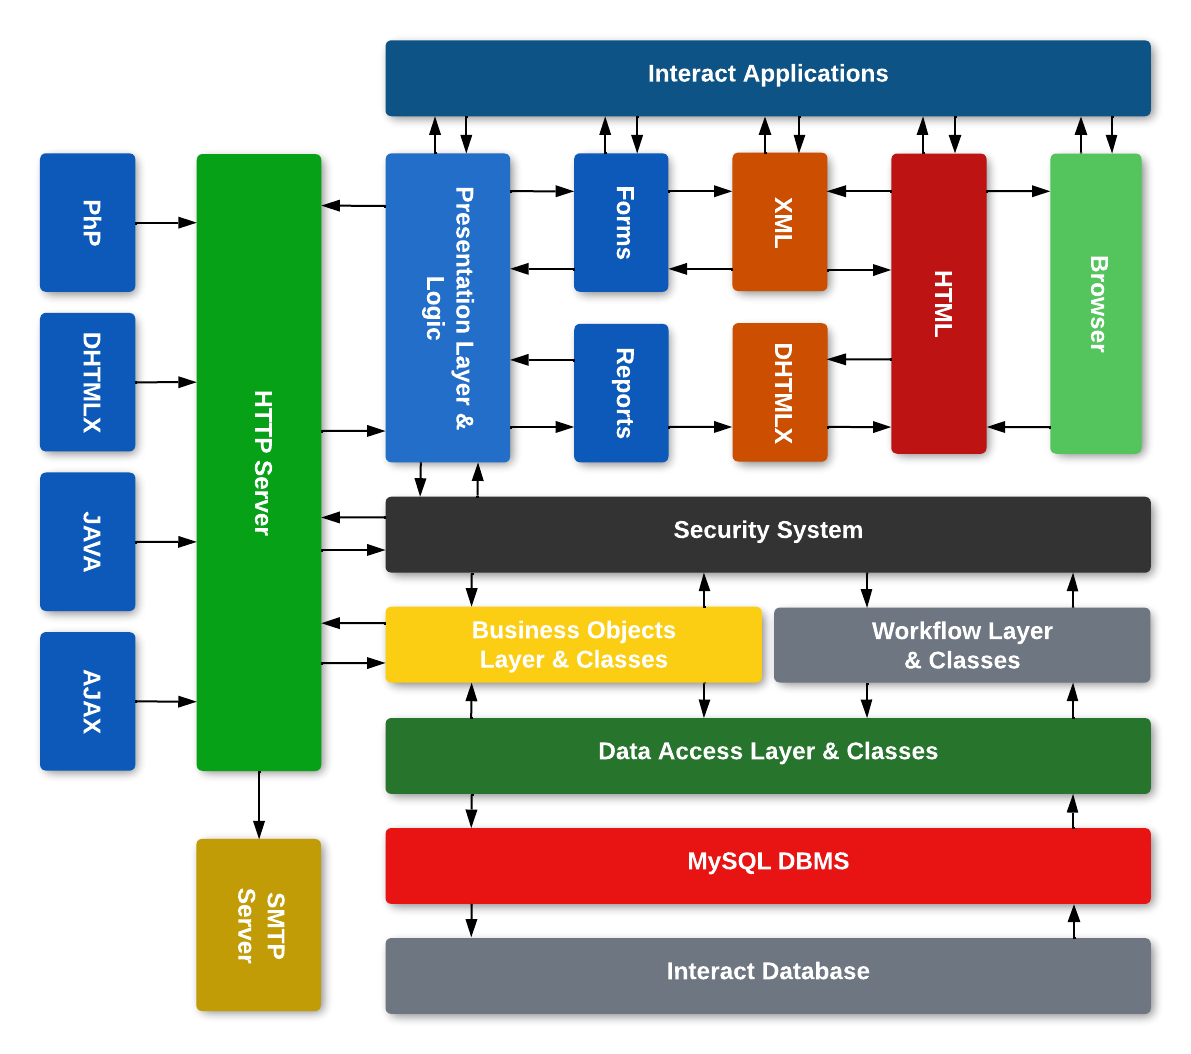
Interact Human Resources Management SystemInteract Human Resources Management System is an integrated Human Capital Management System that is architected and engineered as a pure Web Based Technology that comprises more than sixty (60) integrated Recruitment, HR, Time and Leave Management, Compensation and Payroll, and Talent Management applications. Interact HRMS can be deployed in the client server(s) using LAN and WAN, as SaaS, or Cloud. Interact HRMS can also function as standalone HRMS applications or integrated with commercially available ERP solutions through Web Services or our own Open Inter-Application Communication Framework. We believe that today’s global markets require global solutions and we therefore invest heavily in ensuring that our products can be deployed and used globally. Our HRMS applications and supporting middleware technology are architected and designed for the global market and are I18N and L10N Compliant.Our flagship product, Interact©, provides a full range of comprehensive software solutions in support of job classification, recruitment management, position budgeting, employment/hiring, contracting and hiring, leave management, attendance tracking, training, performance appraisal, manpower planning, compensation management, payroll and other HR business processes, with seamless integration with a number of ERP systems including SAP, Oracle, JD Edwards, Sage ERP, MS Dynamics GP, AX, NAV and SOL, and others. Interact is fully Web based application developed as a Rich Internet Application (RIA) that supports multiple databases and operating systems to give our clients the freedom of choice.Our HRMS solutions are constantly evolving to meet the changing needs of our customers globally. Interact HRMS Suite includes the following integrated applications:
The Interact HRMS applications are fully integrated and use one central database. The integration is achieved through: The Holistic and Layered architecture of Interact HRMS that includes a mid-layer framework that implements a set of Business Objects that are used by all interact HRMS applications.
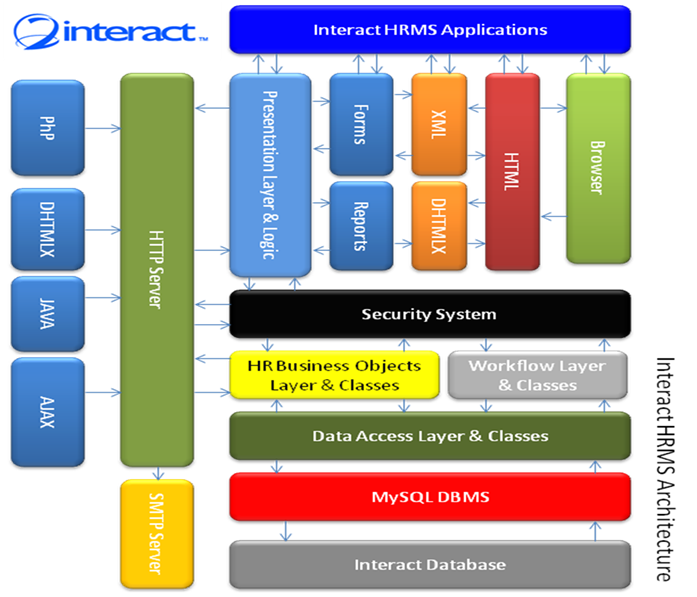 Figure-1: Interact HRMS Architecture Mobile Apps   Interact HRMS Employee Self Service applications can also be accessed through Smart Phones on iOS or Android devices. These applications support the same functionality as available in Interact HRMS Employee and Manager Self Service which means that Employees & Managers can perform various functions online: Note that in order to use the functionality of the Employee Self Service, the underlying Interact HRMS module must be deployed also. For example, in order to use Leave Requests online, the Interact HRMS Leave Request module should be deployed with all the rules and policies which will govern the handling of these Leave Requests. Intuitive Web Based Interface Figure 1: Welcome & Login Screen The Welcome & Login screen is the single point of entry where all users, both internal and external, will login to access the application. This applies to employees, managers, applicants, department heads, HR staff, external recruiters, clients, and anyone else to get access to their self service needs or the functions and features they need to perform their job duties. 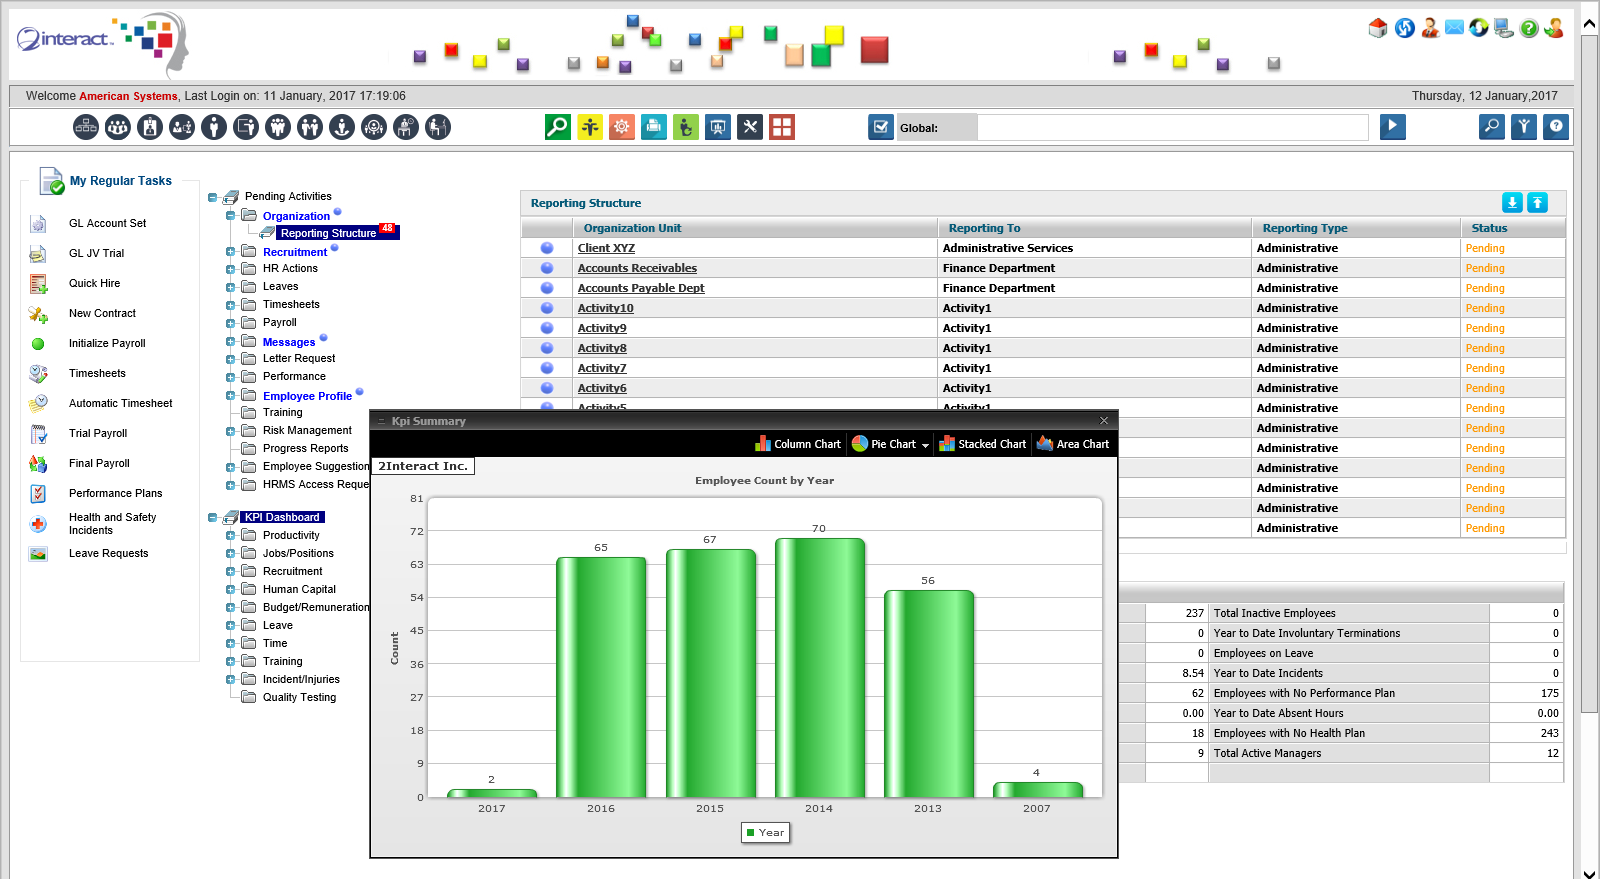 Figure 2: Employer Desktop This Employer Desktop shows the full view of what HR Administrators or other users processing transactions in HR can access all from one single page. The screen is divided in multiple areas where on the left you can save your favorites (giving you one-click access to any favorite function in the system), you can also see immediately any pending activities requiring action through workflow and you can view KPIs both in table and graphical format. In addition, the user can access all 85 modules and all forms and reports from this screen by simple entering the relevant keyword in the menu search which will bring them directly to the required screen. The intuitive interface ensures there’s no need for scrolling through lengthy lists of menus and the user will quickly become familiar with this browser based interface which is 100% consistent across all the applications of Interact HRMS. 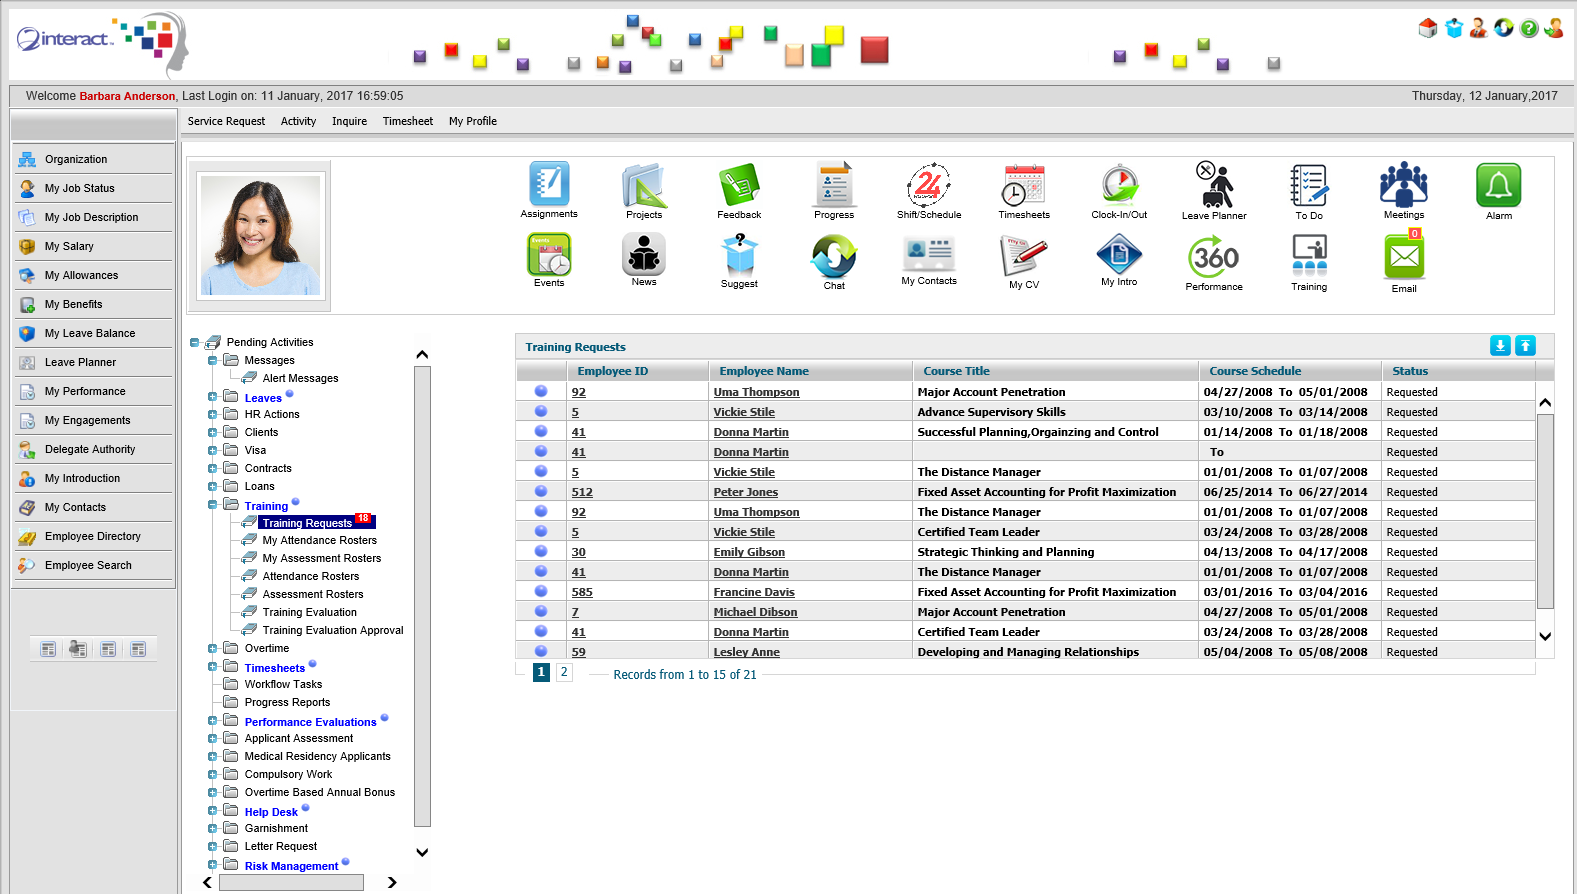 Figure 3: Employee Self Service Employee Self Service is designed in the same intuitive manner as all Interact HRMS modules, it is the area where employees will access all functions that are relevant for them, inquiry about information, request services from HR, perform their duties in case they have to approve/review something, communicate with other employees or departments and ensure they are aware of new policies, events, news, announcements and assignments which have been given to them. 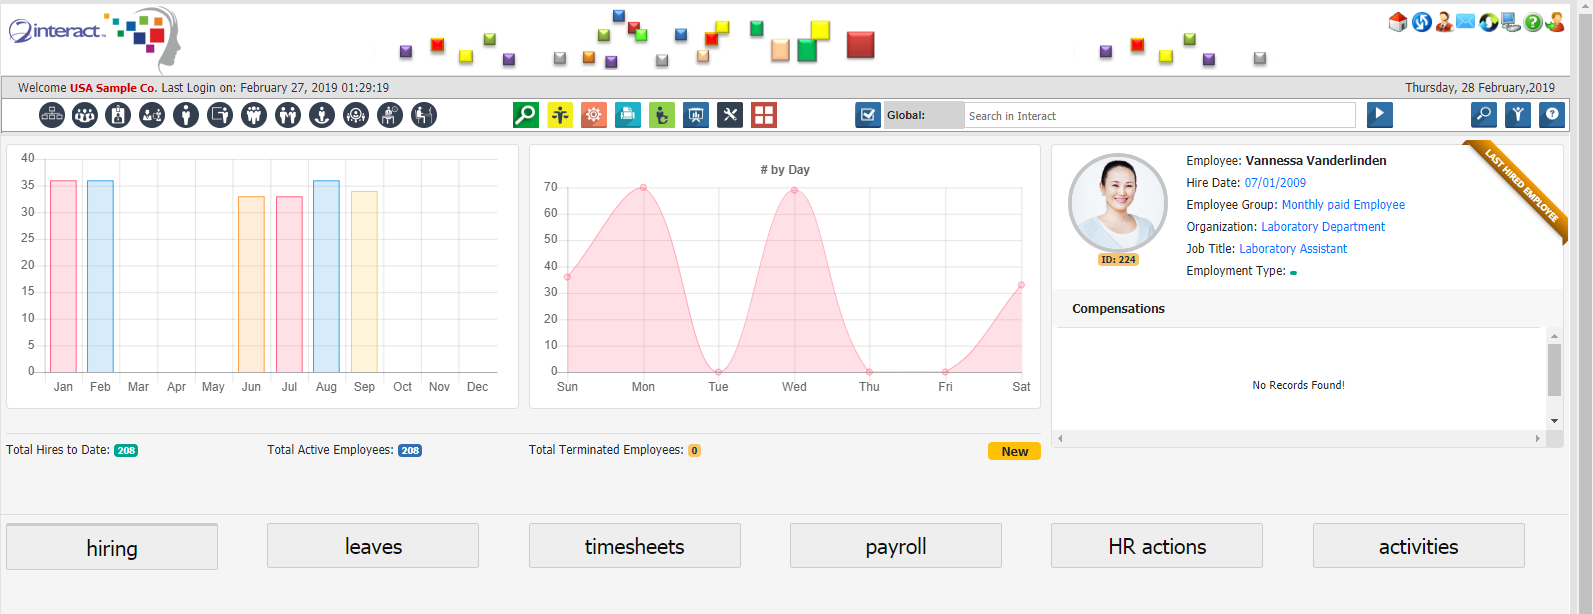 Figure 4: KPI Dashboards Interact HRMS’s powerful KPI Dashboards give the user an immediate view of the full scope of activities that are happening from an HR perspective. Depending on the main functional area which the user chooses, the context-specific KPIs and graphs will appear together with the most recent transactions which took place in this functional area. Interact HRMS Application Functionality OverviewBudgeting, Recruiting, Hiring and Onboarding1. Position Budgeting and Control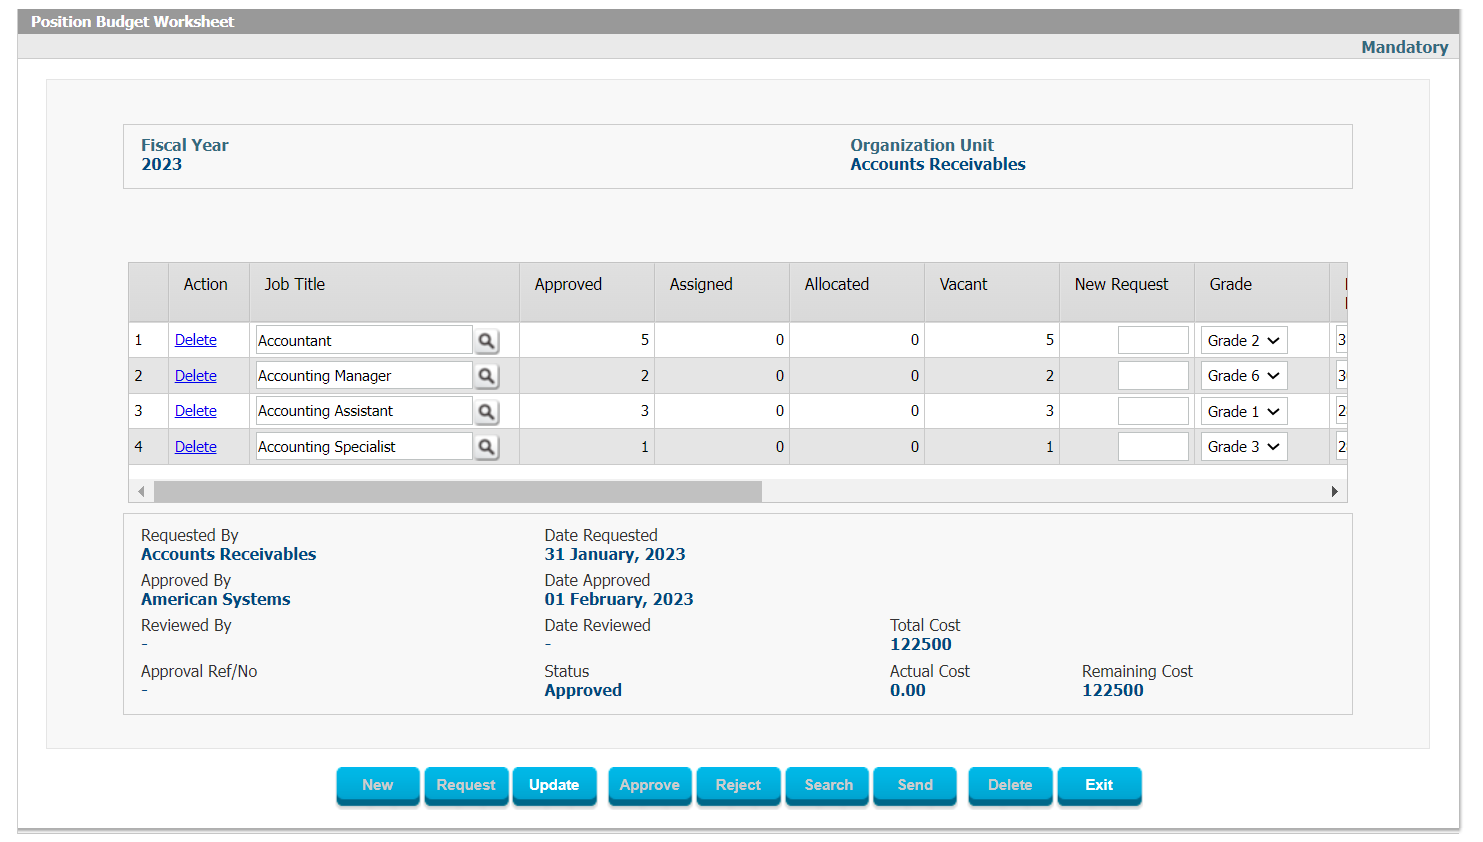 Figure 5: Position Budget Worksheet Position Budgeting and Control is an Interact HRMS application that supports Position Budget and Control within any organization. The functionality provided by Position Budgeting and Control will enable those organizations that manage manpower based on a specific Position Budget/Manpower Plan to streamline the position budgeting and reporting process. Under the Position Budgeting Model of an HR operation, a department (organization unit) in an organization cannot hire an employee unless there is a vacant position in its budget. The position budget is decided/prepared at the beginning of each Fiscal Year by having the Organization Unit Heads fill in Position Worksheets which are then consolidated by the system for Review and Approval by Finance and HR. Once the Position Budget of an Organization Unit is approved, the Position Slots can be created and routed for Approval. Position Slots can be defined with all Compensation elements including Earnings, Allowances, Benefits, Deductions, Bonuses, Commissions and Expenses. Following the creation of Position Slots, the Organization Units can issue Requisitions against their Budget using the approved Position Slots. The module consists of two major components (subsystems), the first is pertinent to “Position Budgeting” or “Manpower Planning”, and the second is relevant to “Position Control”. Comprehensive features are available to handle changes in the Position Budget. Position Budgeting can also be configured to track the Grade and Step for each position and to use a Financial Budget for the same position which is the result of the Grade Step matrix that is defined.General Features
2. Budget Planning and Control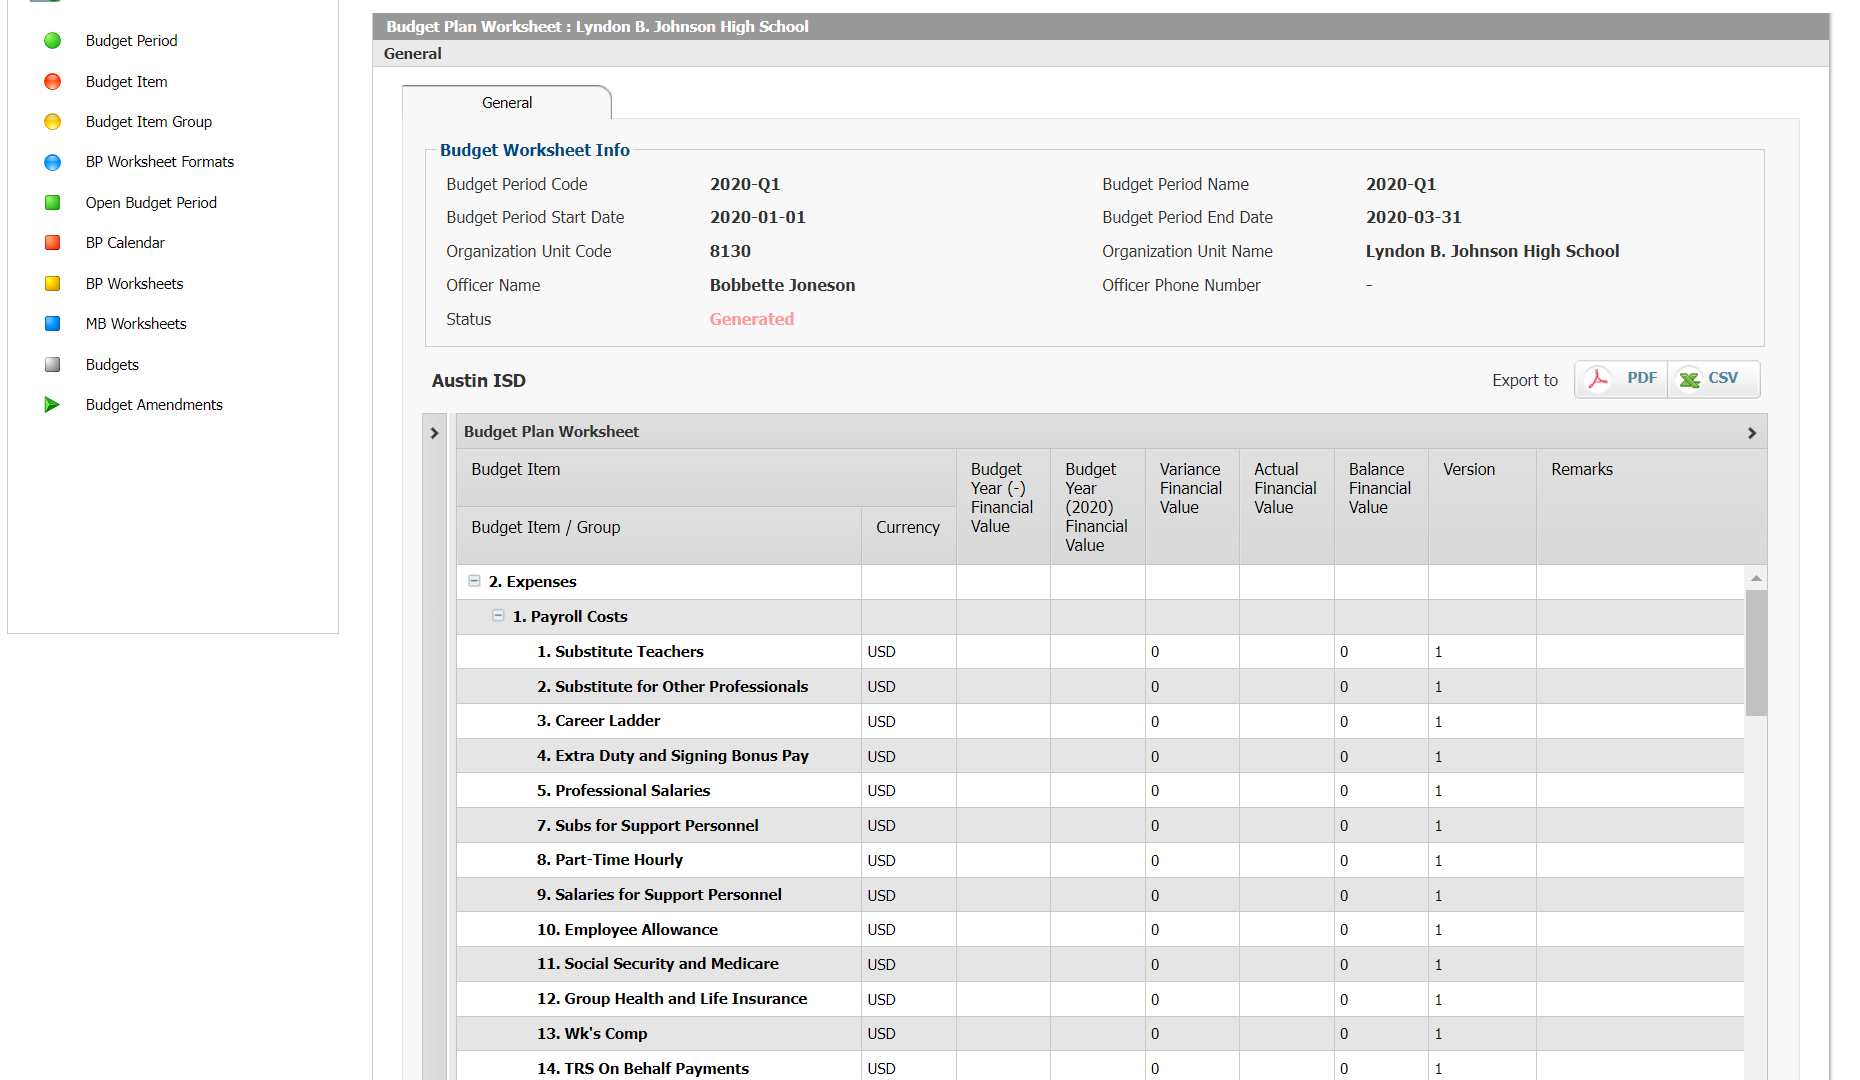 Figure 6: Budget Plan Worksheet Budget planning is the process of developing a financial plan of the organization, known as the Budget, which projects future revenues, assets, liabilities, and expenses of the organization. The budget is usually prepared for one full year, which can be calendar year or fiscal year, this is known as the Budget Period. Most organizations have a year-based budget. However, some organizations may use different budget periods, such as Quarter, 6-Months, 2-Years, 5-Years, etc.Once the budget is prepared the Budget Control process starts. The Budget Control is used to monitor the business performance and operation against the Budget. The purpose of budgetary planning and control is to mitigate the risk that an organization’s financial results will be worse than expected. In summary, Budgeting or Financial Budgeting comprises three processes: – Budget Planning (BP) Together they are known as Budget Planning and Control (BPC). The Budget Planning (BP) process consists of projecting the company’s finances for a specific future period. The company finances are projected based on previous period financial performance and based on projected future investments, revenues and expenditures. The outcome of the Budget Planning process is a budget plan, known as the Budget and includes projected Assets, Liabilities, Expenses, Revenues, and Capital Investment for the budget period. The Budget Control (BC) process is used to monitor the actual financial performance of the company against the Budget, where revenues, expenditures, and capital investments are monitored against the Budget to ensure that the goals of the budget are met and complied with. As a result of the budget control, management may decide to amend the budget to change specific budget items and their values in view of specific unplanned circumstances and/or events such as a new unplanned project, a disaster event, etc.. The process of Amending the Budget is known as Budget Amendment (BA). 3. Payroll Budgeting and Control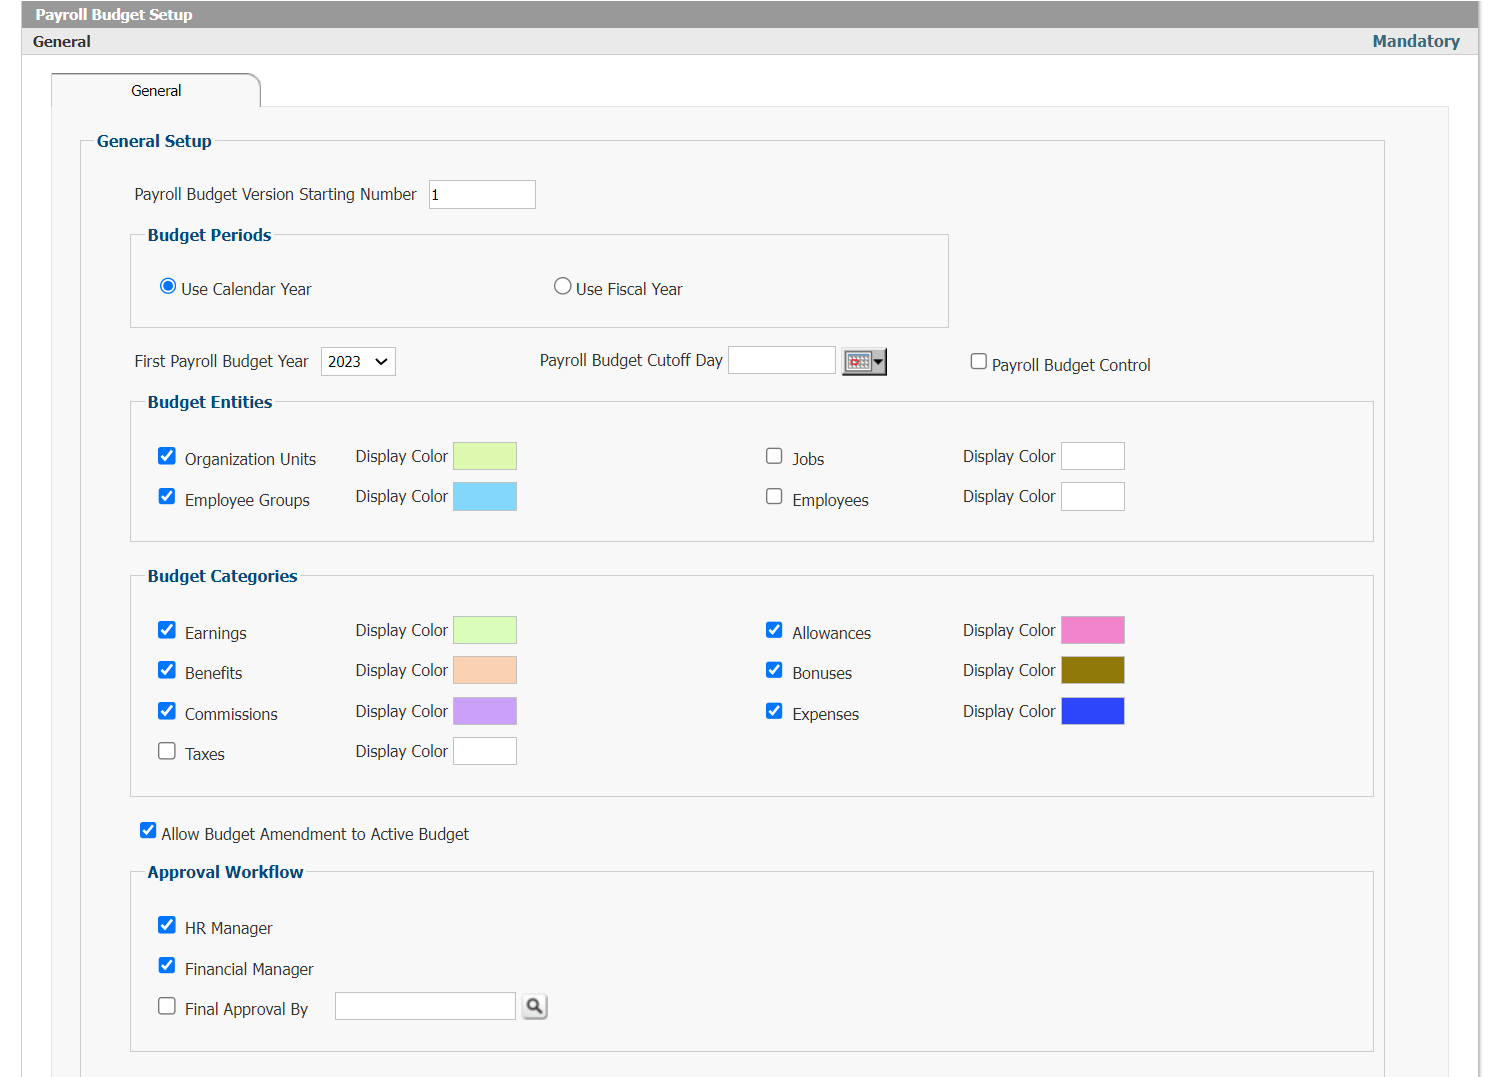 Figure 7: Payroll Budget Setup The Payroll Budgeting and Control module enables the user to create and manage the payroll budget. The payroll budget can be created for specific future budget periods, which can be 2-months, 3-months, 4-months, 6-months, or the whole year. Once the payroll budget is created, approved, and posted, then if the user can control the payroll using the current active payroll budget, so that if the payroll run for a specific pay period within the budget period exceeds the budget, the system will alert the user that the outcome of the pay period exceeds the payroll budget for the pay period. 4. Recruitment Management Figure 8: Interview Roster in Employee Self-Service Interact HRMS Recruitment Management is a streamlined requisition-based recruitment system that supports both internal and external recruitment where recruitment contracts as well as invoicing for external recruitment services is all conducted electronically through the internet. The module supports requisition against position budget, review and approval of requisitions, online applicant/application registration, multiple levels of screening of applicants/applications, user defined screening indicators or questions and scoring, scheduling of applicant interviews with no limit on the number of interviews including interviews by committee, automatic notification for interviewers using Email or Text Message (SMS), user defined screening, assessment, and interview parameters, job offer notification, auto-matching applicants to requisitions, and applicant/application search. General Features
5. Contracting & Hiring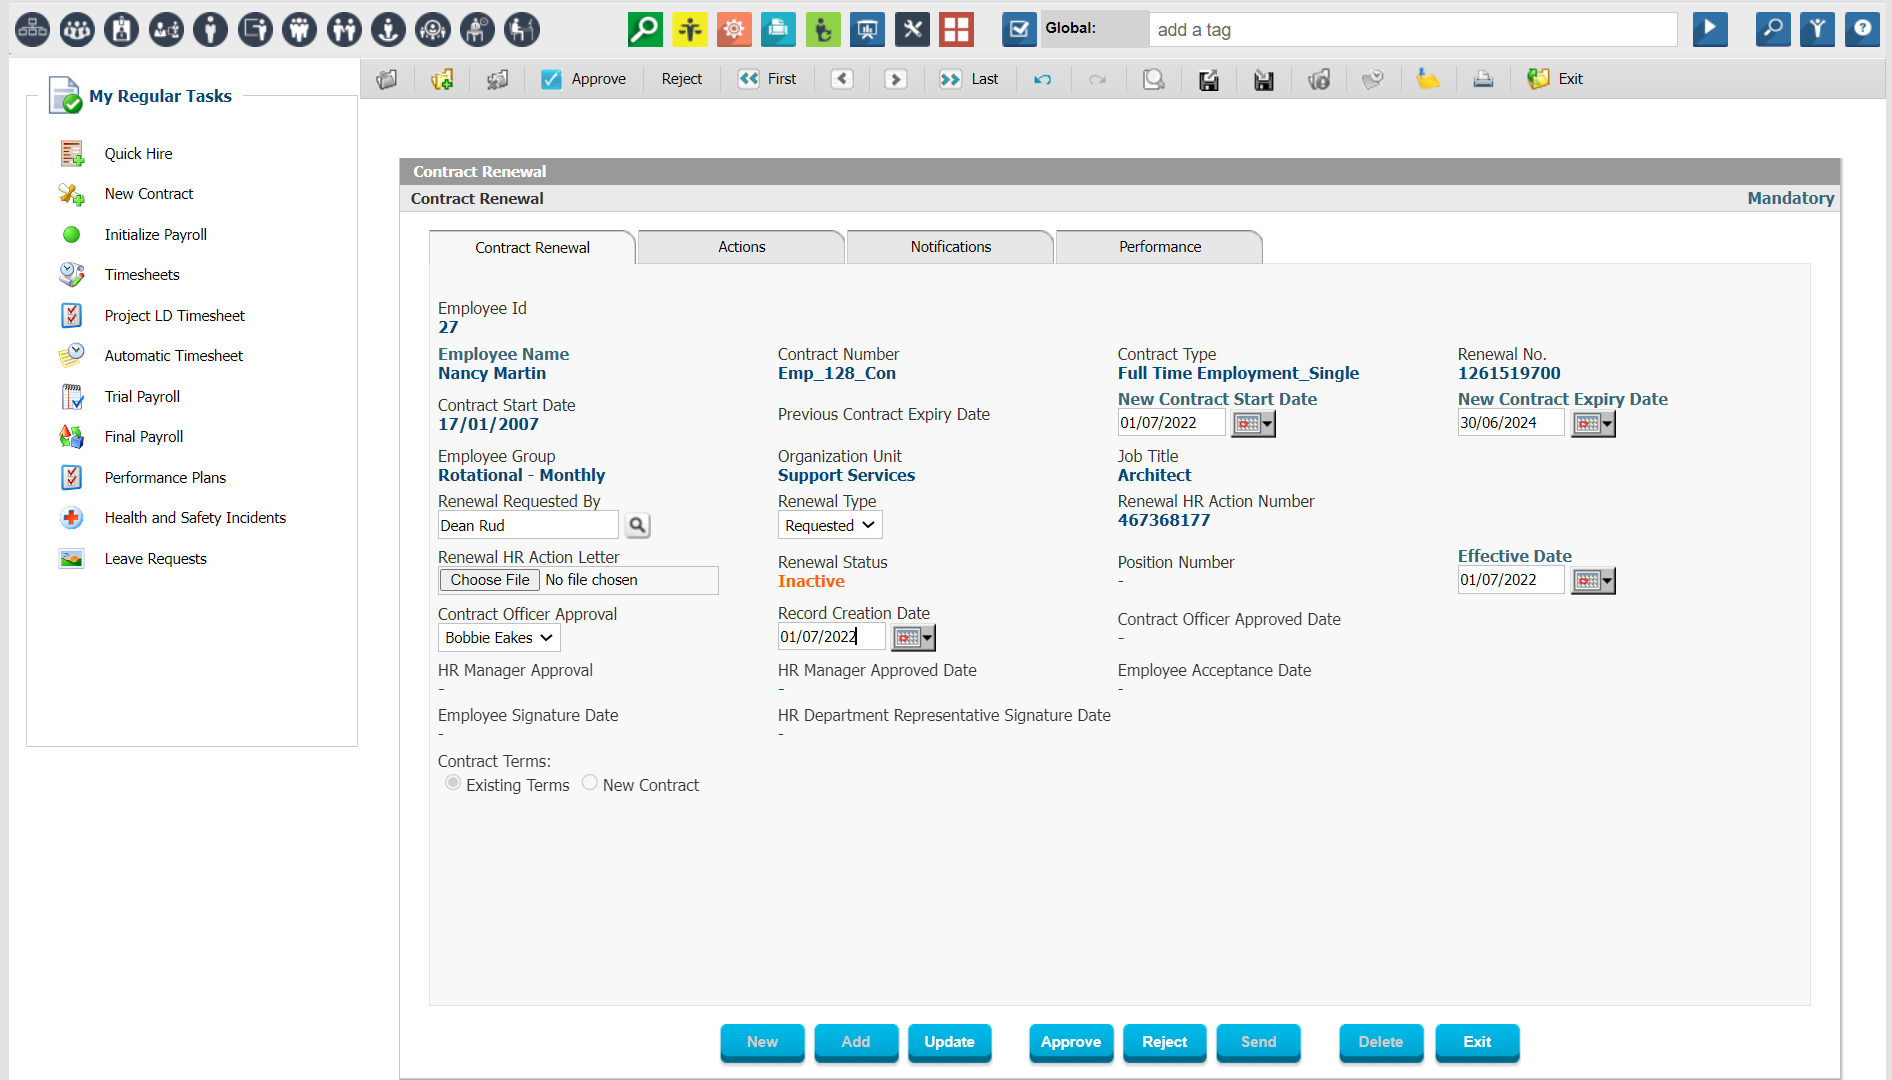 Figure 9: Contract Renewal Form For organizations which provide employment contracts/agreements to some or all of their employees, Contract Management enables these organizations to easily create Contracts using user-defined templates. For those organizations which only issue Employment/Job Offers, the application will allow them to hire quickly and auto-generate the job-offer. Contract and Hiring management allows the Company to define unlimited Types and Templates of Employment Offers and Employment Contracts/Agreements with specific attributes like default contract period, and associated Jobs or Employee Groups. Contracts can be tracked, alerts can be received for expiry of contracts and amendments will be tracked for any changes to the Contract. Employees can be hired using Quick Hire or through a sophisticated multi-step New Employment Contract process where all attributes of the new Employment relationship will be defined including Assignment date, Hire Date, Work Start Date, Job Title, Employee Group, Organization Unit, Compensation Elements, Probationary Period, Work Calendar, Normal Shift, and much more. Using the Inheritance Framework, when a user selects the Employee Group and Organization Unit in which a new Employee will be hired, the application will check the setup and configuration to provide a limited list of Job Titles, Contract Types, Shifts, etc. which are applicable to the combination of Employee Group and Organization Unit that was selected. Once the Employee has been entered with the correct Basic Salary, then the system will automatically assign all relevant associated compensation policies including Earnings, Deductions, Expenses, Commissions, Bonuses, Benefits and Taxes which are associated with the Employee Group and Organization Unit. In addition, the Employee will inherit the relevant Leave Policies. If the organization is using another core HR solution then this module can be used to quickly hire people only and this can even be done through an import of employee data from an Excel sheet. 6. Background ChecksFigure 10: Background Check Setup The Background Screening module enables the Organization to setup a standard Background Screening framework and associated Policies that support the Organization’s requirements. It includes background checks for name change, address history, education, certification, previous employment, driver’s license history and infractions, criminal record, credit history, and more. The application provides flexible management of background check service providers and is fully integrated with external background check systems and applications through HR-XML. Background Screening supports both background screening for new applicants as well as for existing Employees. The process is Workflow based, where the Applicant/Employee completes a Background Check Authorization Form using Self Service and the HR Officer prepares a Request for Background Screening and includes the required background checks that need to be conducted. The request is then automatically sent to the selected provider through an HR-XML message or an email or using the provider’s application API. Once the screening is completed, the system will automatically receive the background check report from the Background Check application and will store and forward the report to the concerned HR Officer(s) for action. 7. Onboarding Management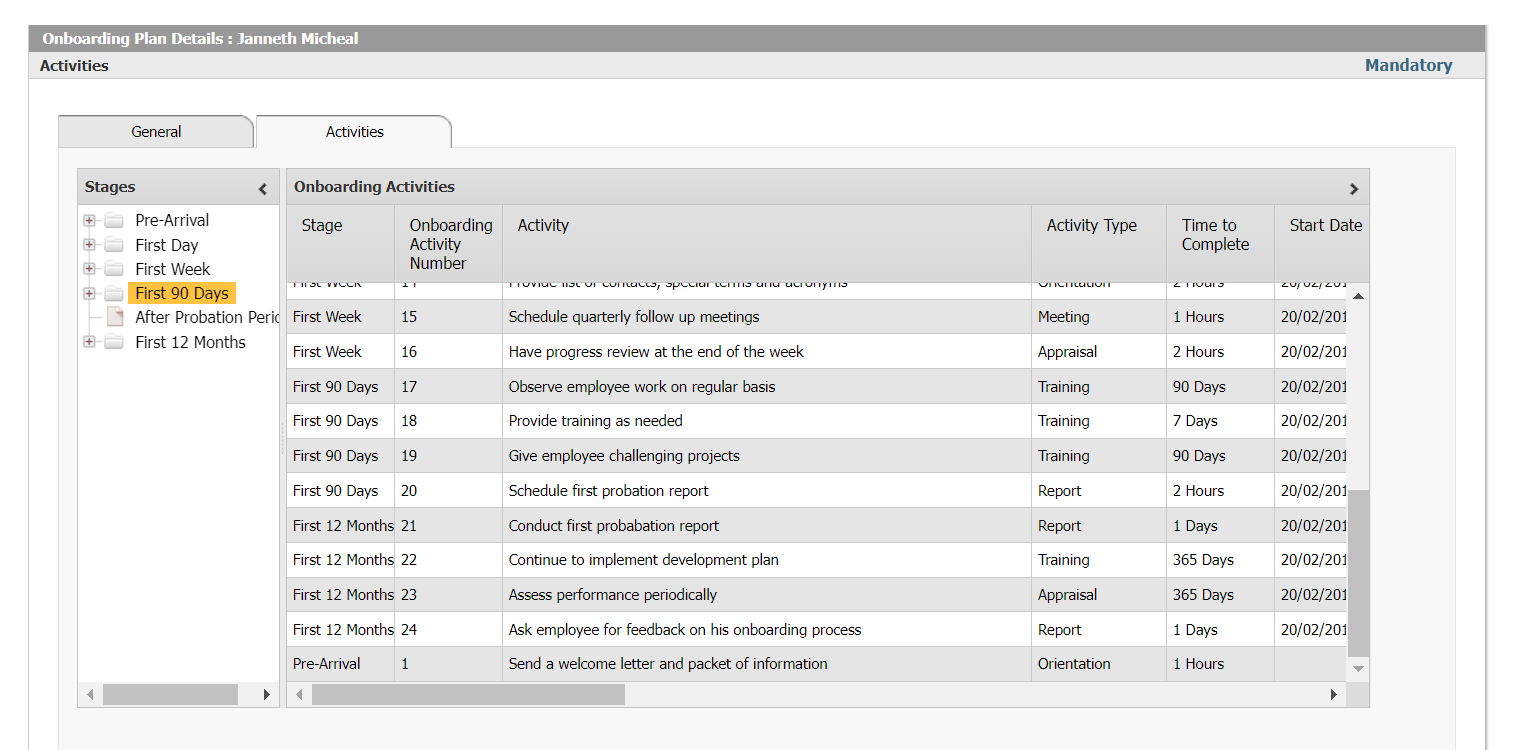 Figure 11: Onboarding Plan Onboarding Management enables Interact HRMS to create Onboarding Plans with different Activities for each Onboarding Stage and issue Onboarding requests automatically upon the hiring of a new Employee. Different Onboarding Stages can be defined for Before First Day, First Day, First Week, First 90 Days, etc., and for each stage a set of Activities will be defined and assigned to Onboarding Officers who can be Process Owners and/or Process Champions. The objective is to facilitate the Onboarding of Employees, to ensure they can be productive more quickly because everything has been arranged in advance and on time for them to be able to start on the job. Onboarding Requests include Security Clearance, Medical Exam, Asset Assignment, Application User ID, Uniform, Business Cards, etc.Onboarding is directly integrated with Employee Self Service and Applicant Self Service using Workflow and Alerts to ensure that those assigned a Task will be notified in advance and Applicants can also access Onboarding information prior to their first day at work. Onboarding Management is a highly configurable application which allows for the user to define a framework with any number of Onboarding Activity Types, Document Types, Form Types, Uniform Types, Office Types, etc., and once this framework has been created for each Type the user can create any number of Activities, Documents, Forms, Uniforms, Office Spaces, but also Non-Disclosure Agreements, Union Agreements, etc. As the Onboarding Process takes place, both new hires and employees involved in the onboarding process can provide feedback and comments/scoring on each Onboarding Activity and can track the Progress of the Onboarding Plan. Performance Evaluations can be part of the Onboarding Process with a range of Appraisals that include Before First Day Appraisal, First Day Appraisal, First Week Appraisal, First 90 Days Appraisal, etc. 8. Probationary Period Management Figure 12: Probationary Period Plan Probation Period Management allows you to carefully monitor and assess new Employees while they are still in their Probationary Period. A standard Probation Plan can be created for a new Employee and this Plan can include Goals, Training Assignments and Competencies upon which they will be assessed. Progress Evaluations, Mid-Probation Evaluations, End Probation Evaluations etc. can be conducted as required. Reports and Alerts will ensure no Employee’s Probation Period will expire without Supervisors and HR Dept being aware. Goals in the Probationary Period plan will have specific Planned Start and End dates and can be tracked against Actual Start and End Dates. The Status of each Goal can be tracked separately as Under Review, Completed, In Progress or Delayed and the Supervisor can add comments on each Goal. 9. Employee Badge Printing Figure 13: Employee Badge Setup With Interact HRMS already providing comprehensive Onboarding solutions as well as Time Attendance and Access Control solutions, with Employee Badge Printing users can now also leverage a powerful module that connects the two processes. Once an Employee has been hired and the Onboarding process has started, you will be able to automatically issue badges straight from the application without having to use another software to drive your badge printer. You will be able to design the layout of your badges, determine what data you would like to display on the employee badge, including employee picture, name, ID, title, office location, phone, fax, company name, company logo, hire date and much more. 10. Organization Management Figure 14: Organization Chart Organization Management is a very powerful application that allows the user to define the structure of their organization in multiple user-defined ways. Interact HRMS is an enterprise system which supports any number of employers (which can be deployed in one single database or with a separate database for each employer. Within each employer, a powerful organization structure can be defined and an organization chart will be produced as a result of the data loaded whereby each Organization Unit is shown in relation to other Organization Units in the organization. The application allows the user to define an unlimited number of Organization Units, an unlimited number of reporting relationships, and an unlimited number of reporting levels. Organization Units can be classified in Groups, Work Unit Types, Work Units or other types of Classifications including as company, branch, division, department, section, project, activity or as any another type of classification. The organization structure is important for reporting purposes so that reports can be run per unit or per group of units, it is also important for costing purposes where the application is used for payroll also and payroll cost needs to be distributed by cost center, project or activity. In addition, the organization structure is used as a foundation module to ensure reporting lines are clear and all workflow approval processes function as per the defined reporting lines. Most reports in Interact HRMS allow the user to filter by Organization Unit. Reporting among organization units can be defined based on an administrative, a functional and a technical reporting line, or a user defined type of reporting line. Each reporting relationship will have a start and end date and can have a manager with a scope of authority defined with it. Organization units can be controlled by a position budget or open for hiring based on standard requisition and approval processes. Each unit also has Self Service capabilities described further under Organization Unit Self Service. Each organization unit will also have performance goals and strategic goals associated with it which can then be used for performance management and KPI management. 11. Unified Employee Electronic Record Figure 2: Employer Desktop The Unified Employee Electronic Record brings together all details from the entire HR system which relate to a specific employee. No longer will an HR officer have to go back to papers and spreadsheets once the data has been properly captured in the Interact HRMS. The UEER provides you with an easy-to-use multi-tab form that includes details on General Demographic, Education, Skills, Experience, Job Details, Leave, Competency Evaluations, Performance Reviews, Career Plans, Training Records, Succession Plans. In addition, a second level of data is available at the user’s fingertips, to pull up the complete History (all Transfers, Promotions, Compensation Changes, Deductions, and Contract Amendments), in addition, at this level you can find with a click-of-the-mouse the Employee’s Work Schedule and Holiday Schedule, the Timesheet and Attendance Sheet, the Payroll Details and Payroll Audit report related to this particular employee, Emergency Contact Details, Address Information, Passport Details (Visa, Passport, Dependents), as well as a generic list of other items under the Miscellaneous header which can be tracked based on the business in which the application is used including Certifications, Military Service Records, Security Credentials, Patents, Publications, Speaking Events, Associations, Languages, Medical Records and any other Supporting Material which needs to be attached to the Employee Electronic Record. 12. Sticky Notes Management Figure 16: Sticky Note Example Sticky Notes help HR/Payroll users in tracking important notes/comments that require further follow-up. By creating a Sticky Note, the HR/Payroll user will ensure that whenever he/she logs in, the Note will appear and Alert the right people so that no information can get lost. A Sticky Note ‘sticks’ on the Employee Record until it is Deleted, or it can be Saved for future reference. Sticky Notes can be shared with other Users and Emailed and will automatically pop up for the right person when he/she logs in. Notes can be highlighted in different colors and prioritized, as well as setup with their own Reminder-function in a number of specific days. 13. HR Actions Management Figure 17: Employee Promotion HR Action Definition Form Interact HRMS is an HR Action driven application where specific Personnel or HR Actions can be initiated by the HR Department or requested by Managers and Supervisors and this will then automatically trigger a workflow which will assign Tasks to specific users who may need to Review or Approve certain steps in the process of the Personnel/HR Action. Scanned Documents can be attached and Alerts can be sent automatically to ensure that everything is followed up correctly.HR Actions are at the core of the system and can be defined for any process. Predefined HR Actions include:
14. Disciplinary Actions Management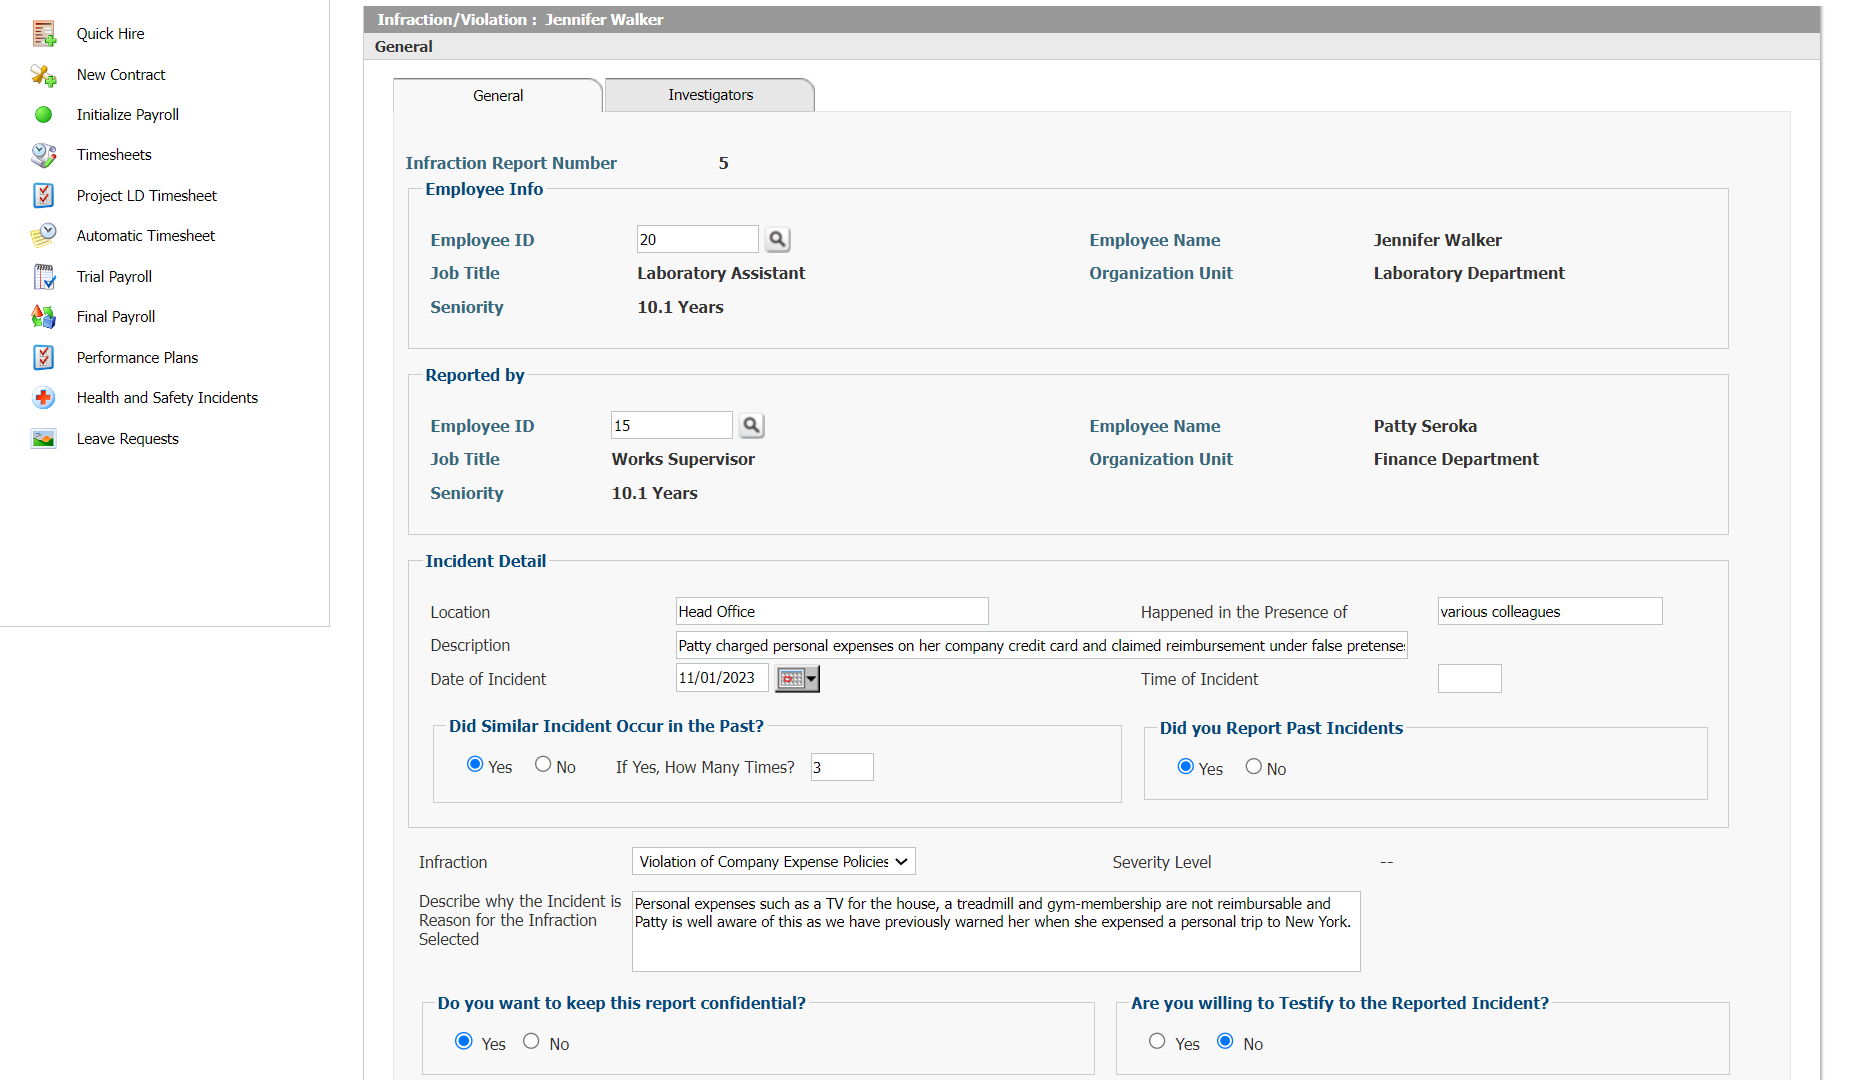 Figure 17: Infraction Report Disciplinary Actions management allows you to define a list of Infractions/Violations of Policy which will be linked with a user-defined list of Severity Levels. The process starts with a Report of Infraction which can then be assigned to an Employee for further Investigation and finally the outcome of the Investigation will be documented together with the resulting Disciplinary Action which will be saved on the Unified Employee Electronic Record. The application supports a framework of Progressive Disciplinary Actions and is completely configurable as per the standard needs of the organization, as all Severity Levels, Infraction Types, Disciplinary Action Types are user defined and color coded for easy display in a list and highlighting the most critical ones. 15. Policy Publishing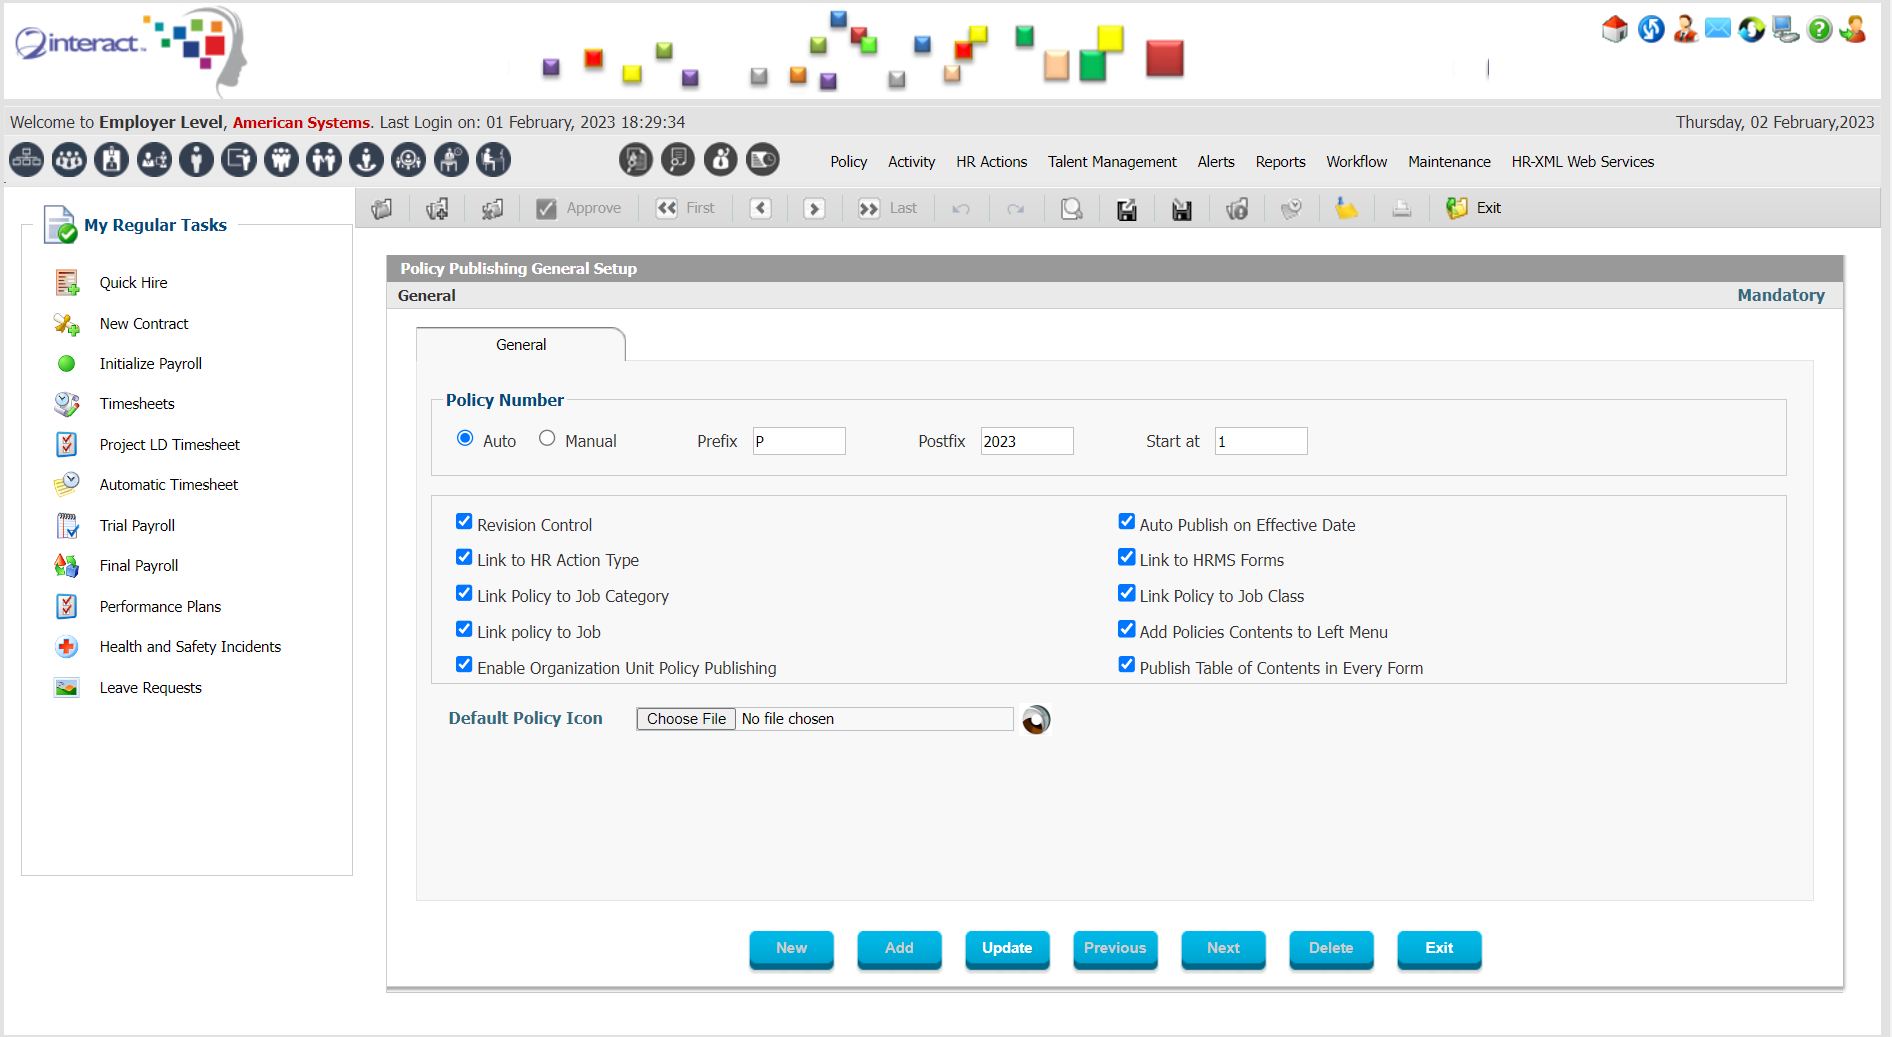 Figure 18: Policy Publishing Setup Policy Publishing allows the Company to define Company Policies and publish them to their Employees based on the applicability of the Policy to a particular Employee Group, Job Category, Job Class or Job Group. Employees can read the Policy through their Self-Service and acknowledge that they have read the Policy. The HR Department can run reports on who has and who has not yet acknowledged reading a new Policy. Policies can be categorized as HR Policy, IT Policy, General Policy, etc., and any changes to Policies can be tracked too so that the history of Policies and their updated Versions is clear and documented. The structure and framework of Policies is fully configurable, and this framework includes the following attributes:
16. Passport and Visa Tracking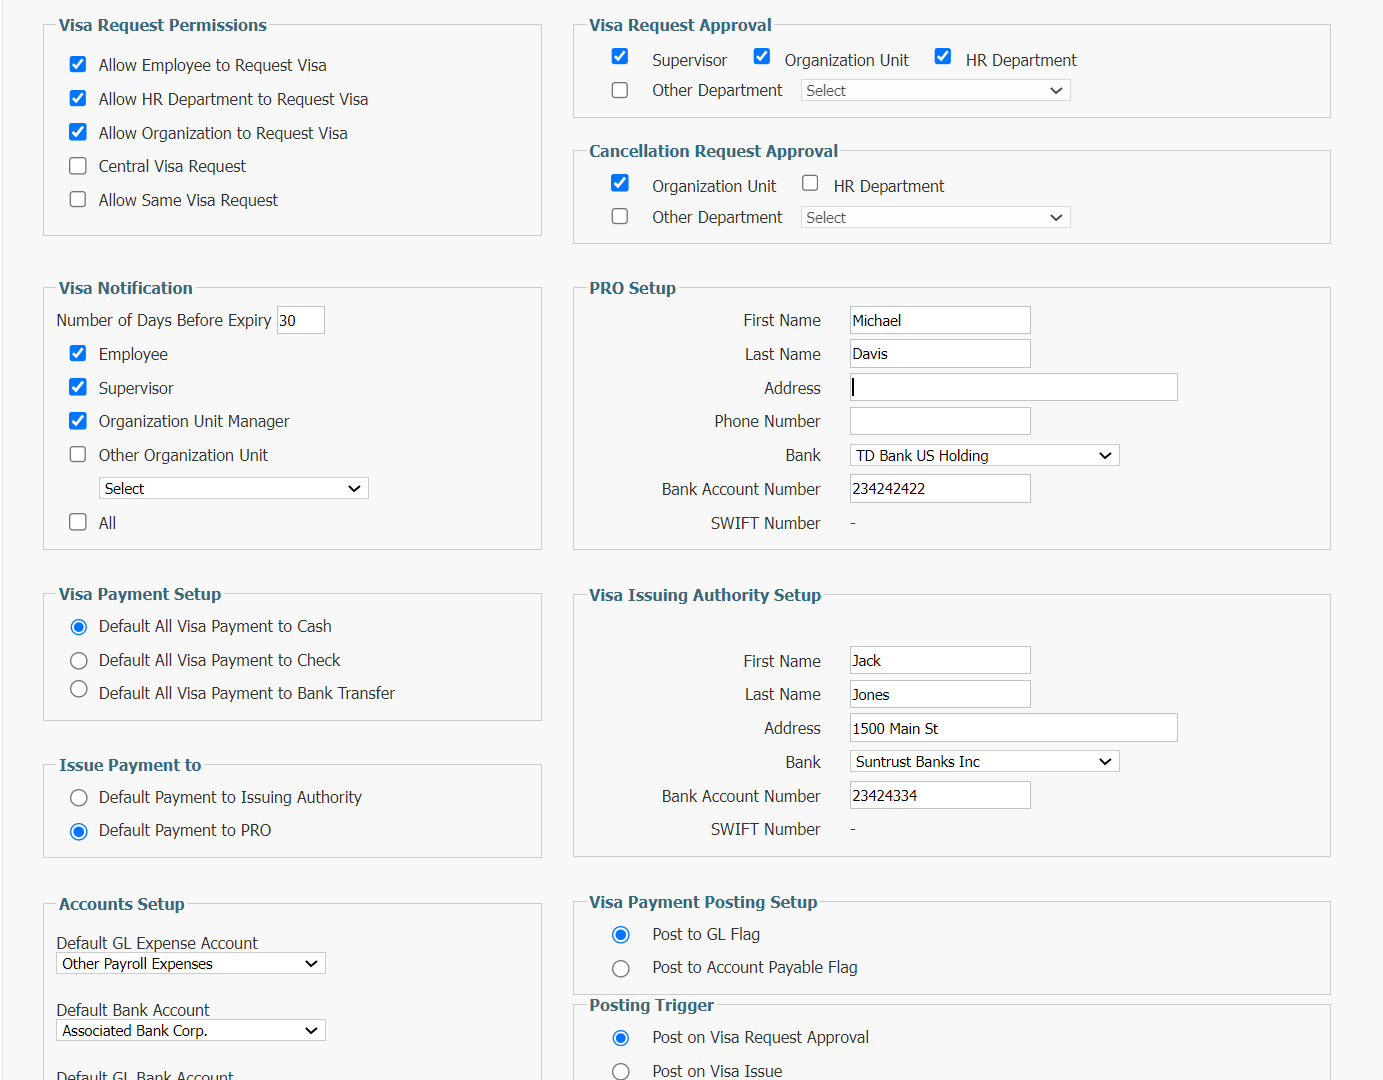 Figure 19: Passport and Visa Tracking Setup Passport and Visa Tracking allows you to define the types of Passports and Visas which you need to track for your staff. Run reports and receive alerts regarding expiry of these documents, keep a scanned copy on file of each document and allow Employees to apply for Exit/Entry visas in countries where this is applicable. You can track multiple passports for employees who have more than one nationality and you will be able to attach 10 scanned pages of each passport. You can track the current location of the passport in case it is with a specific department for administrative reasons. In addition, you can define any number and type of Visas, define the renewal process for visas and ensure the employer is aware of any Work Permits/Visas of their employees which may be expiring in the future. All expiry date information can be produced in reports and exported to Excel, Word, PDF. Etc. Using the comprehensive access control capabilities of Interact HRMS, a specific user can be setup to have only access to Visa or Passport information of a specific Employee Group or Organization Unit but not access other information due to confidentiality reasons. 17. Housing and Accommodation Management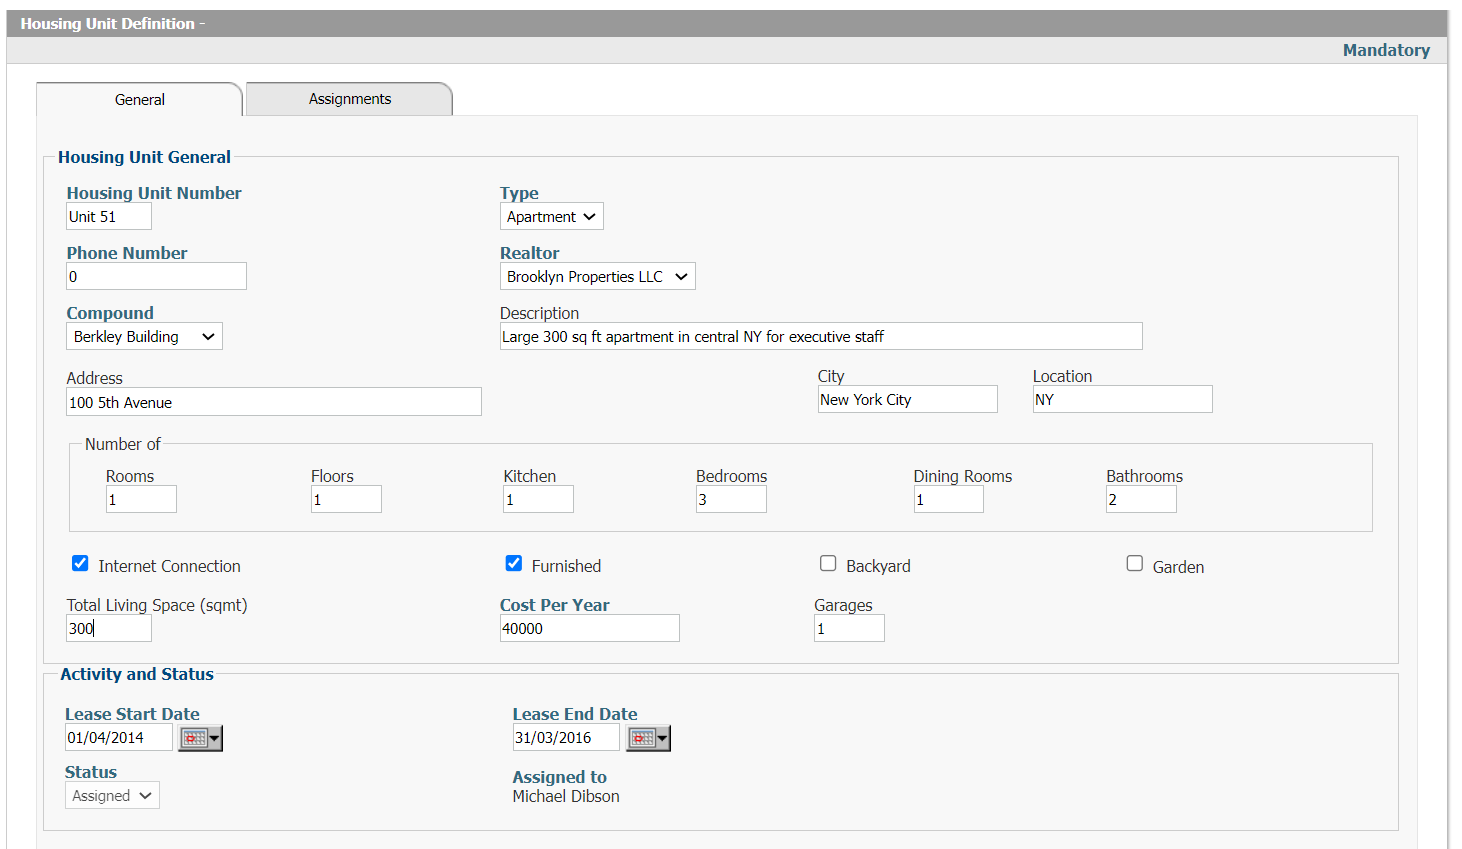 Figure 20: Housing Unit Definition Housing and Accommodation Management allows the user to manage the inventory of housing units, no matter how small or how large to ensure that all housing inventory and rental properties leased by the company are used to their maximum potential. Housing and Accommodation Management gives the company a clear overview of which employees are staying in which units, when leases will expire and ensures that accommodation is planned in advance. For companies who provide Staff Accommodation or Corporate Housing, this application ensures that the Company can keep track of all Housing Units available and who is assigned to each Housing unit. You can keep track of the Lease, Landlord, cost and amenities in the housing unit. You can run reports on who is currently assigned, when the Lease will expire, and process requests for changes in Housing Assignment. 18. Travel Management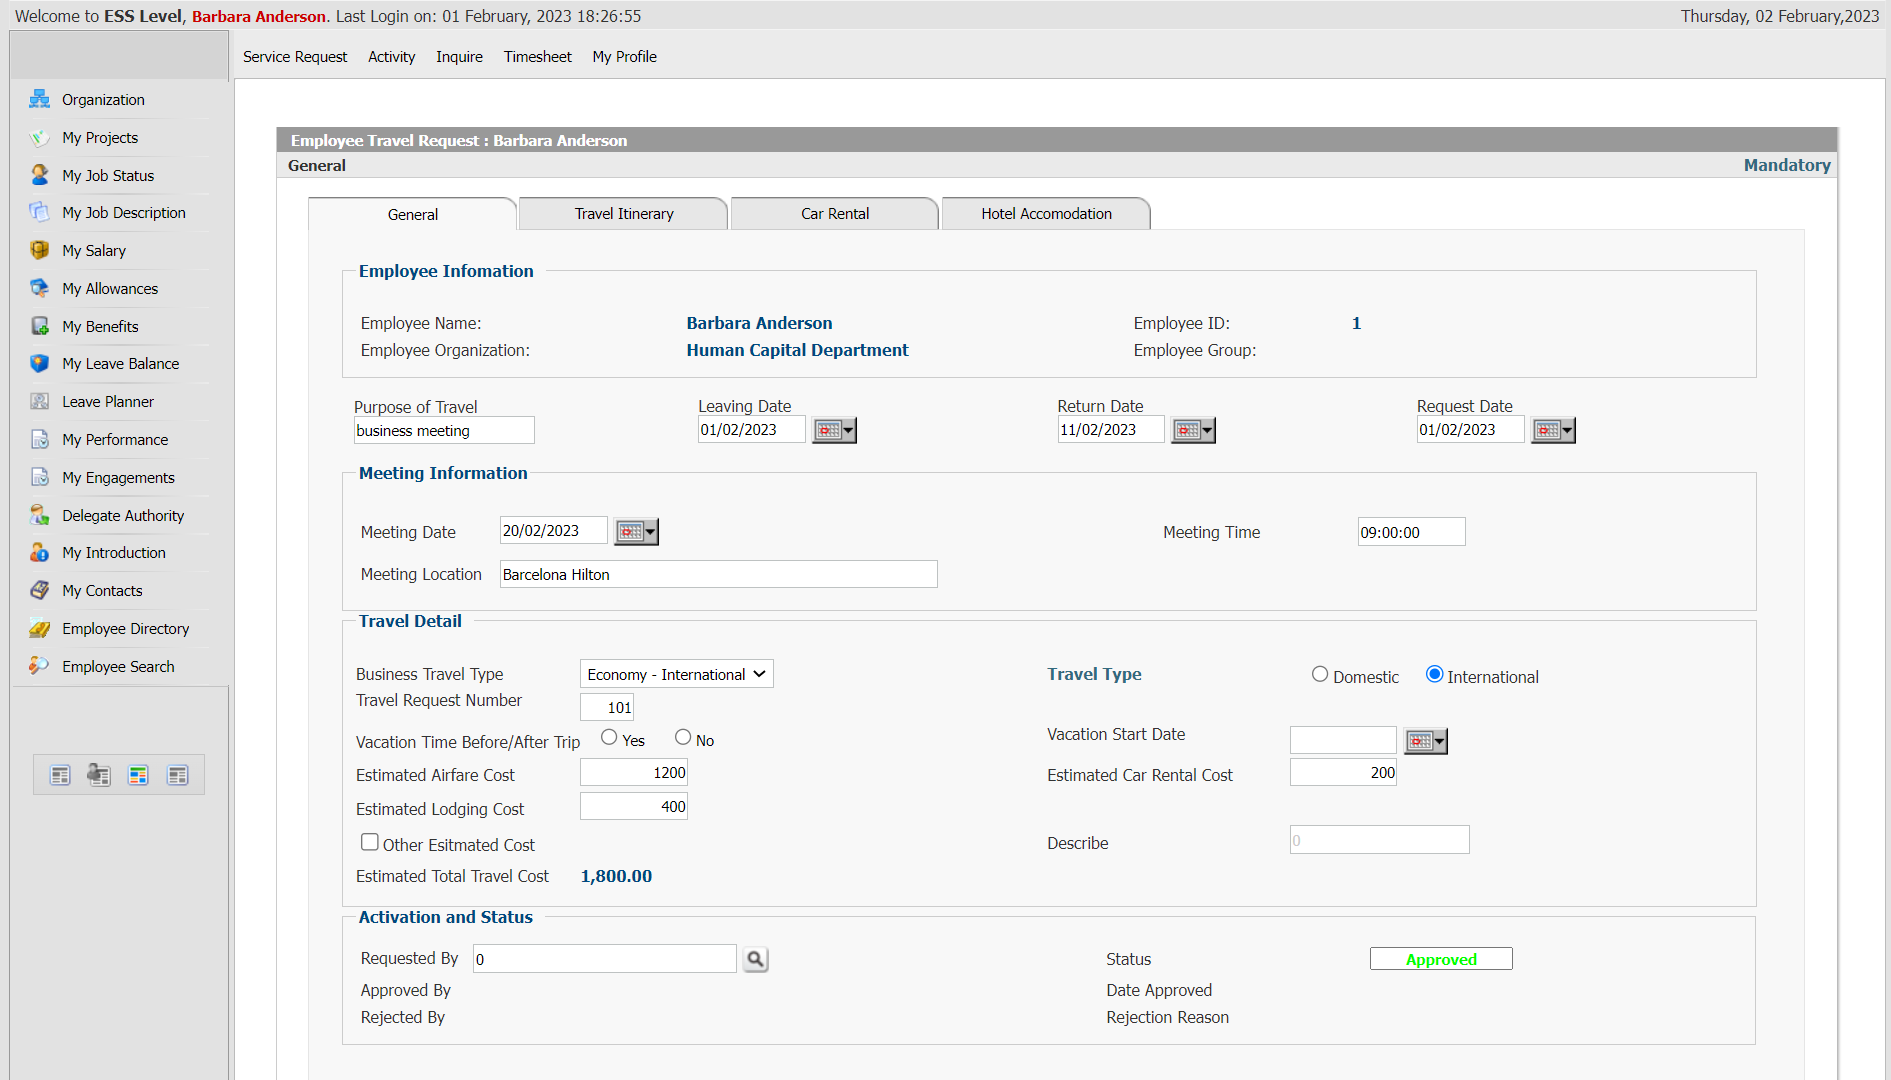 Figure 21: Employee Self-Service Travel Requestv Travel Management allows the user to request for a Ticket to be issued along with a Leave Request or Business Trip Request. It also allows for Travel Approval Requests to be processed which include cost estimates for Travel, Hotel Accommodation and Car Rental. Detailed information can be entered by the employee, including the reason for the Travel Request, meeting information, travel itinerary etc. All travel requests can be routed to the appropriate supervisor using the workflow and alerts engine and once approved the information can be automatically forwarded to the company’s internal or external travel agency. Expense claims can be linked to approved trip requests as part of the expense submission process. Travel budgets can be tracked for each expense type. Travel Management is integrated with Expense Management so that Expense Claims can be linked with approved Travel Requests for easy reconciliation. 19. Employee Asset Management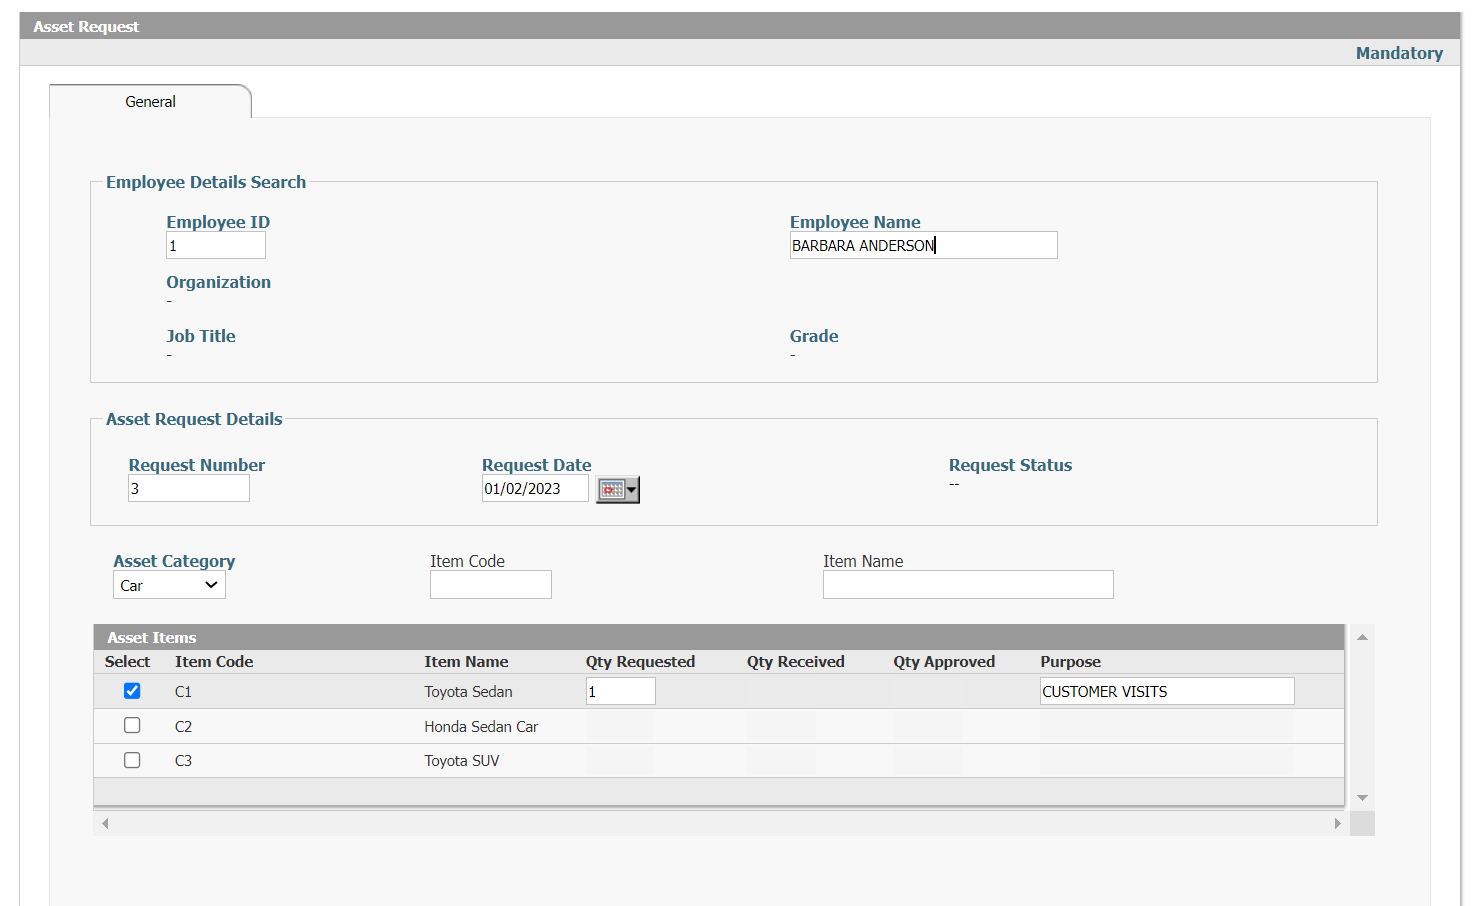 Figure 22: Employee Asset Management Asset Management allows you to define Asset Types and Asset Items, e.g. Laptop, Cell Phone, etc., and assign them to Employees so when an Employee leaves, there is a clear record of what assets need to be returned. It also allows Employees to request Assets and Return them using Self-Service. All Assets will be defined with their detailed characteristics including serial number, purchase date, current value. The company can also track Quantity on Hand Quantity, in Store and Assigned. 20. Parking Space Management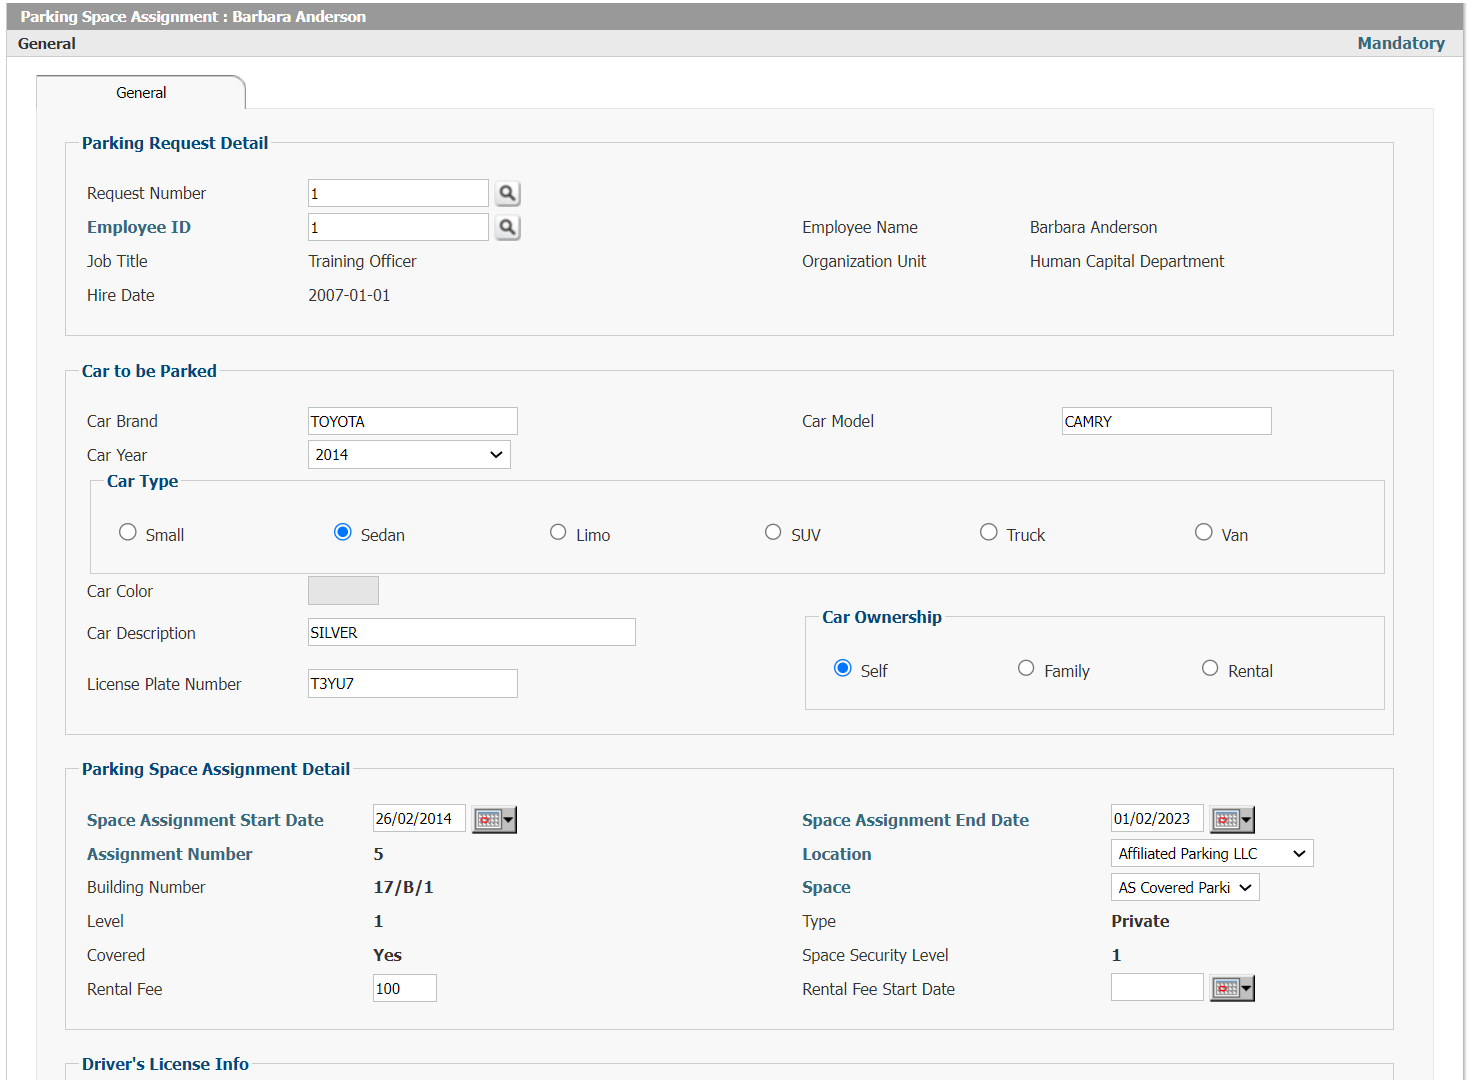 Figure 23: Parking Space Assignment Request For companies who have to manage and plan parking spaces for their employees the Parking Space Management module enables them to define the parking space inventory and track which parking spaces are assigned to which employees. Employees can request parking space through self-service and once the request is approved, any premiums to be paid for the specific parking space requested will be automatically deducted from the payroll for the employee as per the company policy. The Parking Space module allows for detailed definition and classification of different types of Parking Space to ensure optimal distribution of the Parking Space over the employee population. Parking Space inventory can be tracked with many attributes including: Parking Space
Parking Location
21. Office Space Management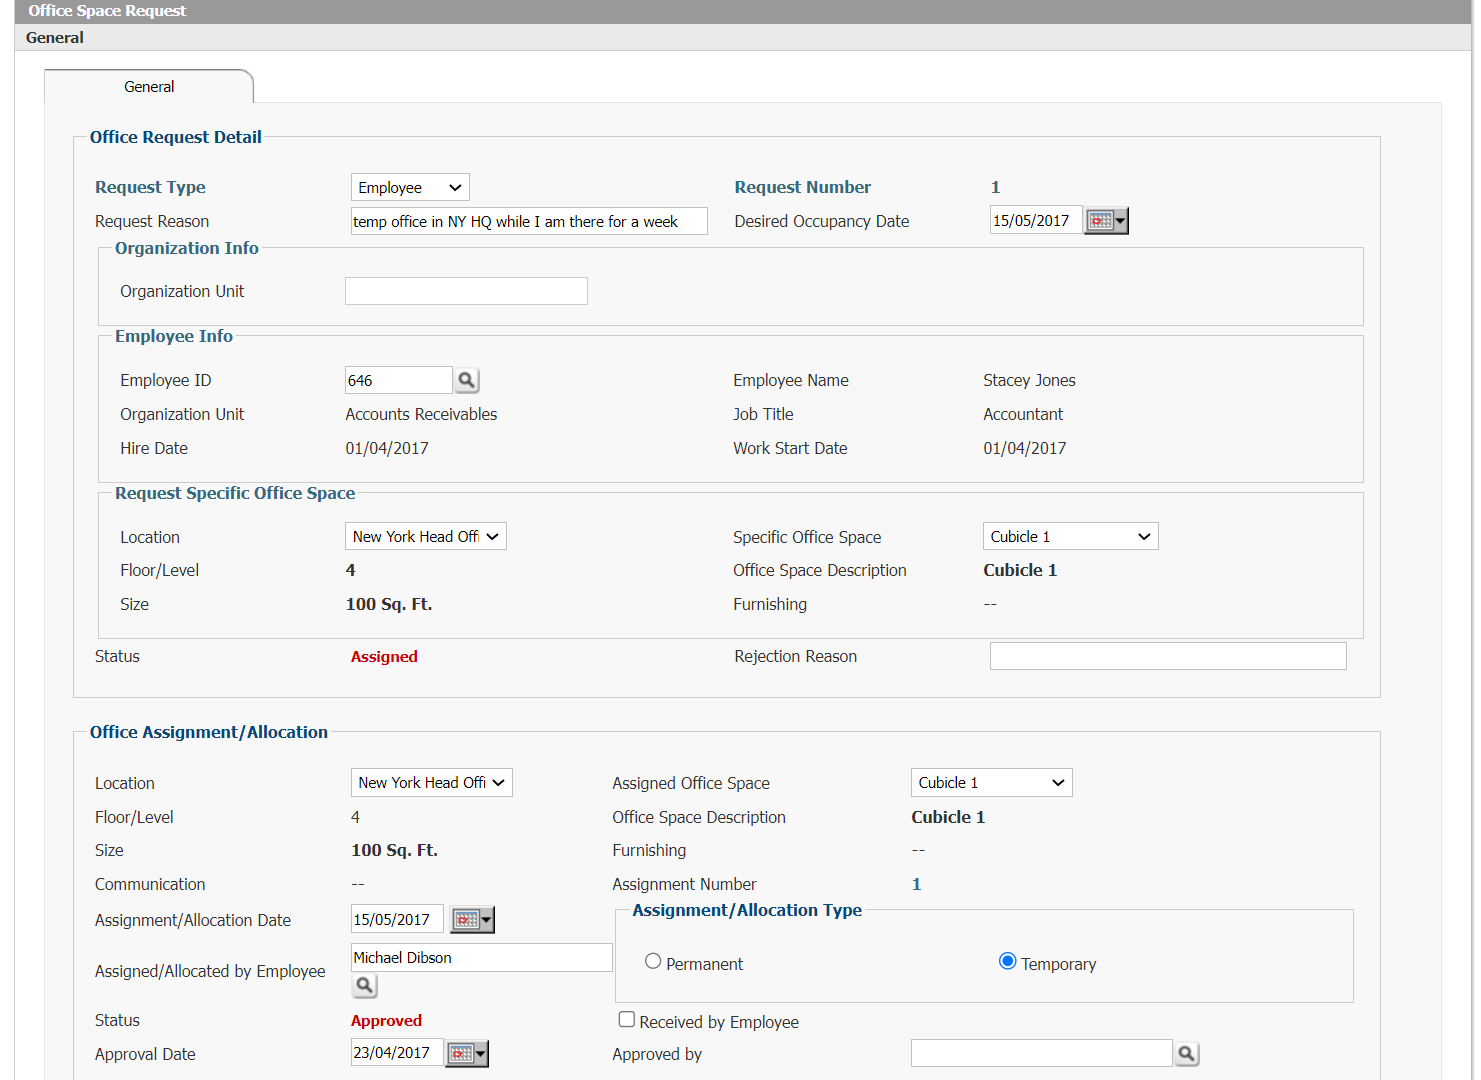 Figure 24: Office Space Request Office Space management enables departments and HR users to plan office space based on the manpower and recruitment plans. By using the Office Space Planning module, the organization can ensure that there is no under-utilization of office space or a sudden lack of space. Employees and departments can request office space through the employee self-service and organization unit self-service capabilities and HR can access all the requests which have been received. Office space can be grouped and reported on and the user can obtain a list at all times of which types of office spaces are currently in use, which ones are currently or expected to be vacant in the near future. You can define any type of office space and define your entire office space inventory and the application is directly integrated with the Onboarding and Offboarding modules in Interact HRMS.
22. HR Risk Management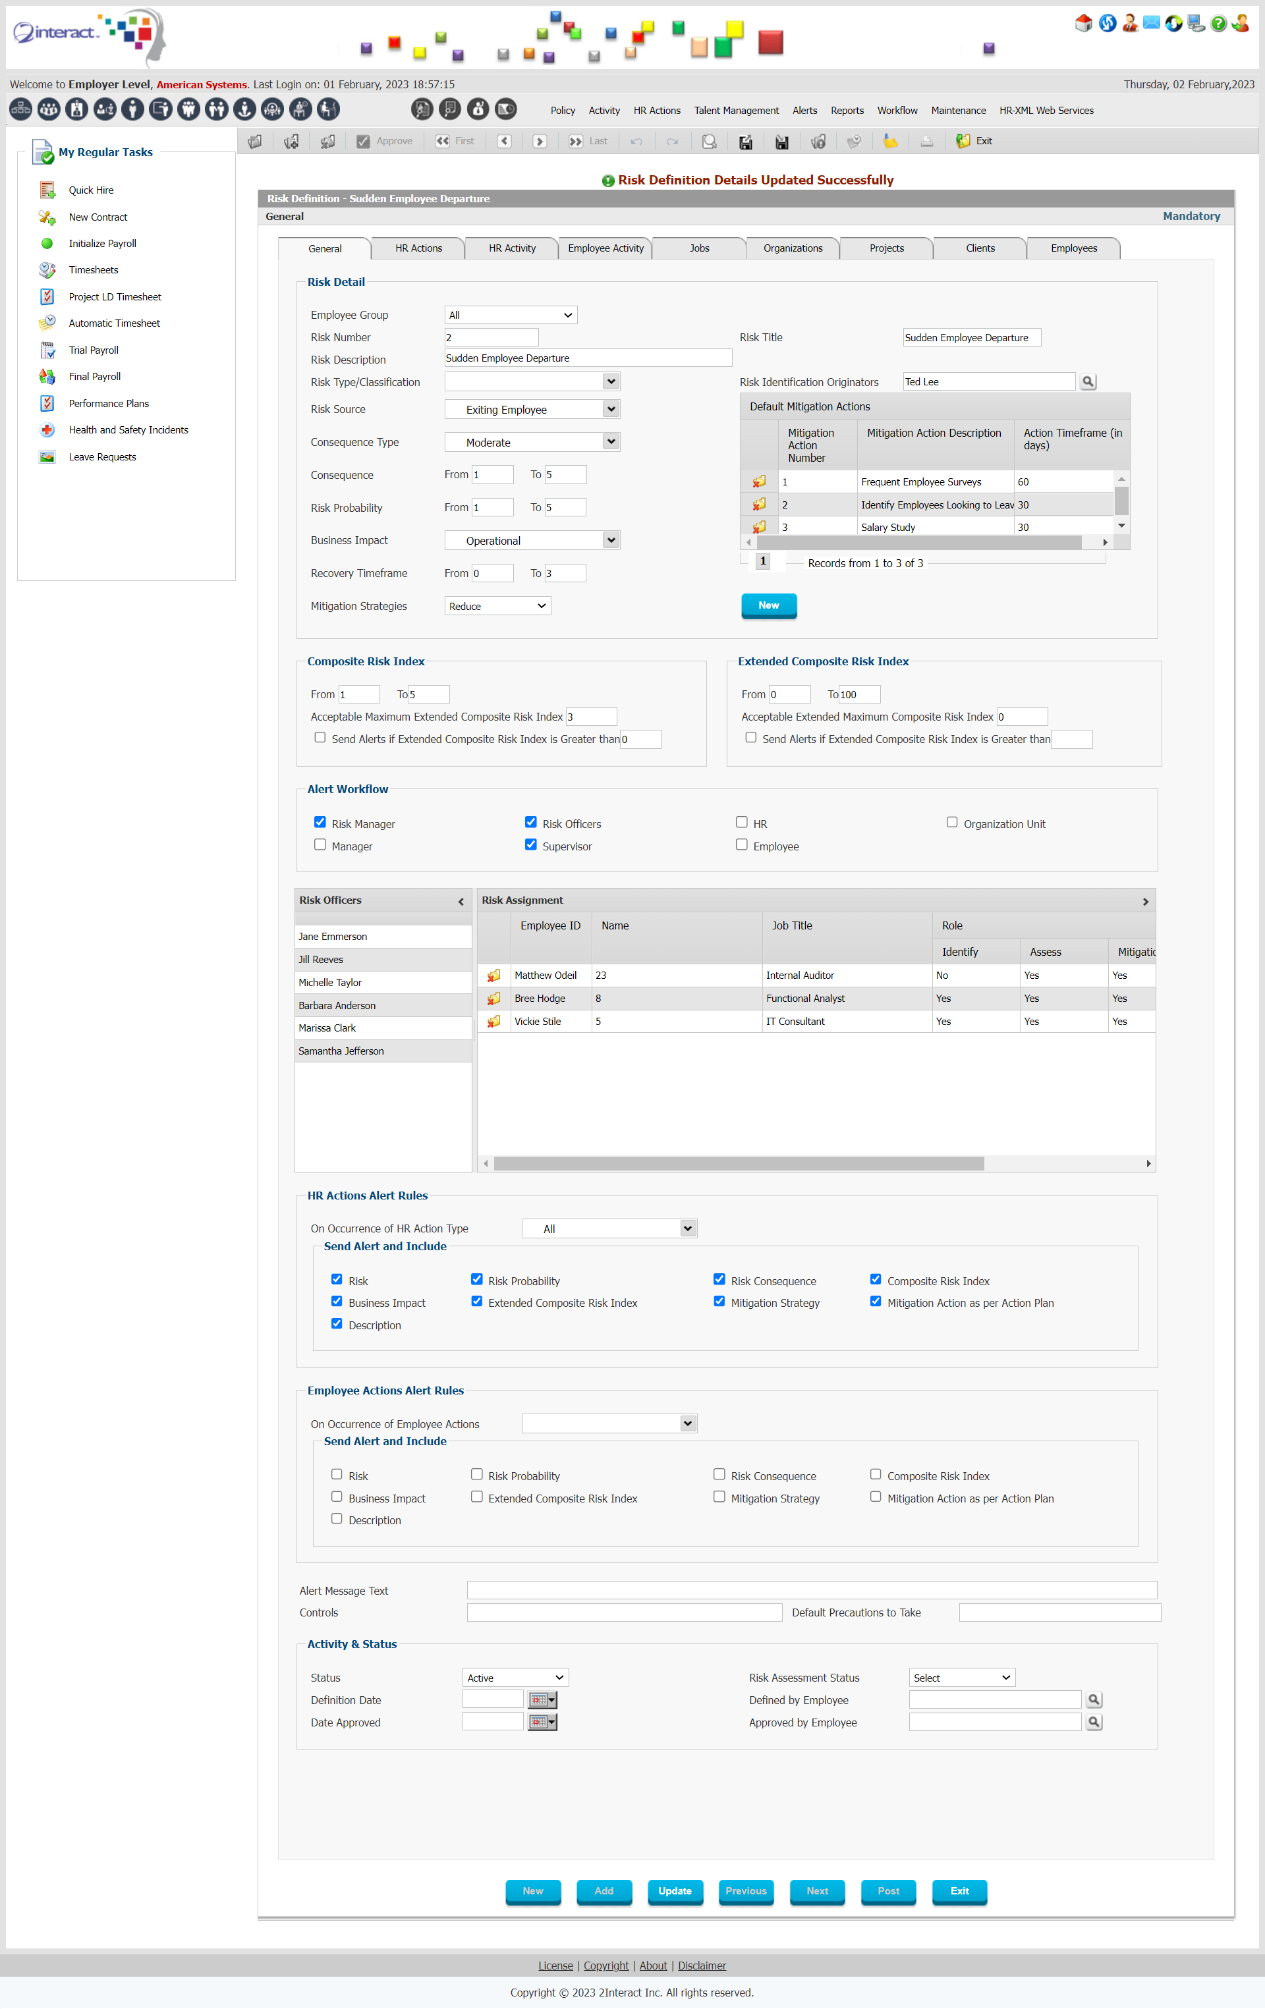 Figure 25: Risk Definition HR Risk Management provides the organization with a very powerful and comprehensive Risk Management application which fully leverages the seamless integration with other Interact HRMS modules, and relies on Self Service, Workflow and Alerts to make sure any reported Risk is properly assessed, tracked, and mitigated. The Risk Management framework consists of classification capabilities to classify Risk as Operational, Financial or Legal. You can define mitigation strategies, including strategies to Avoid, Reduce, Retain or Transfer an identified Risk. Default Alerts can be setup to notify the Risk Manager, HR Dept, Employee Supervisor, Employee Manager, Risk Officers, Organization Unit Head etc. The frequency of Risk Assessment, Risk Mitigation Action Planning and Risk Mitigation Action Planning Reviews can be defined and involved parties can be automatically notified. The assessment can be done tracking Risk Occurrence Probability, Risk Consequence with its own Risk Indicators, Risk Business Impact with its own Business Risk Indicators. Using Self Service and Workflow, Employees can identify Risks in the organization and once these are reported they will be reviewed by Risk Committee members who can find all relevant information regarding these risks on their Interact HRMS Portal. Using the Risk Assessment capabilities, a Composite Risk Index will be determined based on assessed Consequence and Probability and an Extended Composite Risk Index will be calculated which will take into account the Business Impact Level after which a Recovery Timeframe will be determined and ultimately a Risk Mitigation Strategy Plan. This Risk Mitigation Strategy Plan can be reviewed periodically to ensure that it is up to date and relevant for the specific Risk it is supposed to address. Using powerful plotting tools, the application can provide the relevant users with a graphic display of assessed risks showing clearly and immediately those risks which require the most urgent attention. 23. Health & Safety Management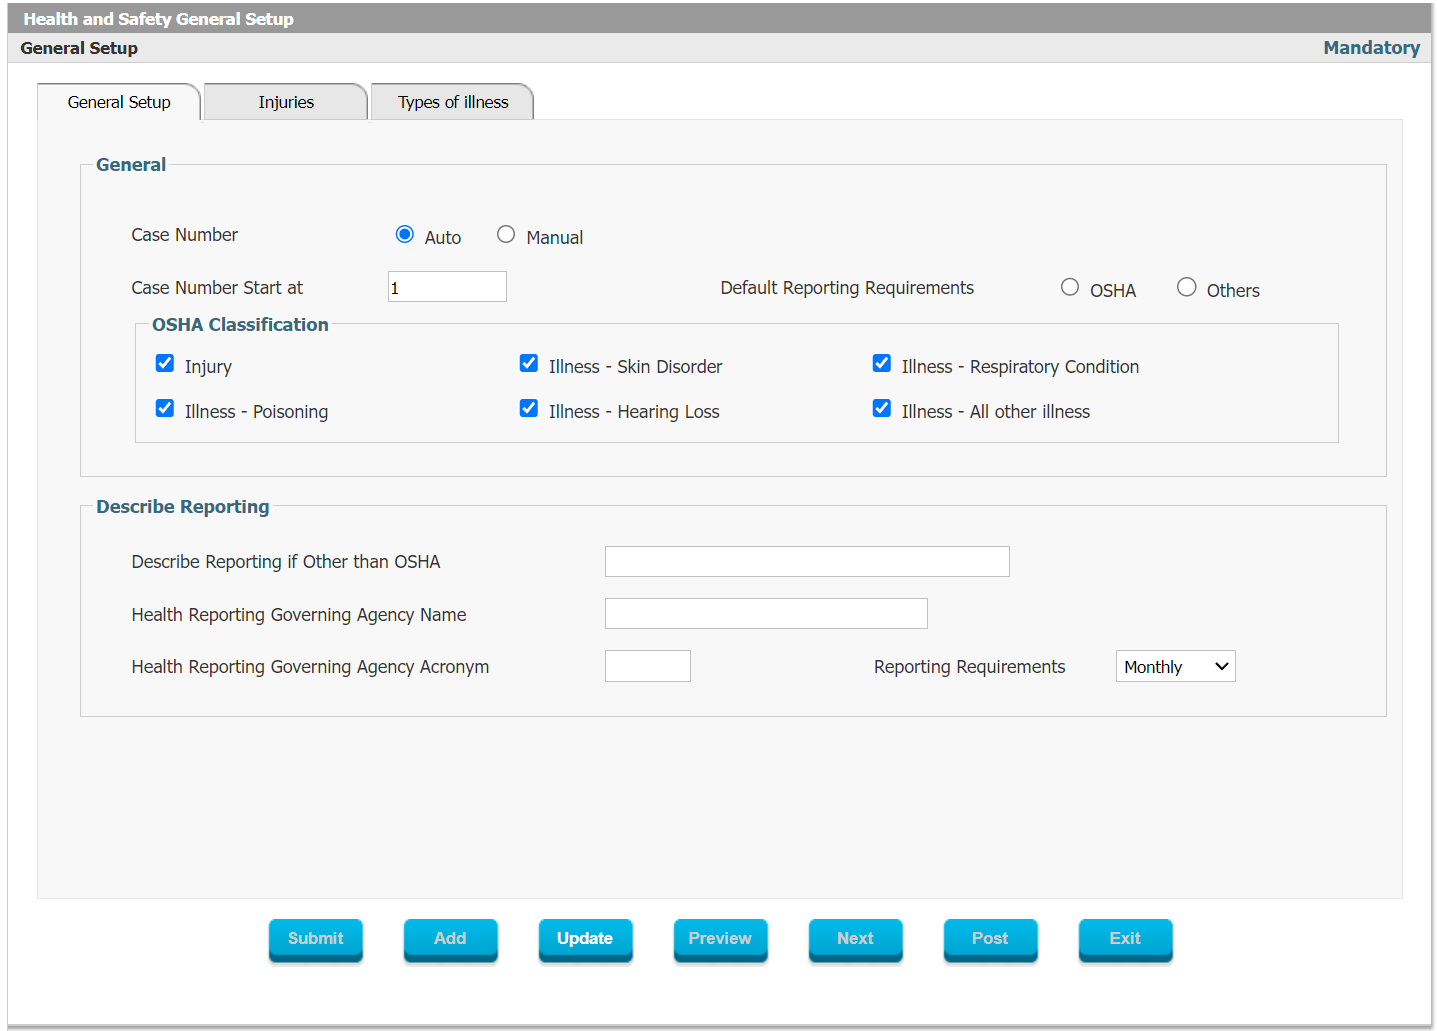 Figure 26: Health and Safety General Setup Interact HRMS allows the user to define the general HSE Classification to be followed when tracking Injuries and Illnesses on the Job. Once this Classification has been chosen, specific Injuries and Types of Illnesses can be defined so they will be part of the standard reporting mechanism required to support HSE management in the Organization. When a work-related Injury or Illness occurs, this can be recorded on the Employee’s record, the record can be reviewed and approved by various authorized individuals, and finally kept in the Employee Electronic Record. The Injury Log will contain information on the specific Accident that occurred which caused the Injury, the Treatment which took place as a result of the Injury and the Details of the circumstances under which the Injury or Illness was sustained. By using specific user-defined codes tor tracking Illnesses and Injuries and relying on standardized terminology, the Employer will be able to easily analyze and create reports to understand trends and underlying causes of Injuries and Illnesses in order to have the data available to act and prevent them from occurring. 24. Letters & Certificates Management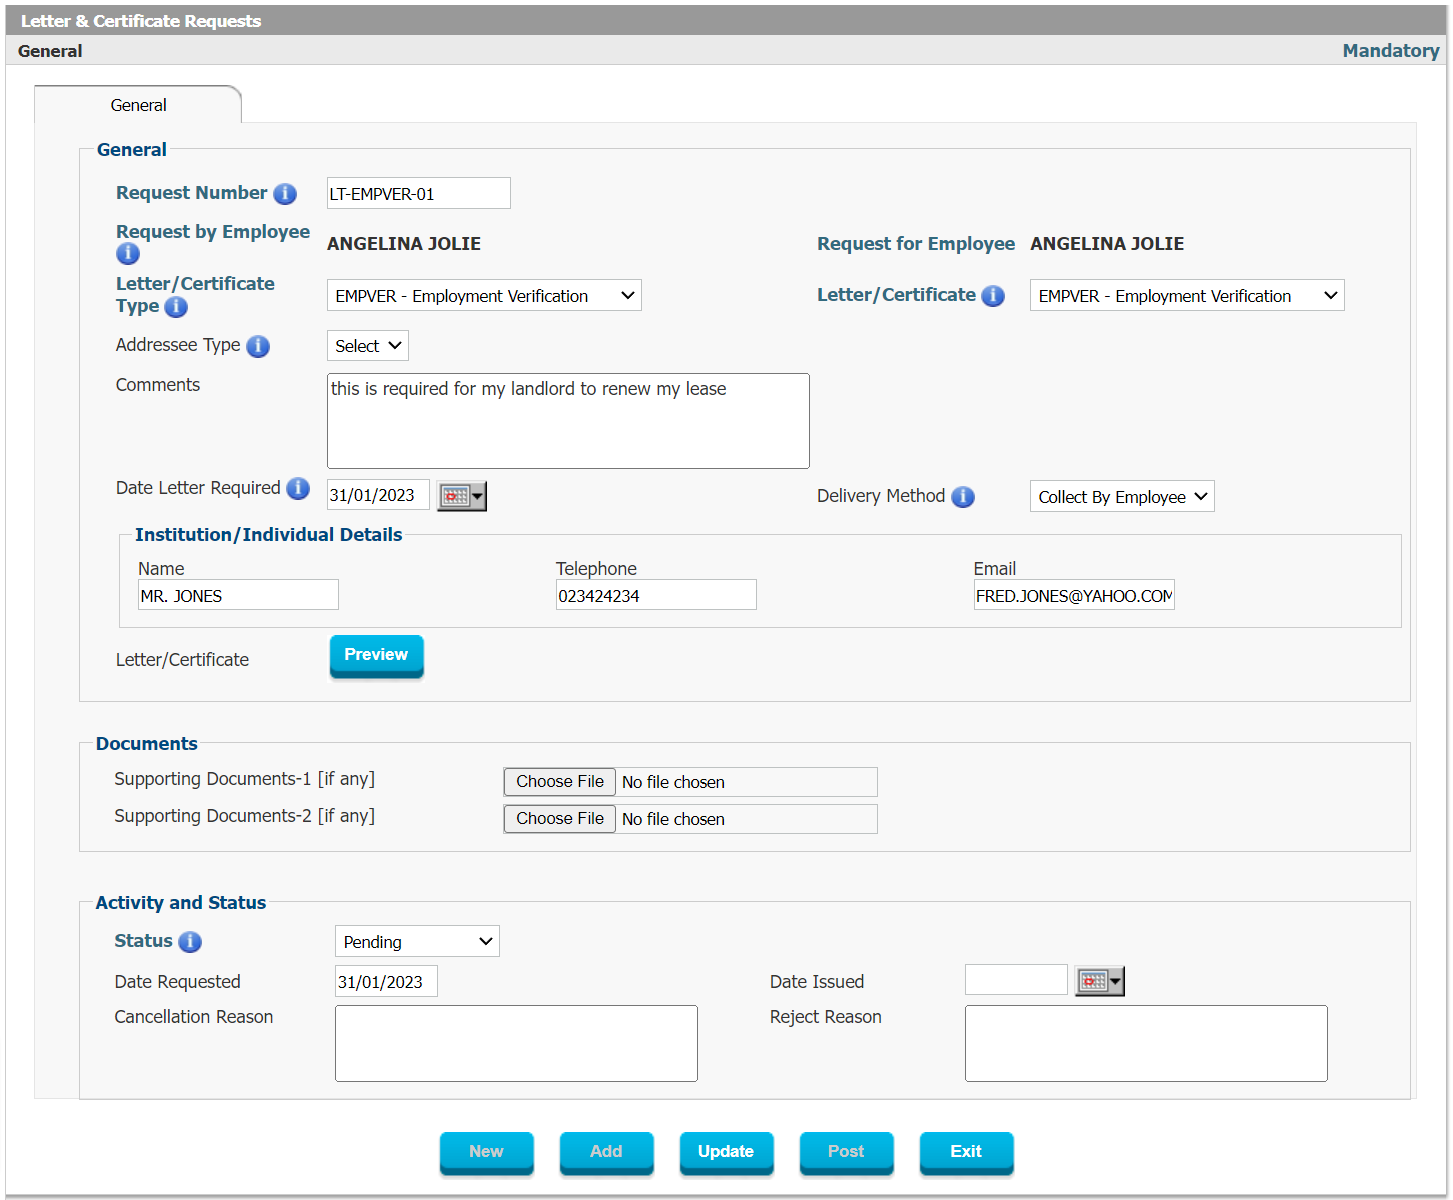 Figure 27: Letter & Certificate Request Letters and Certificates Management lets you define any number and type of Letters and Certificates which can be generated automatically upon request or based on a Workflow event which will trigger the Letter or Certificate. Using the user-defined Templates, the specific data relevant to the Employee will automatically be pulled from the Database and merged with the Template to create the specific Letter or Certificate that is relevant for the Employee. Letters and Certificates can be requested by Employees through Self-Service and approved by Supervisor after which they are generated based on HR approval. 25. Supervisors & Managers Management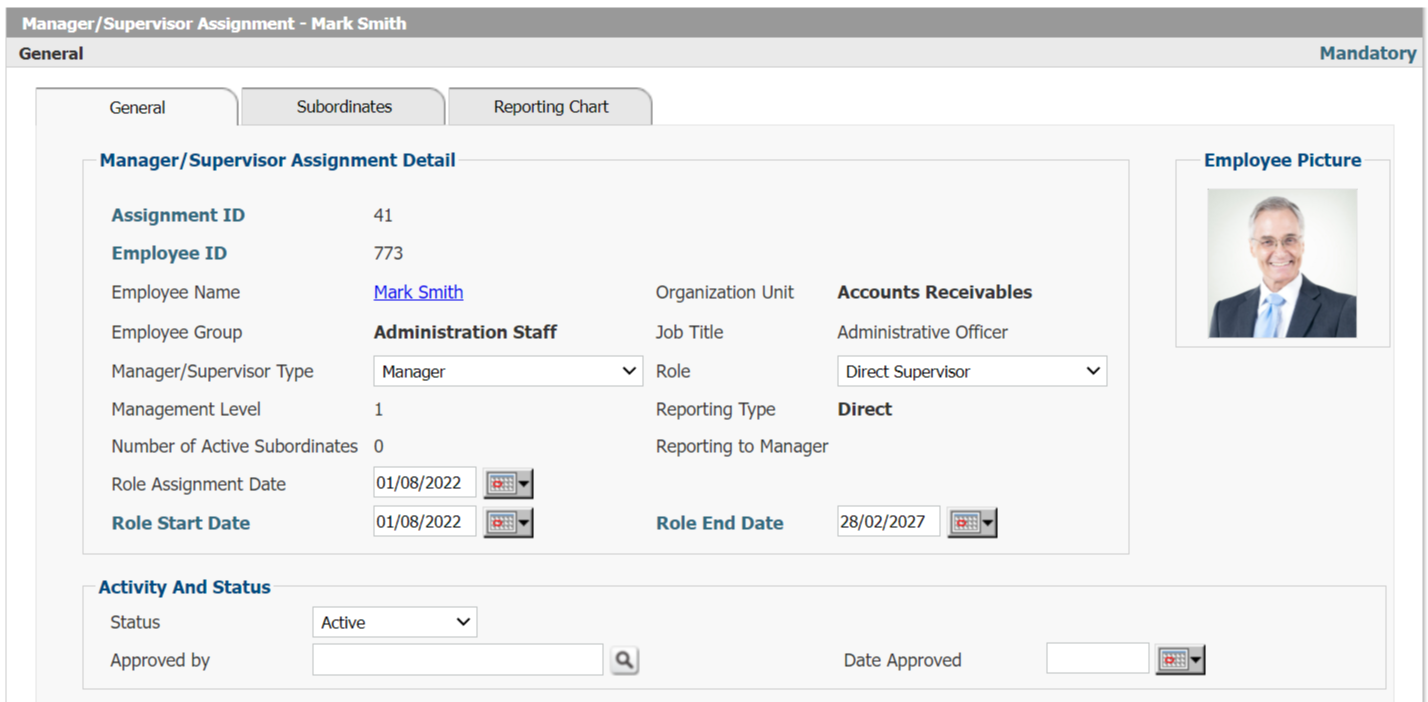 Figure 28: Manager/Supervisor Assignment Since Supervisors and Managers play a very peculiar role in the HRMS system, any changes in Supervisors or Managers need to be managed carefully. This can be done using the Supervisors and Managers modules which lets you define all the reporting relationships, handle termination of Supervisors or Managers and reassigning of their Subordinates, or manage a specific Subordinate Transfer Request. All Workflow processes and reporting related HR processes will automatically be rerouted to the new Supervisor as of the Effective Date of the new Reporting Relationship. 26. Suggestion Box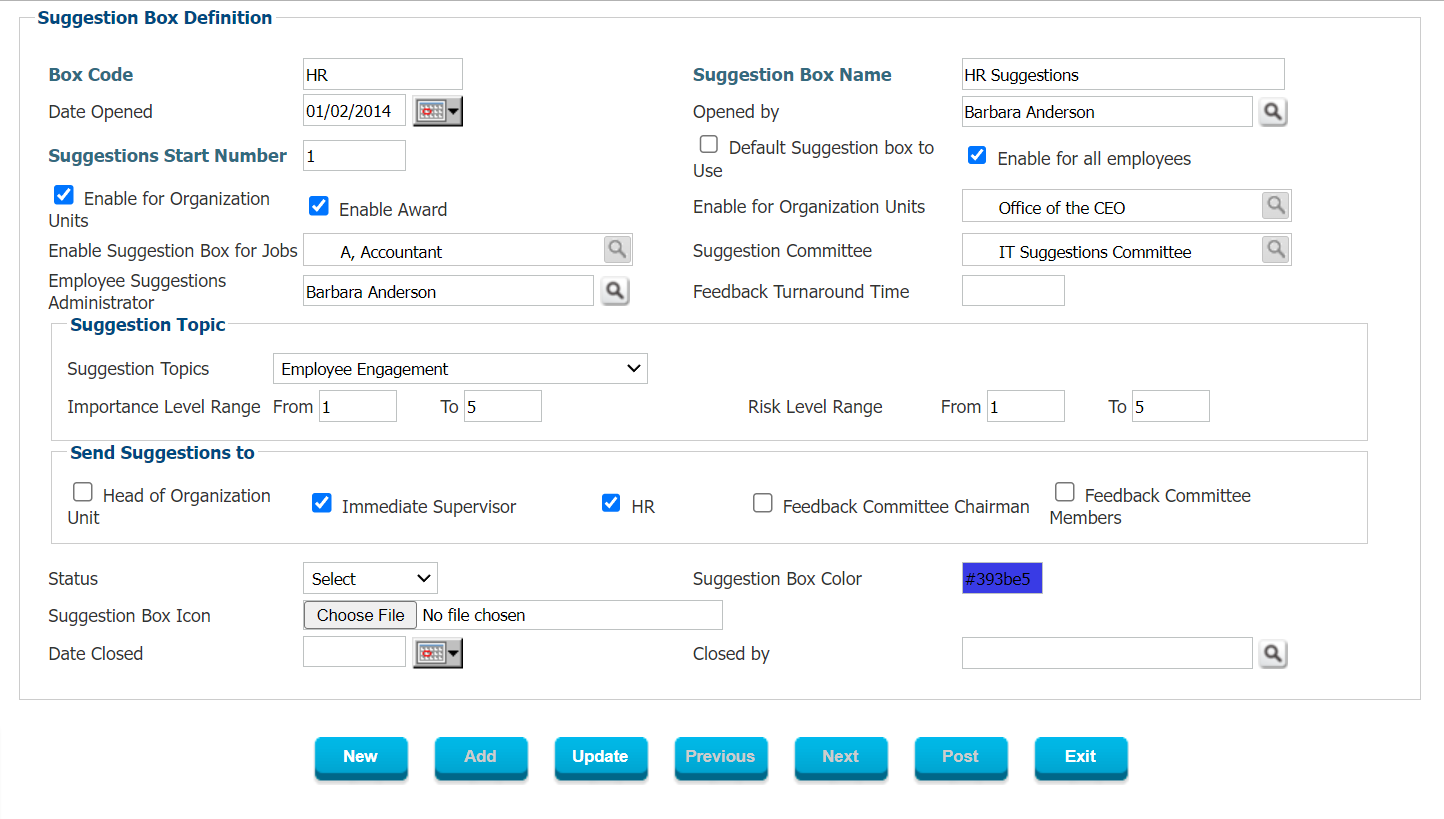 Figure 29: Suggestion Box Definitionv The Suggestion Box module is part of the portal functionalities of Interact HRMS which allow employees to communicate with HR on issues that go beyond core HR matters. Using the Suggestion Box, employees can submit ideas on new Suggestions that may improve the business by simply submitting it through their Self-Service portal. Suggestion Boxes can be setup for various topics/domains so that in a large organization the receipt and processing of these new ideas/suggestions can be structured and organized. Users can be appointed to be responsible for monitoring the submissions which are received in the various Suggestion Boxes and review committees can be setup to review and assess the submissions.Employee suggestions will consist of a brief description of the suggestion with a clear indication of what kind of impact the suggestion will have on the business as well as the timeframe and cost of implementing this particular new idea or suggestion. The system also lets the user indicate who contributed to the idea in case it was a group suggestion. Once a submission has been reviewed and deemed promising then a reward recommendation can be submitted by the evaluators and the final reward, once approved, can be automatically included in the payroll run for this employee. 27. Offboarding Management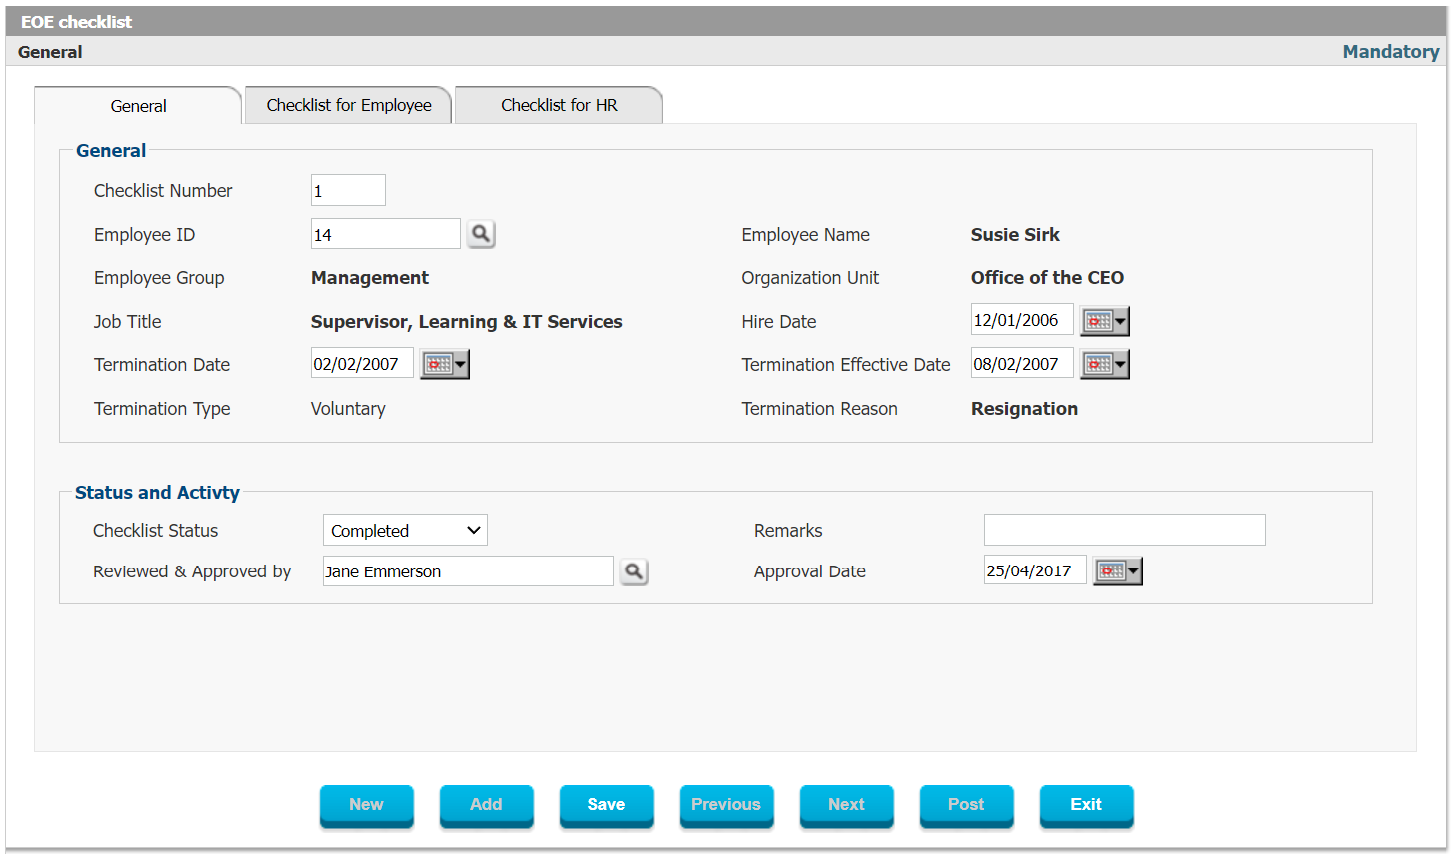 Figure 29: EOE checklist End of Employment Planning or Offboarding, is a comprehensive module to manage the process of ending an Employee or Contractor’s Employment or Contract. End of Employment Planning allows the user to create plans for Employees or Contractors whose Employment/Contract with the Employer will be Ending. In order to make the transition smooth, Employers will be able to create End of Employment Plans which will manage all the End of Employment Activities and allow for the creation of an End of Employment Activity Checklist, the management of Exit Interviews and the scheduling and management of Handover Activities. There are no limits in terms of type and number of End of Employment Activities which can be created as part of the End of Employment Checklist, or the number and types of activities which can be defined to manage the Handover process. Employees and all actors involved in the Exit Interviews, Handover of Project Activities and other End of Employment Activities will be notified through Email Alerts and can view their pending Activities through Self Service. Exit Interviews can be custom-built with specific Questions and Question Groups which can be responded to through Self-Service. 28. Employee Alarm Management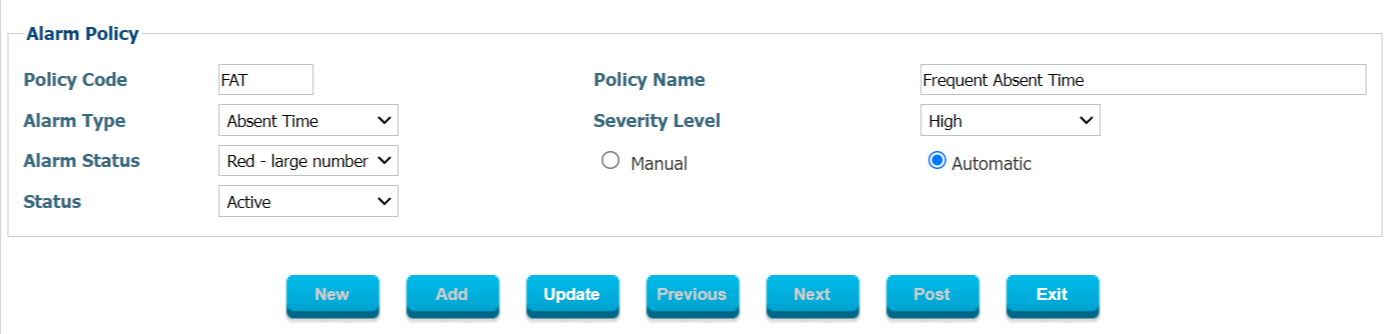 Figure 30: Alarm Policy This application will be used to manage Alarm Status based on a predefined set of alarms using specific rules. Alarms are of three categories:
BENEFITS MANAGEMENT29. Benefit Planning and Enrollment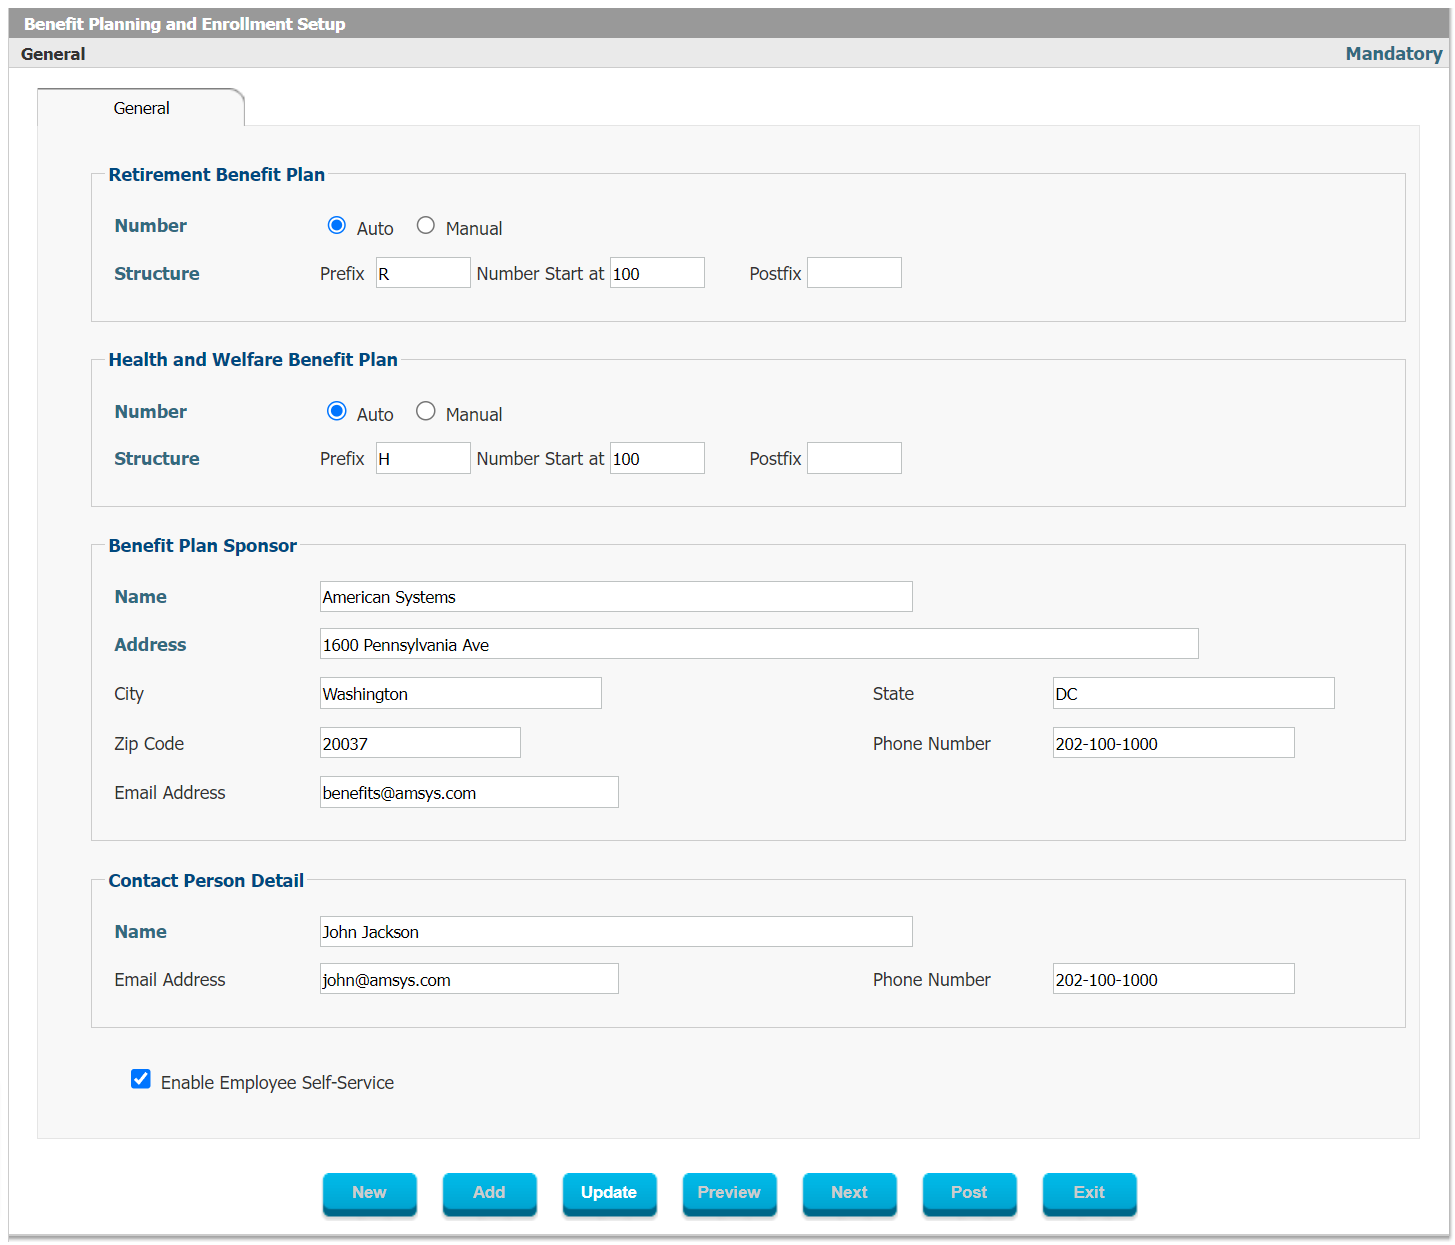 Figure 31: Benefit Planning and Enrollment Setup Benefits Management is designed to support advanced Benefits Administration and allows the user to define unlimited types and numbers of Health and Welfare Benefits as well as Retirement Benefits. Employee eligibility will be determined based on Policy and then Employees will be able to enroll or exit from Benefit Plans through Self-Service.Employees can sign up for Benefits online and enrollment will automatically be communicated to the Benefit Providers. Employee Dependents can be enrolled too. 30. Pension Fund Management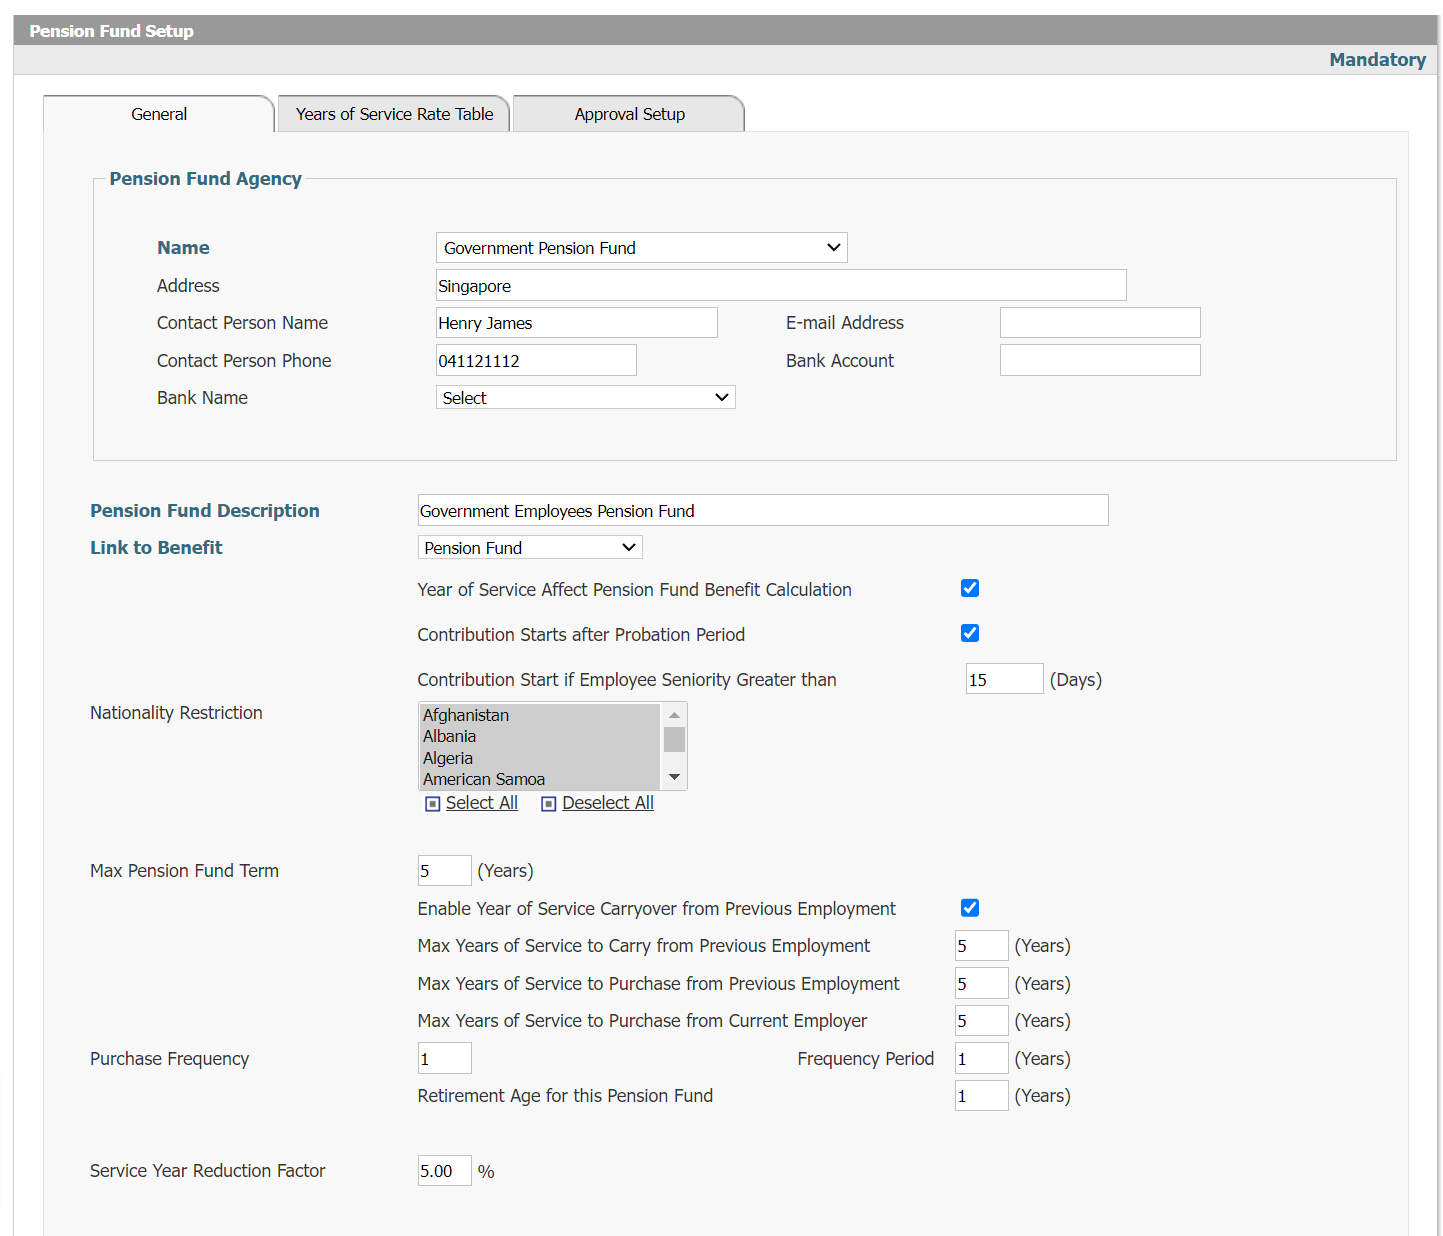 Figure 32: Pension Fund Setup Pension Fund Management allows the user to define specific Terms and Conditions and Eligibility Rules for Pension Funds for countries where Pension Funds are tracked by the Employer and the rules differ based on the Seniority of the Employee.Pension Fund contributions can be deducted automatically through the Payroll module and the balance in the Pension Fund will be tracked by tracking the Pension Fund contributions. 31. Investment Fund Management Figure 33: Investment Funds Participation Request Investment Funds or Savings Plans can be defined and linked to specific Benefits provided by the Employer. Minimum and Maximum Contributions by both Employer and Employee can be defined, as well as Eligibility rules, Payment Rules and who is entitled to Withdraw funds based on which Terms. The application is integrated with Interact’s Payroll. 32. Indemnity Payments Management Figure 34: Indemnity Payment Request Depending on the regulations and practices in a country, Indemnity Payments can be made to employees to cover medical expenses, legal expenses, employment termination (severance pay) or to indemnify the employee against other expenses. Interact’s Indemnity Payment module enables the user to define the rules and conditions under which indemnity can be paid to employees, ensure that proper provisions are accrued for and booked in the GL. The amount of indemnity can be a discretionary flat amount or can be calculated using a formula or expression whereby the indemnity is linked to a particular benefit policy using specific parameters (i.e. last annual salary, number of years of seniority, etc). Once the specific event occurs which triggers the payment of indemnity, Interact will allow the user to include the indemnity in the correct payroll run and generate the relevant bank files and GL entries to process the payment of the indemnity. Powerful reports and audit trails will be available for verification once the appropriate users have approved the payment of the indemnity. COMPENSATION AND PAYROLL33. Compensation Management Figure 35: Earnings Definition  Figure 35: Earnings Definition Compensation Management allows the user to define any number of Allowances, Earnings, Bonuses, Commissions, Benefits, Deductions, Expenses and even Piecework rules which will be used when defining the Compensation Plan of Employees. By creating a logical link with specific Employee Groups, the user will enable the system to automate assigning of specific Policies based on Employee Groups and/or Organization Units. As a result, new Employees will automatically inherit the correct policies and HR/Payroll staff will only need to worry about exceptions when they setup new Employees for Payroll.Powerful calculation methods, including an Expression Builder can be used, in addition to Rate Tables and standard features to define the calculation of specific Compensation Policies to achieve maximum automation. Compensation management is integrated with the Grades and Steps defined under Position Budgeting or can be used in conjunction with the Hay Job Evaluation which will define the correct salary range for Employees based on the their Hay Job Evaluation outcome. 34. Payroll Management
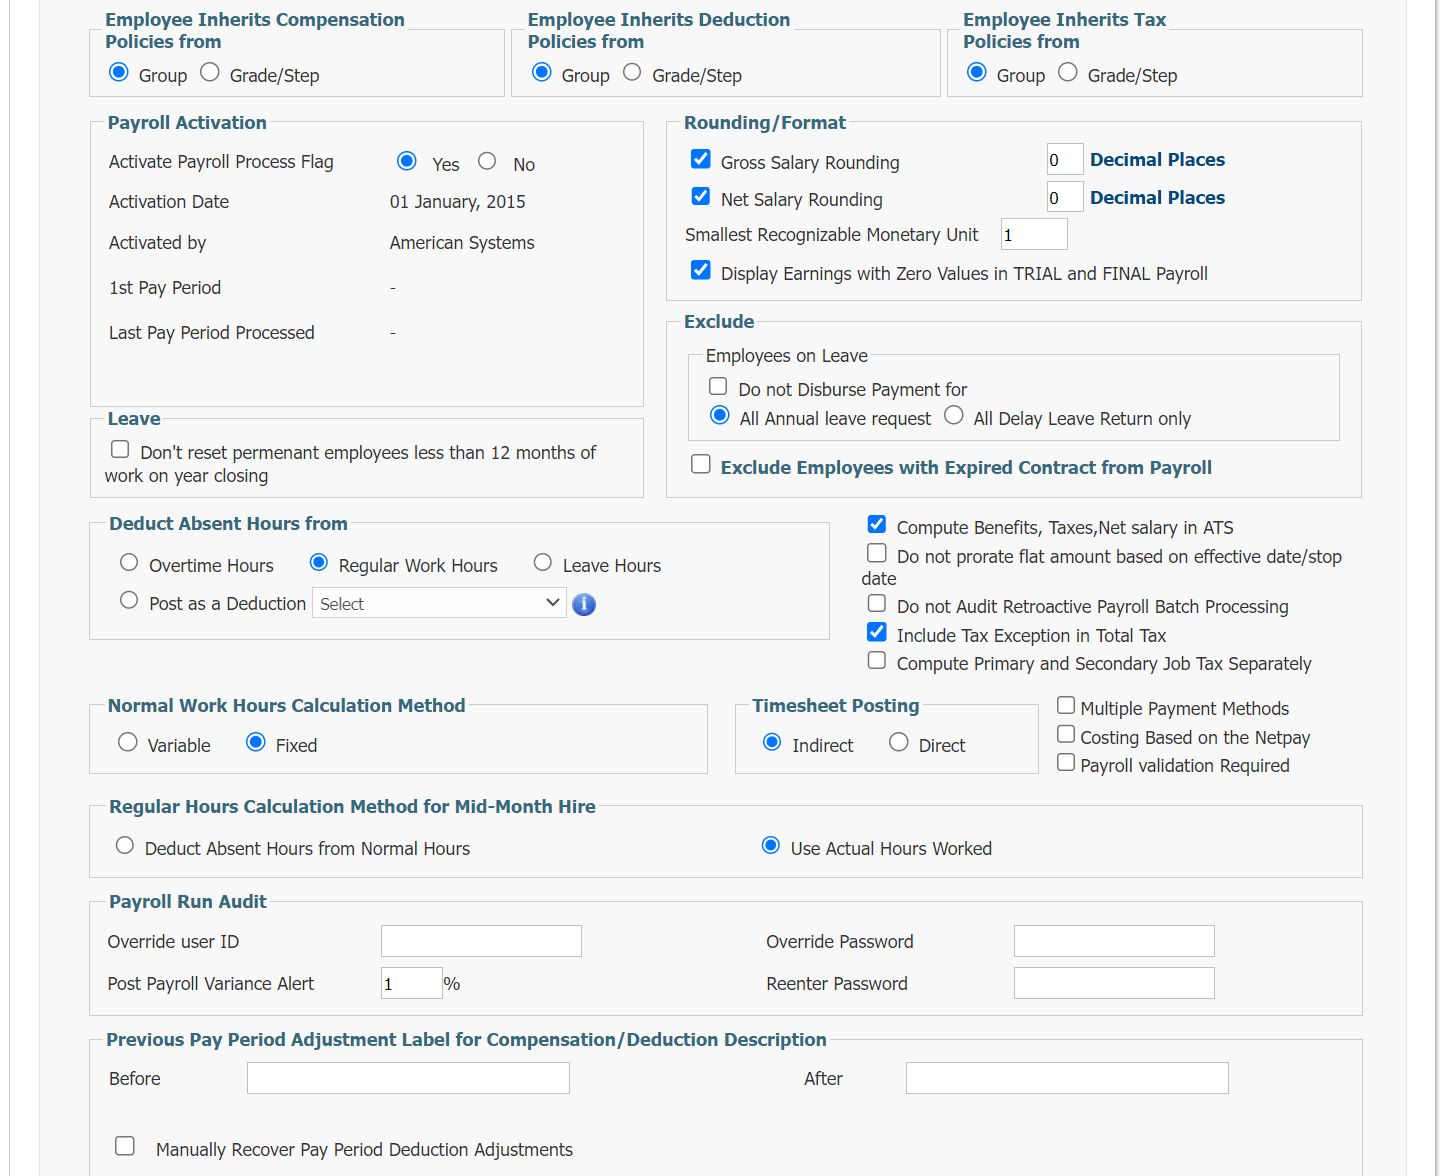 Figure 36: Payroll Parameter Setup Interact HRMS offers a comprehensive global payroll and compensation management which is totally integrated with the employee contract management module and with the time and leave tracking module. It supports both timesheet and deliverable based earnings as well as unlimited Earnings, Benefits, Allowances, Commissions, Bonuses, Deductions, and Taxes. It supports payroll best practices including Auto Time Sheet generation, default time sheet, unlimited trial payroll runs, and final payroll run with a comprehensive audit trail. Interact Payroll supports paycheck printing as well as electronic payroll bank deposits, cash cards, and cash payments. More than 250 payroll reports and payroll related audit reports are included with multicurrency support. In the Payroll Parameter Setup, the User can define the key parameters which will drive the payroll process. This relates to the standard Payroll Calendar, Standard Minimum and Maximum Work Days / Hours per Pay Period, Work Hours per Day, the Rounding Method, Rules about deducting Absent Hours and much more. It also allows the user to define the default Pay Period either for the whole company or for a particular Employee Group in the company. Pay Periods include Weekly, Semi-Montly, Biweekly, Monthly and Quarterly. Alternatively, entirely unique Pay Periods can also be defined. The Payroll Process can be fully flexible for the user to choose the steps and their order or can be highly structured and defined whereby a default Payroll Officer can be defined for each step in the Payroll process and the system can alert the appropriate user of the next required step in the payroll process. The most basic Payroll Process in Interact HRMS consists of 6 steps: (1) Payroll initialization Additional steps can be added, specific Workflow processes can be associated with each step, incase there are separate reviews or approvals needed and alerts can be triggered if specific steps are not completed within the defined timeframe or if specific conditions occur which require an alert by email, SMS, or through the Interact MyPage. Each Payroll Policy type (Earning, Allowance, Deduction, Commission, Bonus, Expense, Tax), will have its own unique definition forms, allowing for unique behavior in the payroll. This includes some of the following; Earnings:
– Support many different types of Overtime and Shift Differential Calculations, including Day OT Rate, Evening OT Rate, Night OT Rate, Rest Day/Weekend OT Rate Allowances
– Allowance Calculation can be based on a User Defined Rate Table
– Allowance can be linked with Fund Source, Cost Item, Budget Item, Liability Item, Expense Item, Payable, Bank/Asset)
– Accrual Provision Annual Cost can be Set at the Employee Level for Each Allowance Deductions
– Deductions can be Taxable at Federal, State and City Level Commissions
– Labor Cost Distribution can be done by Cost Center, Project or Contract Bonuses
– Bonuses can be Taxable at Federal, State and City Level
– Bonuses can be Performance Dependent with a Specific Performance Goal Type Benefits Expenses Taxes
– Taxes can be Deferred
– Unlimited Number of Tax Authorities can be Defined with Address, Contact Person and Phone
General Features:
35. Payroll Wizard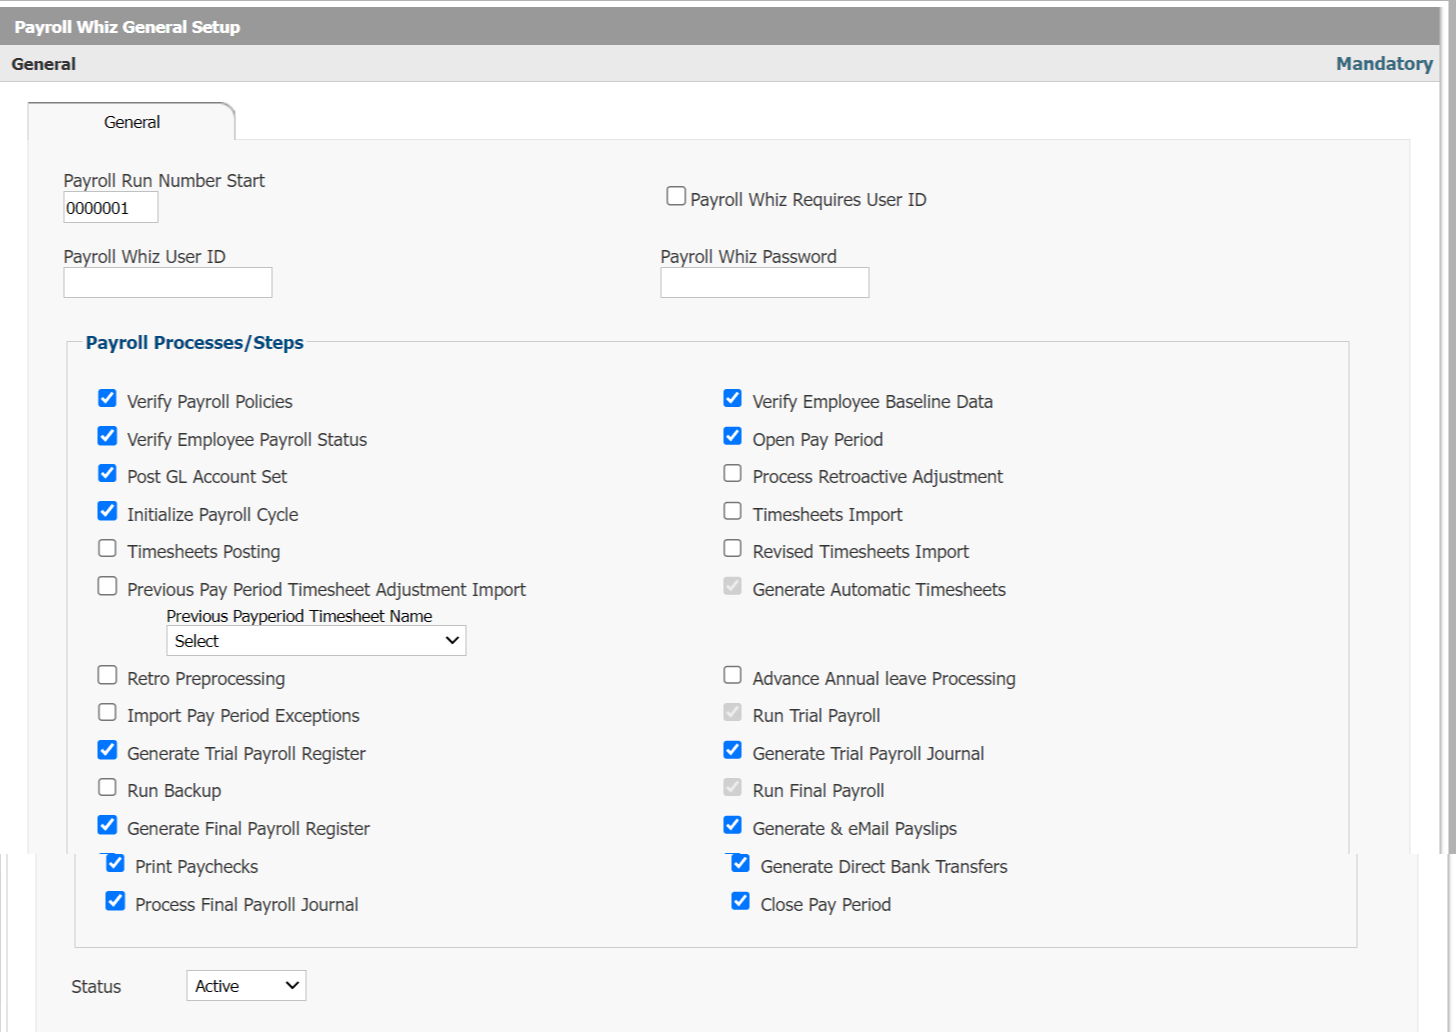 Figure 37: Payroll Whiz General Setup The Payroll Wizard is a powerful module designed to make running the payroll even easier in Interact HRMS. All key steps in the Payroll process can be included or excluded depending on the specific needs and processes of the organization’s payroll. Once configured, the user will no longer have to remember which steps to follow or which menu to choose and most importantly will not be able to forget a critical step which may impact the outcome of the payroll. Using the Payroll Wizard, Interact HRMS will automatically inform the user which step needs to be conducted next, and will launch the appropriate screens for each step at the click of the “Next” button every time the current step is completed. This module is particularly useful for organizations who have very clear and standardized payroll processes and large data volumes or different pay cycles which may cause an inexperienced payroll officer to forget one step and e.g. forget to load overtime data or other exceptions before. Through the use of the Payroll Wizard, it will be easier for you to introduce new users to the system and your payroll process will be driven by the system’s rules and less prone to human error. 36. Expenses ManagementExpense Management enables the Employer to define different Expense Policies and define the types of Expenses which can be claimed by specific Employee Groups or Employees in specific Jobs. Employees can then enter their expenses online through Employee Self-Service and these expenses can be identified as billable/non-billable and can be in multiple currencies. Approved Expenses will automatically be sent to Payroll for reimbursement. Employees can also attach copies of the Expense Receipt as part of their reimbursement request. 37. Labor Costing and Billing Management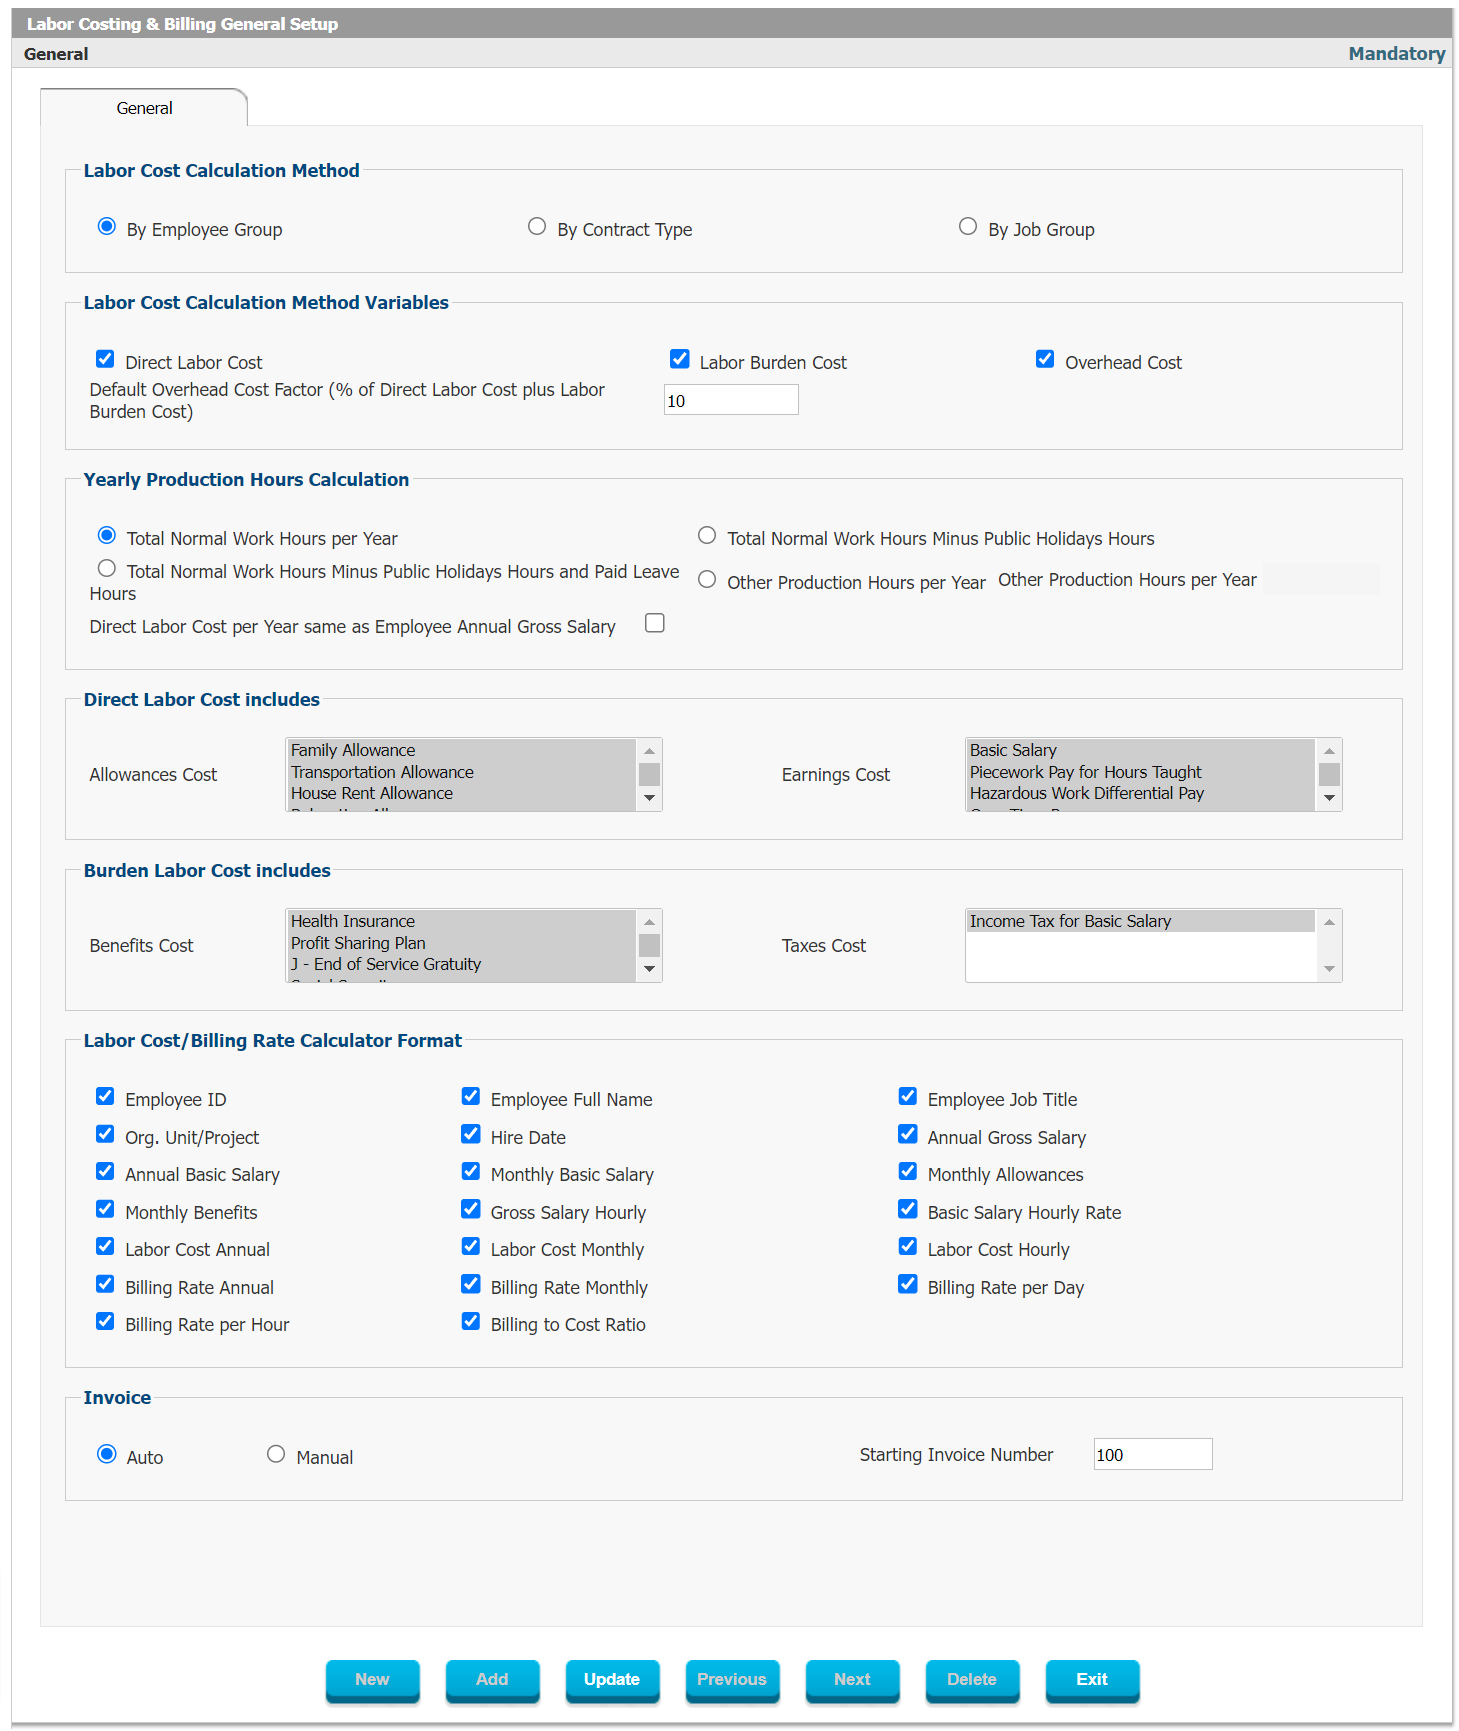 Figure 39: Labor Costing & Billing General Setup Labor Costing and Billing is an advanced Costing module which allows you to accurately calculate the Direct Labor Cost, Labor Burden Cost and Overheads and define the Yearly Production Hours to be able to calculate an accurate Fully Loaded Cost or Labor Burden Cost per Hour of a specific Employee, thereby enabling the Company to be able to more precisely determine the correct Billing Rate required to make a specific Employee profitable to the Company. 38. Garnishment Management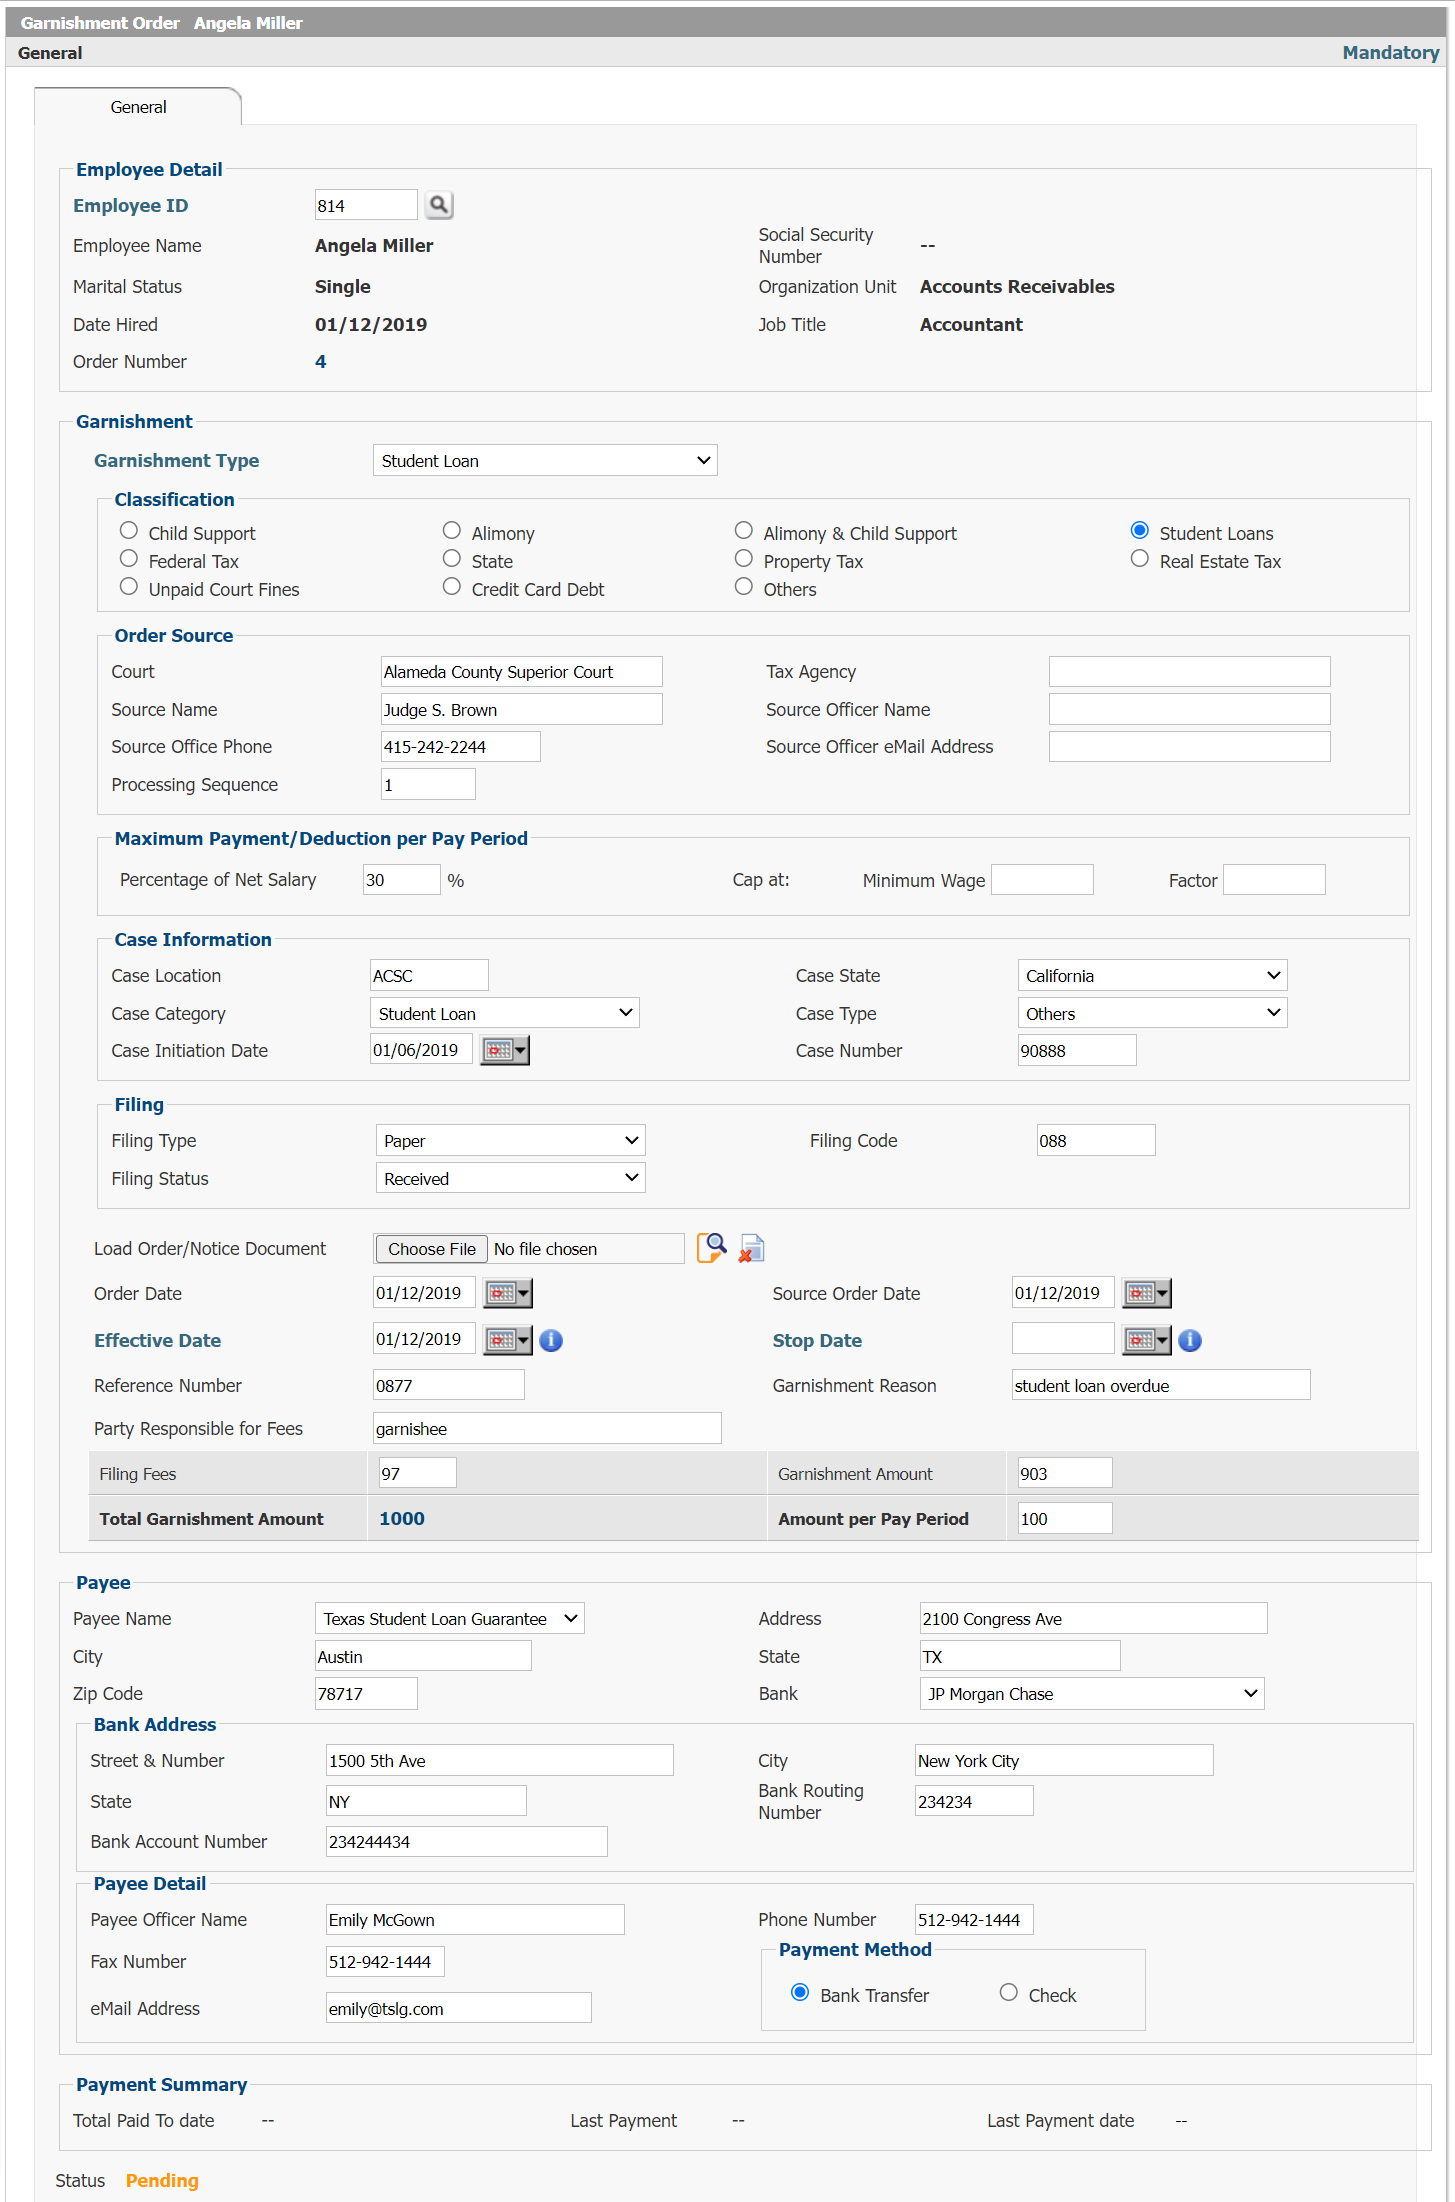 Figure 40: Garnishment Order Garnishment Management is a powerful solution to assist the user in managing Garnishments. Define any type and class of Garnishment, track Court Orders or Tax Agency Orders in favor of Spouse, Tax Agency or Creditor. Attach scanned documents and track all relevant information regarding a Garnishment Order. Garnishment Management is seamlessly integrated with Payroll management and therefore ensures that the correct amounts are withheld from an Employee’s Wages or Salary up to the legal limit that is applicable by Federal and State Law. Alerts will be sent to the appropriate Employee, Supervisor, or HR/Payroll user when an amount has been withheld or a specific target amount has been reached. Built-in Workflow ensures that correct Approvals are obtained for the Payroll Officer to process the Garnishments. Any number and type of Payees can be created and payments of withheld amounts will be processed automatically by Check or Electronic Payment. 39. Loan Management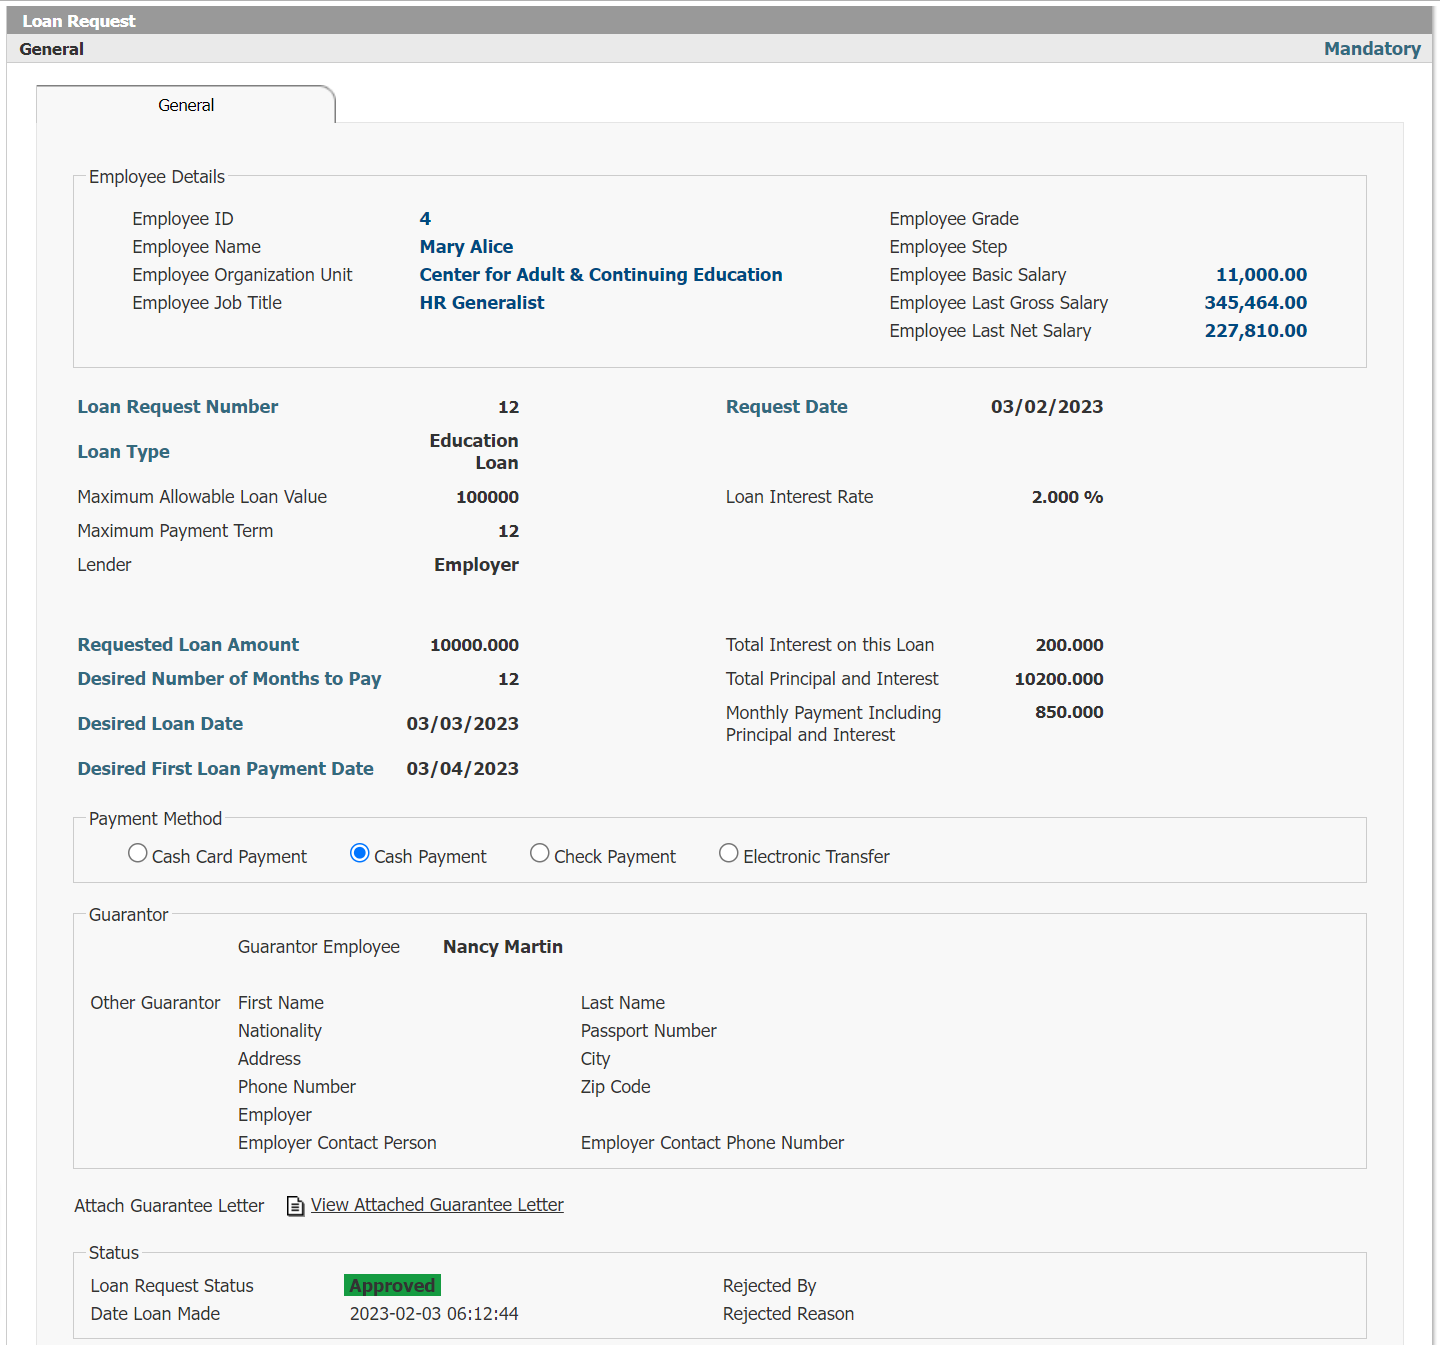 Figure 41: Loan Request Employee Loan Management enables the Company to manage and track the administration of Loans provided to Employees in case the Employer provides the Loan directly or even if the Loan is provided by a Third Party. The application enables you to define different Loan Types and Loan Agreements, with and without Collateral, with and without Guarantors, at specific interest rates, which can be issued to Employees. Many parameters can be used to define the Loan Amount which an Employee is eligible for based on the Employee’s Salary, Seniority, and/or other factors. Employees can request Loans through Self-Service and can request an adjustment or early Repayment or restructuring of the Loan and can monitor their Loan Balance online. Loan Installments can be automatically deducted through the Payroll. 40. Commission Management
41. Third Party Payables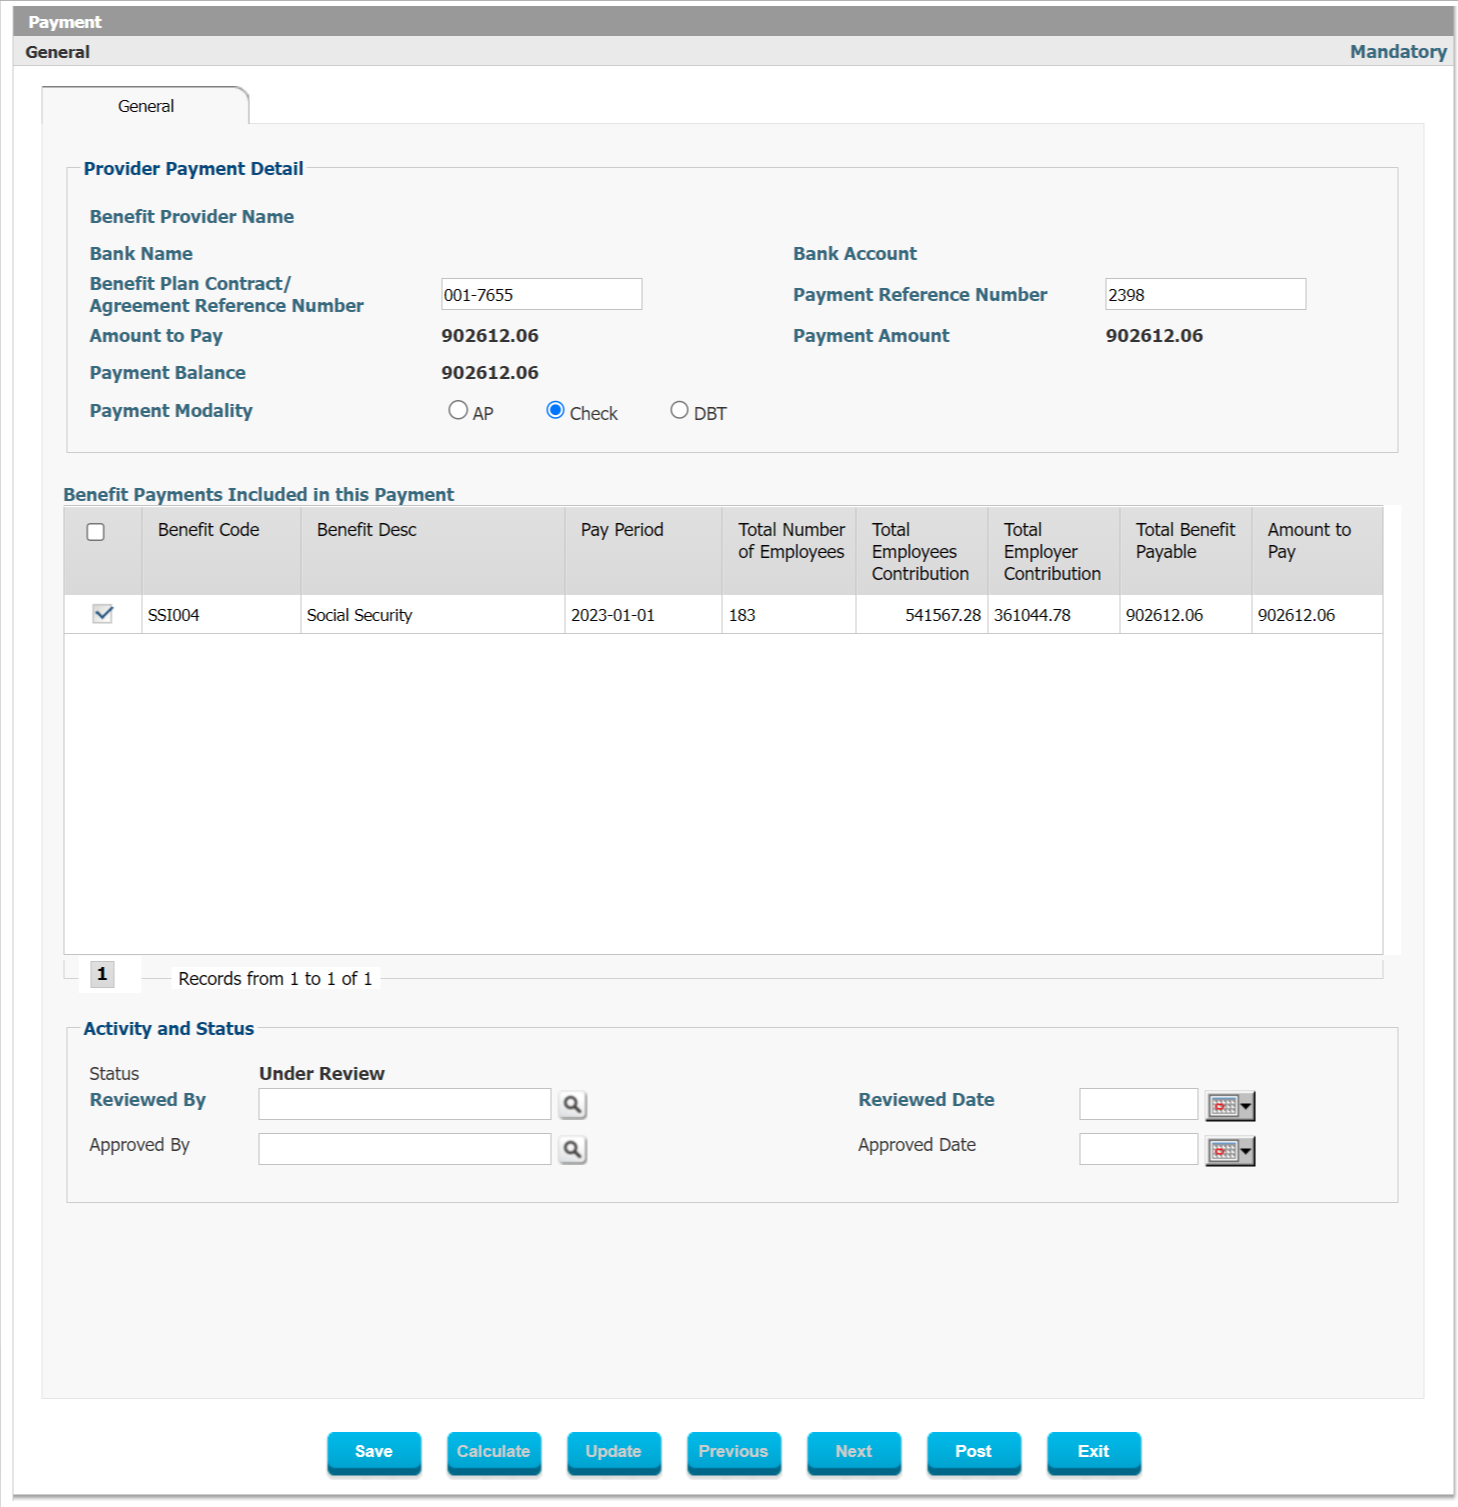 Figure 43: Payment For those amounts which are withheld from employee’s paychecks and need to ultimately be paid to third parties, Interact HRMS offers a Third Party Payables module which allow the user to configure how these payments should be handled. Payments can be posted to the organizations Accounts Payable module or the payment can be processed directly with an ACH bank file that will be produced by the Third Party Payables module and the correct JV entries that will need to go to your General Ledger module. Payments can be processed as electronic payments in the appropriate format for your bank to be able to process, or through check printing, depending on the need. A payment advice can be produced indicating the relevant information required by the third party to identify the specific make up of the consolidated payment amount. LEAVE, TIME AND ATTENDANCE MANAGEMENT42. PTO/Leave Management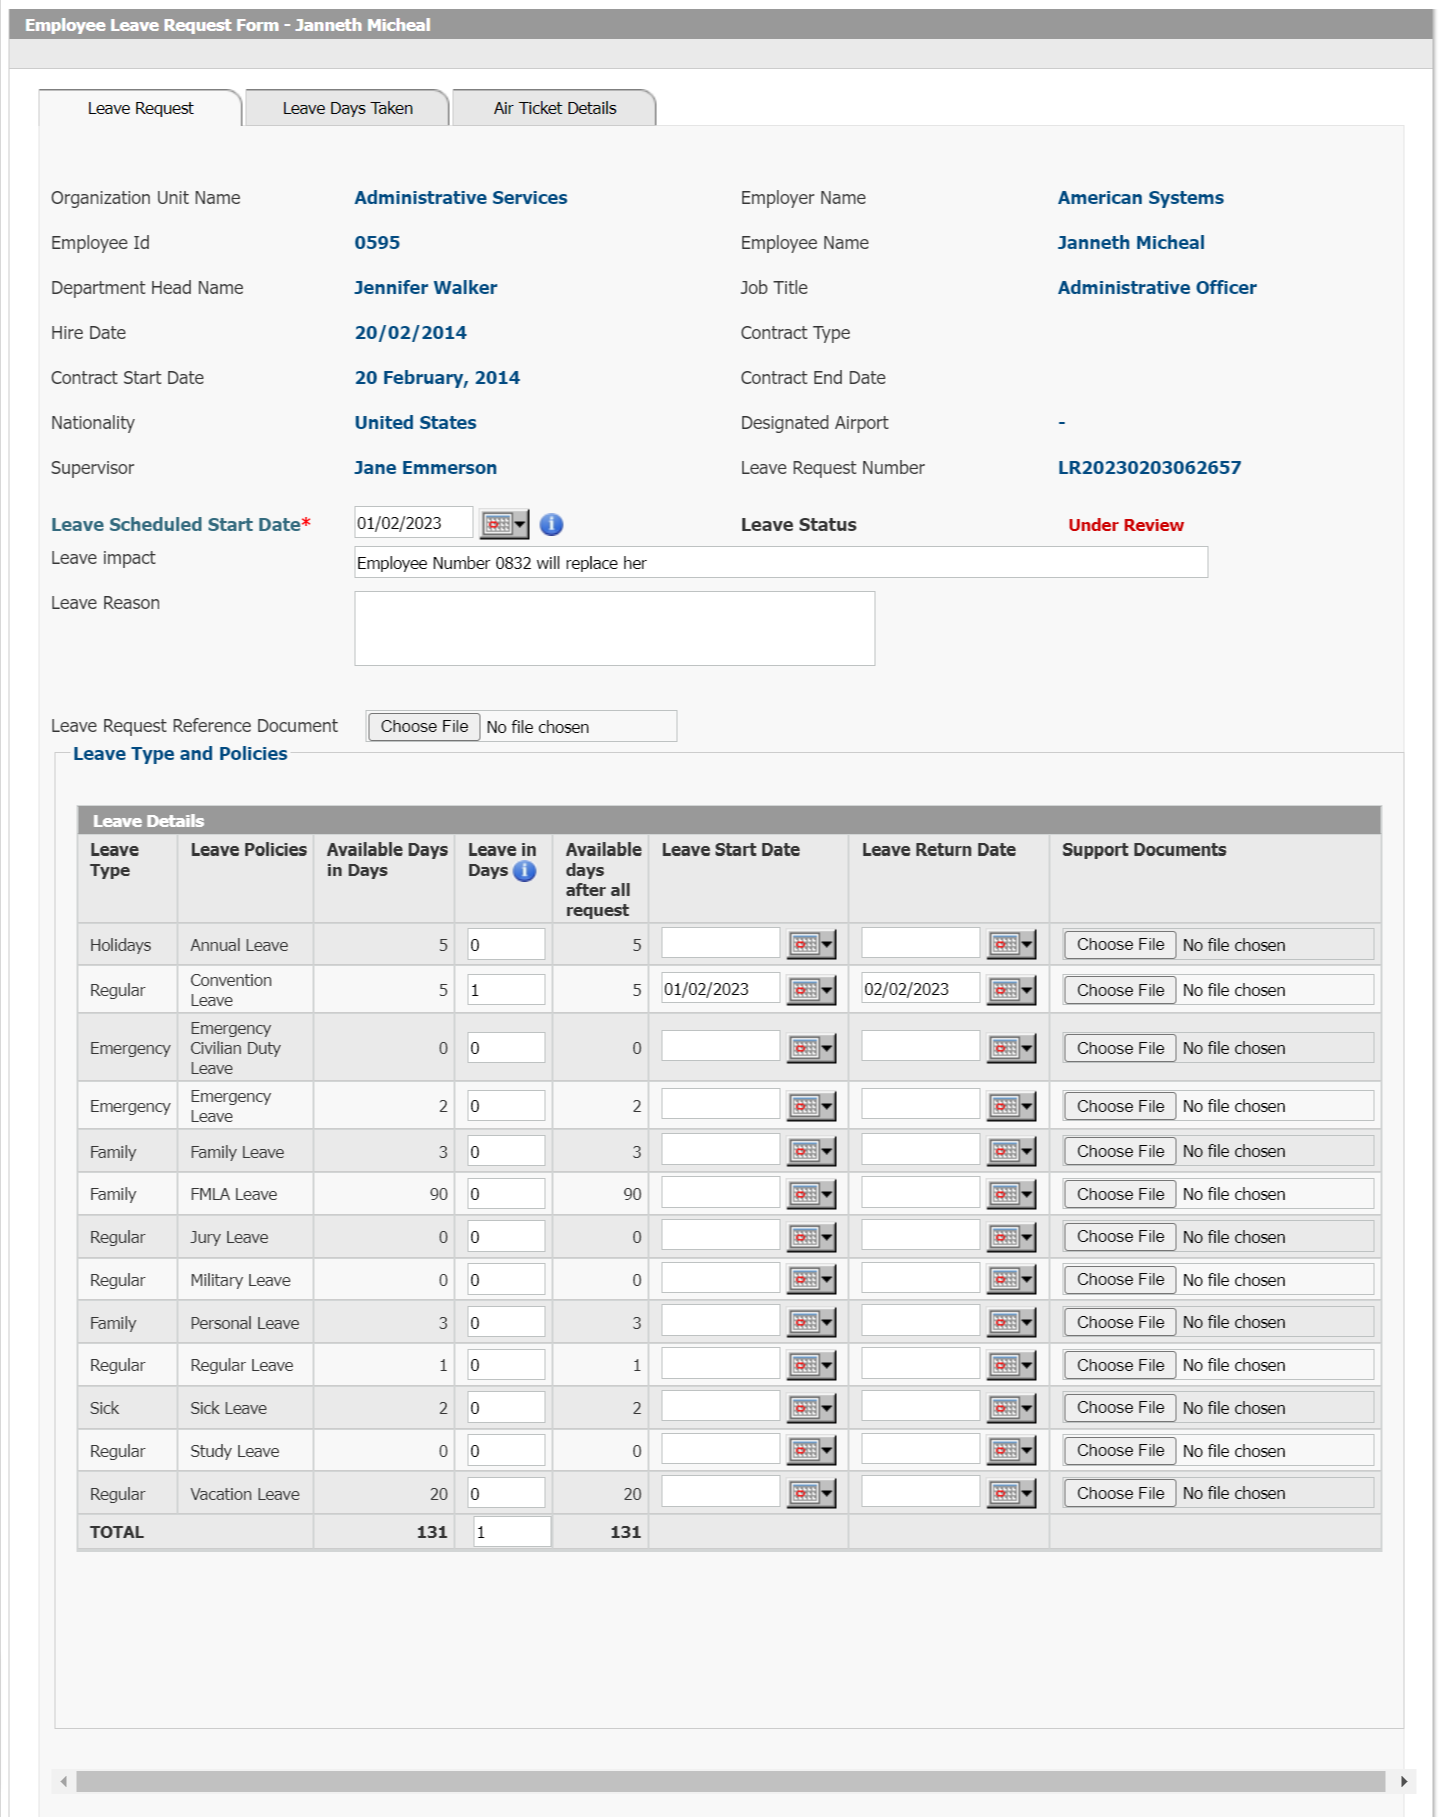 Figure 44: Leave Request Leave Management allows the user to create any number of Leave Policies, link them to Leave Earnings, and associate them with specific Employee Groups. Leave/PTO/Vacation time can then be requested through Employee Self-Service and approved by Supervisors. Leave Accrual rules can be defined as per the Employer’s needs. Employees will be able to see the balance of Leave available to them on their Self Service page. Leave policies can be setup with different Approval workflows depending on the type of Leave.Interact HRMS Leave Management is very powerful in defining Leave policies as the same application is used in more than 30 countries around the world and can support Leave rules in any country as a result. Leave Management is seamlessly integrated with Payroll Management & Employee Self Service but also with Resources Scheduling and Time Clock management so that clock transactions on an approved leave day are highlighted as exceptions and missing transactions on approved leave days are ignored since the Employee is not expected to Clock In or Out on that day. General Features:
43. Leave Planner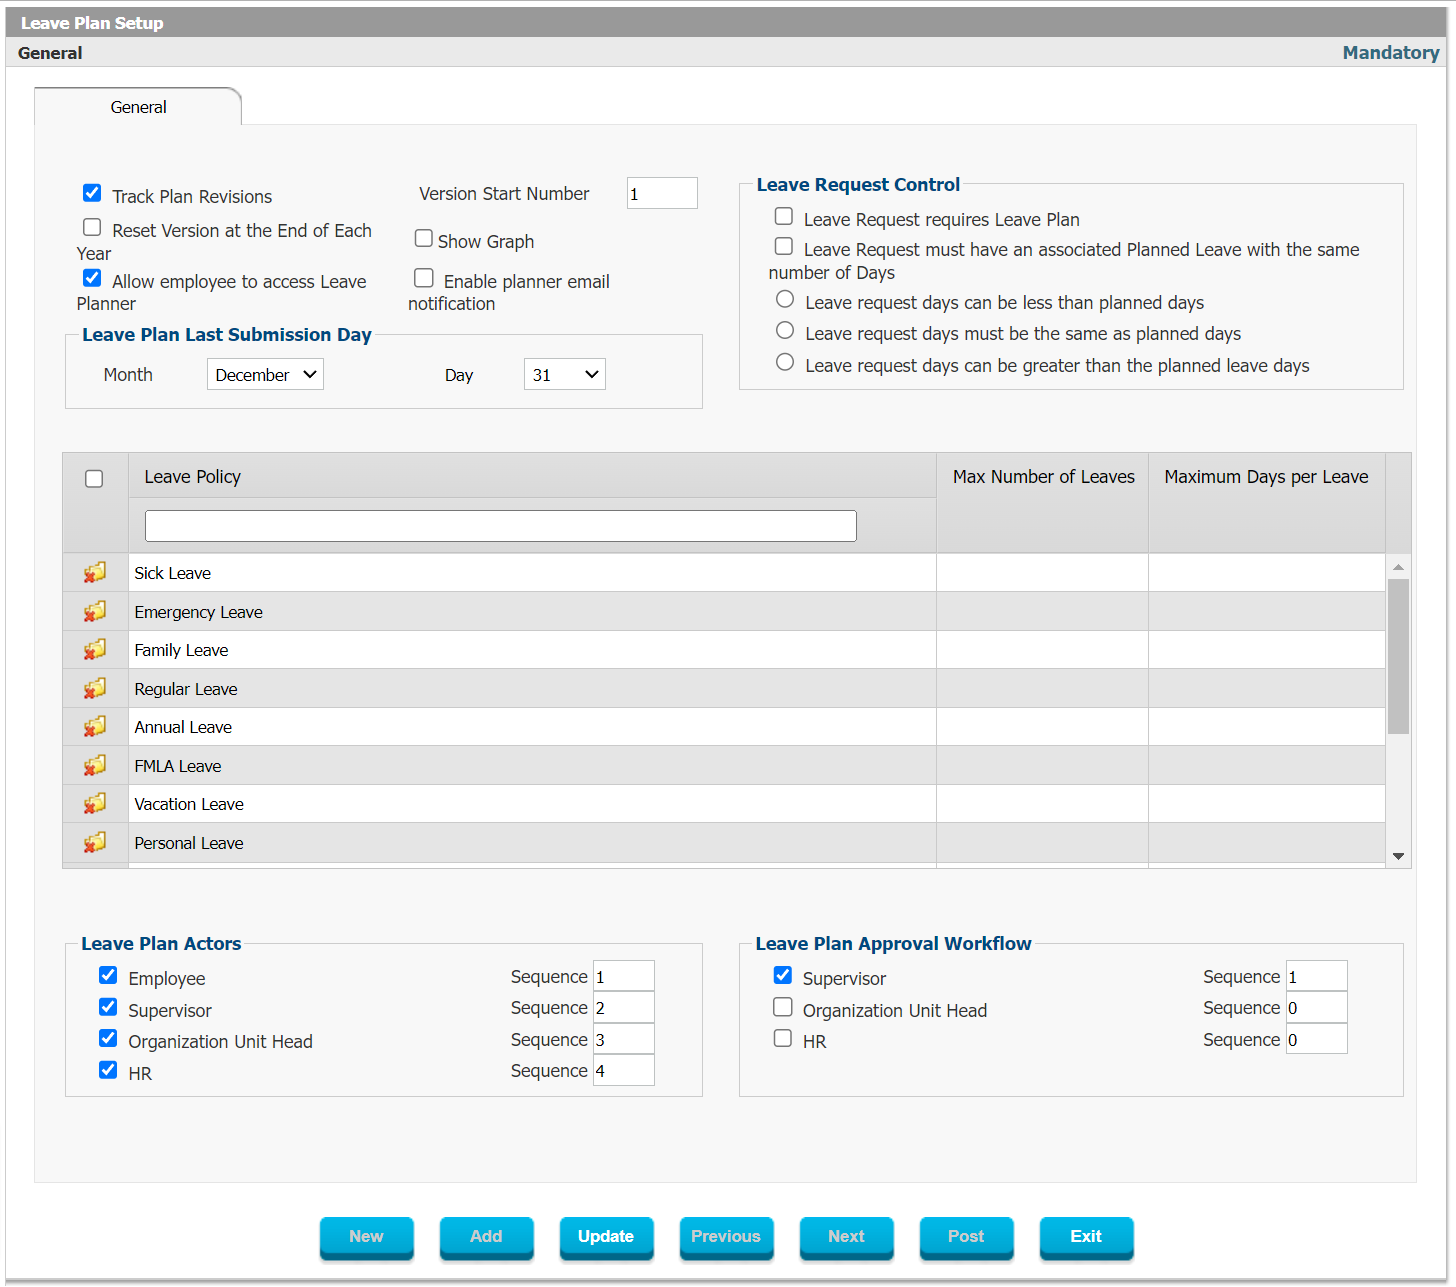 Figure 45: Leave Plan Setup Using the Leave Planner, Employees can see who else is going on leave in their team or department so that there is no confusion or overlapping vacations during critical times or seasonal periods. The Supervisor can also consult the leave planner and check who else is going on leave during the period when the employee is requesting leave, and thereby avoid approving overlapping leave requests in case this will have a negative impact on the business.The user can determine which leave policies should be reflected in the leave planner, which code to use for them and which color to use when displaying the approved leaves in the chart. 44. Time & Attendance Management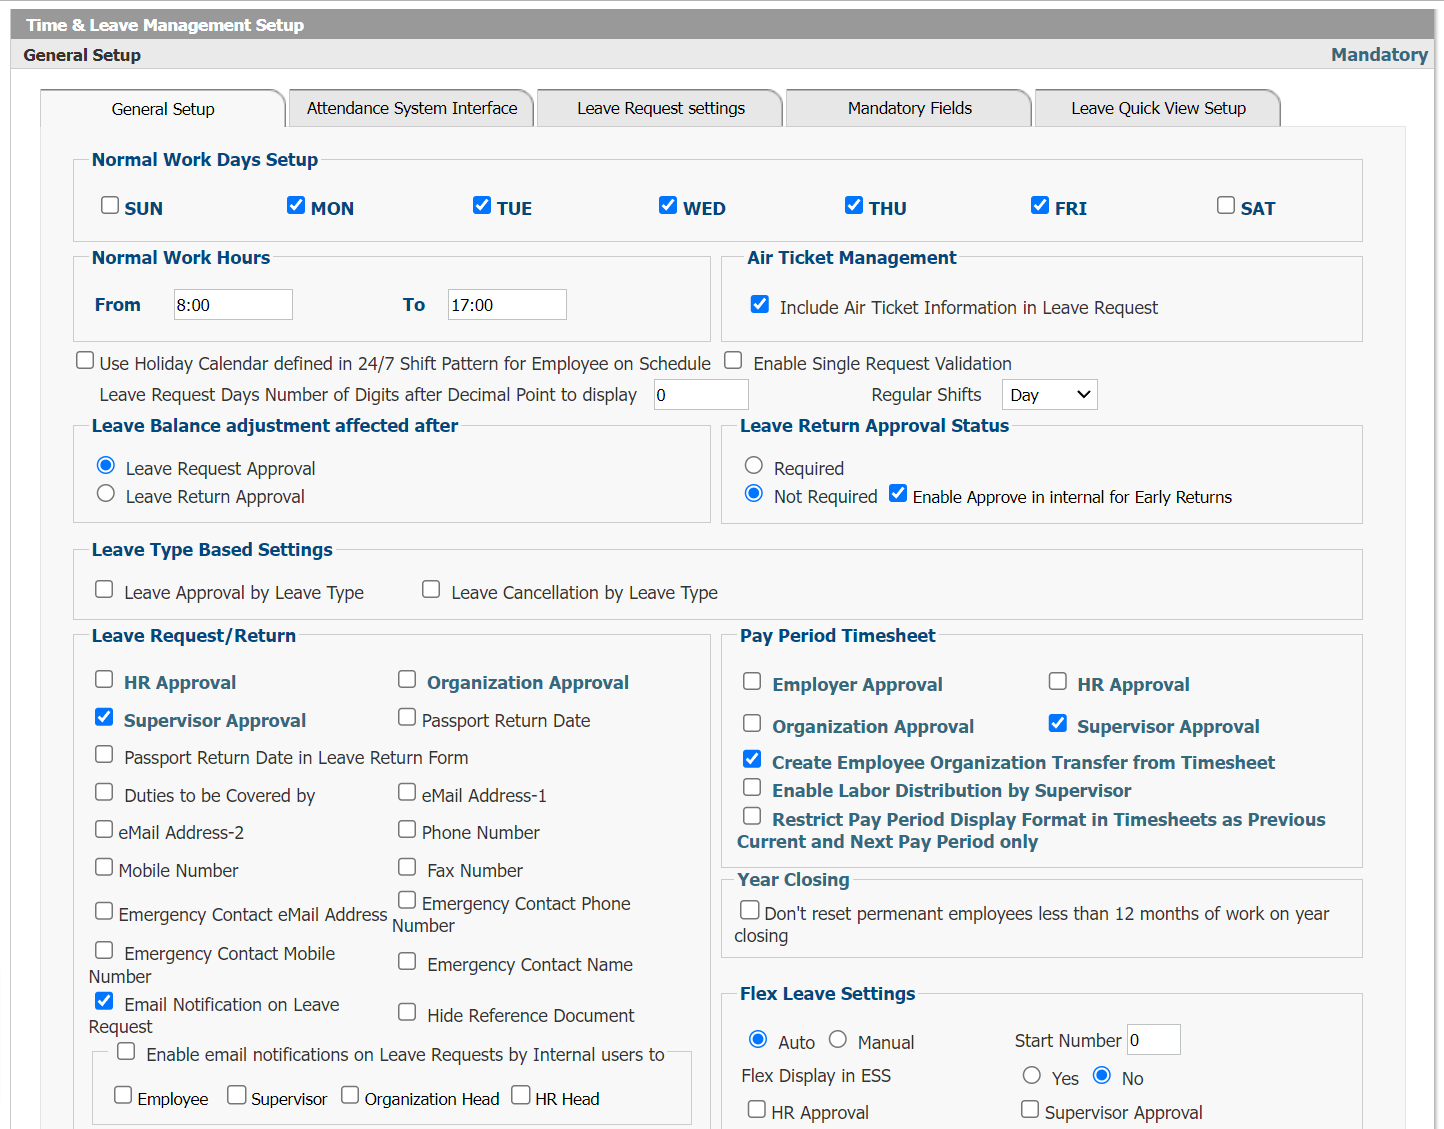 Figure 46: Time & Leave Management Setup The Time Management module which allows for creating Work Calendars, defining of standard Work Hours and Overtime Rules. Timesheets can be uploaded from XLS or CSV formats, entered manually, imported from Biometric Devices or loaded from Third Party applications. There are countless types of standard Timesheets which can be used and many of these Time Sheets can be configured as per the Client’s needs. The module supports many different types of Timesheets, including the following:
Timesheets can be reviewed, edited and approved by Supervisors and Organization Unit (Project or Department Heads) before they are posted to the Payroll. Timesheets can also be viewed by Employees. Any changes/edits made to the Timesheet will be recorded in an audit trail showing who made which change and when the change was made. Timesheets with Clock In and Clock Out transactions are displayed with any exceptions highlighted in color (missing transactions, duplicate transactions, transactions on lave or rest days etc.). Supervisors and Managers will be able to login through their Self Service and approve or review various Timesheet formats and see even underlying raw data for clock in and clock out transactions, these include the following:
Using powerful workflow, the application manages the review and approval of all timesheets from the initial point of loading through the entire approval process and final posting to the payroll. In order to handle erroneous transactions discovered in already processed previous timesheets, handle any changes identified after completion of the payroll or changes which take place after the payroll cutoff date, the application has a number of powerful additional timesheet tools which automate the detail work of comparing and correcting previous timesheets and calculating the impact of these corrections on the current pay period:
45. Biometric Clock & Access Control Figure 47: iClock Setup    Advanced Time, Attendance and Access Control management with a powerful bi-directional interface to a range of Biometric Clock Terminals with Card, Fingerprint and Facial Recognition as identification. Clocks are updated automatically with Employee details, Transfers and Work Hours. Timecards are pulled from the Terminals based on a predefined Schedule, with Alerts and Workflows which can be used to handle Timesheet Review, Edit and Approval. Enrollment of new biometric clock users is done directly from Interact HRMS software over the web or the LAN/WAN to the Time Clock where the user will place his/her fingerprint or swipe his/her proximity or Mifare card. Time clocks can be deployed with Access Control functionality whereby entrances (doors) can be setup with specific access rights for particular users only. The doors will open only if a user authorized in the HRMS solution is attempting to access with his/her fingerprint or proximity card. Users can also be recognized through facial recognition with certain terminals. Time clocks can contain thousands of templates. All time clocks can be managed remotely, with powerful reporting. Time clocks can either contact the server application independently or the server can contact the time clocks to poll the time transactions. Some time clocks are available with function keys and specific codes. All data flows seamlessly from the HRMS to the Time Clocks (for new enrollments or cancellation of access for specific users), and vice versa whereby Time Clock transactions (Clock In and Clock Out) data is obtained from the Time Clock by the server based Interact HRMS software. Once raw In/Out data has been collected the data will be reviewed and approved by supervisors before being posted to payroll. The application will be able to calculate and determine the number of regular hours, overtime hours, rest day overtime, holiday overtime and other types of overtime and highlight any and all exceptions in a report and in the key time attendance forms. Polling of data can happen automatically through a periodically (weekly, daily or hourly) scheduled service which contacts the time clocks and reads the required data. 46. Resources SchedulingInteract HRMS© Resources Scheduling (iSchedule) is a very comprehensive enterprise employee and other resources Schedule Management System that is fully integrated with Interact HRMS©’s Time and Leave Management and Compensation and Payroll systems, and with Employee and Organization Self-Service. It uses the same underlying Web technology and Architecture used by all Interact HRMS© applications. iSchedule not only allows the scheduling of employees, but it also supports the scheduling of other resources such as equipment. This allows the user for example to schedule transportation buses, schedule the use of a production machine, schedule the use of a specific facility, etc. It supports definition of 24/7 shifts with rotating shifts. You can define clients, locations, equipment, projects, activities and teams and schedule your employees using self-service to ensure they are assigned to the correct shifts. Integration with holiday calendar, leave management, time and attendance and biometric clocks makes sure that all rules are complied with in case of collective bargaining agreements. Supports the managing of statutory holidays for 24/7 shift workers. Powerful and easy-to-use Shift Planner shows which employees will be working which shift. The Shift Planner is available at the Employee Self Service level also so both Employee and Supervisor can see which Shift an Employee scheduled on. Changes can be made on the fly for a specific day or an entire period by simply selecting another Shift for the Employee. General Features:
47. Software Clock ManagementSoftware Based Clock-In Clock-Out module for Employees to use through Employee Self Service to allow them to Clock In and Clock Out and maintain their Timesheets and Attendance Records without having to physically clock in using hardware based time-clocks. Software Clock is integrated directly with Project Management, Client Management, Leave Management and Time Management allowing an Employee to Clock In or Clock Out for a specific Project, Client, Activity or for a specific Break or Emergency Leave type. Once the Clock In has been registered it may be viewed by the Employee as part of Attendance Records and Supervisors or Project Managers will be able to make adjustments/corrections where necessary. The purpose of the Software based Clock-In or Clock-Out is to support remote Employees or desk workers who normally do not Clock In / Out using a biometric Clock but for which you still need to track specific time worked on any particular activity. 48. Employee Self-ServiceEmployee Self-Service is the core of Interact HRMS and the main reason for improving efficiency for all users and the HR department in particular. Employee Self Service (ESS) allows Employees to process Requests for Leave, Training, Loan, Letters, and much more. Employees can also Inquire about their Salary, Vacation/Leave balance, Benefits. They can enroll in Benefit Plans, fill in Electronic Forms, print Pay Slips, and update their own Employee Profile. Employees can also play roles in other HR Activities, like Performance Management, Recruitment and more. Employees and Managers can view various Timesheets, see their Attendance Records and request Overtime in case Pre-Approval is required. Employees can edit their Timesheet in case there were missing or incorrect transactions, and all edits will be highlighted and shown on the record for the authorized users to approve if required. In the Self Service employees can also Clock In and Out online using the Software Clock. 49. Assignment ManagementAssignment management is a Self Service application which is used by supervisors and their direct reports to assign and track specific assignments related to a client, project or another matter. The supervisor will go online and create the new assignment by describing its purpose, completion date, priority level and urgency level. The new assignment will then appear on the employee’s self-service portal or MyPage where the employee can provide feedback on the Assignment and change the status to Completed once done as well as update the Actual Completion Date. 50. Project ManagementUsing the Project Management module in Employee Self Service, employees can view the projects which they are assigned to and see all the details, provide feedback on the project, the project plan and the activities which have been assigned to the employee for this project. It is seamlessly integrated with other Project related functionality which falls under the Resources Scheduling module whereby employees can be assigned to a specific shift on a project in a particular location and for a particular client. 51. Feedback ManagementLeveraging the strong self-service capabilities of Interact HRMS, the Feedback Management module allows employees to provide feedback on any assignment, project, client or any general matter. This feedback can be shared with a specific person who will see the feedback appear on their self-service portal also. There will be a detailed trail of all feedback provided so that the record remains and action can be taken as a result of any feedback provided. Once a supervisor or other employees receives feedback which is directed at him/her, he/she can then provide his/her own recommendations in response. Feedback management tracks the time and date when the feedback was given and the priority level. There is no limit on the amount of information that can be submitted as part of this feedback process. 52. To Do List ManagementBy using the To Do List module through Employee Self Service, employees will be able to create their own list of action items (to do items), and share them with anyone who needs to know in the company (supervisor or team/project members). An employee can have multiple To Do List each with unlimited number of To Do Items. The information on it will remain available for reporting purposes and the user can check off each item from the list when it is completed. 53. Events ManagementEvents management is a powerful self-service module which allows Organization Unit users to create events and invite participants from across the company to attend. The application allows the user to invite and indicate the purpose of the event, the timing and venue as well as any other information useful for participants. Invitees can be chosen from the list of employees by org unit or by employee group and once selected they will be notified both by email and through their employee self-service. Employees can then either accept or reject the invitation and confirm their attendance or not. The event organizers can then track how many employees have confirmed their attendance and make their plans accordingly. Attendees can also provide additional comments and feedback upon accepting the invitation to an event. The list of events will be available online for any employee to see who is eligible to attend a particular event. External sponsor information or information about the organization unit organizing it can also be included in the event invitation. 54. Meetings ManagementMeetings management can be used to schedule meetings, invite participants, distribute the agenda and track the meeting minutes of any meeting. All those invited will find the meeting details on their self service portal and can indicate their attendance online. The meeting venue can be chosen at the time of scheduling the meeting and the meeting can be linked to a specific Organization Unit, Client or Project already defined in the application. All information is available to all authorized users in their Self Service. 55. News ManagementNews management allows departments and organization units to make news announcements and share it with the entire company. All news items will appear on the self service portal of employees and the publisher can edit or unpublish announcements if required. Employees can comment on news announcements and these comments can be approved by the department making the original announcement. 56. My CVMy CV allows employees to create their own resume and update it whenever required so it can be used by the company for bidding on projects and for any other relevant purpose. It is primarily useful for those companies who work with consultants on projects and contracts. The employee can publish the CV/Resume internally and HR can approve the format after which it will be available for a project manager who needs to submit an updated CV/Resume as part of a bidding process. 57. My IntroMy Intro allows employees to create a page about themselves to introduce themselves to their colleagues. It is especially useful for new employees to share something about themselves with their new colleagues and for existing employees to introduce themselves to the new hires. Each employee can create a personal page which includes a welcome statement, and free text sections on the employee’s prior job experience, current projects, career aspirations and a direct message to peers and colleagues. The application also allows the employee to choose what type of information can be shared with others including their name, marital status, job title, picture, email address, manager name, age, office phone, country of birth, cell phone and a URL to a personal blog. 58. My ContactsMy Contacts allows the employee to create a shortlist of key contacts in the company and have their own personal phonebook which includes a picture of the colleague as well as details on their job title, location, phone and cell phone, email and possibly other details about the contact. It functions as a personal address book for the employee for quick reference, and all details are directly linked to the company wide employee directory to which the employee also has access to and through which he/she can search at any time. 59. Organization Unit Self-ServiceOrganization unit HR self-service over the internet, enables each Organization Unit to conduct its HR related work electronically including position budgeting, issuing recruitment requisitions, review of employment offers, employment contracts’ review, timesheet review and approval, employee performance review, disciplinary actions, health & safety, scheduling of resources, leave management, probationary period plans, employee housing and even payroll and organization unit based requests of HR actions. The application streamlines HR services to the organization units and eliminates the paper based HR forms in support of HR services and actions. General Features
60. Applicant Self-ServiceApplicant Self-Service allows the Applicant to first create an Applicant Profile and then Log In using the Applicant Self-Service credentials provided and update his/her Profile. Applicant can Apply for Jobs, review Job Descriptions, upload scanned documents, and view Interview Schedule. Applicant can communicate with the HR department using Email messaging and receive Job Offer letter and Employment Contract and after Acceptance, Applicant can receive Pre-Boarding and/or Onboarding documents to be filled in online. 61. External Recruiter Self-ServiceRecruiter Self-Service allows external Recruiters to register and create a profile and contract between your Company and the Recruiting Agent. Your HR department can then assign approved Requisitions to specific Recruiters who will be able to upload CVs against these Requisitions. Once the Recruitment process is completed and certain Applicants have been hired, the Recruiting Agent can generate an Invoice, based on the previously agreed Contract Terms, for the successfully recruited Applicants. 62. Client Self-ServiceClient Self-Service allows External Clients to log in and approve Timesheets for which they will be billed by the Company, or review resumes of Employees being assigned to their Projects. Client Self-Service can also give Clients the ability to communicate with you, their Supplier, on other items like Order Change Requests etc. This module expands Interact HRMS beyond the standard HR functionality. TALENT MANAGEMENT63. Job ClassificationA comprehensive job classification system that supports both grade and point classification systems combined with an extensive set of attributes that cover basic and general job information definition, Salary & Grade Information for budgeting purposes, Education Requirements, Skills Requirements, Certification Requirements, Experience Requirements, Interview Questions associated with the particular job, Training Courses associated with the Job, Hay-method Job-Evaluation and Competencies required to do the Job. The byproduct of the definition of jobs through the job classification system is a Job Catalogue that uniquely defines all jobs used by the organization. Once the job catalogue is defined all job information and associated controls and rules are inherited by all Interact HRMS applications. A detailed Job Description can be defined for every Job, and Jobs can be grouped by Job Group, Job Class, Job Category, Industry, Occupation or Workers’ Compensation Classification. General Features
64. Competency ManagementA multi-tier based competency management system that enables the organization to define the desired competencies model that is used to define competencies using up to 9 tiers, from general competencies to specific occupation and job competencies. Once defined the Competencies are used to conduct Job Competencies Analysis to identify the competencies required for each job. The competency profile of the Job will contain the Competency, the Proficiency Level, the Importance Scale, the Urgency Scale and the Value Scale of each Competency. This way the organization can distinguish between urgent and less urgent competencies in a job profile as well as understand which competencies are most valuable and most important to the organization. Employees can be evaluated on their Competencies and then a Gap Analysis will be available showing which Competencies are missing or which ones are not at the required proficiency level. The database of Competency Evaluations can then be queried by the user to do Best Fit searches and Match Job searches which will allow the user to search the entire organization’s employee database and associated competency data to find those employees who have been confirmed to possess the correct competencies based on a profile created by the user (Best Fit) or based on a predefined Job Profile (Match Job). Employees who are identified through the Best Fit or Match Job analysis can then be shortlisted and saved onto the Competency Workbench. This Competency Workbench allows the user to work with the shortlisted and High Potential employees and create a career plan, conduct further evaluation, create a succession plan or training plan in order for the employee to further develop certain specific competencies. Through the integration with the Training Management module, the application will suggest which training is appropriate to help an employee further develop a particular competency which the employee is deemed to be lacking in as a result of the employee competency evaluation. The competencies management is seamlessly integrated with job classification, career planning, training management, performance appraisal, and succession planning. 65. Training ManagementiTrain is a comprehensive training management system that is totally integrated with other related products such as iPerformance, iContract, iCareer, iSuccession, iCompetency. The basis for the iTrain model is that an employee is trained to develop certain lacking skills or knowledge which are required to conduct a specific job, either already assigned to the employee or to be assigned to him/her in the future. The training business process workflow that is supported by iTrain is based on the Gap Analysis Model, whereby an employee is assigned or to be assigned to a job, the job requires specific skills and knowledge proficiency level. The employee is assessed to determine his/her skills and knowledge proficiency level as they pertain to the job. The employee skills and knowledge level are compared to the job requirements, and then the Gap is determined. Once the Gap is determined, then we know what training courses that the employee needs to take in order to meet the job’s skills and knowledge requirements. Once the training courses required by the employee are defined, then we develop the Training Plan for the employee in view of his time availability. The training courses are then scheduled, and the employee registers in the training, after which a post training assessment of the employee is conducted, and a Gap is derived again, and the training plan is updated. Training plans can be initiated by the employee and reviewed/approved by the supervisor. Training courses can be requested online through self-service and the application will track detailed training history of all employees. 66. Training EvaluationThe training evaluation module is designed to allow the user to define its own set of sections, question subjects within each section and any number of questions within these question subjects. This framework is entirel configurable and all content can be setup as per the user’s need. These sections, question subjects and questions will be used to evaluate the training, the trainer, the training institute, the trainee and any other issue to be evaluated. Users can provide their feedback through self-service and can do so either using open text feedback, multiple-choice / radio buttons or by scoring the questions. Questions can have their own importance level and a separate approval workflow is available to have supervisors, managers and trainers approve the evaluation as required based on the choice of workflow. Any number of user defined default Training Evaluation Actions can be setup which can be chosen by the user as a result of the evaluation, for example, users can choose to recommend “Repeat Training with Same Instructor” or “Repeat Training with Different Instructor” etc. Powerful reporting is available to ensure that all feedback is properly captured, reported on and can be used for decision making about future training engagements and planning. 67. Performance ManagementA 360-degree based performance evaluation system with user defined performance appraisal/evaluation dimensions and associated elements/factors. The Performance Appraisal system is goal based, where the first dimension in the appraisal process is the employee performance plan for the year, where the specific goals are defined which need to be achieved by the employee. The goals are aligned with the organization annual plan, and the employee is assessed on the achievements against the goals as defined in his/her performance plan. Additional performance appraisals dimensions and associated factors such as competencies, Hay factors, and/or internal factors can be defined as well. Based on the employee performance plan/goals, and additional dimensions and factors, the system automatically generates performance evaluation forms with multiple evaluation dimensions and elements and factors where each evaluation block/section with associated factors can be assigned to a different employee/supervisor for assessment and recommendations. Multiple evaluators can be assigned per evaluation, unlimited number of evaluations per employee, predefined evaluation activities through the workflow with auto-notification. Performance Management is integrated with Career Planning and Training Management. Specific actions can be conducted as a result of the performance appraisal such as training and development, career planning, new job assignment, on the job training, coaching, salary increase, grade change, demotion, promotion, etc. The performance appraisal system is seamlessly integrated with other Interact applications including career planning, training and development, competencies management, succession planning, and compensation management. Interact HRMS’s Performance Management model is designed in a generic way to allow users to create their own framework within the application so that the system can support the existing methods being used within the organization and capture all the required information to develop the proper model that applies to the different Employee Groups, Organization Units, Job Classes and Job Categories within the company. In the Performance Model Setup, the user gets to define the specific framework and model which will be used to drive Performance Reviews in the organization. This includes whether a Performance Plan is required (Planned or Unplanned), which Dimensions will be used in a typical Performance Review (Goals, Competencies, Career Factors, Hay Factors, Internal or other User Defined elements) and much more. It also allows the User to setup a link between Organization Unit Strategic and Performance Goals or other Goals related to a specific Fiscal Period. The Appraisal Cycle can be standard (Monthly, Quarterly, Yearly) or user-defined. It may be linked to specific projects only in which case Appraisals may take place throughout the year, as and when Projects are completed or specific Milestones are Reached. Through the use of Self-Service, Performance Plans can be prepared and appraised by the Employee, by the Supervisor, or by the Manager as a standard requirement. However, anyone else in the organization can be assigned the responsibility to perform a specific task within the overall Performance review cycle and as such have the ability to either design or approve a Performance Plan or Appraise an already Approved Performance Plan and subsequently Approve the Appraised Performance Plan. The generic design of Interact HRMS allows you to define a specific Measurement Standard which will then cascade throughout the application and apply to all Performance Paramaters which are defined. However, the User has the ability to make any changes required to support a different Measurement Standard at the individual Parameter level at any time. In addition to a standard Performance Plan, Interact HRMS also supports the definition, tracking and appraisal of Engagement Plans. Engagement Plans are Plans designed around specific Projects or Clients. Employees working in consulting industris or project management industries typically get specific assignments that are linked to a particular client or project which should be reviewed separately from the standard Performance of the Employee on regular work within the Organization. Specific Performance Goals are grouped within Performance Goals Groups. These Groups allow for the creation of a clear model and framework which can then be applied to large numbers of Employees throughout the Organization, depending on the specific model in use. When defining a Performance Goal Group, the User can select the Sequence in which this particular Group will appear in the Performance Plan, accept or change the Overall Score and Rating standards and assign a specific Weight within the Same Dimension of the Group. Using the Interact HRMS Performance Model framework, the User can define specific Performance Goals which will automatically be listed in the Performance Plan of a specific Employee, depending on the Dimension and Goal Group to which the Goal is assigned and depending on the Job Group, Job Class and Job to which the Employee belongs. This method enables organizations with large numbers of employees to leverage the system to quickly create and design Performance Plans which are done based on the general rules and policies within the organization. When creating a Performance Plan, the main Goals, which have been pre-defined by the user as part of the Performance Plan setup, are showing under the relevant Goal Group and are color-coded to enable users to quickly distinguish them based on their own internal setup. At this stage, Employees, Supervisors and Managers, can collaborate and edit the Performance Plan by adding New Goals, modifying existing Goals and/or selecting additional Goals from a pre-defined list of Sample Goals. When modifying the existing Goals, users can enter the Benchmark (Expected Achievement), the Expected Achievement Date and the Key Activities which need to be performed in order to achieve the Goal. 68. Career PlanningInteract HRMS Career Planning is designed to support Career Planning over a 6 year period. For this period the user can define an employee’s individual goals, objectives and activities. Each goal can have an unlimited number of objectives and each objective can have an unlimited number of activities. The goals, objectives and activities can be presented on a Gantt chart and will be setup with a planned start and planned end date. The completion of each activity, objective and goal can be tracked with detailed comments and completion percentage. Career Plans can be set up for different purposes, including to build competencies, achieve certification, prepare an employee for succession, prepare an employee for a new job, develop skills/knowledge, or any other purpose. Career Planning is linked with all other modules in Interact HRMS which relate to Talent Management so that training courses, competencies, goals etc can all be linked up as required. Employees will be assessed based on their achievement against their Career Plan and will have input and feedback through the Self Service portal on the progress against their Plan. 69. Succession PlanningInteract HRMS Succession Planning tracks and marks those critical jobs/positions which require succession due to retirement, termination, or other termination actions, and devises effective action for identifying internal employees or external applicants who can be prepared for succession. For internal employees, career plans can be setup to prepare the employees for assignment to the positions/jobs that are upcoming for succession. Succession Planning allows the user to shortlist any number of potential successors for a position/job and is driven by a workflow which starts with a Succession Request issued by a manager, employee or HR user. Once the Succession Request is approved, a Succession Plan is created which then leads to next steps for the shortlisted potential successors, including further competency evaluation, career planning, performance appraisal, and training and development. 70. Progress ReportingIn addition to the regular performance review process which falls under performance planning, employees and supervisors can also follow a progress reporting process whereby employees provide regular updates throughout the year. The progress reporting is done within a framework which allows the user to define a list of Progress Activity Types, Piecework Units and Piecework Units of Measure. Within this framework, employees can report progress on any activity, and indicate what has been achieved for each Piecework Unit type based on its Unit of Measure. Employees can report daily, weekly, monthly or any time they feel it is useful to do so against a specific action plan and these reports can be linked with specific clients, projects or organization units. The entire framework is flexible whereby e.g. salespeople can report on sales, consultants can report on projects and billable hours, and hourly employees on the shopfloor can report on items produced or piecework completed. Progress reports are available for the supervisor to see and for anyone else who should be authorized to have access SYSTEM MODULES71. System ManagerThe System Manager defines Granular Access Control and Security Settings, MultiCurrency, and Enterprise Level settings which apply to all Employers defined. It manages master-tables which are shared by all companies in the system, and provides a powerful application based Backup and Restore process. 72. Web Services Web Services are used to integrate Interact HRMS to Third-Party HR-related applications, like JobBoards, Recruiting Systems, Benefit Carriers, or other external applications which deal with Payroll or HR. Interact HRMS Web Services are HR-XML compliant allowing for out-of-the-box integration with any other application which is HR-XML compliant.73. Alerts ManagementAlerts are used to alert users of specific conditions that have occurred. Alerts are user-defined and can be setup to be sent by email, SMS, and on the MyPage of the Employee, the clause that will trigger the Alert can include every data-element in the database. 74. Workflow Management |